Advertisement
Quick Links
FOR CAR USE ONLY/NUR FÜR AUTOMOBILGEBRAUCH/POUR APPLICATION AUTOMOBILE
UNIQUEMENT/SOLO PARA USO EN AUTOMÓVILES/PER IL SOLO UTILIZZO IN AUTOMOBILE
EN
R R
PREMIUM INFOTAINMENT SYSTEM
DE
X800D-V447
FR
ES
AUDIO
NAV
IT
Installation Manual
Einbauanleitung
Manuel d'installation
Manual de instalación
Manuale di installazione
Advertisement

Related Manuals for Alpine X800D-V447


Summary of Contents for Alpine X800D-V447
-
Page 1: Installation Manual
FOR CAR USE ONLY/NUR FÜR AUTOMOBILGEBRAUCH/POUR APPLICATION AUTOMOBILE UNIQUEMENT/SOLO PARA USO EN AUTOMÓVILES/PER IL SOLO UTILIZZO IN AUTOMOBILE PREMIUM INFOTAINMENT SYSTEM X800D-V447 AUDIO Installation Manual Einbauanleitung Manuel d'installation Manual de instalación Manuale di installazione... - Page 3 Swallowing them may result in serious injury. If swallowed, consult a amperage. Failure to do so may result in damage to the unit and/or physician immediately. the vehicle. When in doubt, consult your Alpine dealer. DO NOT INSTALL IN LOCATIONS WHICH MIGHT HINDER VEHICLE OPERATION, SUCH AS THE STEERING WHEEL OR SHIFT LEVER.
- Page 4 Amperezahl aufweist. Andernfalls kann es zu Schäden am Gerät Andernfalls ist möglicherweise keine freie Sicht nach vorne gegeben, und/oder am Fahrzeug kommen. Wenden Sie sich im Zweifelsfall oder die Bewegungen des Fahrers sind so eingeschränkt, dass bitte an Ihren Alpine-Händler. Unfallgefahr besteht.
- Page 5 X800D au boîtier à fusibles, s'assurer que le fusible du circuit destiné au X800D possède la bonne intensité. Sinon, l’appareil et/ou le véhicule risquent d’être endommagés. En cas de doute, consulter votre revendeur Alpine.
- Page 6 X800D sea del amperaje adecuado. En caso contrario, Esto podría obstaculizar la visibilidad y dificultar el movimiento, etc. podría ocasionar daños a la unidad y/o al vehículo. Cuando no esté y provocar accidentes graves. seguro, consulte a su distribuidor Alpine.
- Page 7 X800D sia dell’amperaggio corretto. Diversamente, si potrebbero provocare danni all’unità e/o al veicolo. In caso di dubbi, consultare il rivenditore Alpine.
- Page 8 Parts list (1-5) Teileliste (1-5) Liste des pièces (1-5) Lista de piezas (1-5) Elenco dei componenti (1-5)
- Page 9 1 Faceplate 1 Frontplatte 1 Plaque frontale 1 Panel frontal 2 Bracket left 2 Halterung links 2 Support gauche 2 Soporte izquierdo 3 Bracket right 3 Halterung rechts 3 Support droit 3 Soporte derecho 4 Screw M5 x 8 mm 4 Schraube 4 Vis M5 x 8 mm 4 Tornillo...
-
Page 10: Elenco Dei Componenti
Parts list (6-11) Teileliste (6-11) Liste des pièces (6-11) Lista de piezas (6-11) Elenco dei componenti (6-11) - Page 11 6 EXT KEY cable 6 EXT KEY- 6 Faisceau 6 Arnés de cables harness Kabelbaum EXT KEY EXT KEY 7 Keyboard cable 7 Tastatur- 7 Faisceau de 7 Arnés de cables harness Kabelbaum boîtier arrière del teclado 8 CAN Interface 8 CAN Interface 8 Interface CAN 8 Interfaz CAN...
- Page 12 Parts list (12-18) Teileliste (12-18) Liste des pièces (12-18) 14a 14b Lista de piezas (12-18) Elenco dei componenti (12-18) &...
- Page 13 @ DAB Antenna @ DAB-Antenne @ Antenne DAB @ Antena DAB # X800D Premium # X800D Premium # Système # Sistema Infotainment Infotainment d'infodivertissem multimedia System System ent X800D X800D Premium Premium $ GPS Antenna $ GPS-Antenne $ Antena GPS $ Antenne GPS Metal pad Metallblock...
- Page 14 Tools (19-24) Werkzeuge (19-24) Outils (19-24) 8 mm Herramientas (19-24) Attrezzi (19-24)
- Page 15 ( Plastic wedge ( Kunststoffkeil ( Cale en plastique ( Cuña de plástico ) Screwdriver T20 ) Schraubendreher ) Tournevis T20 ) Destornillador T20 - Screwdriver flat - Tournevis plat - Destornillador 8 mm - Flachschlitz- 8 mm plano de 8 mm Schraubendreher = Screwdriver PH1 = Tournevis PH1...
- Page 16 Disconnection of battery Trennen der Batterie Déconnexion de la batterie Desconexión de la batería Distacco della batteria...
- Page 17 WARNING: ADVERTENCIA: Make sure to disconnect the cable from Antes de proceder, asegúrese de desco- negative battery terminal before nectar el cable del terminal negativo de la proceeding. batería. WARNUNG: AVVERTIMENTO: Entfernen Sie das Kabel vom Minuspol der Prima di procedere, ricordare di scollegare Batterie, bevor Sie fortfahren.
- Page 18 Assembly of Keyboard and Brackets (1-3) Montage der Tastatur und Halterungen (1-3) Assemblage du boîtier arrière et des supports (1-3) Montaje del teclado y los soportes (1-3) Montaggio della tastiera e delle staffe (1-3)
- Page 19 Mount left 2 and right 3 brackets to Fije los soportes izquierdo 2 y derecho 3 X800D # with screws 4. al X800D # con los tornillos 4. Attach the faceplate 1 as shown. Fije el panel frontal 1 tal como se muestra. Befestigen Sie die linke 2 und rechte 3 Fissare le staffe lato sinistro 2 e lato Halterung mit den Schrauben 4 am...
- Page 20 Assembly of Keyboard and Brackets (4) Montage der Tastatur und Halterungen (4) Assemblage du boîtier arrière et des supports (4) Montaje del teclado y los soportes (4) Montaggio della tastiera e delle staffe (4) EXT.KEY...
- Page 21 Conecte el arnés de cables EXT KEY 6 al Connect the EXT KEY cable harness 6 to panel frontal 1 y al X800D # tal como se faceplate 1 and X800D # as shown. muestra. Also connect the Keyboard cable harness Conecte también el arnés de cables del 7 as indicated.
- Page 22 Removal of Factory Unit (1-3) Ausbau des werksseitig vorhandenen Geräts (1-3) Retrait du système d'origine (1-3) Retirada de la pieza de fábrica (1-3) Rimozione dell'unità di fabbrica (1-3)
- Page 23 Retire con cuidado el panel frontal del Carefully remove the faceplate of the sistema equipado original con la cuña de original equipped system using the plastic plástico ( tal como se muestra. wedge ( as shown. Rimuovere con cura il frontalino del Entfernen Sie gemäß...
- Page 24 Removal of Factory Unit (4-6) Ausbau des werksseitig vorhandenen Geräts (4-6) Retrait du système d'origine (4-6) Retirada de la pieza de fábrica (4-6) Rimozione dell'unità di fabbrica (4-6)
- Page 25 Desconecte todas las tomas. Disconnect all plugs. Afloje los tornillos con el destornillador Loosen the screws with screwdriver T20 T20 ) y extraiga el sistema equipado ) and pull out the original equipped original. system. Desconecte todas las tomas. Disconnect all plugs. Para extraer conector...
- Page 26 Installation of DAB Antenna at Windshield (Overview) 1 POSITION DER DAB-ANTENNE Anbringen der DAB-Antenne Achtung: an der Windschutzscheibe Weitere Informationen finden Sie in der (Übersicht) Bedienungsanleitung der DAB-Antenne @. Installation de l'antenne DAB sur le pare-brise (vue d'ensemble) Instalación de la antena DAB en el parabrisas (resumen) 1 EMPLACEMENT DE L'ANTENNE DAB Installazione dell'antenna DAB...
- Page 27 1 LOCATION OF DAB ANTENNA Please note: For further information refer to the Owners Manual of the DAB Antenna @.
- Page 28 Installation of DAB Antenna at Windshield (1-3) Anbringen der DAB-Antenne an der Windschutzscheibe (1-3) Installation de l'antenne DAB sur le pare-brise (1-3) Instalación de la antena DAB en el parabrisas (1-3) Installazione dell'antenna DAB sul parabrezza (1-3)
- Page 29 Utilice la cuña de plástico para retirar con Carefully remove the cover of the A-pillar cuidado la cubierta de la columna A. using the plastic wedge. Retire la banda protectora de la película Remove the protective strip from the adhesiva de la antena DAB @ y fije dicha adhesive antenna film of the DAB película en paralelo a la columna A a una Antenna @ and attach the antenna film...
- Page 30 Installation of DAB Antenna at Windshield (4-6) Anbringen der DAB-Antenne an der Windschutzscheibe (4-6) Installation de l'antenne DAB sur le pare-brise (4-6) Instalación de la antena DAB en el parabrisas (4-6) Installazione dell'antenna DAB sul parabrezza (4-6)
- Page 31 Retire la segunda banda protectora de la Remove the second protective strip from película adhesiva de la antena tal como se the adhesive antenna film as shown muestra (Fig. 4). (Fig. 4). Retire la banda protectora del cuerpo de la Remove the protective strip from the antena y fíjela (Fig.
- Page 32 Installation of DAB Antenna at Windshield (7-8) Anbringen der DAB-Antenne an der Windschutzscheibe (7-8) Installation de l'antenne DAB sur le pare-brise (7-8) Instalación de la antena DAB en el parabrisas (7-8) Installazione dell'antenna DAB sul parabrezza (7-8)
- Page 33 Retire la banda protectora de la cinta de la Remove the protective strip from the antena y conéctela con la columna A tal antenna tape and connect it with the como se muestra (Fig. 7/8). A-pillar as shown (Fig. 7/8). Asegúrese de fijar el cable de la antena Make sure to affix the antenna cable whilst mientras lo guía en una posición de 90°...
- Page 34 Installation of DAB Antenna at Windshield (9) Anbringen der DAB-Antenne an der Windschutzscheibe (9) Installation de l'antenne DAB sur le pare-brise (9) Instalación de la antena DAB en el parabrisas (9) Installazione dell'antenna DAB sul parabrezza (9) ANT.
- Page 35 Pase el cable de la antena DAB @ a Route the DAB Antenna cable @ through través del receptáculo de la radio, tal como the radio dock as shown and connect it se muestra, y conéctelo al X800D #. with X800D #. Disporre il cavo @ dell'antenna DAB Führen Sie das Kabel der DAB-Antenne facendolo passare nel vano della radio,...
- Page 36 Installation of GPS Antenna (Overview) Anbringen der GPS-Antenne (Übersicht) Installation de l'antenne GPS (vue d'ensemble) Instalación de la antena GPS (resumen) Installazione dell'antenna GPS (panoramica)
- Page 37 Nota: Please note: La posición de montaje de la antena GPS The GPS Antenna mounting position is in está en el centro del panel de instrumentos. the center of the dashboard. Utilice la pinza para fijar el cable de la Use the clip to affix the cable of the antena GPS $ y enrolle el exceso de...
- Page 38 Installation of GPS Antenna (1-3) Anbringen der GPS-Antenne (1-3) Installation de l'antenne GPS (1-3) Instalación de la antena GPS (1-3) Installazione dell'antenna GPS (1-3)
- Page 39 Extraiga la cubierta del altavoz central con Remove the cover of the center speaker la cuña de plástico y desconecte todas las using the plastic wedge and disconnect all tomas. plugs. Extraiga la lámina de seguridad de la Remove the protective foil from the metal almohadilla metálica Con il cuneo in plastica, rimuovere la Entfernen...
-
Page 40: Installazione Dell'antenna Gps
Installation of GPS Antenna (4-6) Anbringen der GPS-Antenne (4-6) Installation de l'antenne GPS (4-6) Instalación de la antena GPS (4-6) Installazione dell'antenna GPS (4-6) - Page 41 Fije la almohadilla metálica al área Attach the metal pad to the marked especificada. area. Retire la lámina de seguridad de la antena Remove the protective foil from the GPS GPS $. Antenna $. Fije la antena GPS $ a la almohadilla Affix the GPS Antenna $ to the metal pad metálica tal como se muestra.
- Page 42 Installation of GPS Antenna (7) Anbringen der GPS-Antenne (7) Installation de l'antenne GPS (7) Instalación de la antena GPS (7) Installazione dell'antenna GPS...
- Page 43 Pase el cable de la antena GPS $ a través Route the GPS Antenna cable $ to the del receptáculo de la radio y conéctelo al radio slot and connect it to X800D # as X800D # tal como se muestra. shown.
- Page 44 Installation of Microphone (1) Anbringen des Mikrofons (1) Installation du microphone (1) Instalación del micrófono (1) Installazione del microfono (1)
- Page 45 Taladre un orificio (Ø6,5 mm) en la cubierta Drill a hole (Ø6.5 mm) into the cover of the de la columna A del lado del conductor. A-pillar of the driver's side. Asegúrese de colocar el orificio a la altura Make sure to position the hole in the height de la cabeza del conductor.
- Page 46 Installation of Microphone (2) Anbringen des Mikrofons (2) Installation du microphone (2) Instalación del micrófono (2) Installazione del microfono (2) EXT.KEY...
- Page 47 Pase el cable del micrófono * a través Route the Microphone cable * to the del receptáculo de la radio y conéctelo al radio slot and connect it to X800D # as X800D # tal como se muestra. shown. Disporre il cavo * del microfono facendolo Führen Sie das Mikrofonkabel * gemäß...
- Page 48 Installation of Radio Antenna (1) Anbringen der Radioantenne (1) Installation de l'antenne radio (1) Instalación de la antena de la radio (1) Installazione dell'antenna radio (1) “AUDIO 10 / AUDIO 15” 1 Factory Radio Antenna RAD. ANT. 2 Blue Power Antenna...
- Page 49 Sistema equipado original Original Equipped System Utilice el cable del adaptador de la antena Use the Radio Antenna adapter cable 0 de radio 0 para conectar el X800D # con to connect X800D # with the Factory la antena de radio de fábrica 1. Radio Antenna 1.
- Page 50 Installation of Radio Antenna (2) Anbringen der Radioantenne (2) Installation de l'antenne radio (2) Instalación de la antena de la radio (2) Installazione dell'antenna radio (2) “RADIO PREPARATION” RAD. 1 Factory Radio Antenna ANT. 2 CAN LOW 3 Climate CAN HIGH Control...
- Page 51 Sistema equipado no original No Original Equipped System Utilice el adaptador de la antena de radio Use the Radio Antenna adapter para conectar el X800D # con la connect X800D # with the Factory Radio antena de radio de fábrica 1. Antenna 1.
- Page 52 Attach Bullet Connector for Speed Pulse Signal Befestigen des Bullet-Connectors für Geschwindigkeitsimpuls-Signal Fixation des connecteurs pour le signal d'impulsion de vitesse Fije el terminal de latón redondo para la señal de impulso de velocidad Collegamento dello spinotto per il segnale ad impulsi della velocità...
- Page 53 1 (Verde/blanco) 1 (Green / White) Fije el terminal de latón redondo para la Attach the Bullet Connector for Speed señal de impulso de velocidad al arnés Pulse Signal to the Camera cable de cables de la cámara ^ tal como se harness ^ as indicated.
- Page 54 Final Installation – Original Equipped System Schließen Sie alle Stecker gemäß Abbildung am “AUDIO 10 / AUDIO 15” X800D-V477 an Endgültige Installation - 1 Radio-Dock Ursprünglich 2 DAB-Antenne eingebautes System 3 Stromversorgungskabel „AUDIO 10 / AUDIO 15“ 4 Radioantenne 5 Interface-Box Installation finale - 6 Geschwindigkeitssensor Système d'origine...
- Page 55 Connect all plugs to X800D-V447 as shown...
- Page 56 Final Installation – Original Equipped System Conecte todas las tomas al X800D-V477 tal “AUDIO 10 / AUDIO 15” como se muestra (Continued) 1 Receptáculo de la radio Instalación final − 2 Antena DAB Sistema equipado original 3 Arnés de alimentación “AUDIO 10/AUDIO 15”...
- Page 57 Connect all plugs to X800D-V447 as shown...
- Page 58 Final Installation – Original Equipped System Schließen Sie alle Stecker gemäß Abbildung am “Radio Preparation” X800D-V477 an Endgültige Installation - 1 Radio-Dock Ursprünglich eingebautes 2 DAB-Antenne System „Radiovorbereitung“ 3 Stromversorgungskabel 4 Radioantenne Installation finale - 5 Interface-Box Système d'origine " Radio 6 Geschwindigkeitssensor Preparation "* 7 Kamera 1...
- Page 59 Connect all plugs to X800D-V447 as shown...
- Page 60 Final Installation – Original Equipped System Conecte todas las tomas al X800D-V477 tal “Radio Preparation” como se muestra (Continued) 1 Receptáculo de la radio Instalación final – 2 Antena DAB Sistema equipado no original 3 Arnés de alimentación “Preparación de la radio” 4 Antena de radio (continuación) 5 Caja de la interfaz...
- Page 61 Connect all plugs to X800D-V447 as shown...
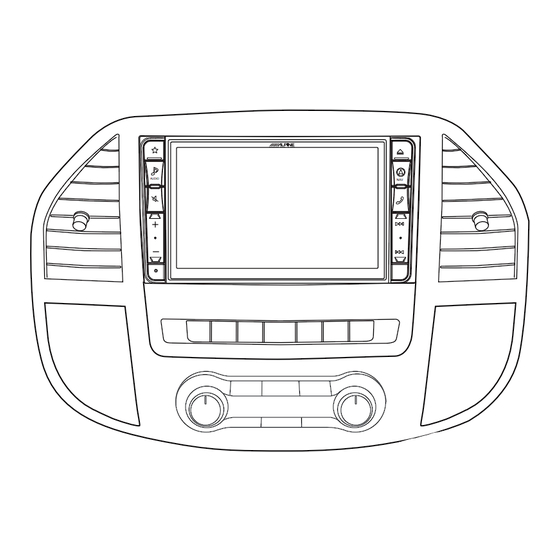
- Page 62 Integration of X800D-V447 Integration des X800D-V447 Intégration de X800D-V447 Integración del X800D-V447 Integrazione dell'unità X800D-V447...
- Page 63 Inserte el X800D-V447 (#/1) después de Insert X800D-V447 (#/1) after connecting conectar todas las tomas. Asegúrese de no all plugs. Make sure not to squeeze any comprimir ningún cable entre la unidad y el cables between unit and radio dock.
- Page 64 Connections Anschlüsse Connexions 1 RADIOANTENNE 1 ANTENNE RADIO 2 GPS-ANTENNE 2 ANTENNE GPS 3 DAB-ANTENNE 3 ANTENNE DAB 4 USB-Verlängerungskabel 4 Câble d'extension USB 5 AUX/iPod Video 5 AUX / iPod Video 6 BEEP/NAV I RG * 6 BIP/NAV I RG * 7 KAMERA 2 7 CAMÉRA 2 8 KAMERA 1...
- Page 65 RADIO ANTENNA GPS ANTENNA M5XL8MM MAX OPTICAL HDMI IN DAB ANTENNA OEM SUB.D CAMERA/ W.REMOTE EXT.KEY DAB ANT. RADIO POWER AUX&PRE OUT ANT. USB Extension Cable To USB Connection AUX / iPod Video To iPod Video Output terminal BEEP/NAV I RG * CAMERA 2 CAMERA 1 &...
- Page 66 Connections (Continued) Conexiones (continuación) Collegamenti (continua) 1 ANTENA DE RADIO 1 ANTENNA RADIO 2 ANTENA GPS 2 ANTENNA GPS 3 ANTENA DAB 3 ANTENNA DAB 4 Cable prolongador USB 4 Cavo di prolunga USB 5 Vídeo AUX/iPod 5 AUX/Video iPod 6 BEEP/NAV I RG * 6 BEEP/NAV I RG * 7 CÁMARA 2...
- Page 67 RADIO ANTENNA GPS ANTENNA M5XL8MM MAX OPTICAL HDMI IN DAB ANTENNA OEM SUB.D CAMERA/ W.REMOTE EXT.KEY DAB ANT. RADIO POWER AUX&PRE OUT ANT. USB Extension Cable To USB Connection AUX / iPod Video To iPod Video Output terminal BEEP/NAV I RG * CAMERA 2 CAMERA 1 &...
- Page 68 SWRC Commands Steering-wheel key Command Short Push: FM/DAB Preset Up CD/DVD Track Up Long Push: FM/DAB Seek Up CD/DVD Seek Up Short Push: FM/DAB Preset Down CD/DVD Track Down Long Push: FM/DAB Seek Down CD/DVD Seek Down Accept call End call Volume Up (Short Push) Volume Down (Short Push) Voice Command to Phone (Short Push)
- Page 69 SWRC-Befehle Lenkradtaste Befehl Kurz drücken: FM/DAB Preset vor CD/DVD Titel vor Lang drücken: FM/DAB Suchen vor CD/DVD Suchen vor Kurz drücken: FM/DAB Preset zurück CD/DVD Titel zurück Lang drücken: FM/DAB Suchen zurück CD/DVD Suchen zurück Anruf annehmen Anruf beenden Lauter (kurz drücken) Leiser (kurz drücken) Sprachsteuerung an Telefon (kurz drücken)
- Page 70 Commandes SWRC Touche du volant Commande Pression courte : Préréglage précédent FM/DAB Piste précédente CD/DVD Pression longue : Recherche précédente FM/DAB Recherche précédente CD/DVD Pression courte : Préréglage suivant FM/DAB Piste suivante CD/DVD Pression longue : Recherche suivante FM/DAB Recherche suivante CD/DVD Accepter l’appel Raccrocher (pression courte)
- Page 71 Comandos del mando en el volante Tecla del volante Comando Pulsación corta: Pista superior CD/DVD Pulsación larga: Búsqueda hacia arriba FM/DAB Búsqueda hacia arriba CD/DVD Pulsación corta: Pista inferior CD/DVD Pulsación larga: Aceptar llamada Finalizar llamada Subir volumen (pulsación corta) pulsación corta) Comando de voz para teléfono (pulsación corta)
- Page 72 Comandi SWRC Comandi Pressione breve: Preselezione su FM/DAB Brano su CD/DVD Pressione lunga: Ricerca su FM/DAB Ricerca su CD/DVD Pressione breve: Preselezione giù FM/DAB Brano giù CD/DVD Pressione lunga: Ricerca giù FM/DAB Ricerca giù CD/DVD Termina chiamata Aumento volume (pressione breve) Riduzione volume (pressione breve) Comando vocale a telefono (pressione breve)
- Page 73 ........Memo .
- Page 74 ................
- Page 76 Designed by Alpine Electronics (Europe) GmbH Printed in Hungary ALPINE ELECTRONICS MARKETING, INC. ALPINE ELECTRONICS OF AUSTRALIA PTY. LTD. ALPINE ELECTRONICS FRANCE S.A.R.L. 1-7, Yukigaya-Otsukamachi, Ota-ku, 161-165 Princes Highway, Hallam 184, Allée des Erables Tokyo 145-0067, JAPAN Victoria 3803, Australia...
Need help?
Do you have a question about the X800D-V447 and is the answer not in the manual?
Questions and answers