
Subscribe to Our Youtube Channel
Related Manuals for Home Sentinel VI 300

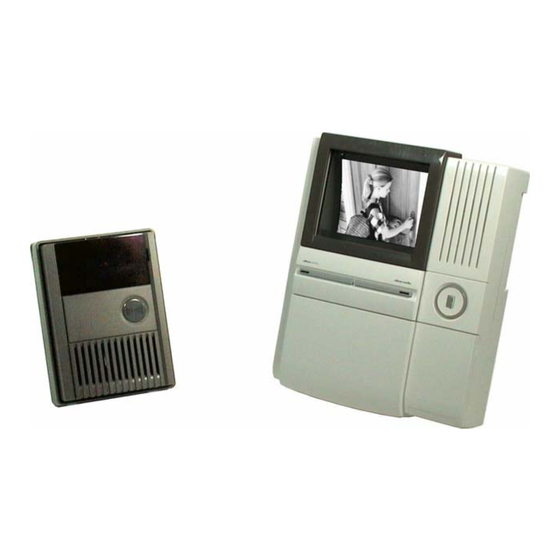
Summary of Contents for Home Sentinel VI 300
- Page 1 VIDEO DOORPHONE SYSTEM OWNER’S MANUAL INSTALLATION AND OPERATION BEFORE INSTALLING OR, OPERATING THE SYSTEM, PLEASE READ THIS MANUAL VI 300 MODEL:...
-
Page 2: Table Of Contents
TABLE OF CONTENTS Page Section Important Safety Instructions…………………....Warning……………………………………………………. FCC Class B Notice……………………………………….. Introduction......……………......System Contents......……………......Features............………….... Identifying the Parts Monitor ......…...…..……………………… Camera………………………………………………….. Monitor Terminal Connections…………………………. Camera Terminal Connections…………………………. Installation Monitor & Camera......…..……………..Testing Units....……...………....…… Installation Tips…………………………………..…….. Operation Door Camera & Monitor…………….………………….. Trouble Shooting Guide....…....………….. -
Page 3: Important Safety Instructions
IMPORTANT SAFETY INSTRUCTIONS WARNING: TO REDUCE THE RISK OF FIRE OR ELECTRIC SHOCK, DO NOT EXPOSE THIS APPLIANCE OR POWER ADAPTER TO WATER OR MOISTURE • Read Instructions – All the safety and operating instructions should be read before operating this equipment. These instructions should be retained for future reference •... -
Page 4: Warning
WARNING CAUTION RISK OF ELECTRIC SHOCK. DO NOT OPEN. CAUTION! TO REDUCE THE RISK OF ELECTRIC SHOCK, DO NOT REMOVE COVER (OR BACK). NO USER-SERVICEABLE PARTS INSIDE. REFER SERVICING TO QUALIFIED SERVICE PERSONNEL. Explanation of two Symbols The lightning flash with arrowhead symbol, within an equilateral triangle, is intended to alert the user to the presence of un-insulated "dangerous voltage"... -
Page 5: Fcc Class B Notice
FCC CLASS B NOTICE NOTE This equipment has been certified and found to comply with the limits regulated by FCC, EMC and LVD. Therefore, it is designed To provide reasonable protection against interference and will not cause interference with other appliance usage. However, it is imperative that user follows this manual's guidelines to avoid improper usage which may result in damage to the unit, electrical shock and fire hazard or injury. -
Page 6: Introduction
INTRODUCTION Thank you for purchasing the Home Sentinel® Video Doorphone entry system. This model allows you to identify and communicate with callers at the door, from the security and convenience of any room in your home. Visitors activate the system by pressing a call button on the outdoor camera, which sounds a doorbell chime as well as turning on the inside video monitor. -
Page 7: Features
FEATURES MONITOR • High definition 4" flat screen CRT • Auto shut off after 30 seconds for unanswered calls and 90 seconds for answered calls • Hands free audio intercom • Brightness and sharpness controls • Separate bell and audio volumes •... -
Page 8: Identifying The Parts
IDENTIFYING THE PARTS Monitor 170mm 1. 4” B/W flat type CRT screen Displays image delivered from the door camera 2. Hands free audio intercom Emits audio from the door camera 3. Lock release button 6 . 6 9 “ Press to remotely unlock/open your door (requires optional electric door release) 4. -
Page 9: Camera
IDENTIFYING THE PARTS Camera 133mm 100mm 1. 1/3” B/W CCD camera A discreet high resolution black & white 1/3” CCD camera is located behind the tinted cover 2. Infrared Emitters Infrared Light Emitting Diodes (LED) will detect low light, thereby giving you clear pictures at night at close range 3. -
Page 10: Monitor Terminal Connections
IDENTIFYING THE PARTS Monitor terminal connections 1. Power Adapter Connection - Remove the screw and the plastic cover to connect the 24V DC power adapter from the back of the monitor to a wall outlet using the supplied adapter.The terminal connection at the monitor is a Y-terminal, and the +/- leads need to be inserted and screwed into the corresponding contacts (refer to the DC 24V illustration). -
Page 11: Camera Terminal Connections
IDENTIFYING THE PARTS Camera terminal connections 1. Reserve – These terminals are not connected and should not be used 2. Volume Control – Used to control the audio at the camera for clear audio reception 3. Monitor – Connect two wires from this terminal to the monitor, marked “Door Camera”... -
Page 12: Installation
INSTALLATION Important Note: Turn off the power to all units being used before connecting or disconnecting cables 1. Monitor Installation: Choose a suitable location inside you home and fasten the wall mount plate on the wall using the provided screws and screw crank 2. -
Page 13: Testing Units
INSTALLATION Note: You do not have to utilize the cable supplied with this product for this connection. An alternate solution is to use your existing doorbell wiring instead of the cable provided.You will need to disconnect the existing doorbell and the power supply if you’re using the doorbell wiring.This unique feature makes installation easier! 4. -
Page 14: Operation
OPERATION Below is a typical sequence depicting how the Doorphone system is used: Call Button 1. The visitor presses the Call button, which activates the monitor inside your home. 2. One way audio and video at the camera becomes active, so the visitor can be seen and heard. -
Page 15: Troubleshooting Guide
TROUBLESHOOTING GUIDE Before requesting service, check the troubleshooting guide to solve the problem Problem Solution No Power Make sure that the AC plug is firmly inserted into the AC outlet (no picture on monitor) Make sure that the Y shaped terminal is firmly inserted into the DC 24V input on the monitor unit System is on, but no picture on the... -
Page 16: Technical Specifications
TECHNICAL SPECIFICATIONS Camera: Image sensor: 1/3" B/W CCD Resolution: >380 TV lines No. of pixels: 251,000 pixels Lens: Wide angle >120°, F2.7 Illumination: Infrared LED Lux: 0 lux (up to 3 ft from camera) Operating Temp: -25°C ~ +50°C, (-13°F ~ 122°F) Dimensions: 3.94"... -
Page 17: Appendix 1 - Connecting A Magnetic Contact
APPENDIX #1 Connecting a Magnetic Contact for a door or window You can see if a door or window is open or closed using an optional NO (Normally Open) / NC (Normally Closed) magnetic contact. Note: This magnetic contact can be purchased at most electronic or security supply stores. -
Page 18: Appendix 2 - Connecting An Electric Door Strike
APPENDIX #2 Connecting an optional Electric Door Strike or magnetic lock to a door Note: Before attempting to install the Electric Door Strike or Magnetic Lock please call a professional such as a locksmith or electrician to help with your installation. - Page 19 APPENDIX #2 Connect two wires (18 gauge) from the monitor input, marked “Lock Release” to the Electric Door Strike. One wire from the monitor will connect to the positive terminal on the power supply. The other wire from the monitor will connect to the positive terminal on the door strike unit.
- Page 20 Distributed By: Strategic Vista Corp. 300 Alden Road, Markham, Ontario, Canada L3R 4C1 www.strategicvista.com...
Need help?
Do you have a question about the VI 300 and is the answer not in the manual?
Questions and answers