Table of Contents
Advertisement
Quick Links
Advertisement
Table of Contents

Related Manuals for SpeedLeader DVX602

Summary of Contents for SpeedLeader DVX602
-
Page 1: User Manual
Speed Leader User Manual DVX602 LED Video Processor... -
Page 2: Table Of Contents
Contents About This Manual ....................3 Trademarks ......................3 Safety Precautions ....................4 Accessories ......................5 Product Models ......................6 Overview ......................... 7 Panel ........................9 Front Panel ...................... 9 Button Combinations ................11 Rear Panel ...................... 12 Application Scenarios .................... 13 Menu Introduction .................... - Page 3 Splicing Setting ..................... 31 Function Setting ..................31 Equal Splicing ..................32 Unequal Splicing ................... 33 PIP Mode Setting ................... 34 PIP Parameter Setting ................34 Keying Mode ..................35 Presetting Scenarios....................36 Specifications ......................38 Trouble Shooting ....................40...
-
Page 4: About This Manual
About This Manual Without written permission of the Company, no unit or individual may imitate, reproduce or copy this Manual, in full or in part. This Manual shall not be distributed or used for any commercial purposes in any form (electronic, mechanical, photocopy, recording or other possible forms). -
Page 5: Safety Precautions
Safety Precautions This device must be connected to a ground wire. This device must use voltage with rated power. Ensure the error of the input voltage is ±10%. Do not connect the AC power cable to an AC power cable that may cause excessive noise. -
Page 6: Accessories
Accessories Item Name DVX602 AC power cable User manual Qualified Certificate Warranty Card M3*6 round head screw Φ5*18 copper cylinder Table 4-1 Package content * Accessories can be defined based on customer requirements. -
Page 7: Product Models
Product Models Model Description DVX602 Basic DVX602S Basic + Expanding 1x3G - SDI input Basic + Expanding 1x3G - SDI input, DVX602SD Expanding Program output DVI/VGA Basic + Expanding 1x3G - SDI input, DVX602SF Expanding Program output SDI/DVI/VGA/VID DVX602F Basic + Program output SDI/DVI/VGA/VID... -
Page 8: Overview
Overview DVX602 series video processor is a high-performance LED video processor that uses the 30-bit digital signal processing technology, advanced deinterlacing signal processing and real Seamless Switch technology for professional demonstration. It supports 1080p and 1920x1200@60Hz full HD resolution output (up to 2304x1152@60Hz). Point-to-point pixel adjustment can be realized. - Page 9 DVX602 provides three independent video outputs for preview, program, and LED. Convenient Keys on the Panel An intuitive LCD interface and the clear key indicators simplify the installation and control of the system. Preset Scenarios DVX602 supports multiple scenarios to be saved and invoked, which is easy to realize.
-
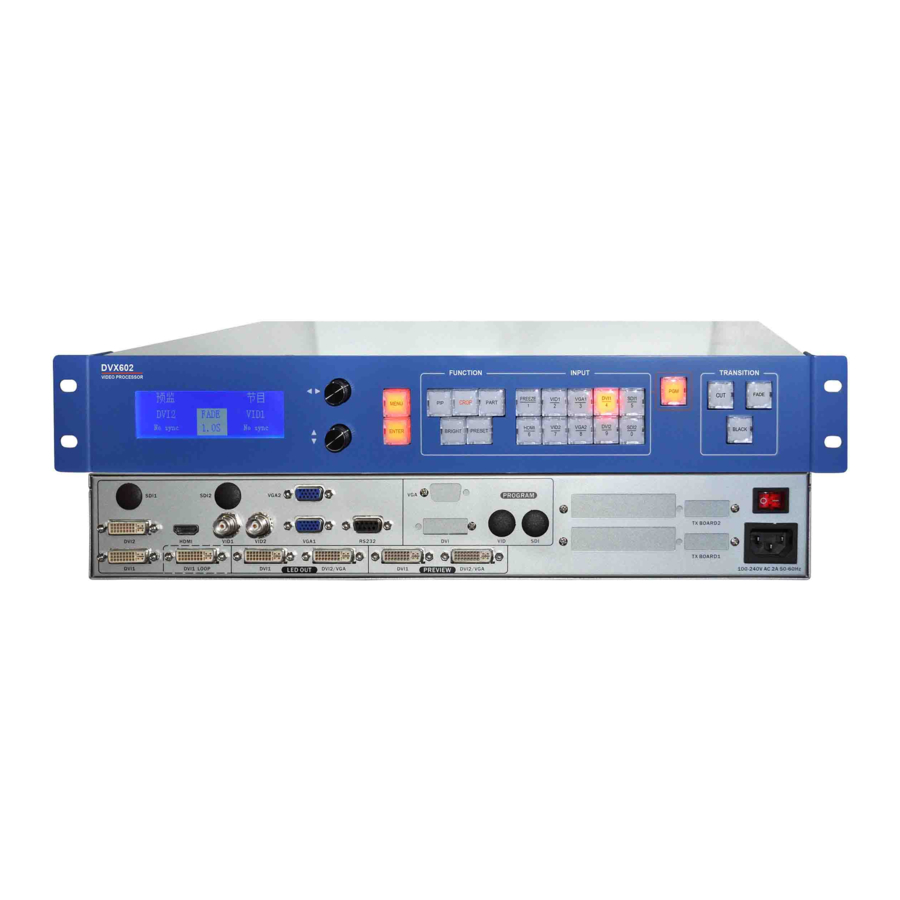
Page 10: Panel
Panel Front Panel Name Operation LCD display Show menu and current information. Select up/down/left/right menus and adjust the Knob (up) parameters. Press this knob for confirmation. Select up/down and adjust the parameters. Press this Knob (down) knob for confirmation. MENU Enter the main menu or return to the previous menu. - Page 11 Full or Part shortcut key. Press and hold this button for one second to enter window parameters setting PART menu. Press the ENTER button to switch the current operation interface. BRIGHT Adjust image brightness and contrast Scenario switch button. Press the ENTER button to PRESET switch the current operation mode.
-
Page 12: Button Combinations
Button Combinations ENTER + CROP : Restore the crop parameters for selected preview/program output back to default values. Reset the crop parameters of the selected preview/program to default. ENTER + PART : Restore the window parameters for selected preview/program output back to default values. -
Page 13: Rear Panel
Rear Panel Port DVX602 can receive 2* VGA, 2*DVI, Video input 1*HDMI, 2* VID and 2*SDI (optional) signal source simultaneously. COM port One RS-232 port Expanding program output DVI/VGA and Program output SDI/DVI/VGA/VID DVI loop-out port One DVI 1 loop-out port... -
Page 14: Application Scenarios
Application Scenarios Application 1 Application 2... -
Page 15: Menu Introduction
Default Menu DVX602 provides a convenient menu system. Figure 9-1 shows the default menu that appears after DVX602 is powered on. The user can observe the current preview signal source, program signal source and other important information via the default menu. -
Page 16: Main Menu
Under the default menu, press the MENU button to enter the main menu of DVX602. Figure 9-2 is the first-level menu of the main menu system displayed on LCD and the user can enter the next menu quickly by the rotary knob. -
Page 17: Image Setting
Image Setting Figure 10-1 Image setting submenu Item Operation Output Channel Knob adjustment: Preview/Program/LED/PIP Brightness Knob adjustment: 0~64~127 Contrast Knob adjustment: 0~64~127 Color Knob adjustment: 0~64~127 Amplitude Knob adjustment: 0~255 Green Knob adjustment: 0~255 Blue Knob adjustment: 0~255 CutOff Knob adjustment: 0~31 Green Knob adjustment: 0~31 Blue... -
Page 18: Image Setting Shortcut
Note: Image brightness, contrast, color saturation, and color can be saved separately in the parameters of the signal source which the output selected. The parameters of each input signal source is saved without interference. For example, brightness and contrast for preview output VGA1 are 78 and 87 respectively;... -
Page 19: Window And Crop
Window and Crop Figure 11-1 Window and crop submenu Item Operation Output Channel Knob adjustment: Preview/Program/LED/PIP Window Adjust Knob adjustment: Enable/Disable Window H Width Knob adjustment Window V Height Knob adjustment Window H Start Knob adjustment Window V Start Knob adjustment Press ENTER or press the knob to enter the Window Reset Resetting menu and reset the window parameters for... -
Page 20: Window Setting Shortcut
Note: Window parameters and crop parameters can be saved separately in the parameters of the signal source which the output selected. parameters of each input signal source is saved without interference. Window Setting Shortcut To set window parameters in a convenient way, press PART – the partial window switch. -
Page 21: Crop Setting Shortcut
Crop Setting Shortcut To set crop parameters in a convenient way, press CORP – the window crop switch. The switch is turned on when the button is lighted up. Press and hold CORP for one second to enter the shortcut menu. Figure 11-3 Crop shortcut menu Figure 11-3 shows the crop parameters of the selected signal under the... -
Page 22: Output Resolution
Output Resolution Figure 12-1 Output resolution submenu Item Operation Press ENTER to enter the resolution menu Preview Timing Turn the knob and press ENTER or press the knob Press ENTER to enter the resolution menu SDI/DVI/VGA Timing Turn the knob and press ENTER or press the knob Program Timing Press ENTER to enter the resolution... -
Page 23: Led
Figure 13-1 LED submenu... - Page 24 Item Operation Window Adjust Knob adjustment : Enable/Disable Window H Width Turn the knob Window V Height Turn the knob Screen Window H Start Turn the knob Size Window V Start Turn the knob Press ENTER or press the knob to enter the Window Reset Resetting menu and restore the spliced window parameters to default values.
-
Page 25: Function Setting
Function Setting Figure 14-1 Function setting submenu Overview DVX602 provides EDID definable functions for users to set required resolution for an output device, such as a PC or other image output device. -
Page 26: Setting Edid
Setting EDID Enter the EDID setting menu and select a required input channel. Press ENTER or press the knob to enter the EDID menu. Select required parameters and press ENTER or press the knob to change parameters. Item Operation Press ENTER to enter the resolution DVI1 EDID menu Turn the knob and press ENTER or... -
Page 27: Pip
DVI1 input Turn the knob: 0~63 DVI2 Input Turn the knob: 0~63 Preview Turn the knob: 0~47 Output 1 Equalizer Preview Turn the knob: 0~47 Setup Output 2 Program Turn the knob: 0~47 Output 1 Program Turn the knob: 0~47 Output 2 Table 14-1 Parameters of the function setting submenu Figure 15-1 PIP submenu... - Page 28 Item Operation PIP Input Turn the knob: DVI1/DVI2 PIP Mode Turn the knob: PIP/Key Turn the knob: Black, White, Red, Green, Blue, Key Color Black Invert, White Invert, Red Invert, Green Invert, Blue Invert, User Red Max Turn the knob: 0~15 Red Min Turn the knob: 0~15 Green Max...
-
Page 29: Pip Setting Shortcut
PIP Setting Shortcut To set PIP parameters in a convenient way, press and hold PIP for one second to enter the PIP shortcut menu. PIP is a switch and it will be turned on when the button is lighted up. Figure 15-2 PIP shortcut menu Figure 15-2 shows the PIP shortcut menu. -
Page 30: Advanced Setting
After an LED display is finished, users may want to test the display screen. DVX602 provides different patterns for users to detect defective pixels and blind spots and check LED dot matrix for misalignment. Refer to the following step to adjust the display screen. -
Page 31: System Information
System Information Figure 17-1 System information submenu Item Operation Language Chinese/English Press ENTER or turn the knob to view the System Version hardware & software version information Press ENTER or turn the knob to reset all System Reset system parameters to default values Table 17-1 Information of the system information submenu... -
Page 32: Operation Guide
DVI1 LOOP DVI1 LOOP Processor 3 Processor 2 Processor 1 Figure 18-1 Function Setting DVX602 supports equal splicing and unequal splicing. In equal splicing, horizontal pixels and vertical pixels are equal; in unequal splicing, pixels of different parts are unequal. -
Page 33: Equal Splicing
V Splice Unit=1 V Splice Unit=1 V Splice Unit=1 Splice Position =2 Splice Position =3 Splice Position =1 DVX602 1 DVX602 2 DVX602 3 Figure 18-2 As shown in the preceding figure, under main menu, choose "LED"→ "Screen Size" and change "... -
Page 34: Unequal Splicing
Window V Height" to "1040", "window H/V start" to "0", "splice mode" to Window "Unequal", "H Total Width" to "3640", "V Total Height" to "1040", and "H/V Splice Start" to "0". Change DVX602-2 window "H Width" to "1768", "V Height"... -
Page 35: Pip Mode Setting
to "1040", "Window H Start" to "0", "Window V Start" to "0", "Splice Mode" to " Unequal", "H Total Width" to "3640", "V Total Height" to "1040", "H splice Start" to "1872", and "V Splice Start" to "0". PIP Mode Setting PIP adopts the digital technology to realize concurrent display of two programs, allowing one or more compressed sub-screens to be displayed on the main screen so that you can monitor channels while watching the main screen. -
Page 36: Keying Mode
Keying Mode Keying is an extended function of PIP. This is realized by subtracting specified color from image color input through a PIP channel. Keying is used to produce simple special effect and add subtitles. Adding Subtitle PIP channel Main screen channel Subtitle Figure 18-5 Under the main menu, choose "PIP"... -
Page 37: Presetting Scenarios
Presetting Scenarios Preset modes are various application scenarios that users can invoke to use without repeatedly setting the scenarios. This function helps improve working efficiency. A preset scenario must be configured with channel mode, image quality image, capture, window and PIP associated parameters. The following will describe how to save and invoke a preset scenario: Press PRESET to enter the preset mode menu. - Page 38 Invoking and Erasing a Scenario Under the preset mode menu, press ENTER to switch to invocation/erasing mode. If there are scenarios available, The symbol which is corresponding to numbers is . Press these numbers to recall or erase the scenarios. Note: If there are preset scenarios available, changing resolutions of preview outputs or program outputs will cause all the scenarios to be cleared.
-
Page 39: Specifications
Specifications Video Input Interface Connecto r Specifications DVI1.0, in compliance with VESA DVI-I standard, PC to 1920× 1080 In compliance with VESA standard, PC DB15 to 1920× 1080 PAL/NTSC/SECAM 1Vpp± 3DB(0.7V Video+0.3V Sync) 75 DVI1.0,HDMI1.3 HDMI HDMI downward c o mpatible PC to 1920×... - Page 40 Program output (optional) Output Connector DVI-I DB15 640x480@60Hz 800x600@60Hz 1024x768@60Hz 1280x1024@60Hz 1366x768@60Hz 1440x900@60Hz VGA/DVI 1600x1200@60Hz 1680x1050@60Hz 1920x1080@60Hz 1920x1200RB@60Hz 1080p 60/59.94/50/30/29.97/25/24/23.98 Resolu tio n 1080i 60/59.94/50 720p 60/59.94/50 SDI/DVI 625i 525i NTSC LED output 1 VGA channel and 2 DVI channels Connector DVI-I Stand ard...
-
Page 41: Trouble Shooting
Trouble Shooting Problems may be encountered during installation or use. Here, the user can follow the steps below to remove the troubles; if the steps below still cannot fix the problems for you, please contact the local dealer. 1. The equipment has no image and the indicator light doesn’t work. Check whether the power supply is connected well and the power switch is turned on. - Page 42 H o t l i n e : 4 0 0 - 6 2 8 6 - 9 5 9 SHENZHEN SPEEDLEADER TECHNOLOGY CO., LTD. Tel.: 0755-26588939 Fax: 0755-26586619 Postal code: 518052 Address: Floor 6, Baocheng Tech Building , Majialong Industy, Nanshan District, Shenzhen, China Website: http://www.jstron.com...
Need help?
Do you have a question about the DVX602 and is the answer not in the manual?
Questions and answers