Table of Contents
Advertisement
Available languages
Available languages
Quick Links
Advertisement
Table of Contents

Related Manuals for SKS-Kinkel HT 4600


Summary of Contents for SKS-Kinkel HT 4600
- Page 1 HT 4600 Version 1.1 ~ 1 ~...
-
Page 2: Installation
1. Installation Gefahr für Personen durch einen elektrischen Schlag. Verbrennungsgefahr, Geräteschäden und Fehlfunktionen. Bei der Installation sind die Richtlinien der VDE 0100 und VDE 0800 einzuhalten. (Deutschland) Gegenmaßnahmen: Schalten Sie zu Beginn der Arbeiten alle Spannungsführenden Leitungen frei. Sichern Sie die ausgeschalteten Leitungen gegen irrtümliches Wiedereinschalten. Stellen Sie Spannungsfreiheit durch Messung fest. - Page 3 3. Montageanleitung HT4600 Mit einem Schraubenzieher vorsichtig den unteren Klipp eindrücken und die Front abnehmen. Aufputz Montage: Mit Dübel und Schrauben das Hinterteil der Sprech- stelle an der Wand befestigen. Dabei auf das Kabel achten! Unterputz Montage: Mit zwei Schrauben das Hinterteil der Sprechstelle an der Unterputzdose befestigen.
- Page 4 Montageanleitung HT4600 (Fortsetzung) Verbinden Sie das Kabel mit der Anschlussklemme. Stellen SKS-BUS Rufadresse Sprechstelle ein. Jede Adresse ist einem Klingel Taster an der Türstation zugeordnet. Die Adressen sind im Anhang aufgeführt. In der Regel wird mit der SKS-BUS Rufadresse „A1“ begonnen. Beim Austausch von Sprechstellen stellen Sie den DIP-Schalter so ein wie bei der zuvor montierten Sprechstelle.
- Page 5 4. Programmierung Nur für Sonderfunktionen 4.1 Programmierung von nur einer Rufadresse (ein Klingeltaster für eine Sprechstelle) Nach der im Anhang befindlichen SKS-BUS Rufadressen Tabelle die gewünschte Rufadresse des Gerätes am DIP-Schalter einstellen. Jede Rufadresse ist fest einem Klingeltaster in der Türstation zugeordnet.
- Page 6 5. Einrichten des Internrufs 5.1 Programmieren der Internrufadressen Internsprechen ermöglicht das Sprechen zwischen zwei Innensprechstellen. Mit der HT4600 kann mit bis zu 6 Innensprechstellen gesprochen werden. An der HT4600 sind dafür die Tasten 1 bis 6 vorgesehen. Durch Drücken der entsprechenden Taste wird der Internruf abgesetzt. Intersprechstelle Internsprechtaste(n) Ablauf der Programmierung für Internrufadressen:...
- Page 7 6. Bedienungsanleitung Funktion Tasten Vorgehensweise Nehmen Sie nachdem das Gerät angeklingelt wurde den Hörer ab. Gespräch annehmen Nehmen Sie den Hörer ab und halten Sie die Tontaste solange gedrückt (ca. 5 Sekunden), bis Sie die Bestätigungstöne (3 gleichlange Töne) hören. Der Rufton ist jetzt abgeschaltet. Um auf diesen Zustand hinzuweisen,...
-
Page 8: Technische Daten
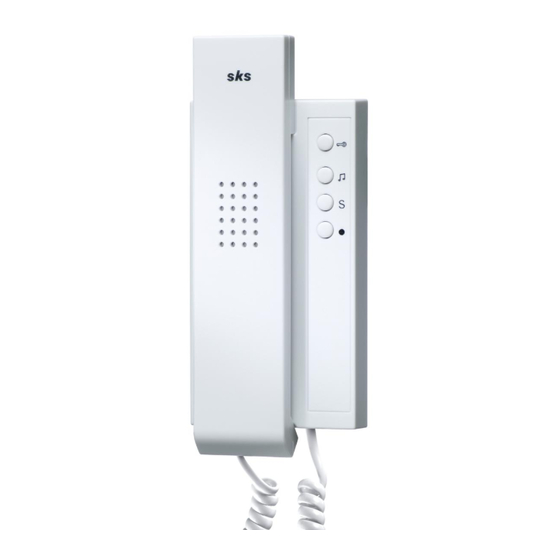
7. Technische Daten Elektrische Daten 19 – 23VDC Spannung a / b Allgemeines Umgebungstemperatur -10°C bis +45°C Feuchtigkeit 20% bis 90% nicht kondensierend Gehäuse Kunststoffgehäuse Abmessungen (Breite x Höhe x Tiefe) 82 x 193 x 33mm ~ 8 ~... - Page 9 ~ 9 ~...
-
Page 10: Terminal Designation
1. Installation Hazard of electrical strike and burns to persons, as well as damage of equipment and malfunctions. Observe VDE 0100 and VDE 0800 guidelines during installation. (Germany) Countermeasures: Before beginning any work, deactivate and disconnect all energized electrical wires. Secure the switched off/ disconnected lines against erreneous reconnection. - Page 11 3. Assembly Instructions HT4600 Using a screwdriver, carefully press in the lower middle clip and remove the front. Assembly of Mounting Box: Fasten the rear part of the intercom unit to the wall using dowels and screws. Watch the cable! Flush Mounting Socket Assembly: Using two screws, fasten the rear part of the intercom to the flush-mounting socket.
- Page 12 Assembly Instructions HT4600 (Continued) Connect the cable to the terminal connector. Set the SKS-BUS call address on the intercom. Each address is assigned to one call button at the door station. The addresses are listed in the appendix. As a rule, the SKS-BUS call address set in with “A1“.
- Page 13 4. Programming DIP switch programming key For special function For special function only only 4.1 Programming Only One Call Address (One Call button for One Intercom Unit) Set the desired call address for the device on the DIP-Switch following the SKS-BUS Address Table in the appendix.
- Page 14 5. Setting Up Internal Calling 5.1 Programming Internal Call Addresses Internal calling makes it possible to communicate between two intercom units. Using the HT4600, you can speak with up to 6 intercom units. Buttons 1 through 6 are provided on the HT4600 for this purpose. You place an internal call by pressing the matching button.
- Page 15 6. Operating Instructions Function Button Procedure Pick up the receiver after the unit has been rung. Accept call Pick up the receiver and push the sound button (around 5 seconds) until you hear the confirmation tone (3 tones of equal length). The ringer is now off.
-
Page 16: Technical Data
7. Technical Data Electric Data 19 – 23VDC Voltage a / b General Ambient Temperature -10°C to +45°C Humidity 20% to 90% non-condensing Housing Plastic housing Dimensions (width x height x depth) 82 x 193 x 33mm ~ 16 ~... - Page 17 ~ 17 ~...
- Page 18 1. Installation Danger d'électrocution pour les personnes. Risque de brûlure, de dommages à l’appareil et de dysfonctionnements. Les directives de la VDE 0100 et de la VDE 0800 doivent être respectées lors de l’installation. (Allemagne) Contre-mesures : Mettez hors tension toutes les lignes conductrices au début des travaux. Sécurisez les lignes déconnectées de manière à...
- Page 19 3. Instructions de montage du HT4600 Enfoncer prudemment le clip inférieur à l’aide d’un tournevis et démonter la façade. Montage apparent : Fixer au mur la partie arrière du poste avec des vis et des chevilles. Attention au câble ! Montage encastré...
- Page 20 Instructions de montage HT4600 (suite) Connectez le câble a la borne de raccordement. Définissez l’adresse d’appel du bus SKS sur le poste. Chaque adresse est dédiée à une touche de sonnerie sur la station de porte. Les adresses figurent en annexe.
- Page 21 4. Programmation Micro interrupteur DIP Touche programmation Seulement pour fonctions spéciales 4.1 Programmation d’une seule adresse d’appel (un bouton de sonnette pour un carillon sur bus) D’après le tableau des adresses d’appel sur BUS SKS situés den annexe, définir l'adresse d'appel de l’appareil sur l'interrupteur DIP.
- Page 22 5. Configuration de l'appel interne 5.1 Programmation des adresses d’appel interne La conversation interne permet de parler entre deux postes intérieurs. Le HT4600 permet de converser avec 6 postes internes (maxi). Les touches de 1 à 6 sont prévues sur le HT4600. L’appel interne est supprimé...
- Page 23 6. Mode d'emploi Fonction Touches Procédure à suivre Après sonnerie sur l’appareil, décrochez le combiné. Accueillir l’appel Décrochez le combiné et maintenez appuyée la touche Son (env. 5 secondes) jusqu’à ce que vous entendiez les tonalités de confirmation (3 tonalités d’égale longueur). La tonalité d’appel est désactivée.
-
Page 24: Caractéristiques Techniques
7. Caractéristiques techniques Caractéristiques électriques 19 – 23VDC Tension a / b Généralités Température ambiante de -10°C à +45°C Humidité 20% à 90% sans condensation Boîtier Boîtier plastique Dimensions (largeur x hauteur x profondeur) 82 x 193 x 33mm ~ 24 ~... - Page 25 ~ 25 ~...
-
Page 26: Anhang, Appendix, Annexe
Anhang, Appendix, Annexe ~ 26 ~...
Need help?
Do you have a question about the HT 4600 and is the answer not in the manual?
Questions and answers