Table of Contents

Related Manuals for Blaupunkt Arrifana 15 BAC-PO-0015-C06D


Summary of Contents for Blaupunkt Arrifana 15 BAC-PO-0015-C06D
- Page 1 Arrifana 15 BAC-PO-0015-C06D Portable air conditioner Page: 3–28 Instruction manual Mobiles Klimagerät Seite: 29-65 Bedienungsanleitung Klimatyzator przenośny Strony: 66-97 Instrukcja obsługi...
-
Page 2: Table Of Contents
CONTENTS IMPORTANT ISSUES FOR THE PROPER USE ........3 INTRODUCTION ..............4 NAME OF EACH PART AND FUNCTION ..........5 INSTALLATION ............... 6 CONTROL PANEL ..............13 OPERATION OF CONTROL PANEL ..........14 REMOTE CONTROL ..............17 FUNCTIONS OF REMOTE CONTROL ..........18 REMOTE CONTROL DISPLAY ............ - Page 3 SPIS TREŚCI PRZEPISY I ZASADY BEZPIECZEŃSTWA ........... 68 WSTĘP ................72 NAZWA KAŻDEJ CZĘŚCI ORAZ JEJ FUNKCJA ........74 INSTALACJA ................. 75 PANEL STEROWANIA ............... 81 OBSŁUGA PANELU STEROWANIA ..........82 OBSŁUGA PILOTA ..............85 FUNKCJE PILOTA ZDALNEGO STEROWANIA ........87 WYŚWIETLACZ NA PILOCIE ............
-
Page 4: Important Issues For The Proper Use
IMPORTANT ISSUES FOR THE PROPER USE Use this air conditioner only as described in this instruction manual This air conditioner has been designed and manufactured to operate in a domestic situation only and should not be used for other purposes. -
Page 5: Introduction
INTRODUCTION This portable air conditioner can alter the room temperature and humidity. It has multiple functions of cooling, dehumidifying (drying) and fan ventilation and can be moved from room to room and transported from building to building easily. Room temperature range should be under 18 ~35ºC to get this unit operational well and target room temperature can be adjusted from Remote Control under 18~32ºC. -
Page 6: Name Of Each Part And Function
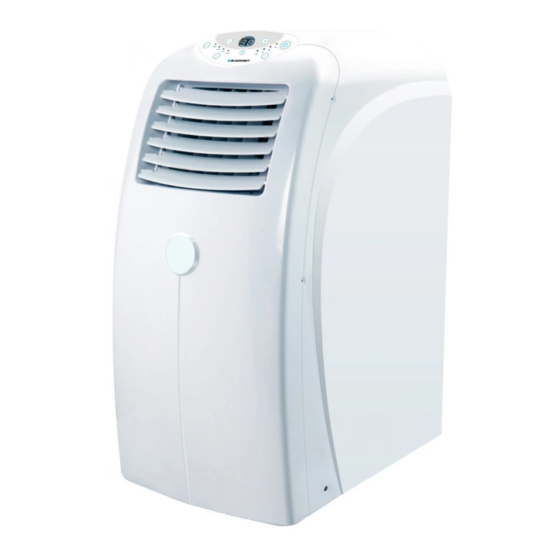
NAME OF EACH PART AND FUNCTION FRONT (Fig. 1) 1. Control panel 2. Up/down manually adjusted air fins 3. Air outlet 4. Left/Right auto air swinging fans 5. Rolling castor 6. Cable (power cord and plug) Fig. 1 BACK (Fig. 2) 1. -
Page 7: Installation
INSTALLATION SELECTION OF INSTALLATION LOCATION (Fig.3) Place the portable air conditioner in a flat location where the air inlets and outlets cannot be covered up. Place the unit no less than 50cm away from a wall or other obstacle. - Page 8 ASSEMBLY OF EXHAUST HOSE, HOSE INLET, HOSE OUTLET, WINDOW ADAPTOR AND WINDOW SLIDER (Fig. 4) Extend each end of the exhaust hose by about 8 cm and attach the hose inlet and hose outlet to opposite ends by rotation the inlet/outlet in a counter clockwise direction approximately 3 to 4 turns, making sure that the hose wire is well threaded into the hose inlet and outlet.
- Page 9 MOUNTING OF ASSEMBLED AIR EXHAUST HOSE (Fig. 5) Take care not to damage the hose inlet when attaching/detaching at the back of the Air Conditioner. Slide the hose inlet (square end) in the direction indicated by the arrow onto the fixing lugs on hot air outlet grill at the back of the appliance.
- Page 10 ATTENTION The exhaust hose should be not longer that 1,5 meters. Never bend the exhaust hose excessively when the appliance is working Always keep the exhaust hose at its shortest length and as straight as possible when the appliance is working.
- Page 11 If the air exhaust hose needs to be bent, the correct method is shown below(Fig. 7) Fig. 7 ARRIFANA 15...
- Page 12 Incorrect or excessive bending of the exhaust hose will cause inefficient cooling and possible malfunction (Fig. 8) Fig. 8 WINDOW SLIDER KIT INSTALLATION (Fig. 9, Fig. 10, Fig. 11 and Fig. 12) The window slider kit has been designed to fit most standard “vertical” and “horizontal”...
- Page 13 Fig. 9 Fig. 10 Fig. 11 Fig. 12 ARRIFANA 15...
-
Page 14: Control Panel
CONTROL PANEL A. ON/OFF button. B. MODE button to select modes of cooling/dry/fan. C. FAN SPEED button to select fan speed of High/Med/Low/Auto. D. SWING button to switch on/off left/right auto swing function. E. TIMER button. F. INCREASE button to increase temperature/time. -
Page 15: Operation Of Control Panel
OPERATION OF CONTROL PANEL The operating ranges for cooling and dehumidifying are 18 C ~ 32 If the appliance is turned off during cooling or dry operation and restarted immediately, the unit will wait at least 3 minutes before restarting compressor. - Page 16 NB: In COOLING mode the exhaust hose must be connecter to allow warm air to be expelled from the room being cooled. DRY (DEHUMIDYFYING) MODE Keep the windows and doors closed for an effective dehumidification. When used as dehumidifier only, keep the air exhaust hose disconnected from the back of the unit.
- Page 17 Press TIMER button again to confirm the timer setting, the TIMER INDICATOR LIGHT lights up and keeps flashing to indicate the timer is activated. At the end of the set time the appliance switches off automatically.
-
Page 18: Remote Control
REMOTE CONTROL How to insert the batteries Remove the cover from the battery compartment, by sliding it in the direction of the arrow. Insert the new batteries, ensuring that the (+) and (-) directions are correct. Refit the cover by sliding it into place. -
Page 19: Functions Of Remote Control
CORRECT USE Point the remote control towards the front of the air conditioner (see Fig. Maximum distance approximately 7 meters (without any obstacles between the remote control and receiver). Do not drop remote control expose it to direct Fig. -
Page 20: Remote Control Display
To select the fan speed of HIGH/MED/LOW/AUTO. TIMER To set automatic switching-on/off. SLEEP NOT AVAILABLE IN THIS MODEL CLOCK When you press this button the time will be flickering; then through and , you can adjust the time (one time you press, one minute you adjust;... - Page 21 Meaning of the symbols on the LCD display: Symbol Meaning FEEL indicator (not available for this model) COOLING indicator DEHUMIDIFYING indicator FAN ONLY OPERATION indicator HEATING indicator (not available for this model) SIGNAL RECEPTION indicator TIMER OFF indicator TIMER ON indicator...
-
Page 22: Using The Remote Control Unit
USING THE REMOTE CONTROL UNIT COOLING MODE Press the ON/OFF button to turn the appliance on. Press the MODE button to select icon. Set the temperature using or button. To set fan speed press the FAN button repeatedly until the required speed is selected (HIGH, MED, LOW, AUTO). - Page 23 CLOCK FUNCTION When you press „CLOCK button the time will be flickering. Then through and you can adjust the time. One time you press, one minute you adjust; and if you continue to press the button the time change rapidly.
- Page 24 To program the time start, the appliance should be off. Press TIMER button, set the temperature with pressing the key or . Press TIMER again, set the time with pressing the key or . Press the key more times till on the display you can read the timed start.
-
Page 25: Water Drainage Methods
WATER DRAINAGE METHODS WATER DRAINAGE This air conditioner is equipped with the very latest MIST technology which means the water tank never fills. This has been verifies by independent testing conducted both in Australia and overseas under extremely humid conditions. Water drainage will generally only be required at the end of the season (see End of Season Operations). -
Page 26: Maintenance And Service
NOTE: To completely drain all water from the water tank, tilt the unit by lifting is slightly upwards from the front until no more water drains from the outlet. MAINTENANCE AND SERVICE MAINTENANCE METHODS ... -
Page 27: End Of Season Operation
Insert the filter back into the original positions. END OF SEASON OPERATION Switch off the unit and disconnect the plug from the power supply outlet. Remove the plug from the drain outlet to drain the water onto the drain pan and dispose of the water. -
Page 28: Troubleshooting
TROUBLESHOOTING Before seeking repair or service, please check the following. PROBLEM CHECK ACTION Is A/C plugged into power Insert power plug securely into power No power to supply outlet? supply outlet and turn power on. Has fuse blown (circuit ... - Page 29 Air exhaust hose detached? Connect the hose Window/door opened? Close the windows/doors to room Air inlet/outlet blocked? being cooled. Air filters dirty? Clear blockage Fan speed set at low? Clean air filter ...
- Page 30 Mobiles Klimagerät Arrifana 15 BAC-PO-0015-C06D Bedienungsanleitung ARRIFANA 15...
-
Page 31: Sicherheitshinweise
Blaupunkt-Klimagerät. Diese Bedienungsanleitung enthält detaillierte Informationen und Anweisungen, die Ihnen helfen sollen, auf einfachem Wege das Beste aus Ihrem neuen Blaupunkt-Klimagerät Arrifana 15 herauszuholen. Lesen Sie bitte alle diese Informationen sorgfältig durch, bevor Sie Ihr mobiles Klimagerät in Betrieb nehmen! - Page 32 Bedienungsanleitung. Bewahren Sie die Bedienungsanleitung zum späteren Nachschlagen an einem sicheren Ort auf. 2. Die Bedienungsanleitung dient nur dazu, Sie mit den Funktionen und der Wartung des Gerätes vertraut zu machen. Wenn eine Reparatur des Gerätes notwendig ist, wenden Sie sich bitte unbedingt an einen autorisiertes Service.
- Page 33 Gerät angeschlossen wird, soll von einem qualifizierten Elektriker geprüft werden. 11. Um das Gerät betriebsfähig zu machen, müssen Sie es an die Stromversorgung anschließen. Vor dem Anschluss stellen Sie sicher, dass die Nennspannung des Gerätes den örtlichen Spannungswerten entspricht. Ist dies nicht der Fall, kann das Gerät beschädigt werden.
- Page 34 17. Wenn Sie das Gerät längere Zeit nicht benutzen, ziehen Sie den Netzstecker aus der Steckdose aus. Fassen Sie am Netzstecker an. Ziehen Sie niemals direkt am Netzkabel. Berühren Sie das Netzkabel niemals mit feuchten Händen. 18. Auf keinen Fall benutzen Sie das Gerät wenn das Netzkabel zerfasert oder anderweitig beschädigt ist.
- Page 35 Fachpersonal durchgeführt werden. Versuchen Sie niemals das Gerät selbst oder durch nicht autorisierte Personen zu reparieren. Dies kann zum sofortigen Verlust des Garantieanspruchs führen. 25. Wenn irgendwelche Teile ersetzt werden müssen, achten Sie bitte darauf, dass nur solche Ersatzteile verwendet werden, die vom Hersteller zugelassen werden oder dieselben Eigenschaften haben wie das Originalteil.
- Page 36 Seriennummer Die Seriennummer finden Sie auf der Rückseite des Gerätes. Diese Nummer gilt ausschließlich für dieses Gerät und ist sonst niemandem bekannt. CE-Zertifikationssymbol Das CE Zertifikationssymbol weist darauf hin, dass wir das Produkt getestet und attestiert haben, um dessen Übereinstimmung mit allen gültigen Vorschriften und Anforderungen der EU festzustellen.
- Page 37 2. Verwenden Sie ausschließlich Batterien mit dem gleichen Ladezustand. Verwenden Sie nicht alte und neue Batterien oder verschiedene Batteriesorten gleichzeitig. 3. Wenn Sie das Gerät für längere Zeit nicht benutzt wird, entfernen Sie die Batterien aus der Fernbedienung, um den Korrosionsschäden vorzubeugen.
- Page 38 Union (2006/66/EC) gedeckt wird. Informieren Sie sich über die lokalen Vorschriften wie die Batterien ordnungsgemäß entsorgt werden sollen. Wenn Sie die Batterien ersetzen, achten Sie bitte darauf, dass die verbrauchten oder beschädigten Batterien gemäß den geltenden Vorschriften entsorgt werden.
-
Page 39: Einleitung
EINLEITUNG Das mobile Klimagerät kann die Lufttemperatur und Feuchtigkeitsgrad ändern. Es verfügt über solche Funktionen wie: Kühlung, Trocknung, Gebläse. Es konnte ohne Schwierigkeiten von einem Raum in anderen oder von einem Gebäude in anderes transportiert werden. Dieses Klimagerät kann eine Raumtemperatur von 18 bis 35 Grad anbieten. -
Page 40: Bezeichnung Und Funktion Der Geräteteile
Versichern Sie sich, dass die Luftaus- und Einlässe nicht bedeckt sind. Reinigen Sie den Filter mindestens einmal pro zwei Wochen. BEZEICHNUNG UND FUNKTION DER GERÄTETEILE Vorderteil (Abb. 1) 1. Bedienpanel 2. Up/down manually adjusted air fins 3. Obere/untere von Hand einstellbare Lüftungsgitter... -
Page 41: Installation
INSTALLATION Installationsplatz wählen (Abb. 3) Stellen Sie das Klimagerät auf eine ebene Fläche, so, dass die Luftein – und auslässe nicht bedeckt sind. Das Gerät soll mindestens 50cm von Wänden und anderen Gegenständen entfernt stehen. Abb. 3 INSTALLATIONSELEMENTE Adapter (Abluftschlauch-Einlass) Fensterhebersatz 33 1/2"... - Page 42 INSTALLATION ABLUFTSCHLAUCH, ABLUFTSCHLAUCH-EINLASS, ABLUFTSCHLAUCH-AUSLASS, FENSTERADAPTER UND DEM FENSTERHEBERSATZ (Abb. 4) Ziehen Sie jede Schlauchseite auf eine Länge von 8cm auseinander, befestigen Sie den Aus- und Einlass des Abluftschlauchs an die andere Seite indem Sie den Aus- und Einlass im Uhrzeigersinn drehen (ca. 3,4 mal).
- Page 43 INSTALLATION VON DEM FERTIGEN ABLUFTSCHLAUCH (Abb. 5) Passen Sie gut auf, dass Sie den Abluftschlauch-Einlass nicht beschädigen während Sie ihn in das Gerät einstecken oder aus dem Hinterteil des Gerätes herausziehen. Schieben Sie das Abluftschlauch-Einlass (Quadrat-Endung) in die von Pfeil gezeigte Richtung auf die Anschlussklemmen, die an der Gitter des warmen Luftauslasses am hinteren Teil des Gerätes befestigt sind.
- Page 44 Verlagern Sie das Gerät niemals durch ziehen von dem Abluftschlauch, der sich im hinteren Teil des Gerätes befindet. Verlagern Sie das Gerät nicht, wenn es im Betrieb steht. Die richtige Installation von dem Abluftschlauch ist auf der unteren Abbildung zu sehen.
- Page 45 Abb. 7 Das falsche oder zu feste Knicken von dem Abluftschlauch, kann den Kühlungseffekt verschlechtern oder fehlerhaftes Funktionieren des Gerätes verursachen. (Abb. 8). Abb. 8 ARRIFANA 15...
- Page 46 INSTALLATION VON FENSTERHEBERSATZ (Abb. 9, Abb. 10, Abb. 11, Abb. 12) Der Fensterhebersatz wurde so entworfen, dass er zur Mehrheit von horizontalen und vertikalen Fenstern passt. Es ist jedoch möglich, dass es notwendig wird, einige Installationsschritte für die bestimmten Fenstertype zu ändern. Einige Fenstertype werden auch eine Füllung von Karton oder/und Isolierband...
- Page 47 Fenster vertikales Fenster Länge des Fensterhebersatzes Länge des Fensterhebersatzes Min. 85cm Min. 85cm Max. 123cm Max. 123cm Abb. 9 Abb. 10 Standardtürhöhe beträgt 210cm. Die Spalte kann von Karton oder Isolierband verdichtet werden. Man kann auch den zusätzlichen Fensterhebersatz kaufen.
-
Page 48: Bedienpanel
BEDIENPANEL A. Taste ON/OFF (Ein/Ausschalten) B. Taste MODE – Betriebswahl: Kühlung, Trocknung, Gebläse C. Taste FAN SPEED – Lüftergeschwindigkeit: schnell, mittlere, langsam oder automatisch. D. Taste SWING – schaltet ein/aus das automatische Gebläse rechts/links E. Taste TIMER (Zeitanzeiger) F. Taste INCREASE – steigert die Temperatur/die Zeit G. -
Page 49: Bedienpanelsteuerung
BEDIENPANELSTEUERUNG Das Kühlung- und Trocknung- Modus arbeitet in Temperatur von 18 bis 30 Grad. Falls das Gerät während der Kühlung oder Trocknung ausgeschaltet ist und zugleich dann wieder eingeschaltet, bleibt es im Schlafmodus mindestens 3 Minuten, bevor der Kompressor wieder in Betrieb gesetzt wird. - Page 50 VORSICHT: In dem Kühlung-Modus wird das Klimagerät den Feuchtigkeitsüberfluss aus der Luft entsorgen. VORSICHT: In dem Kühlung-Modus muss der Abluftschlauch in dem Gerät eingesteckt sein um die warme Luft aus dem gekühlten Raum zu entsorgen. TROCKNUNG - MODUS ...
- Page 51 Wenn das Gerät eingeschaltet ist, drücken Sie die Taste TIMER, die übrige Zeit wird auf dem Display gezeigt. Stellen Sie die Zeit nach dem Wunsch ein, indem Sie die Tasten INCREASE (+) und DECREASE (-) drücken (ab 30 Minuten bis 24 Stunden).
-
Page 52: Fernbedienungsteuerung
Drücken Sie die TIMER Taste wieder um die Einstellung zu bestätigen, wenn die TIMER Diode blinkt, ist die Einstellung aktiv. Die restliche Zeit (in Stunden) ist auch auf dem Display zu sehen. Am Ende der gewählten Zeit, schaltet das Gerät automatisch ein und arbeitet im gewählten Modus, z.B. - Page 53 DIP-Position Funktion/Einstellung: Das Display zeigt die Temperatur in Grad Celsius Das Display zeigt die Temperatur in Grad Fahrenheit COOL Die Fernbedienung ist eingestellt nur für den Kühlbetrieb HEAT Die Fernbedienung ist eingestellt nur für den Heizbetrieb (nicht verfügbar für Arrifana 15) 6.
-
Page 54: Fernbedienungstaste Und Anzeigen
FERNBEDIENUNGSTASTE UND ANZEIGEN Funktionstasten Taste Funktion vergrößert die Temperatur oder Uhrzeit um eine Einheit (1 Min.). verringert die Temperatur oder Uhrzeit um eine Einheit (1 Min.). ON/OFF schaltet das Klimagerät ein und aus. stellt die Lüftergeschwindigkeit ein: AUTO (automatisch), LOW (niedrig), MID (mittlere) oder HIGH (hoch) aus. -
Page 55: Fernbedienungsdisplay
SLEEP aktiviert die Schlaffunktion SLEEP . (nicht verfügbar für Arrifana CLOCK Wenn Sie diese Taste drücken, beginnt die Uhrzeitanzeige zu flimmern. Drücken Sie die Tasten und , um die gewünschte Uhrzeit einzustellen. Jedes Mal wenn Sie die Taste oder ... - Page 56 Meaning of the symbols on the LCD display: Symbol Bedeutung Anzeige des FEEL-Betriebsmodus (nicht verfügbar für Arrifana Anzeige des Kühlbetriebs COOLING Anzeige der Entfeuchtung DEHUMIDIFYING Anzeige des alleinigen Lüfterbetriebs FAN ONLY Anzeige des Heizbetriebs HEATING (nicht verfügbar für Arrifana 15)
-
Page 57: Fernbedienung Benutzen
Batterieanzeige Uhranzeige FERNBEDIENUNG BENUTZEN DAS KÜHLUNG - MODUS Drücken Sie die Taste ON/OFF, um das Gerät auszuschalten. Drücken Sie die Taste MODE um das Kühlung – Modus auszuwählen ( Stellen Sie die Temperatur ein, indem Sie die Tasten „ und “ drücken. - Page 58 Drücken Sie die Taste ON/OFF um das Gerät auszuschalten. Drücken Sie die Taste MODE, um das Trocknung-Modus zu wählen ( ), in diesem Modus ist die Lüftergeschwindigkeit immer automatisch und kann nicht geändert werden. GEBLÄSE – MODUS ...
- Page 59 Haben Sie die gewünschte Zeit eingestellt, drücken Sie die Taste CLOCK erneut, um die Zeiteinstellungen zu bestätigen. SUPER: Schnellkühlfunktion Diese Funktion ist ideal, um z. B. Räume im Sommer schnell zu kühlen. Drücken Fernbedienungstaste SUPER, um die Schnellkühlfunktion zu aktivieren.
- Page 60 2. Drücken Sie danach die Tasten und , um die gewünschte Temperatur einzustellen. Nach dem automatischen Einschalten wird das Klimagerät so schnell wie möglich diese Temperatur erreichen. 3. Drücken Sie die Taste TIMER erneut. 4. Drücken Sie danach die Tasten und , um den Zeitabschnitt einzustellen, nach welchem sich das Gerät automatisch einschaltet.
-
Page 61: Methoden Des Wasserabzugs
2. Drücken Sie danach die Tasten und , um den Zeitabschnitt einzustellen, nach welchem sich das Gerät automatisch ausschaltet. Drücken Sie die obigen Tasten bis die Angaben des gewünschten Zeitabschnitts zum automatischen Einschalten auf dem Fernbedienungsdisplay erscheinen. Anmerkungen: 1. - Page 62 Wasserbehälter nicht ausgeleert wird. Vor dem Wasserabzug aus dem Behälter, schieben Sie das Gerät nicht an die Seite, da das Wasser dann auslaufen kann. Schalten Sie das Klimagerät aus, indem Sie die ON/OFF Taste auf dem Bedienpanel oder Fernbedienung drücken.
-
Page 63: Aufbewahrung Und Wartung
AUFBEWAHRUNG UND WARTUNG WARTUNGSMETHODEN • Bevor Sie mit der Reinigung oder Wartung anfangen, schalten Sie das Gerät aus, indem Sie die Taste ON/OFF drücken, ziehen Sie dann den Netzstecker aus der Steckdose. • Um die Abdeckung des Gerätes zu reinigen, verwenden Sie kein Lösungsmittel. -
Page 64: Ende Des Gebrauchssaisons
ENDE DES GEBRAUCHSSAISONS Schalten Sie das Gerät aus und ziehen Sie den Netzstecker aus der Steckdose. Ziehen Sie den Wasserabzugskorken aus, um das Wasser in die Ablaufwanne auslaufen zu lassen, entfernen Sie den Rest des Wassers. Kippen Sie das Gerät zur Seite um sich zu versichern, dass es sich kein Wasser mehr in dem Behälter befindet. -
Page 65: Fehlerbehebung
FEHLERBEHEBUNG Bevor Sie sich mit unserem Service in Verbindung setzen, prüfen Sie die folgenden Beispiele nach. Prüfen Sie nach! Lösung PROBLEM Stecken Sie vorsichtig den Netzstecker in die Steckdose Ist der Netzstecker in und schalten Sie den Strom ein. - Page 66 Temperatur niedriger ein. Effizienz ist entfernen Sie die Hinderung. gewählt? niedrig. Ist der Abluftschlauch der Abluftschlauch sollte am blockiert? kürzesten sein und sollte auch Gibt es Biegungen im gerade gelegt werden. die Länge des Abluftschlauchs Abluftschlauch? ...
- Page 67 VORSICHT: In dem Kühlung-Modus ist der Kompressor eingeschaltet, wenn die gekühlte Luft durch den Auslass fließt und die Kompressor Diode auf dem Display leuchtet. In dem Trocknung – Modus, ist der Kompressor ständig in Betrieb und die Diode leuchtet die ganze Zeit.
- Page 68 Klimatyzator przenośny Arrifana 15 BAC-PO-0015-C06D Instrukcja obsługi ARRIFANA 15...
-
Page 69: Przepisy I Zasady Bezpieczeństwa
3. Wszystkie produkty marki Blaupunkt są starannie testowane przed sprzedażą. Po rozpakowaniu urządzenia należy sprawdzić, czy w dostarczonym zestawie znajdują się wszystkie jego części i akcesoria. W przypadku stwierdzenia uszkodzeń... - Page 70 6. Konieczne jest, aby urządzenie podłączyć do wydajnego systemu uziemienia. To oznacza, że gniazdko sieciowe, do którego podłączone jest urządzenie, powinno być połączone z systemem uziemiania. Elektryczny obieg prądu, do którego podłączone jest urządzenie powinien być...
- Page 71 Urządzenia nie powinny obsługiwać osoby, które nie posiadają odpowiedniej wiedzy na jego temat i nie zapoznały się z instrukcją obsługi. Dotyczy to w szczególności dzieci. 12. Aby podczas chłodzenia jak najszybciej osiągnąć docelową temperaturę, należy w klimatyzowanym pomieszczeniu zamknąć drzwi i okna oraz do minimum ograniczyć...
- Page 72 16. Urządzenie należy czyścić suchą i miękką ścierką. Jeżeli obudowa urządzenia jest mocno zabrudzona, można użyć ścierki nasączonej domowym środkiem czystości.
-
Page 73: Wstęp
WSTĘP Ten klimatyzator przenośny może zmienić temperaturę oraz wilgotność pomieszczenia. Posiada wiele funkcji chłodzenia, osuszania i wentylacji. Z łatwością może być przenoszony z pomieszczenia do pomieszczenia oraz z budynku do budynku. Temperatura powietrza w pomieszczeniu dla optymalnego działania urządzenia powinna wynosić... - Page 74 W TRYBIE CHŁODZENIA (COOLING MODE), klimatyzator nie zacznie chłodzić dopóki ustawiona temperatura nie będzie niższa niż temperatura pomieszczenia. W TRYBIE CHŁODZENIA, gdy temperatura pomieszczenia osiągnie ustawioną temperaturę, wentylator kontynuuje swoją pracę, a kompresor włącza się i wyłącza po to, aby utrzymać w pomieszczeniu ustawioną...
-
Page 75: Nazwa Każdej Części Oraz Jej Funkcja
NAZWA KAŻDEJ CZĘŚCI ORAZ JEJ FUNKCJA PRZÓD (Rys. 1) 1. Panel sterowania 2. Górne/dolne ręcznie ustawiane żaluzje wentylacyjne 3. Wylot powietrza 4. Lewe/prawe automatyczne żaluzje wentylacyjne 5. Kółko samonastawne 6. Kabel (kabel zasilania oraz wtyczka) Rys. 1 TYŁ (Rys. 2) 1. -
Page 76: Instalacja
INSTALACJA WYBÓR MIEJSCA INSTALACJI (Rys. 3) Umieść klimatyzator przenośny na powierzchni poziomej, tak aby dojścia i ujścia powietrza nie były niczym przykryte. Umieść urządzenie w odległości nie mniejszej niż 50 cm od ściany lub innych obiektów. Rys. 3 ELEMENTY INSTALACYJNE ŁĄCZNIK(WLOT WĘŻA) - Page 77 MONTAŻ WĘŻA WYDECHOWEGO, WLOTU WĘŻA, WYLOTU WĘŻA, ŁĄCZNIKA OKIENNEGO ORAZ SUWAKA WENTYLACYJNEGO. (Rys. 4) Rozciągnij każdy z końców węża wydechowego na długość ok. 8 cm przymocuj wlot i wylot węża do przeciwnych końców przykręcając wlot/wylot w kierunku zgodnym ze wskazówkami zegara (ok. 3, 4 obroty), upewniając się, że przewód węża jest mocno przymocowany do wlotu i...
- Page 78 MONTAŻ GOTOWEGO WĘŻA WYDECHOWEGO (Rys. 5) Uważaj żeby nie uszkodzić wlotu węża podczas przyczepiania/odczepiania go z tyłu urządzenia. Przesuń wlot węża (kwadratowy koniec), w kierunku wskazanym przez strzałkę, na wypustki umieszczone na kratce ujścia ciepłego powietrza z tyłu urządzenia.
- Page 79 Nigdy nie przenoś urządzenia poprzez ciągnięcie za węża wydechowego, przymocowanego do tyłu urządzenia. Nie przenoś klimatyzatora kiedy pracuje. Prawidłowy montaż węża wydechowego pokazany jest na rysunku poniżej. W przypadku montażu w ścianie, otwory powinny być na wysokości 40 i 130 cm. (Rys.
- Page 80 Nieprawidłowe lub nadmierne zgięcie węża wydechowego spowoduje nieskuteczne chłodzenie lub wadliwą pracę urządzenia. (Rys. 8) Rys. 8 INSTALACJA SUWAKA WENTYLACYJNEGO (Rys. 9, Rys. 10, Rys. 11, Rys. 12) Suwak wentylacyjny został tak zaprojektowany, aby pasować do większości standardowych „pionowych” i „poziomych” typów okien. Jednakże, możliwe, że koniecznym będzie modyfikacja niektórych aspektów instalacji dla pewnych...
- Page 81 Okno poziome Okno pionowe Długość suwaka wentylacyjnego Długość suwaka wentylacyjnego Min. 85cm Min. 85cm Max. 123cm Max. 123cm Rys. 9 Rys. 10 standardowa wysokość drzwi to 210 cm. Przerwa może być uszczelniona przy pomocy tektury lub taśmy izolacyjnej. Można również zakupić...
-
Page 82: Panel Sterowania
PANEL STEROWANIA A. Przycisk ON/OFF (włącznik/wyłącznik). B. Przycisk MODE – wybór trybu: chłodzenie, osuszanie lub nawie C. Przycisk FAN SPEED – wybór szybkości wentylatora: wysoka, średnia, niska lub automatyczna. D. Przycisk SWING – włącza lub wyłącza automatyczny nawiew lewy/prawy. -
Page 83: Obsługa Panelu Sterowania
OBSŁUGA PANELU STEROWANIA Proces chłodzenia jak i osuszania odbywa się w przedziale od 18C do 35C. Urządzenie powinno być używane w temperaturze otoczenia nia nie wyższej niż 40ºC Jeśli urządzenie jest wyłączone podczas chłodzenia bądź osuszania i od razu uruchomione ponownie, pozostanie ono w stanie spoczynku co najmniej przez 3 minuty zanim kompresor uruchomi się... - Page 84 Aby wybrać szybkość wentylatora, naciskaj przycisk FAN SPEED kilkakrotnie do czasu aż odpowiednia szybkość zostanie wybrana (wysoka, średnia, niska, automatyczna). Automatyczna szybkość wentylatora dopasowuje swoją szybkość do ustawionej temperatury oraz temperatury panującej w pomieszczeniu. Panel sterowania wyświetli ustawioną temperaturę.
- Page 85 MED, LOW). Automatyczna szybkość wentylatora (AUTO) nie może zostać wybrana w trybie wentylatora. UWAGA: W trybie wentylatora, wąż wydechowy nie musi być podłączony. USTAWIENIA MINUTNIKA (TIMER) Minutnik może opóźniać uruchomienie lub zakończenie pracy urządzenia. To powoduje uniknięcie nadmiernego zużycia prądu, poprzez optymalizowanie czasu działania.
-
Page 86: Obsługa Pilota
Ustaw czas pozostały do uruchomienia urządzenia, przy użyciu przycisków INCREASE i DECREASE (od 30 minut do 24 godzin). Przez pierwsze 10 godzin możesz ustawić przerwy półgodzinne, dla czasu powyżej 10 godzin możesz ustawić przerwy godzinne. Naciśnij przycisk TIMER ponownie, aby potwierdzić ustawienia minutnika, gdy DIODA MINUTNIKA jest podświetlona i miga minutnik jest aktywny. - Page 87 Temperatura podawana jest w stopniach Celsjusza Temperatura podawana jest w stopniach Fahrenheita. COOL Pilot obsługuje tylko tryb chłodzenia. HEAT Pilot obsługuje tylko tryb grzania. (Tryb grzania jest niedostępny dla tego modelu) 4. UWAŻAJ: Po zmianie funkcji musisz wyciągnąć baterie z urządzenia oraz powtórzyć...
-
Page 88: Funkcje Pilota Zdalnego Sterowania
FUNKCJE PILOTA ZDALNEGO STEROWANIA Przycisk Funkcja Zwiększenie docelowej temperatury oraz czasu zegara. Zmniejszenie docelowej temperatury oraz czasu zegara. ON/OFF Włącza/Wyłącza urządzenie. Ustawia prędkość wentylatora: LOW(niska), MID(średnia), HIGH (wysoka). TIMER Ustawia czas automatycznego włączenie/wyłączenia urządzenia. SLEEP NIEDOSTĘPNA DLA TEGO URZĄDZENIA CLOCK Pozwala ustawić... -
Page 89: Wyświetlacz Na Pilocie
SUPER/TURBO Uruchamia funkcję szybkiego schładzania. SWING Uruchamia opcje nawiewu. WYŚWIETLACZ NA PILOCIE Znaczenie symboli na pilocie: Symbol Meaning Tryb pracy FEEL (niedostępny dla tego urządzenia) Chłodzenie Osuszanie Wentylacja Grzanie (niedostępne dla tego modelu) ARRIFANA 15... -
Page 90: Obsługa Pilota Zdalnego Sterowania
Odbiór sygnału pilota Automatyczne wyłączanie Automatyczne włączanie Prędkość wentylatora Niska prędkość wentylatora Średnia prędkość wentylatora Wysoka prędkość wentylatora Funkcja snu (niedostępna dla tego modelu) SWING (Nawiew) Szybkie schładzanie Wskaźnik baterii Czas zegarowy OBSŁUGA PILOTA ZDALNEGO STEROWANIA TRYB CHŁODZENIA ... - Page 91 UWAGA: W trybie chłodzenia, urządzenie automatycznie usuwa nadmiar wilgoci z powietrza. UWAGA: W trybie chłodzenia, wąż wydechowy musi być podłączony do urządzenia w celu odprowadzenia ciepłego powietrza z ochładzanego pomieszczenia. TRYB OSUSZANIA Podczas używania urządzenia jedynie jako osuszacza, wąż wydechowy musi być...
- Page 92 ZEGAR – Ustawienia czasu zegarowego Aby ustawić czas zegarowy, należy nacisnąć przycisk CLOCK. Na wyświetlaczu zaczynają migać dane czasu. Następnie naciskając przyciski lub można zwiększać lub zmniejszać cyfrę minut (+/- 1 minuta) i w ten sposób ustawić...
-
Page 93: Metody Odprowadzania Wody
PROGRAMOWANIE TIMERA Używając czasomierza można tak zaprogramować klimatyzator, aby włączył lub wyłączył się samoczynnie po upływie ustalonego okresu czasu. Aby ustawić czas automatycznego wyłączenia urządzenia TIMER OFF, należy. Podczas pracy urządzenia nacisnąć przycisk TIMER i naciskając lub , ustawić... - Page 94 że zbiornik wodny nigdy się nie przepełnia. Zostało to sprawdzone przez niezależne badania przeprowadzone w Australii oraz na terenach nadmorskich, gdzie panują niezwykle wilgotne warunki. Opróżnienie zbiornika wody będzie tylko potrzebne na koniec sezonu użytkowania (czyt. koniec sezonu użytkowania).
-
Page 95: Utrzymanie I Koserwacja
UTRZYMANIE I KOSERWACJA METODY KONSERWACJI Przed czyszczeniem lub konserwacją, wyłącz urządzenie, naciskając przycisk ON/OFF, następnie wyjmij wtyczkę z gniazda zasilania. Nie używaj chemicznych rozpuszczalników, aby wyczyścić powierzchnię urządzenia. Nie pryskaj środkami owadobójczymi lub podobnymi w pobliżu urządzenia. -
Page 96: Koniec Sezonu Użytkowania
KONIEC SEZONU UŻYTKOWANIA Wyłącz urządzenie oraz odłącz wtyczkę kabla od źródła zasilania. Wyjmij wtyczkę z otworu odpływu, aby odprowadzić wodę do naczynia odprowadzającego, a następnie wylej wodę. Przechyl urządzenie, trzymając je z przodu, aby upewnić się, że w zbiorniku wodnym nie ma już... -
Page 97: Rozwiązywanie Problemów
ROZWIĄZYWANIE PROBLEMÓW Przed udaniem się do punktu naprawy lub centrum serwisowego, sprawdź następujące rzeczy. Problem Sprawdź! Działanie czy wtyczka prądu ostrożnie włóż wtyczkę do gniazda Do klimatyzatora dochodzi zmiennego jest włożona do zasilania, a następnie włącz prąd ... - Page 98 czy wąż wydechowy jest usuń rozciągnięcie, długość węża nadmiernie wygięty? powinna zawsze wynosić mniej niż czy wąż wydechowy jest 1,5 m podłącz węża rozciągnięty powyżej 1,5 m? czy wąż wydechowy jest ...
- Page 99 AUTODIAGNOZA Urządzenie posiada system zdolny do autodiagnozy , który ma na celu wykrywanie nieprawidłowości. Postępuj zgodnie z następującymi wytycznymi w razie pojawienia się któregoś z tych kodów Gdy urządzenie pracuje w trybie osuszania, ten (NISKA mechanizm zapobiega tworzeniu się lodu.
- Page 100 WEE SIGN Deutsch (DE): Entsorgung von Elektrogeräten durch Benutzer in privaten Haushalten in der EU. Dieses Symbol auf dem Produkt oder dessen Verpackung gibt an, dass Produkt nicht zusammen mit dem Restmüll entsorgt werden darf. Es obliegt daher Ihrer Verantwortung, das Gerät an einer entsprechenden Stelle...
- Page 101 électriques et électroniques sur la base de la directive 2002/96/CE, les piles et accumulateurs sont extraits des déchets d’équipements électriques et électroniques collectés. Italiano (IT): Smaltimento di apparecchiature da rottamare da parte di privati nell’Unione Europea.
- Page 102 Brugere af elektrisk og elektronisk udstyr må ikke bortskaffe affald af elektrisk og elektronisk udstyr sammen med husholdningsaffald. Brugere skal benytte de kommunale indsamlingsordninger for at mindske den miljømæssige belastning i forbindelse med bortskaffelse af affald af elektrisk og elektronisk og øge mulighederne for...
- Page 103 återvinns på rätt sätt. Kommunala myndigheter , sophanteringsföretag eller butiken där varan köptes kan ge mer information om var du lämnar kasserade produkter för återvinning. När batterier eller ackumulatorer samlas in tillsammans med WEEE i enlighet med direktiv 2002/96/EG, skall batterier eller ackumulatorer avlägsnas från insamlade WEEE.
- Page 104 El reciclaje y la recolección por separado de estos residuos en el momento de la eliminación ayudará a preservar recursos naturales y a garantizar que el reciclaje proteja la salud y el medio ambiente.
-
Page 105: Nomenclature
NOMENCLATURE C06D AC: Air PO: Portable Heating Cooling Internal Blaupunkt Conditioner capacity: capacity: number in kBTU/h in kBTU/h KUNDENHOTLINE ARRIFANA 15...
Need help?
Do you have a question about the Arrifana 15 BAC-PO-0015-C06D and is the answer not in the manual?
Questions and answers