Advertisement
Quick Links
Wireless Viewfinder &
Trigger System
for DSLR Cameras
USER GUIDE
Questions?
If you still have questions
Need some help?
call our support line:
1-800-226-6534
These instructions will help you
enjoy your new product
Distributed by: C&A Licensing LLC
Polaroid and Polaroid & Pixel are trademarks of PLR IP Holdings, LLC, used under license. All other
2 Bergen Turnpike, Ridgefield Park, NJ 07660
trademarks are the property of the respective owner, who has not sponsored, endorsed or approved
this product. PLR IP Holdings, LLC does not manufacture this product or provide any Manufacturer's
© 2012 All Rights Reserved
Warranty or support.
MADE IN CHINA
For warranty information and technical support please call
Product features, specifications and appearances
are subject to change without notice.
1-800-226-6534 or visit www.polaroid.com
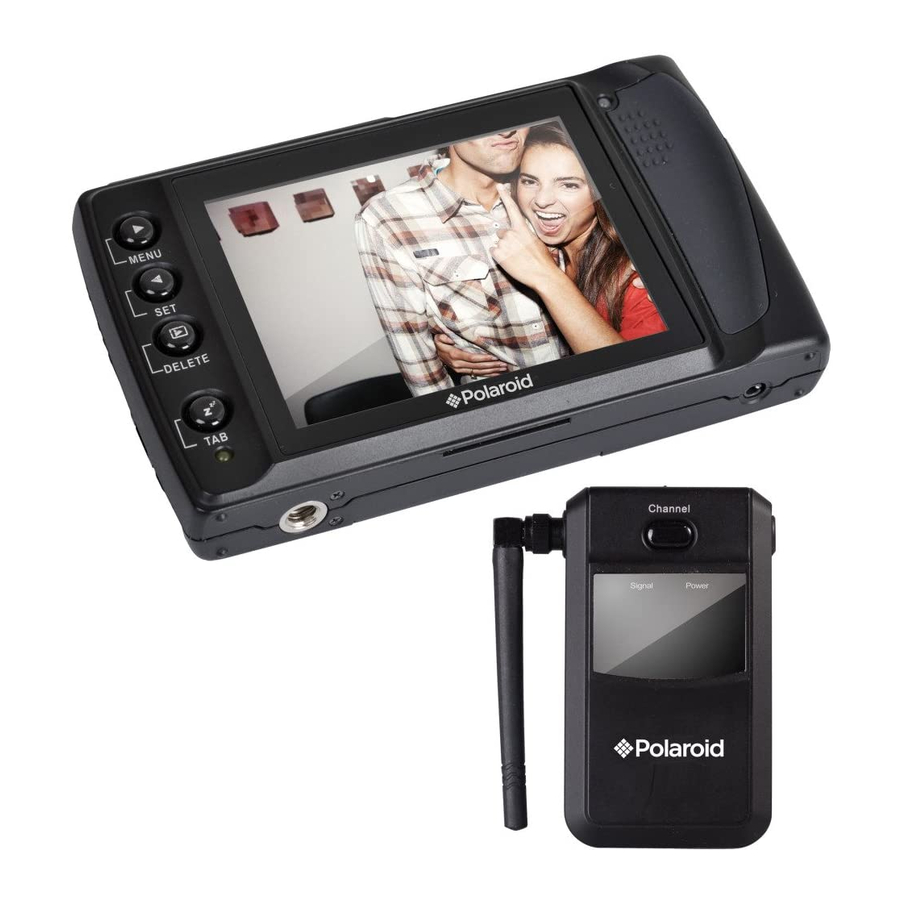
Parts Familarization
Wireless Viewing Screen (Transmitter)
1
2
7
3
4
5
8
6
Accessories
10
9
12
14
11
Screen Buttons
Wireless Viewing Screen (Receiver)
Welcome
Thank you for your purchase of the Polaroid DSLR Wireless Viewfinder System. With it, you'll
be able to see what the camera sees and control its shutter at distances up to 300 feet away.
In addition, you'll be able to control up to four cameras at a time and for some models, you'll
be able to take command of the video recording feature.
With the portable viewing screen, you'll be able to see what's displayed on your camera's
external viewing screen. If your camera has only an eye-level viewfinder, don't worry, the
Polaroid transmitter has a built-in camera which will still let you see your subject.
Features
• Hand-held live-view wireless receiver
• Remote transmitter with 300-ft range
• Transmitter with built-in camera
• Monitor 4 cameras at once
• Digital signal transfer technology
• Built-in memory and playback
• 3.5"-TFT-LCD w/320x240 pixels
• Easy mounting sunscreen hood
• 2.4GHz signal with strong resistance to interference
• Video start and stop control*
or visit us at
www.polaroid.com
*only used for select Canon model cameras.
Battery Setup & Charging
Wireless Viewing Screen (Receiver)
1 Remove the battery cover by pressing in on the arrow
while sliding the cover downward.
1 Power switch
2 Hot-shoe mount
2 Insert the battery being certain to align the polarity
3 Charge indicator
markings (+ and -) on the battery with those inside
4 Mini USB socket
the battery compartment.
5 Infrared socket (IR)
3 Replace the battery cover.
6 Camera socket
7 Battery cover
Wireless Transmitter
8 Battery compartment
1 Press inward on the Release Tab while grabbing hold
9 Sunscreen
of the Hot-Shoe mount, and then slide the cover off the
10 Batteries (2) NP-60
transmitter body.
11 Wall Charger
12 Data Cable (See Cable
2 Be certain to align the polarity markings (+ and -) on
Compatibility Chart)
the battery with those inside the battery compartment.
13 USB cable
3 Replace the battery cover.
14 AV-out cable
15 IR cable (Canon DSLR
Charging (transmitter or receiver)
cameras only)
1 Turn off the Power Switch.
13
2 Connect the mini USB cable via the USB socket to the unit to be charged and connect the full-
size USB connector to the Wall Charger. Insert the Wall Charger into a 120-V outlet. Charge until
the red indicator light turns off. Max charge may take 2.5-hr.
15
Screen Adjustments
Brightness
1 Press the "Menu" button and navigate to Brightness (five levels total).
2 Press the "Set" button to adjust brightness. Each level increases brightness by 20%.
Contrast
1 Press the "Menu" button and navigate to Contrast.
2 Press the "Set" button to adjust contrast. Each level increases contrast by 20%.
Signal Matching
One viewing receiver can control each of four cameras by switching signals amongst four different
transmitters mounted on the cameras. In order to do this, you must match the s ignals coming from
each transmitter.
1 Power on receiver, press "Menu" button and navigate to "Channel. " The default signal is one.
2 Press the "Set" button to switch between different signals.
3 Once your signal is chosen, fully press the "Shutter" button on the receiver. The shutter indicator
light will flicker and then stop after a few seconds.
4 Press the "Channel" button on transmitter while the receiver's shutter indicator light is flickering
or after it stops.
5 The signal light will start to flicker. When it stops, it is successfully matched with the receiver.
6 The signal will be matched successfully when the receiver's signal intensity indicator changes
from an "x" to
View Mode
1 "Mini" mode relies on the transmitter's internal camera for live-view. It provides a 35mm angle
of view. The image shown on the receiver's LCD is only what the internal camera captures, not
your DSLR. However, if your camera lens is set to 35MM, it should be roughly equivalent to the
image shown on the screen.
Transmitter Body
Battery
Cover
Release Tab
.
Parts Familarization
Wireless Viewing Screen (Receiver)
Bottom
3
4
1
2
Top
1 AV out socket
2 Tripod socket
3 Power switch
4 Shutter release
5 Menu button
6 Set button
7 Delete button
8 Tab button
9 Sleep indicator
13
10 Shutter indicator
11 Battery cover
14
12 Air vent
13 USB socket
14 Charge indicator
On Screen Information
Wireless Viewing Screen (Receiver)
NP-60
Battery
2 "LV" is live-view mode. The images shown on the viewing screen are exactly what your DSLR
will capture.
NOTE: The default view mode is "Mini. " Press the "Set" button to change to "LV" mode.
Functions and Operation
Setup
1 Connect the transmitter to the camera's hot shoe.
2 Connect the single end of the appropriate cable to the transmitter's camera socket. Connect the
twin end to the camera's AV-Out and remote shutter release sockets.
3 Switch on the transmitter and receiver.
Front
5
Viewing Screen
6
7
8
9
10
4
11
12
Back
Advertisement

Related Manuals for Polaroid PL-LCDWRNK


Summary of Contents for Polaroid PL-LCDWRNK
- Page 1 10 Shutter indicator Distributed by: C&A Licensing LLC Polaroid and Polaroid & Pixel are trademarks of PLR IP Holdings, LLC, used under license. All other 11 Battery cover 2 Bergen Turnpike, Ridgefield Park, NJ 07660 trademarks are the property of the respective owner, who has not sponsored, endorsed or approved this product.
- Page 2 5. Mail to: C&A Licensing LLC, 2 Bergen Turnpike, Ridgefield Park, NJ 07660 1100D(T3) -You may also visit www.polaroid.com for further assistance if necessary or call our technical support department toll free at 1-800-226-6534 • This device contains small parts which may pose a choking hazard. Consult a physician...
Need help?
Do you have a question about the PL-LCDWRNK and is the answer not in the manual?
Questions and answers