
Related Manuals for Philco PWN07CRB-D15


Summary of Contents for Philco PWN07CRB-D15
- Page 1 Remote Control Model: PWN07CRB-D15, PWN09CRB-D15 PWN12CRB-D15, PWN18CRB-D15 Mechanical Model: PWN07CMB-D, PWN09CMB-D, PWN12CMB-D PWN18CMB-D, PWN24CMB-D, PWN07CMB-D15 PWN09CMB-D15, PWN12CMB-D15, PWN18CMB-D15...
-
Page 3: Table Of Contents
CONTENTS Our design is based on the best efficiency and the lowest noise operation and it can keep the room comfortable. Please read this operating manual carefully before operating the unit and keep it for consultation. Str uctur e mechanism and Installation Function Operating condition Power requirement... -
Page 4: Function
Function Introduction Autumn Spring Window type room air conditioners can regulate the room Summer Winter Room temperature and dry the room. It is convenient for your work,study temp. and life. It can be widely used in residence, shop, hotel, office, library and laboratory, and so on. -
Page 5: Operating Condition
Operating Condition Please operate air conditioner in the correct conditions as following. DRY mode operation COOL mode operation Outdoor temperature should be in range of 18 Outdoor temperature should be in range of 18 to 43 , to 43 , otherwise it is possible for air conditioner otherwise it is possible for air conditioner to breakdown. -
Page 6: Installation
Installation Installation precaution: Window type conditioner is so valuable and the improper installa- tion of it will cause a lot of damage! Please associate the profes- sional technician to install the unit and don’t install it by yourself. Otherwise, we are not responsible for the damage like this. Location: The condensation water must be drained away conveniently. -
Page 7: Installation Procedure
Installation procedure: Horizontal line 1) Remove the sticker from the front panel. 2) Put the unit into the installation hole. When installing the unit, it should be slanted down to the back to avoid the enlargement of noise or vibration. (Slant between 6-10mm.) (Shown at right figure.) The installation place should be strong enough to avoid the enlargement of noise or vibration. - Page 8 Drain water for one style: To get the maximum cooling efficiency,the air conditioner is designed to splash the condensate on the condenser coil. If the splashing sound annoys you, you can provide an outside drain by using the following procedure, which may however cause a small loss of performance.
-
Page 9: Notes For Installation
Notes for installation Remove Before removing air conditioner to the other place, you should contact the seller firstly. Then it must be done under the direction of the professional technician. In addition, the charge of this must be paid. Noise Install in a location where is firm enough to avoid the enlargement of noise and vibration. -
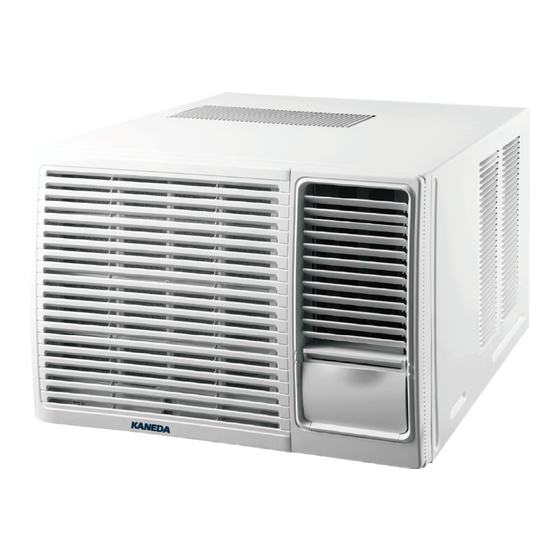
Page 10: Part Identification
Parts identification Mechanical Model Panel outlook picture, just for reference, please take the real unit as standard. Cabinet Air inlet louver Front grille Front intake grille Power cord Air filter Control panel (behind the front intake grille) Remote Control Model Panel outlook picture, just for reference, please take the real unit as standard. -
Page 11: Main Switch Operation Procedure
Main switch operation procedure (Applicable to Mechanical Models ONLY) 1.Main Control Knob Set to Low Cool,Med Cool or High Cool as desired (FAN setting operates the fan only.) CAUTION:If the main control knob is turned off changed to a fan setting from a cooling operation setting, WAIT at teast 3 minutes before resetting to cooling operation. -
Page 12: Operation Of Wireless Remote Control
Operation of wireless remote control (Applicable to Remote Control Models ONLY) Name and function of wireless remote control Note: Besure that there are no obstructions between receiver and remote controoler; Don't drop or throw the remote control; Don't let any liquid in the remote control and put the remote control directly under the sunlight or any place where is very hot. - Page 13 Name and function of wireless remote control Note: This wireless remote control is universal, andit could be used for many units, some buttons of this control which are not available to this unit will not be described below. button Presetting temperature can be increased. Press this button, the temperature can be set up, continuously press this button and hold for two seconds, the relative...
- Page 14 Name and function of wireless remote control Note: This wireless remote control is universal, and it could be used for many units, some buttons of this control which are not available to this unit will not be described below. TIMER ON TIMER ON BUTTON At unit off, press Timer On button, "HOUR ON"...
- Page 15 Guide for operation- general operation 1. After powered on, press ON/OFF button, the unit will start to run. (Note: When it is powered on the guide louver of main unit will close automatically.) 2. Press MODE button, select desired running mode. 3.
-
Page 16: Changing Batteries And Notices
About switch between Fahrenheit and Centigrade Under status of unit off, press MODE and - buttons simultaneously to switch Changing batteries and notices Slightly to press the place with , along the arrowhead direction to push the back cover of wireless remote control. - Page 17 Remote control panel Note: If wireless remote controller is lost, open the surface panel and operate manually. POWER BUTTON SIGNAL RECEIVER Operation starts when pressing this button, and stops when pressing this button again. MODE BUTTON SWING BUTTON Select the operation mode, or AUTO,COOL,FAN, DRY. Activate the automatic air swing function.
-
Page 18: Operation Tips
Operation Tips Operation for comfort and economy Do not overcool the room Keep blind or curtains closed. Keep the room temp. uniform. temperature. This is not good Do not let sunshine enter the Adjust the vertical and horizon- for health and wastes electricity. room directly when the air con- tal airflow direction to ensure a dition is in operation. -
Page 19: Caution
Caution Operations for safety and health 1) The plug must be accessible after the appliance is positioned. 2) Do not use this appliance in the laundry. 3) If the power cord is damaged, it must be replaced by the manufacture or its service agent in void of hazard. Do not pull out the power cord. -
Page 20: Care And Maintenance
Care and maintenance Always turn off the air conditioner and main power supply before cleaning to ensure safety. Cleaning unit 1. Cut power off before cleaning. Air filter The air filter behind the intake grille should be washed at least Plug out only after once every two weeks or as often as it needs cleaning. -
Page 21: Trouble Shooting Guide
Trouble shooting guide Please check the following items before asking for repair,it saves your time and money. Fault phenomenon Trouble-shooting * Is there a power failure? * Is the plug out? Air conditioner dose not * Is power fuse or switch off ? operate at all. -
Page 22: After Service
*Carelessly splash water or something into air conditioner; *Electrical lines are much hot or lines cover breaks; *Other strange situations. After service If your air conditioner has the questions of quality or anything else, please contact the service center of Philco. - Page 24 66129914156...
Need help?
Do you have a question about the PWN07CRB-D15 and is the answer not in the manual?
Questions and answers