Advertisement
Available languages
Available languages
FeAtUReS
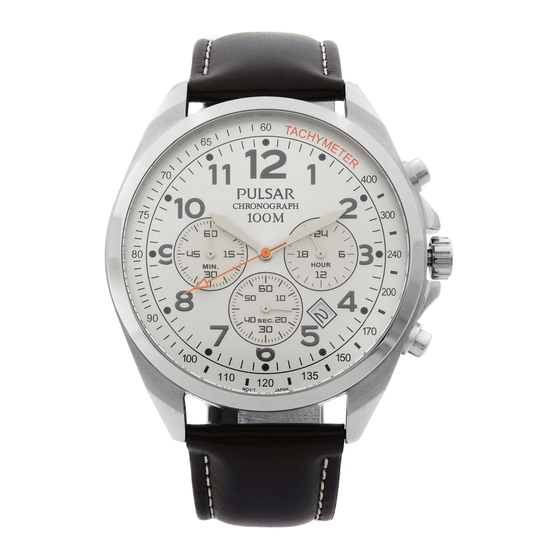
1. Time display with Hour, Minute and Second Hands.
2. One hour Stopwatch (Chronograph) with Seconds and
Minutes Hand display
3. 24-Hour Hand.
4. Date Display (On some models).
BEFORE USING THIS WATCH
StoPWAtCH HAND ADJUStMeNt
1. Refer to the diagram. Notice the small dial on the bottom
and the small dial on the left side. These are the stopwatch
hands. The bottom dial shows elapsed seconds (0-60) and
the dial on the left shows elapsed minutes (0-60). These
hands are synchronized with each other. They must be
programmed to start at the "zero" or 12 o'clock position
before the stopwatch can be used.
2. Pull the crown to the position "3". Push and hold buttons
"A" and "B" simultaneously for two seconds, then release.
The stopwatch second hand (bottom small dial) will move
backwards for one half turn and then forward for one half
turn. This will electronically reset
3. With the crown still in position "3", push either button A
or B to position the stopwatch second hand. Button "A"
will move the hand backwards (counter-clockwise). Button
"B" will move the hand forward (clockwise). Each push of
the buttons will move the hand one step — if the button is
held "in" the hand will move rapidly.
4. Remember, the stopwatch second and minute hands are
synchronized with each other. For each revolution of the
second hand, the minute hand will move one minute. Both
hands must be positioned at the zero or 12 o'clock posi-
tion.
SettING tHe tIMe
With the crown still in position "3", turn the crown to set the
hands to the desired time. We suggest moving the hands to
approximately 5 minutes past the correct time — then back-
wards to the correct time. The 24 hour hand is permanently
synchronized with the hour/minute hands. When setting the
hands, check the 24 hour dial (on the right side of the watch
— see diagram). AM time is 0-12 Hours on this dial, PM time
is 13-24 hours on this dial (24:00 hours is midnight). After the
time is set, push the crown back to position "1".
SettING tHe DAte
1. Pull the crown to position "2" (See diagram).The watch will
continue to run. Turn the crown away from you to advance
to the current date.
STOPWATCH VD53/54
BOOK NO. 537
2. Once the date is set, push the crown back to position "1".
Note: Do Not set the date as above between the hours of
9:00 pm and 1:00 am. This may cause the date to be incor-
rect and the date will have to be reset later.
USING tHe StoPWAtCH/ SPLIt tIMe
1. Insure that the stopwatch hands have been properly ad-
justed (see section "Before Using This Watch", above).
2. Push the "A" button to start the stopwatch. Push "A" but-
ton again to stop.
3. Push the "B" button and the stopwatch hands will aut-
matically return to the "0" or starting position.
4. For "SPLIT" time measurement — With the stopwatch run-
ning, push button "B". The hands will stop moving, but the
watch will keep the stopwatch time internally. Push "B"
again and the hands will catch up to the actual elapsed
time.
eLeCtRoNIC ReSet FoR StoPWAtCH
If for any reason, the stopwatch behaves erratically, it can be
electronically reset as follows:
1. Pull the crown to position "3".
2. Push buttons "A" and "B" simultaneously for two seconds,
then release.
3. The stopwatch second hand will move backwards for 1/2
revolution then forward 1/2 revolution.
4. Reset the hands to "0" following the above instruction:
"Stopwatch Hand Adjustment", steps #2 through #4.
5. Push the crown back in.
Watch Setting Guide
Page 1 of 7
04/2013
Advertisement
Table of Contents

Related Manuals for Bulova VD53


Summary of Contents for Bulova VD53
- Page 1 Page 1 of 7 Watch Setting Guide STOPWATCH VD53/54 BOOK NO. 537 FeAtUReS 2. Once the date is set, push the crown back to position “1”. 1. Time display with Hour, Minute and Second Hands. Note: Do Not set the date as above between the hours of 2.
- Page 2 Page 2 of 7 Watch Setting Guide STOPWATCH VD53/54 BOOK NO. 537 CARACtÉRIStIqUeS ReGLAGe De LA DAte. 1. Affichage de l’heure avec aiguilles des heures, des minutes 1. Tirez la couronne en position “2” et tournez la couronne et des secondes.
- Page 3 Page 3 of 7 Watch Setting Guide STOPWATCH VD53/54 BOOK NO. 537 PRoDUktMeRkMALe lung “1” ein. eINSteLLeN DeS DAtUMS 1. Zeitanzeige mit Stunden-, Minuten- und Sekundenzeiger. 2. Stoppuhr (Chronograph) mit 1-Stunden Messfunktion, 1. Ziehen Sie die Krone in die Stellung “2” heraus (siehe Diag- Sekunden- und Minutenzeiger ramm).
- Page 4 Page 4 of 7 Watch Setting Guide STOPWATCH VD53/54 BOOK NO. 537 FUNZIoNI IMPoStAZIoNe DeLLA DAtA 1. Display orario con lancette ore, minuti e secondi. 1. Tirare la corona fino a collocarla in posizione “2” (Vedi 2. Cronometro orario con display lancette minuti e secondi diagramma).
- Page 5 Page 5 of 7 Watch Setting Guide STOPWATCH VD53/54 BOOK NO. 537 FUNçõeS CoMo AJUStAR A DAtA 1. Mostrador de tempo com ponteiros de horas, minutos e 1. Puxe a coroa para a posição “2” (veja o diagrama).O reló segundos.
- Page 6 Page 6 of 7 Watch Setting Guide STOPWATCH VD53/54 BOOK NO. 537 CARACteRíStICAS manecillas, examine la carátula de 24 horas (al lado derecho del reloj – véase la gráfica). Las horas 0-12 en esta carátula 1. Visualización de la hora con manecillas de la hora, de los corresponden a las horas de la a.m., las horas 13-24 en esta...
- Page 7 Page 7 of 7 Watch Setting Guide STOPWATCH VD53/54 BOOK NO. 537 FUNCtIeS De DAtUM INSteLLeN 1. Tijdweergave met uur-, minuut- en secondewijzer. 1. Trek het instelknopje in positie 2 (zie diagram). Het horloge 2. Stopwatch (chronometer) met tijdweergave met minuut- en blijft lopen.
Need help?
Do you have a question about the VD53 and is the answer not in the manual?
Questions and answers