Table of Contents
Advertisement
Advertisement
Table of Contents

Related Manuals for Crypto ReDi 40 MP


Summary of Contents for Crypto ReDi 40 MP
-
Page 2: Table Of Contents
ReDi 40 MP User Manual Table of Contents 1. INTRODUCTION ..............5 2. SYSTEM CONNECTION ............8 3. GETTING STARTED..............9 4. OPERATION ................11 5. EDIT CHANNEL..............12 6. SYSTEM SETUP ..............13 7. TOOLS ..................16 8. GAME..................20 9. REC..................20 10. -
Page 3: Safety Information
ReDi 40 MP User Manual SAFETY INFORMATION This sheet lists important safety information that will help to assure proper use of the product. Please read them carefully before operation of your product. TO REDUCE THE RISK OF FIRE AND ELECTRIC SHOCK, DO NOT EXPOSE THIS UNIT TO RAIN OR MOISTURE. - Page 4 ReDi 40 MP User Manual This Receiver has been manufactured to satisfy international safety standards. Please read the following recommended safety precautions carefully. MAINS SUPPLY: AC220-240V ~ 50/60Hz Do not overload wall outlets, extension cords or adapters as this can result OVERLOADING: in fire or electrical shock.
-
Page 5: Introduction
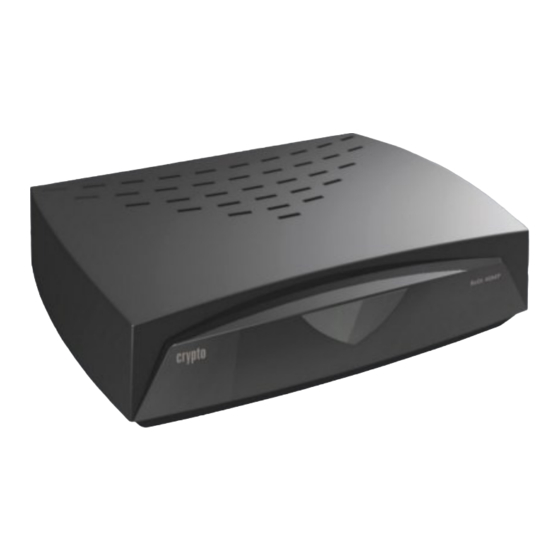
ReDi 40 MP User Manual 1. INTRODUCTION Main Unit 1. USB 2. RF OUT 3. RF IN 4. Scart 5. Power Input Korinthou 11, 14451 Metamorfosi Τel: 210-8098700, Fax: 210-6122512 Site: www.crypto.gr, Email: crypto@crypto.gr... -
Page 6: Remote Control
ReDi 40 MP User Manual Remote control 1. NUMERIC ENTRY 2. MENU 3. CH+ 4. VOL - /LEFT 5. OK 6. PAGE UP 7. CH- 8. TV/RADIO 9. INFO 10. AUDIO 11. SUB-T 12. PLAY 13. PAUSE 14. RED BUTTON/FB 15. - Page 7 ReDi 40 MP User Manual 21. PAGE DN 22. FAV 23. EPG 24. TTX 25. RECORD 26. STOP 27. BLUE BUTTON/PVR 28. YELLOW BUTTON Loading batteries to the remote control 1. Pull the battery compartment stock. 2. Load one button battery into the battery compartment.
-
Page 8: System Connection
ReDi 40 MP User Manual The remote control transmits a directional infrared beam. Be sure to aim the remote control directly at the infrared sensor of the unit during operation. If the sensor has been covered or there is a large object between the remote control and the sensor, the sensor will not respond. -
Page 9: Getting Started
3. GETTING STARTED Welcome Srceen If you use ReDi 40 MP for the first time, the "Welcome" menu appears. Press cursor button to setup the Region, Language, Display Mode and Aspect Mode. Highlight "OK" and press the "OK" button to start channel search. -
Page 10: Channel Scan
ReDi 40 MP User Manual 3.2.2 Channel Scan 1. Select "Channel Scan", press the "OK" button to enter the Channel Scan menu. 2. Press cursor button to set Scan mode, Scan Band, Channel No., Frequency and Bandwidth, then highlight "Search", press "OK" button to start channel scan . -
Page 11: Operation
ReDi 40 MP User Manual 4. OPERATION Changing Channels There are three ways of channel selection - stepping through the channel list, selection by number and from the on-screen channel list. 1. Stepping through the channel list: To move through the channel list, press the upward arrow or downward arrow key on the remote control. -
Page 12: Edit Channel
ReDi 40 MP User Manual 5. EDIT CHANNEL Edit Channel menu 1. Press the "MENU" button to enter main menu. 2. Press "UP" or "DOWN " button to highlight "Edit Channel", press "RIGHT" button to enter the Edit Channel menu. -
Page 13: System Setup
ReDi 40 MP User Manual Delete All 1. In the Edit Channel menu, select "Delete All", press "OK" button. 2. A warning window appears. Select "Yes", press "OK" button to delete all channels. Select "No", Press "OK" button to cancel deleting. -
Page 14: Local Time Setting
ReDi 40 MP User Manual TV System This menu allows us to set Display Mode, Aspect Mode, Video Output and Digital Audio Output. Display Mode: PAL/NTSC Aspect Mode: Auto/4:3PS/4:3LB/16:9 Video Output:: CVBS/RGB Local Time Setting This menu allows you to set the region and time. -
Page 15: Parental Lock
ReDi 40 MP User Manual Parental Lock This menu allows you to protect the installation menu and channel, and change the Password. 1. In "System Setup" menu, select "Parental Lock" and press "OK" button, you are asked to input a password (the default password is"0000"). -
Page 16: Tools
ReDi 40 MP User Manual Favorite This menu allows you to rename the favorite group. 1. In Channel menu, select "Favorite", press "OK" button to enter Favorite menu. 2. Select desired group, press "OK" button to open the screen keypad. Input a letter and a number one by one by pressing the cursor button and press "OK"... -
Page 17: Receiver Information
ReDi 40 MP User Manual Receiver Information This menu can display some parameters of bootloader, maincode, radioback, countryband and userdb information. 1. In "Tools" menu, select "Receiver Information", press "OK" button to open receiver information window. 2. Press "EXIT" button to exit. -
Page 18: Usb Device
ReDi 40 MP User Manual 7.5 USB Device This function allows you to play files from USB port. 1. In "Tools" menu, select "Media+", press "OK" button to enter Media Player menu. 2. Press "UP" or "DOWN" cursor button to select a desired item, and press "OK" button to play the desired files. -
Page 19: Remove Usb Device Safely
ReDi 40 MP User Manual · Yellow Key: The “Please select play list type” operation window will be shown by pressing Yellow key. After that, the user can play the image or music by choosing the files. If here is no file in the directory, an operation window “This type of play list doesnot exist”... -
Page 20: Game
ReDi 40 MP User Manual 8. GAME Game This menu allows you to play games. 1. Press the "MENU" button to enter main menu. 2. Press "UP" or "DOWN" button to highlight "Game", press "RIGHT" button to enter the Game menu. -
Page 21: Record Manager
ReDi 40 MP User Manual Record Manager This menu allows you to play the recorded files. 1. In "REC&MEDIA" menu, select "Record Manager" and press "OK" button to enter Record Manage menu. 2. Press "UP" or "DOWN" cursor button to select a desired item, and press "OK" button to play the desired files. -
Page 22: Timeshift/ Record
10.1 Time shift The digital receiver ReDi 40 MP gives you the ability to record and watch one program interfacing with the viewing time. All you have to do is to connect an external hard drive or a USB stick in the usb port of the device. - Page 23 ReDi 40 MP User Manual - Press "PAUSE" to pause the program and <PLAY> to continue watching later. - Press "STEP FORWARD" or "FORWARD" to fast forward the recorded program at specified time steps according to “Jump” settings(30 Mon - 30 minutes) or at 2χ, 4x, speed etc respectively.
- Page 24 ReDi 40 MP User Manual start writing. Duration: Press OK and then the numbers to enter the duration of the recording To see all the programs you have recorded press : 1. Menu <Rec&Media> select “Record Manager” press OK. 2. Press the Up and Down arrow keys to select the desired entry and press the OK to play the file.
-
Page 25: Troubleshooting
ReDi 40 MP User Manual 11. TROUBLESHOOTING In some region, the digital terrestrial signal may be weak. So you'd better use an antenna with builtin signal booster. Problem Possible cause What to do Check mains lead. Mains lead unplugged. Check fuse. -
Page 26: Technicalspecifications
ReDi 40 MP User Manual 12. TECHNICALSPECIFICATIONS Power Voltage AC 100V / 240V 50-60Hz Power Consumption Standby<1W, Power<11W Video decoder MPEG-1 / MPEG-2 MP ML / MPEG-4 AVC / H.264 HP L3 Audio decoder MPEG-1 Layer 1,2 PCM / HE-AAC V1.0... - Page 27 ReDi 40 MP User Manual Modulation QPSK/16QAM/64QAM Band Width 6 / 7/ 8 MHz 1 x Scart USB 2.0 Host Interface Dimensions W x D x H 132x 103 x 35 mm Weight 177 gr Technical specifications are subject to change without prior notice.
Need help?
Do you have a question about the ReDi 40 MP and is the answer not in the manual?
Questions and answers