Table of Contents
Advertisement
Advertisement
Table of Contents

Related Manuals for Matchmaster 05MM-RE03

Summary of Contents for Matchmaster 05MM-RE03
-
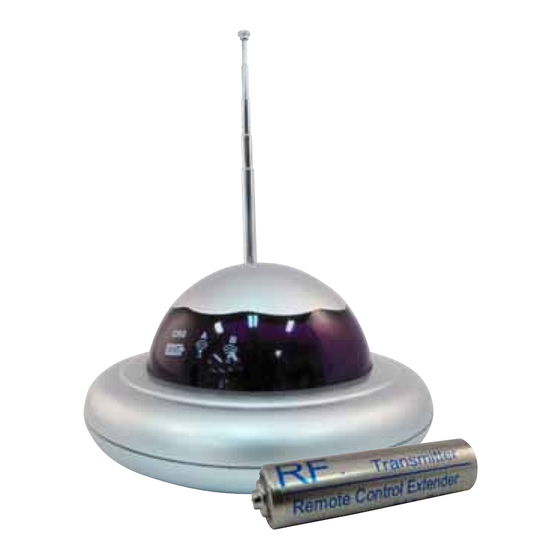
Page 1: Remote Control
05MM-RE03 Remote Control Extender User’s Manual... - Page 3 Introduction This Remote Control Extender uses the smartest and easiest technology in extending the remote control operation. By installing the transmitter in the battery pocket only, your remote control now detects the key signals and transmits them far away. This extender kit (called Remote Control Extender) includes transmitter (battery type), receiver (UFO shape), adaptor, eye emitter, two 2/3 AAA rechargeable batteries and AA sleeve.
- Page 4 1) AA sleeve 2) RF transmitter 3) Adaptor 4) 2/3AAA Rechargeable battery 5) RF receiver 6) Eye emitter The upgraded remote controls with RF transmitter can operate through doors, windows, floors and walls, And this extender kit removes the worry about line of sight requirements. When the RF transmitter is installed, the remote control still transmits the normal infrared signal like a normal remote control.
- Page 5 Installing and Operating Cases 1. Normal use in living room 2. Side view control 3. Living to bedroom Control satellite/cable in living room from bedroom...
- Page 6 4. Floor to floor Control satellite/cable in living room from the second floor 5. Outside control 6. Normal longer range...
- Page 7 Installing the RF Transmitter Your remote control will use several AAA or AA size batteries, normally 2 to 4. Please install RF transmitter instead of a battery (one of batteries only). Below shows the battery AAA and AA size using in normal remote control. 1.
-
Page 8: Installing The Receiver
Installing the Receiver Front Rear Place the receiver in front of the audio/video and direct it towards the audio/video equipment. - Page 9 1) Within 5-10 meters of the audio/video equipment. 2) The front of the receiver should directly face the audio/video remote sensor.
- Page 10 3) If there is no space for the receiver in front of audio/video equipment, please place near the audio/video equipment and use the eye emitter(see section to Connecting the Eye Emitter). 4) Fully extend the antenna. Connecting Adaptor 1. Connect the AC/DC adaptor’s barrel plug into receiver’s 12V jack then connect the adaptor’s AC plug to a standard AC outlet.
- Page 11 Connecting the Eye Emitter You can connect the supplied Eye Emitter cord when you need to place the receiver next to your audio/video equipment instead of in front of it . 1. Insert the Eye Emitter cord plug into the receiver IR output jack on the back of the receiver.
- Page 12 Function Switch Selection (A,B,C) You will find slide switch on the bottom of receiver if you remove the Plastic case. The positions A,B,C are used to set the receiver to different remote controls .The factory setting is on position B (Most of remote control use position B). A: 56KHz(a few special remotes) B: 38KHz(most of remote controls) C: Sensitivity lower(external interference etc.)
-
Page 13: Recharging Battery
Recharging Battery Your RF transmitter is installed with small recharging battery (2/3 AAA size) and the performance of the extender deteriorates (the LEDs do not blink when you press the remote button), you need to recharge (replace) the battery. 1. Remove the RF transmitter from your remote control and take rechargeable battery out. -
Page 14: Limited Warranty
Limited Warranty Warrants this product against defects of workmanship for one year from the date of purchase. During this warranty period, this product will be repaired or replaced, at option, without charge. Please read your instructions thoroughly and use this product only as directed. - Page 16 For more information call: AUST TOLL FREE: 1800-AERIAL (1800-237425) www.matchmaster.com.au NZ TOLL FREE: 0800-AERIAL (0800-237425) www.matchmaster.co.nz...
Need help?
Do you have a question about the 05MM-RE03 and is the answer not in the manual?
Questions and answers