Table of Contents
Advertisement
Available languages
Available languages
Quick Links
Advertisement
Table of Contents

Subscribe to Our Youtube Channel
Related Manuals for WorkPro PA 120 USB/R

Summary of Contents for WorkPro PA 120 USB/R
- Page 1 PA 120 USB/R PA 120 USB/R User Manual /Manual de Uso Rev 10.15.2...
- Page 3 Do not use this product when in close proximity to water. Do not install this product near any direct heat source. Do not block areas of ventilation. PAGE 1 User Manual / Manual de uso PA 120 USB/R...
-
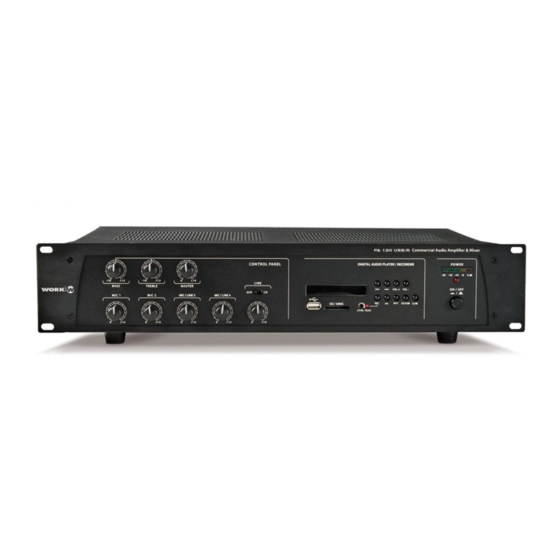
Page 4: Front Panel
FRONT PANEL PA 120 USB/R 1. Mic 1 Volume Control 7. Master Tone Control (Bass) 2. Mic 2 Volume Control 8. Master Tone Control (Treble) 3. Input 3 Volume Control 9. Master Volume Control 10. Power On / Off switch 4. -
Page 5: Installation Notes
300 mm 483 mm PAGE 3 User Manual / Manual de uso PA 120 USB/R... -
Page 6: Operation
3. When you want to finish the recording, press the button. 4. The track displayed will be stored in the “FRE” folder (This is shown as the “RECORD” folder when reading the device through a PC). PAGE 4 User Manual / Manual de uso PA 120 USB/R... - Page 7 Priority Microphones PA 120 USB/R has a cascade priority system, i.e., Mic 1 has the highest priority (apart from TEL/EMER), Mic 2 has priority over the rest of inputs except Mic 1, Mic 3 has priority over the rest of inputs except Mic 1 & Mic 2, and, finally, Mic 4 has priority only over AUX and USB/SD player/recorder.
- Page 8 Aux Connection The PA 120 USB/R provides an auxiliary input (19) & (20) which may be used for connecting other signal sources such as a Radio Tuner, CD or Cassette player (LINE level). Select the type of the input (CD or AUX) from the front panel switch (6), and connect the audio source in the adequeate rear connectors (19) or (20).
- Page 9 The volume can be set by the tel. paging volume control (42). The terminals allow connection of a telephone/paging system interface. NOTE: The Telephone/Emergency input has the highest priority; all other units will be overriden. PAGE 7 User Manual / Manual de uso PA 120 USB/R...
- Page 10 Less than 1%at1kHz,ratedpower Chime Two tonechime (‘Ding-dong’pre-announcement chime Priority Tel./Emer. -MIC1-MIC2-MIC3-MIC4-AUX/CD-USB/SD MainSupplyACpower 115 /230 V - 50/60Hz MainSupplyDCpower 24 V - 8A Consumption 400 W Dimensions 483x88x300mm(WxHxD) Weight 10 kg. PAGE 8 User Manual / Manual de uso PA 120 USB/R...
- Page 11 No use el producto cerca del agua. descargas eléctricas. No instale este producto bajo la luz solar directa. No bloquee las salidas de ventilación. PAGE 9 User Manual / Manual de uso PA 120 USB/R...
-
Page 12: Panel Frontal
PANEL FRONTAL PA 120 USB/R 1. Mic 1 Control de Volumen 7. Control de Tonos (Bass) 2. Mic 2 Control de Volumen 8. Control de Tonos (Treble) 3. Input 3 Control de Volumen 9. Control de Volumen Master 10. Interruptor Power On / Off 4. -
Page 13: Notas De Instalación
(115/230Vac) tiene que llevarse a cabo mediante la inserción del cable de alimentación suministrado en la toma correspondiente y luego conectarlo a una toma de corriente. DIMENSIONES 300 mm 483 mm PAGE 11 User Manual / Manual de uso PA 120 USB/R... - Page 14 4. La pista visualizada se almacena en la carpeta “FRE” (Esto se muestra como la carpeta "RECORD" cuando la lectura del dispositivo se realiza a través de un PC). PAGE 12 User Manual / Manual de uso PA 120 USB/R...
- Page 15 Micrófonos con prioridad PA 120 USB/R tiene un sistema de prioridad en cascada, es decir, Mic 1 tiene la prioridad más alta (aparte de TEL / EMER), Mic 2 tiene prioridad sobre el resto de las entradas excepto Mic 1, Mic 3 tiene prioridad sobre el resto de las entradas excepto Mic 1 y Mic 2, y, por último, Mic 4 tiene prioridad sólo a través de AUX y USB / SD...
- Page 16 Conexión AUX PA 120 USB/R pproporciona dos entradas auxiliares (19) y (20) que se pueden usar para la conexión de otras fuentes de señal tales como un sintonizador de radio, reproductor de CD o Cassette (nivel de línea). Seleccione el tipo de la entrada (CD o AUX) con el interruptor del panel frontal (6), y conecte la fuente de audio en los conectores adecuados (19) o (20).
- Page 17 Los terminales permiten la conexión de una interfaz de sistema de teléfono / paginación. NOTA: La entrada Tel. /Emer. tiene la más alta prioridad, todas las demás entradas se anularán. PAGE 15 User Manual / Manual de uso PA 120 USB/R...
- Page 18 115 /230 V - 50/60 Hz Alimentación DC 24 V - 8 A Consumo 400 W Dimensiones 483 x 88 x 300 mm ( An x Al x Pr) Peso 10 kg. PAGE 16 User Manual / Manual de uso PA 120 USB/R...
- Page 20 This symbol on the product or on its packaging indicates that this product shall not be treated as household waste. Instead it shall be handed over to the applicable collection point for the recycling of electrical an electronic equipment. By ensuring this product is disposed of correctly, you will help prevent potential negative consequences for the environment and human health, which could otherwise be caused by inappropriate waste handling of this product.
Need help?
Do you have a question about the PA 120 USB/R and is the answer not in the manual?
Questions and answers