Table of Contents
Advertisement
Available languages
Available languages
Quick Links
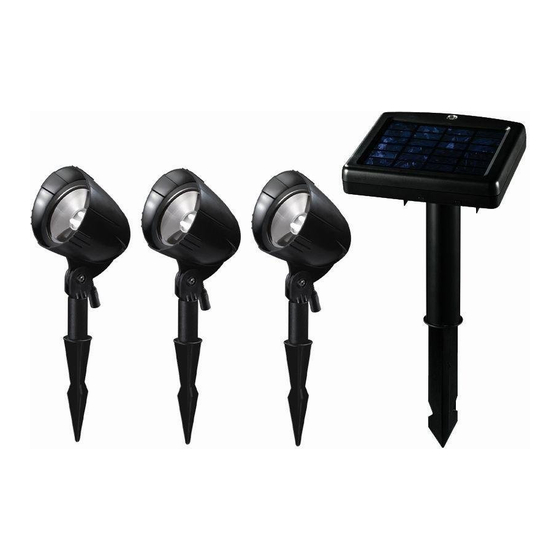
Package contents
A
PLannIng FoR a sUccessFUL asseMBLY
Read all instructions before assembly and installation.
Inspect each part for defects that may have occurred during shipping.
Keep your receipt and these instructions for proof of purchase.
cHoosIng tHe RIgHt LocatIon
Install your solar light in a location with full, direct sunlight. Do not install in shad-
ed areas as these areas will not allow the batteries to fully charge and reduce
the nighttime operating hours for your light. Ensure that the installation location
is away from other nighttime light sources such as street or porch lamps. These
light sources may prevent your solar light from automatically turning on.
HoW soLaR WoRks
The solar light has a solar panel that converts sunlight into electricity. During the day, the converted electricity is stored in the rechargeable batteries.
At night, the solar light is powered by the batteries using the electricity stored during the day. The operating time depends on geographical location,
daily weather conditions, and season. For optimal performance during the evening, allow the batteries to charge for 6 to 7 hours in direct sunlight.
assembly and Installation
1
attaching and installing the
solar panel and stake
NOTE: Do not use a hammer. If the ground is
hard, use water to soften or a trowel to loosen
the soil.
□
Insert the post (I) into the bottom of the solar
panel (E).
□
Insert the solar panel stake (J) firmly into the
solar panel post (I).
□
Push the assembly into the ground.
E
I
J
Use and care guide
solar LeD spotlights with Remote
solar Panel
B
C
D
2
Installing the spotlight
into the ground (option 1)
NOTE: Ensure the wire at the bottom of the
spotlight head fits into the notch (AA) at the
bottom of the spotlight head post to avoid
pinching the wire.
□
Attach the spotlight head (A) firmly to the stake
(D).
□
Push the spotlight assembly firmly into the
ground.
NOTE: Do not use a hammer. If the ground is
hard, use water to soften or a trowel to loosen
the soil.
E
Part
A
B
C
D
E
F
G
450mAh LiFePO4, 14430 3.2V
H
rechargeable battery (pre-installed)
I
J
A
AA
D
1
Please contact 1-877-527-0313 for further assistance.
Item #555-208
Model #79718
F
I
G
H
Description
Spotlight head
Fixers
Screws
Spotlight stake
Solar panel
Battery cover
Waterproof cover
Post for solar panel
Solar panel stake
2
Installing on a wooden post
(option 2)
NOTE: Make sure the wire at the bottom of
the spotlight head fits into the notch (AA)
at the bottom of the spotlight head post to
avoid pinching the wire.
□
Mount the fixer (B) to the post using the
screws provided (C).
□
Attach the spotlight head (A) firmly to the
fixer (B).
A
AA
C
B
J
Quantity
3
3
6
3
1
1
1
3
1
1
HOMEDEPOT.COM
Advertisement
Table of Contents

Related Manuals for HAMPTON BAY 79718


Summary of Contents for HAMPTON BAY 79718
- Page 1 Use and care guide solar LeD spotlights with Remote solar Panel Item #555-208 Model #79718 Package contents PLannIng FoR a sUccessFUL asseMBLY Part Description Quantity Spotlight head Read all instructions before assembly and installation. Fixers Inspect each part for defects that may have occurred during shipping.
-
Page 2: Maintenance
assembly and Installation (continued) connecting the spotlights to the solar connecting the spotlights panel □ Connect the last spotlight in the series to the solar panel (E) by NOTE: Each spotlight has a top wire (1) and a bottom wire screwing the bottom wire (1) clockwise into the outlet plug on the (2). -
Page 3: Mantenimiento
Guía de uso y Mantenimiento Foco led Solar con Panel Solar Remoto artículo núm. 555-208 Modelo núm. 79718 Contenido del Paquete PlaniFiCaR un enSaMBlado eXitoSo Pieza descripción Cantidad Cabezal del foco Lee todas las instrucciones antes de ensamblar e instalar. -
Page 4: Solución De Problemas
ensamblaje e instalación (continuación) Cómo conectar los focos al panel solar Cómo conectar los focos □ Conecta el último foco de la serie al panel solar (E) enroscando NOTA: Cada foco tiene un cable superior (1) y el cable inferior (1) hacia la derecha en el enchufe de salida en la uno inferior (2). -
Page 5: Assemblage Et Installation
Projecteurs del solaires article n° 555-208 avec panneau solaire distant modèle n° 79718 Contenu de l'emballage PRÉPaRatIon PouR un aSSemblage RÉuSSI Pièce description Quantité Tête de projecteur Lisez toutes les instructions avant de procéder à l’assemblage et l'installation. -
Page 6: Entretien
assemblage et installation (suite) Raccorder les projecteurs au Raccorder les projecteurs panneau solaire □ Raccordez le dernier projecteur du groupe au panneau solaire (E) REMARQUE : Chaque projecteur a un fil supérieur (1) et en vissant le fil inférieur (1) dans le sens des aiguilles d'une montre un fil inférieur (2).
Need help?
Do you have a question about the 79718 and is the answer not in the manual?
Questions and answers