
Related Manuals for Jensen JCR-232


Summary of Contents for Jensen JCR-232
- Page 1 AM/FM DUAL ALARM CLOCK RADIO WITH DIGITAL RETRO FLIP DISPLAY USER MANUAL JCR-232 PLEASE READ THIS USER MANUAL COMPLETELY BEFORE OPERATING THIS UNIT AND RETAIN THIS BOOKLET FOR FUTURE REFERENCE.
-
Page 2: Important Safety Instructions
WARNING TO PREVENT FIRE OR SHOCK HAZARD, DO NOT USE THIS PLUG WITH AN EXTENSION CORD, RECEPTACLE OR OTHER OUTLET UNLESS THE BLADES CAN BE FULLY INSERTED TO PREVENT BLADE EXPOSURE. TO PREVENT FIRE OR SHOCK HAZARD, DO NOT EXPOSE THIS APPLIANCE TO RAIN OR MOISTURE. - Page 3 The serial number of this product is found on its bottom cover. You should note the serial number of this unit in the space provided as a permanent record of your purchase to aid in identification in the event of theft of loss. Model Number: JCR-232 Serial Number: ________________...
-
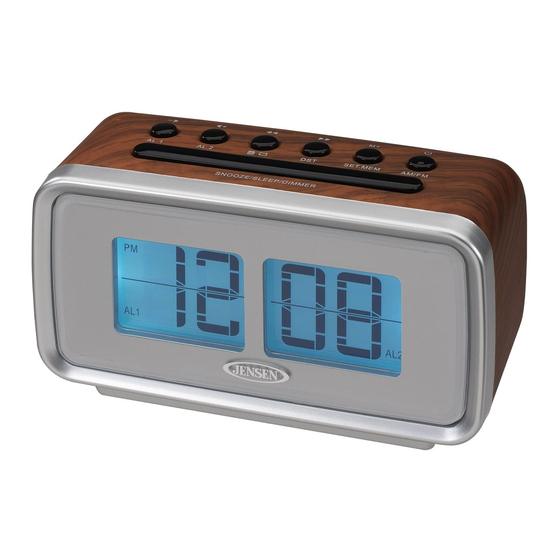
Page 4: Location Of Controls
PROTECT YOUR FURNITURE!! This system is equipped with non-skid rubber ‘feet’ to prevent the product from moving when you operate the controls. These ‘feet’ are made from non-migrating rubber material specially formulated to avoid leaving any marks or stains on your furniture. -
Page 5: Power Connection
POWER CONNECTION AC POWER CONNECTION This product operates on 120V~ 60Hz AC power supply. Plug the AC power cord into a household outlet AC source. INSTALLING/REPLACING THE BACK-UP BATTERY This unit is equipped with a battery back-up system, requiring one 3V CR2032 lithium battery (included) to maintain the time/calendar settings and radio presets during AC power outage. -
Page 6: Alarm Setting
Make sure the hour is set so that the PM indicator is displayed correctly for afternoon/night times. ALTERNATE DISPLAY BETWEEN TIME AND MONTH-DATE DISPLAY button for about 3 seconds until “ON” appears in the In clock mode, press and hold the CALENDAR TOGGLE LCD DISPLAY. -
Page 7: Listening To The Radio
To disable ALARM 1 (or 2) from automatically sounding on the upcoming days, press and hold the AL1 (or AL2) button for about 2 seconds, the corresponding AL1 (or AL2) INDICATOR will go off. To resume ALARM 1 (or 2) from automatically sounding on the upcoming days, press and hold the AL1 (or AL2) button for about 2 seconds, the corresponding AL1 (or AL2) INDICATOR will turn on and the alarm(s) will sound the following day at the set time. -
Page 8: Resetting The Unit
after your selection for the unit to confirm the selection, the unit will play for the selected length of time then turn itself ‘Off’ automatically. To cancel the sleep timer, repeatedly tap the SLEEP button until you see the current time in the LCD DISPLAY after last sleep timer option (15 minutes). -
Page 9: Specifications
SPECIFICATIONS AC Power: 120V~ 60Hz 5W Backup battery for the clock: 1 x 3V CR2032 Lithium Battery FM 87.5 – 108 MHz Frequency Range: AM 520 – 1710 kHz At Spectra, environmental and social responsibility is a core value of our business. - Page 10 0314 Printed in China...
Need help?
Do you have a question about the JCR-232 and is the answer not in the manual?
Questions and answers