Table of Contents
Advertisement
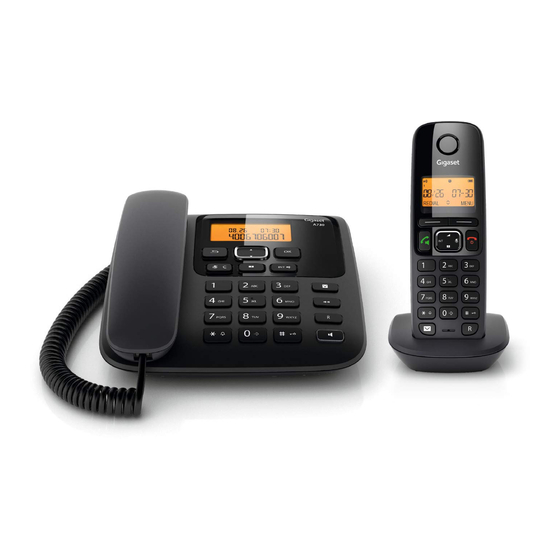
Gigaset A730
The base at a glance
1 Display in idle status
Indicates that the telephone is powered on.
¢
2 End/Back key
3 Control key (
page 14)
4 Menu / OK key
5 Phonebook
6 INT key
- Making internal calls (
- Registering handsets (
¢
7 Mute key (
page 16)
¢
Mute the microphon
¢
8 Call list (
page 19)
9 Redial key (
page 18)
10 Recall key
- Consultation call (flash)
- Insert a dialling pause (press and hold)
13
12
14
¢
¢
page 16)
page 24)
The base at a glance
11 Speaker key (LED)
Switch between earpiece and speaker mode
12 Star key
Ringtone on/off (press and hold);
with an open connection: switch between
pulse and tone dialling (press briefly);
¢
text input: open table of special characters
13 Priority key (
page 33)
Memory key (press and hold) 14
Hash key
Keypad lock on/off (press and hold in
idle status);
1
2
3
4
5
6
7
8
9
10
11
1
Advertisement
Chapters
Table of Contents

Related Manuals for Gigaset A730


Summary of Contents for Gigaset A730
-
Page 1: Gigaset A730
The base at a glance Gigaset A730 The base at a glance 1 Display in idle status 11 Speaker key (LED) Indicates that the telephone is powered on. Switch between earpiece and speaker mode ¢ 2 End/Back key 12 Star key... -
Page 2: Base Display Symbols
The base at a glance Base display symbols The following symbols are displayed dependent on the settings and the operating status of your telephone: Index number ¢ Call log ( page 19) ¢ Keypad locked ( page 14) ¢ Ringtone switched off ( page 20) ¢... -
Page 3: The Handset At A Glance
13 Signal strength symbol of the connection to the base §10§ You can register up to four handsets to the ¢ §§5§§ §§9§§ Gigaset A730 ( page 24). §§8§§ §§6§§ §§7§§... -
Page 4: Handset Display Symbols
MENU – = low warning tone: batteries almost empty – e V U during charging, the symbol is outlined red while the charging state changes periodically For more information about your telephone, visit www.gigaset.com/gigasetA730. Have fun using your new phone! -
Page 5: Table Of Contents
The Gigaset A730 base ........ - Page 6 The Gigaset A530H handset ........21...
- Page 7 Contents Customer Service & Assistance ....... . . 34 Questions and answers ........... . . 34 Appendix .
-
Page 8: Safety Precautions
Do not use the devices in environments with a potential explosion hazard (e.g., paint shops). If you give your Gigaset to a third party, make sure you also give them the user guide. Remove faulty devices from use or have them repaired by our Service team, as these could interfere with other wireless services. - Page 9 Safety precautions Disposal Batteries should not be disposed of in general household waste. Observe the local waste dis- posal regulations, details of which can be obtained from your local authority. All electrical and electronic equipment must be disposed of separately from general house- hold waste using the sites designated by local authorities.
-
Page 10: First Steps
The display is protected by a plastic film. Please remove the protective film! Please note: Never expose the telephone to the influence of heat sources, direct sunlight or other electri- cal devices. Protect your Gigaset from moisture, dust, corrosive liquids and vapours. - Page 11 First steps Connecting the base ¤ Connect the receiver to the telephone using the coiled cable supplied 1. ¤ Connect the telephone jack 2. ¤ Connect the mains adapter 3. ¤ Insert the cable of the mains adapter into the cable ducts 4. Please note The mains adapter must always be connected, as the phone will not operate without a mains connection.
-
Page 12: Setting Up The Handset For Use
¢ Only use the rechargeable batteries ( page 35) recommended by Gigaset Communica- tions GmbH, i.e. never use conventional (non-rechargeable) batteries, as this could result in significant health risks and personal injury. For example, the outer casing of the batteries could be damaged or the batteries could explode. -
Page 13: Setting The Date And Time
First steps Placing the handset in the charging cradle Place the handset in the charging cradle with its display facing forward. ¤ Place the handset in the charging cradle for 10 hours. ¤ Then remove the handset from the charging cradle and do not replace it until 10 h the batteries are fully dis-... -
Page 14: The Gigaset A730 Base
Using the base The Gigaset A730 base Using the base Activating/deactivating the keypad lock Control key The keypad lock prevents any inadvertent use of the phone. Below, the side of the con- Press and hold the hash key in trol key you need to press in... -
Page 15: Making Calls
Making calls Making calls Accepting a call The base indicates an incoming call in three You make a call using the phone's receiver or ways: by ringing, by a display on the screen the speaker. and by the flashing talk LED. You can accept the call by: ¤... -
Page 16: Adjusting The Earpiece/Speaker Volume During A Call
Making internal calls Activating/deactivating speaker Making internal calls mode Internal calls between the base and the Activating while dialling handset or to other handsets registered on Enter the number and press the the same base are free. speaker key. When the speaker mode is activated, the m An internal call is indicated by the paging tone, which is different from the incoming key lights up. -
Page 17: Internal Consultation/Conference Calls
Making internal calls If no internal participant answers or the line Accepting/rejecting call is busy, press the k key again to return to waiting the external call. If you receive an external call during an Internal consultation/ internal call, you will hear the call waiting tone (short tone). -
Page 18: Using The Directory And Lists
Using the directory and lists Using the directory and Editing an entry in the phone book Open the directory. lists Select an entry. Press long the directory key. The following options are available to store information on calls, contacts and numbers: Enter the number. -
Page 19: Call List
Using the directory and lists Manual redial Call list Lift the receiver or press the speaker key m. Requirement: Calling Line Identification, ¢ page 15. Press the redial key. The number The telephone stores a maximum of 20 num- bers in the call list. In idle mode the Ë sym- is dialled. -
Page 20: Base Settings
Base settings Deleting the call list Setting the ringer Press and hold the delete key You can set the ringer volume to six different until “---” is displayed. levels for the base. The ringer melody can Press the OK key to confirm. A only be changed for handsets. -
Page 21: The Gigaset A530H Handset
Using the handset The Gigaset A530H handset The Gigaset A730 comes with one Gigaset During a call A530H handset. The handset is already Adjust the loudspeaker volume registered to the base. for earpiece and speaker mode. You can register up to four handsets to your ¢... -
Page 22: Correcting Incorrect Entries
Using the handset Correcting incorrect entries Menu guidance You can correct incorrect characters in the Your telephone's functions are accessible input fields by navigating to the incorrect using a menu that has a number of levels. entry using the control key. You can then: The full menu tree is shown in the next ¢... -
Page 23: Handset Menu Overview
Using the handset Reverting to idle status Handset menu overview You can revert to idle status from anywhere §MENU§ To open the main menu press the in the menu as follows: ¤ Press and hold the end call key a. display key. -
Page 24: Registering Handsets
Using the handset Registering handsets De-registering handsets You can de-register any other registered Manual registration of the Gigaset handset from any registered Gigaset A530H A530H on a Gigaset A730 or handset. ¢ ¢ §§MENU§§ SETTINGS DE-REGISTER If you want to register additional handsets. -
Page 25: Making Calls
Making calls ¢ page 32), the handset automatically answers the call when you remove it from Please note the charging cradle. In the case of an incoming external call the paging is stopped. You can accept the call as long as it is displayed on the screen. -
Page 26: Adjusting The Earpiece/Speaker Volume During A Call
Making calls Activating/deactivating speaker Battery status control during mode a call Activating while dialling The battery charging state is shown on the ¢ Enter the number and press the display symbol bar ( page 4). speaker key. If during a call the battery status falls below ¤... -
Page 27: Making Internal Calls
Making internal calls Making internal calls Internal consultation/ conference calls Internal calls between the base and the handset or to other handsets registered on When you are conducting an external call, the same base are free. you can call an internal participant at the same time for consultation or hold a The name of the calling station (base or conference call between all 3 participants. -
Page 28: Using The Directory And Lists
Using the directory and lists §OK Using the directory and Press the display key to save the entry. ¤ lists To insert a pause, e.g. if an prefix is added automatically, press and hold the key. The following options are available for Order of directory entries storing information on calls, contacts and numbers:... -
Page 29: Redial List
Using the directory and lists Editing entries Redial list Select the entry. The redial list contains the 10 numbers last §MENU§ Press the display key. dialled with the handset (max. 24 digits). If one of the numbers is in the directory, the Select EDIT ENTRY and press corresponding name will be displayed. -
Page 30: Call List
Handset settings Call list Handset settings Requirement: Calling Line Identification, ¢ Your handset is preconfigured, but you can page 25 change the settings to suit your individual The telephone stores a maximum of 20 requirements. numbers in the call list. In idle status, the display shows an symbol Setting the date and time for the new missed call. -
Page 31: Audio Settings
Handset settings Activating/deactivating the alarm Setting the volume clock You can choose between five volumes. ¢ In idle status: §§MENU§§ ALARM CLOCK ¢ ¢ §§MENU§§ RING SETTING VOLUME §§OK§§ Press the display key. Set the volume for incoming Select the activation option: calls. -
Page 32: Activating/Deactivating Auto Answer
Handset settings Activating/deactivating System settings auto answer The Settings apply to the entire phone system. They can be set on any registered If you activate this function, when you hand-set and are synchronised between receive a call you can simply lift the handset base and all registered handsets. -
Page 33: Connecting The Telephone To The Pabx
Connecting the telephone to the PABX The following settings are only necessary if Activating/deactivating the your PABX requires them; see the PABX user automatic prefix ¢ ¢ guide. The settings can only be made via a ¢ §§MENU§§ SETTINGS AUTO PREFIX ¢... -
Page 34: Customer Service & Assistance
Questions and answers Customer Service & Assistance If you have any question, reach us by Error tone sounds after system PIN prompt. Web site: www.gigaset.com/cn You have entered the wrong system PIN. ¥ Hotline: 4006 706 007 Enter the correct system PIN. -
Page 35: Appendix
When it has fully dried out, you will normally Due to the constant progression in battery be able to use it again. development, the list of recommended batteries in the FAQ section of the Gigaset Customer Care pages is regularly updated: www.gigaset.com/service Base power consumption In standby mode (backlight off ): approx. -
Page 36: Writing And Editing Text (Handset)
Care General specifications Writing and editing text (handset) WDCT standard is supported Radio frequency range 2402.784~2480.544 MHz The following rules apply when writing text: Each key between Q and O is No. of channels Channel grid 861 kHz assigned several letters and characters. Control the cursor with t s Bit rate 1.152 Mbit/s... -
Page 37: Index
Index Index Call waiting (base) ....... . Calling Line Identification Advisory tones . - Page 38 ....... . . Gigaset A730 overview ... .
- Page 39 Index ......Power adapter Setting up ....
- Page 40 Issued by Gigaset Communications GmbH Frankenstr. 2a, D-46395 Bocholt © Gigaset Communications GmbH 2014 Subject to availability. All rights reserved. Rights of modifications reserved. www.gigaset.com *A31008-M2542-Y101-1- A31008-M2542-Y101-1-5D19...
Need help?
Do you have a question about the A730 and is the answer not in the manual?
Questions and answers