Table of Contents
Advertisement
Advertisement
Table of Contents

Related Manuals for Travelux supernova


Summary of Contents for Travelux supernova
- Page 2 User Manual BEFORE USE YOUR NEW SUPERNOVA SCOOTER YOU AND / OR YOUR ATTENDANT MUST READ AND FULLY UNDERSTAND THIS MANUAL. General information You have just purchased a Van Os Medical UK ltd. scooter and we want to thank you for the confidence in our Excel®...
- Page 3 User Manual Fill out the information on your authorized dealer below: Company: ………………………………………………………………… Address: ………………………………………………………………… ………………………………………………………………… Telephone number: ………………………………………………………………… Fax number: ………………………………………………………………… Email address: ………………………………………………………………… Website: ………………………………………………………………… ~ 2 ~ © 2013 VAN OS MEDICAL B.V., Koperslagerij 3, 4651 SK, Steenbergen, Nederland Tel.
-
Page 4: Table Of Contents
User Manual INDENTIFICATION ...................... 4 GENERAL EXPLANATION CONCERNING YOUR SCOOTER ........5 2.1 C ....................5 OMPONENTS OF THE SCOOTER 2.2 G ........6 ENERAL EXPLANATION OF THE FUNCTION AND POSSIBILITIES OF YOUR SCOOTER SAFETY REGULATIONS ....................6 3.1 G ....................6 ENERAL SAFETY REGULATIONS 3.2 W ......................6 ARNINGS FOR SAFE USE... -
Page 5: Indentification
User Manual INDENTIFICATION Your Travelux Supernova scooter is equipped with a unique serial number. You can find this number on the frame of your scooter. Below is an example of the frame label on which you can find the identification number. Furthermore you will find the explanation of the various data stored on the frame label listed below. -
Page 6: General Explanation Concerning Your Scooter
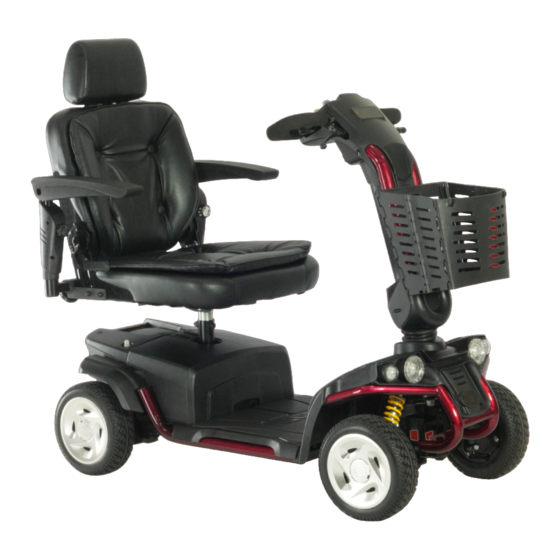
User Manual GENERAL EXPLANATION CONCERNING YOUR SCOOTER 2.1 Components of the scooter Tiller Rear fender Foldable basket Battery pack Front light Seat post Front bumper Seating Spring Backrest Front wheel Armrest Throttle lever Footplate Control panel Rear wheel Headrest Your scooter is equipped with a number of elements and parts. You should know these before continue reading this manual. -
Page 7: General Explanation Of The Function And Possibilities Of Your Scooter
If used correctly, the Travelux supernova scooter is an utmost safe and stable product, if the instructions for use as described in this manual are followed. -
Page 8: Instructions For Use
INSTRUCTIONS FOR USE Your Travelux Supernova scooter is a battery working personnel mobility vehicle. Before you take your first trip, you should familiarize yourself well with the operation of the vehicle and with all operating elements. Take your time to test all functions and driving modes. -
Page 9: Control Units
User Manual 4.1 Control units Battery indicator Head light Emercency light Indicator left Indicator right Lever Lever Horn Horn Speed adjustment button Control panel: Speed adjustment button With the speed adjustment button you can adjust the minimum and maximum speed;... -
Page 10: Getting On And Off Your Scooter
User Manual Indicators Always use the indicators when you change your direction. Warning: Always use the indicators for the safety of yourself and others around you. Head light When you do not have enough vision while driving with the city lights on you can press this button to engage the head light. -
Page 11: Charging Batteries
User Manual Getting off your scooter: Make certain that the power is turned off and the key is removed; Return tiller to full upright position; Flip up the armrests; Unfasten the seatbelt; Carefully place one foot on the ground, transfer your weight to that leg, and ... -
Page 12: Before Driving
User Manual 4.4 Before driving For your first driving session, make certain that your scooter starts out on a level surface and that you will continue driving on a level surface. Turning your scooter on and off Make sure that your scooter is in the drive position; ... - Page 13 User Manual Warning: Pushing the scooter too quickly into the freewheel position (photo 4) will cause the motor to act as a generator causing the scooter to become difficult to push; Never set your scooter in freewheel mode when it is on an incline; ...
-
Page 14: Basic Driving
User Manual 4.5 Basic driving Make certain that you are seated safely and properly on your scooter; Turn the speed control knob fully counter clockwise to the slowest setting; Insert the key into the key switch; Turn the key counter clockwise to the “On” position; ... -
Page 15: Control Through Tight Spots
User Manual 4.7 Control through tight spots Your scooter is developed to increase your mobility but you will undoubtedly encounter some obstacles that will require practice to manoeuvre smoothly and safely. Below are some common obstacles that you may encounter during the daily use of your scooter. -
Page 16: Going Up An Incline / Down A Decline
User Manual 4.8 Going up an incline / down a decline Driving on inclines For maximum stability lean forward; Drive with caution when attempting to drive up to any incline even handicap access ramps; Always climb or descend an incline by driving straight up or straight down ... -
Page 17: Emi / Rfi
User Manual Procedure 2: Emergency (No power) Set the key switch to the “Off position”; Get off of your scooter; Put the scooter into the freewheel position; While standing next to the scooter, carefully manually maneuver it down the ... - Page 18 User Manual EMI / RFI recommendations Do not turn on or use hand-held personal electronic communication devices such as cellular phones, walkie-talkies, and CB radios while your scooter is turned on; Be aware of any nearby transmitters (radio, television, microwave, etc.) on ...
-
Page 19: Instructions For Use And Mounting Options
User Manual MAKING ADJUSTMENTS TO YOUR SCOOTER CAN CAUSE BIG RISKS FOR YOUR SAFETY AND THE FUNCTION OF YOUR SCOOTER. ADJUSTMENTS MADE BY YOURSELF ARE STRONGLY ADVISED AGAINST AND CARRIED OUT AT YOUR OWN RISK. INSTRUCTIONS FOR USE AND MOUNTING OPTIONS 5.1 Technical information (with capatain seat) 3 Wheel 4 Wheel... -
Page 20: Armrest Adjustments
User Manual 5.2 Armrest adjustments Armrest width adjustment To adjust the armrest width: Loosen the adjustment knob at the back of the seat (photo 5); Slide the armrest in or out to the desired width; Tighten the adjustment knob. ... -
Page 21: Seat Adjustments
User Manual Adjust the angle of the armrest Loosen the screw, see photo 7; Put the armrest in the desired angle; Retighten the screw. Photo 7 5.3 Seat adjustments Seat rotation lever The seat turning lever (at the bottom of the seat) allows the seat to rotate from 45º till 360 Pull the seat rotation lever up (photo 8) and rotate the seat to the desired ... -
Page 22: Tiller
User Manual 5.4 Tiller Adjusting the position of the tiller You can adjust the position of the tiller of your scooter: Pull the lever as showed on photo 9; Place the tiller in the desired position; Release the lever so the tiller is locked in this position; ... - Page 23 User Manual Disassemble the battery pack You should remove the battery pack when you won’t use the scooter for more than a week; Loosen the screw and remove the top of the battery pack Remove the battery packs from the scooter, see photo 11. ...
- Page 24 User Manual Folding down the tiller Pull the lever of the tiller; Fold the tiller completely down, see photo 13; Release the lever so the tiller is locked in this position. Photo 13 Separating the front frame from the rear frame Pull the lever that disassemble the front frame with the rear frame (photo 14);...
-
Page 25: Assembly
User Manual 5.6 Assembly Warning: Make sure while assemble that body parts won’t get stuck between parts of your scooter! Replace the seat Make sure that the seat is straight above the seat post when you replace the seat of your scooter. -
Page 26: Transporting Your Scooter
User Manual TRANSPORTING YOUR SCOOTER You can transport your Travelux scooter in every car with an approved transport system. Disassemble or fold down the seat and tiller as close as possible to the loading area of the vehicle to be used for transporting your scooter. - Page 27 User Manual Batteries and charging Your scooter is equipped with two maintenance free batteries. These batteries require no maintenance other than ensuring they are properly charged. Warning: Before using new batteries for the first time you should be charge them for 12 hours.
-
Page 28: Problem Analysis And Solutions
User Manual PROBLEM ANALYSIS AND SOLUTIONS Your Travelux Supernova scooter is inspected and adjusted so that you can use it immediately. Number of flashes 1 flash The batteries need to be charged. Remedy Charge your scooter’s batteries. See §4.3 batteries and charging. -
Page 29: Warranty
WARRANTY 9.1 Warranty application Together with your Travelux Supernova scooter you get the factory warranty. This warranty is only granted to you as the consumer. It is not intended to be used commercially (like hiring or institutional use). The warranty is limited to defects to materials and possible hidden shortages. -
Page 30: Warranty Conditions
While this manual is created with care it is not exclusive. The warranty is only valid during the indicated period. If adjustments are made to the Travelux Supernova scooter, which have structural impact on the product, the warranty will expire completely. You can visit www.vanosmedical.com... -
Page 31: General Maintenance Instructions
User Manual GENERAL MAINTENANCE INSTRUCTIONS The Travelux Supernova scooter needs periodical maintenance. A badly maintained scooter will give more technical problems, turn less flexible and fall out the warranty terms. Preventive maintenance is most important and many of these things you can easily do yourself or a friend or family member can help you. - Page 32 User Manual Product identification Product: Electrically powered, scooters and their chargers Brand: Travelux Model/type: Supernova Version: Manufacturer: Name Van Os Medical UK ltd. Address Koperslagerij 3 4651 SK Steenbergen Country The Netherlands EU Representative: Name W. van Os Address Koperslagerij 3...
Need help?
Do you have a question about the supernova and is the answer not in the manual?
Questions and answers