Table of Contents
Advertisement
Quick Links
Legal Information
All rights are reserved. Reproduction, transfer, distribution of the contents
herein in any manner without the prior written permission of Best IT World
(India) Pvt. Ltd. is prohibited. Best IT World (India) Pvt. Ltd. reserves the
right to add, modify or delete, any of the contents herein or withdraw this
document at any time without prior notice and without assigning any
reasons
thereof.
For
detailed
terms
and
conditions
refer
www.iBallMobiles.co.in
Safety Precautions
Operate Safely
• Please do not use Mobile while charging. Disconnect Mobile from charger
before use.
• Make sure to charge the battery full for the first time usage.
• Keep the mobile phone at least an inch away from your body while dialing /
answering calls.
1
Advertisement
Table of Contents

Related Manuals for iBall Andi 3.5 Classique


Summary of Contents for iBall Andi 3.5 Classique
-
Page 1: Legal Information
Legal Information All rights are reserved. Reproduction, transfer, distribution of the contents herein in any manner without the prior written permission of Best IT World (India) Pvt. Ltd. is prohibited. Best IT World (India) Pvt. Ltd. reserves the right to add, modify or delete, any of the contents herein or withdraw this document at any time without prior notice and without assigning any reasons thereof. - Page 2 • Do not use the mobile phone if the screen is cracked or broken. Cracked and / or broken screens could cause injury to hands and / or face. • To reduce the risk of motion injuries: - While using your mobile phone, hold it with a relaxed grip and press the keys lightly.
- Page 3 Careful handling • Avoid potential damage to your mobile phones as under: - Keep away from liquids. - Avoid using and / or storing in dusty and / or dirty places / environments. - Do not drop, knock, throw or other wise handle the mobile phone roughly. - Avoid exposing your mobile phone and / or batteries to extreme temperatures.
- Page 4 - Do not dismantle the mobile phone and / or accessories without permission. - Avoid handling by unauthorized personnel. Turn Off your Mobile Phone in Restricted Areas Use of mobile phones in certain areas / places / conditions can be hazardous.
- Page 5 - Areas where any kind of blasting activity is being carried out. • Removing, installing or charging mobile phone batteries in such areas is hazardous as potential sparks may result in explosion and / or fire and may cause damage to property and / or life and can also prove fatal. Drive Safety Avoid using your mobile phone while driving and respect and obey all regulations that restrict the use of mobile phones while driving.
-
Page 6: Protect Your Hearing
/ or music. Use & Dispose of Batteries & Chargers • Use only iBall accessories and batteries. Using incompatible batteries and / or accessories may damage your mobile phone or cause injury. • Never dispose the battery or mobile phone in fire. -
Page 7: Using This Guide
In order to use mobile phone correctly, please read the following statement of the user manual carefully before using the mobile phone. Using this Guide This guide has been specially designed to guide you through the basics of your device, such as getting started with the device. Please read this guide carefully before using your device to ensure safe and correct use. -
Page 8: Table Of Contents
INDEX Legal Information ...............1 Safety Precautions ..............1 Using this Guide .................7 INDEX ..................8 1. Introduction ................. 10 2. Installing the SIM card, Battery, and Storage card ....16 3. Using phone features ............27 4. Contacts................37 5. Messaging ................42 6. - Page 9 7. Setting .................. 55 8. Internet ................83 9. Experiencing Multimedia ............89 10. Music .................. 93 11. Video Player ............... 99 12. FM Radio ................100 13. Sound record ..............101 14. Other System Apps ............102 15. SIM Toolkit ................ 118 17.
-
Page 10: Introduction
1. Introduction 1.1 Specifications of Andi3.5 Classique Details Description Dual Core 1.3GHz Cortex A7 Advanced Processor 8.89cm (3.5”) LCD, 320x480 HVGA Display Display Memory 256MB RAM Storage 512MB internal storage (Approx. 20MB memory free for file storage & 130MB free for third party APK download) Micro SD Support up to 32 GB Operating System Android 4.2.2, Jelly Bean... - Page 11 Soft Keys Menu, Home & Back Hardware Keys Power and Volume controller Charging Port Micro USB Battery Li-ion 1200mAh Battery Power 5.0V Dimension 115.98x62.61x11.10mm Weight 112 gram Application Google search, Google Maps & Mobile Tracker etc.
-
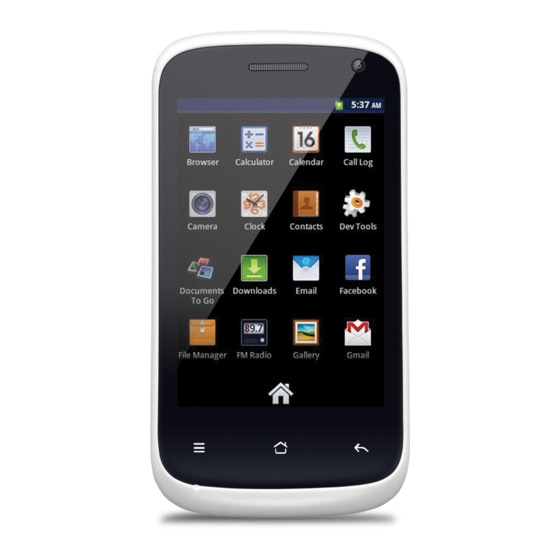
Page 12: Phone Overview
1.2 Andi3.5 Classique Phone overview Volume Key Camera LED Flash Menu Home Back Speaker Power Key Flash... - Page 13 1.3 SAR This mobile phone is SAR accredited adheres to international quality benchmarks and safety measures concerning the harmful impact of radiations. It complies with applicable safety requirements for exposure to radio waves. The radio waves exposure guidelines employ a unit of measurement called Specific Absorption Rate (SAR).
- Page 14 • The SAR value of the phone may depend on factors such as proximity to the network tower, use of accessories. SAR Recommendations: • Use a wireless hands free system (headphone, headset) with lower Bluetooth emitter. • Make sure the cell phone has a low SAR. •...
- Page 15 SAR Value Tested SAR Value of Andi3.5 Classique is as follows: (2G) GSM 900MHz: 0.669 W/Kg (1g) (2G) GSM 1800MHz: 0.706 W/Kg (1g) Maximum Permitted SAR value is: 1.6 W/Kg (1g)
-
Page 16: Installing The Sim Card, Battery, And Storage Card
2. Installing the SIM card, Battery, and Storage card You need to remove the back cover before you can install the SIM card and battery. Also, make sure to always turn off the power before installing or replacing the SIM card and battery. To remove the back cover 1. - Page 17 1. Remove the battery if it is installed. 2. Locate the SIM card slot, and then insert the SIM card with its gold contacts facing down and its cut-off corner facing out the card slot. 3. Push the SIM card completely into the slot. Note: •...
- Page 18 • Do not attempt to open, disassemble, or service the battery pack. • Do not crush, puncture, short external contacts, or dispose of in fire or water. • Do not expose to temperatures above 60°C (140°F). • Replace only with the battery pack designated for this product. •...
- Page 19 3. The bottom of the phone has a notch. Lift the battery by the notch to remove it. To install the memory card To have additional storage for your images, videos, music, and files, you can purchase a memory card and install it into your device. 1.
-
Page 20: Charging The Battery
2.2 Charging the Battery New batteries are shipped partially charged. Before you start using your device, it is recommended that you install and charge the battery. Some batteries perform best after several full charge/discharge cycles. Note: Only the AC adapter and USB sync cable provided with your device must be used to charge the device. -
Page 21: Starting Up The Device
2.3 Starting up the device Power on/off To power off your phone, press & hold POWER key. On release, the Phone options menu opens. Select ‘Power off’ and confirm. To power on again, press & hold POWER key. Silent mode To silence your phone quickly, press &... - Page 22 1. On the Home screen, touch and select Settings. 2. Select Display option. 3. Select Screen Time out, to set the time period of sleep mode Press POWER key once to off display immediately. While not on a call, to lock your control buttons and screen from accidental touch activation, press POWER key.
-
Page 23: Home Screen
Note: You must swipe your finger along the screen to create the pattern, do not select individual dots. Connect at least four dots in order to create a lock pattern. If you want your pattern to be hidden as you draw it, clear ‘Make pattern visible’... - Page 24 The Home screen is your starting point for using all the applications on your phone. You can customize your Home screen to display applications, shortcuts, and widgets as you like. 1. Touch the application tab with your fingertip to reveal the application icons.
-
Page 25: Status Icons
4. To remove a shortcut or widget from your Home screen, touch & hold the item to enter “move mode”. The application tab turns into a Trash button. Drag the item to the Trash button and release. You will know when your item is in the Trash because the item and the tab will turn red. -
Page 26: Read Your Notifications
something else you should notice. On the right side of the status bar, you’ll see connection status icons. Read your notifications When you see a notification in the status bar, touch the bar and swipe your finger down the screen to open the list of notifications displayed in the sliding window. -
Page 27: Using Phone Features
To open the message, reminder, or other notification, you can touch the items. To close the notifications window, drag your finger up the screen. Note: On the home screen, touch the bar and swipe your finger down the screen to open the list of notifications displayed in the sliding window, you can touch the icon on the top of the screen (such as Wi-Fi, Bluetooth, Data connection, Airplane mode, Brightness) to open or close the selected function, sliding your finger left or right to select more functions. - Page 28 When you enable Airplane Mode, all wireless connectivity radios on your device are turned off, including the phone function, Bluetooth, and Wi-Fi. 1. Touch -> Settings -> More… -> Airplane mode. 2. Touch ‘Airplane mode’ to enable or disable. When you disable Airplane mode, the phone function is turned back on and the previous state of Bluetooth and Wi-Fi are restored.
-
Page 29: Making A Call
3.2 Making a call On Home screen, touch Phone to enter the dial screen. You can type a number which you want to dial, you can search your particular contact through number and name. To dial a number, touch ‘Voice Call’ button (Green icon ) to select SIM1 card or SIM2 card to make a call. -
Page 30: Answering And Ending A Call
1. Call log tab: Select an entry listed in the log to call the number. 2. Contacts tab : Contacts with phone numbers are listed. Select a contact, and then select the phone number to dial the call. Note : If you inserted dual SIM card, the dial screen is default dual call (Defined in the menu Settings/SIM management/Voice call). - Page 31 Note: that if Bluetooth services are on and you are connected to a hands-free device, the more menu indicator will show Bluetooth on. 1. Speaker: To use the speaker, select ‘Speaker’ so it shows a green bar. To turn it off, select it again so the bar is unfilled. The status bar will display below this icon when the speaker is on.
- Page 32 2. Mute: To mute your side of the conversation, select ‘Mute’ so it shows a green bar. To turn it off, select it again so the bar is unfilled. The status bar will display this icon when Mute is on. 3.
-
Page 33: Using Call History
6. While on a call, you can conference up to six callers, counting yourself. Please note that you can also have an additional caller on hold during a conference call, regardless of how many participants are on the conference. Note: Whether the group call function can be used depends on whether the network operator supports and provides such function as well as whether you have applied for such function. -
Page 34: Call Settings
3.6. Call settings On the dialing screen or call log screen, press MENU > Settings to enter Call settings: You can make the operation of voice call, internet call and the other settings. Please note that when you open ‘Call settings’ for SIM1 or SIM2, your current settings are fetched, which can take a few moments. -
Page 35: Other Settings
Caller ID: Use default operator settings to display your number in outgoing calls. Call waiting: During an active call it will notify you of another incoming call & caller will get the call waiting message. This is operator supported function. ... -
Page 36: Background Sound
International dialing assist: This option allow making international calls. Auto Call Record: Record all your important active call, which help your to listen your conversation again. Background sound It gives the background sound effects during active call. Status: Whether it is On/Off. Sound: Which type of sound effect you want to select out of the given list. -
Page 37: Contacts
4. Contacts The contacts on your phone are synced with your account contacts stored on the Web. To view the contacts on your phone, touch and select People. Contacts belonging to a specific group (you can choose which group) are listed in the Contacts tab. -
Page 38: Add A Contact
2. Go to Contact details: Select the contact’s name to open the Contact details screen, where all screen the information you have saved for this contact is displayed. 4.1 Add a contact 1. On the Home screen, touch and select People. Your contact list appears. 2. -
Page 39: Assign Favorites
4.2 Assign favorites Use Favorites as a way to display only those contacts you contact most frequently. To add a contact to Favorites: 1. From Contacts, touch the contact you want to add to Favorites to open the Contact details screen. 2. -
Page 40: Communicate With A Contact
3. Make your changes, then press ‘Done’. 4.4 Communicate with a contact From Contacts you can quickly call or text a contact’s default number, as displayed below their name on the screen. However, to view all the information you have stored for a contact, and to initiate other types of communication with that contact, open the Contact details screen. - Page 41 4. Send email to a contact: To send an email message to a contact, you must have an email address stored for them in their contact details. • Select the contact you want to email. Their Contact details screen opens. •...
-
Page 42: Messaging
5. Messaging 5.1 SMS and MMS messaging To open the SMS & MMS Messaging application, on the Home screen, then touch and select the Messaging icon. About text and multimedia messages... - Page 43 SMS messages are also known as “text” messages and can each be around 160 characters. If you continue to type after the limit is reached, your message will be delivered as one, but count as more than one message. These are called “concatenated” messages. MMS messages are also known as “multimedia”...
- Page 44 If you are downloading only the headers, then you must first select the Download button to retrieve the message body. If you are concerned about the size of your data downloads, you can check the message size before you download. Once the message has downloaded, select “Play”...
- Page 45 context menu. Delete all messages in a thread - With the message thread open in Read view, press MENU >Delete. You can also delete an entire thread from the message list by pressing & holding the thread to open the context menu, then select ‘Delete’.
- Page 46 Any recordings you make will be stored automatically in the Music application in a play list named “My recordings”. To remove an attachment, select the attachment’s ‘Remove’ button. 5. Type your message. As you type, you will be able to track how many characters/messages you’re creating.
- Page 47 1. Notification settings You can receive a notification each time you receive a new message. Select ‘Notifications’ check box to receive a notification in the status bar when a new message arrives. If you want your phone to ring when a new message arrives, select that check box as well.
-
Page 48: Email
Delivery reports: To receive a report on the delivery status of your message, select this check box. Read reports: To receive a report on whether each recipient has read or deleted the message without reading it, select this check box. Auto-retrieve: To retrieve all your MMS messages automatically (the header plus the message will download to your phone), select this check box. -
Page 49: Add An Email Account
6.1 Add an email account You can fetch messages from up to five POP3 or IMAP accounts. Follow these steps: 1. On the Home screen, then touch and select Email application. 2. The Set up new account screen appears. - Page 50 3. Type your account email address and password. 4. If you want, select the Send email from this account by default check box. This setting only applies if you have more than one POP3 or IMAP account set up. (For this details please contact your IT support team) 5.
- Page 51 Once you have set up an account, you can do the following: 1. Refresh Inbox: From the Inbox, press MENU and then select ‘Refresh’ to update your Inbox with any previously-un-fetched email. 2. Read email: You can display or collapse the messages in your Inbox by selecting Inbox.
- Page 52 3. Forward, Reply, Reply all: You can forward, reply, or reply all to an email message from the Inbox. From the Inbox, touch & hold the message to open its context menu. Select the action you want to take. 4. Compose new From the Inbox: 1.
- Page 53 7. Remove an email account: You can always remove a POP3 or IMAP email account from your phone. Go to your Inbox, press MENU and select ‘Accounts’. Your Accounts screen opens. Touch & hold the account you want to remove to open the context menu. Select ‘Remove account’.
- Page 54 Default account: If you have more than one POP3 or IMAP email account set up on your phone and want to use this account by default when selecting Compose from the Accounts screen, select this check box. Email notifications: If you want an icon to appear in the status bar when a new message arrives, select this check box.
-
Page 55: Setting
7. Setting Control phone-wide settings from the Home settings screen: touch and select Settings. Wireless & networks 7.1 SIM management You can select to activate or deactivate the SIM card you want to open. Set the default SIM to use voice call, messaging and data connection on/off switch. - Page 56 7.2 Wi–Fi Wi-Fi on/off: Select this check box if you prefer to use Wi-Fi for your data connection. Wi-Fi settings: Open the Wi-Fi settings screen; select it from the network list. Provide your username or password if required.
- Page 57 Scan: To scan the available Wi-Fi networks. WPS Pin Entry: Any wireless computer or wireless adapter that will connect to the modem router wirelessly is a client. The client must support a WPS PIN, and must have a WPS configuration utility. Wi-Fi Direct: Using Wi-Fi direct feature, you can transfer data from your phone to another through Wi-Fi without the need of an access point.
- Page 58 IPv4 address: The Internet Protocol (IP) address assigned to the device by the Wi-Fi network you are connected to (unless you used the IP settings to assign it a static IP address). 7.3 Bluetooth Bluetooth on/off: Use this check box to turn Bluetooth services on or off.
- Page 59 Bluetooth settings: With Bluetooth services on, you can open the Bluetooth settings screen to: Rename Phone: 1. Make sure you have turned Bluetooth on. 2. Select Settings > Bluetooth > Bluetooth settings > Device name. 3. Type the name for your device in the dialog box, and then select ‘OK’. 4.
- Page 60 3. When on, the Bluetooth icon appears in the status bar. Discoverability By default, your phone is not “discoverable”. This means other Bluetooth devices will not see your phone in their scans for Bluetooth devices. If you make your phone discoverable, it will be visible to other Bluetooth devices for up to 120 seconds.
- Page 61 Before your phone can communicate with a Bluetooth headset or hands-free car kit, the devices must “pair”, then “connect”: 1. Make sure you have turned Bluetooth on. 2. Select Settings > Bluetooth > Bluetooth settings. 3. Your phone starts scanning for Bluetooth devices within range. As they are found, the devices appear in the list of Bluetooth devices.
-
Page 62: Data Usage
Note: The phone supports only the headset and hands-free Bluetooth profiles, so if you try to connect to a device that is not a headset or hands-free car kit, then you will receive an “unable to connect” message. If you pair with a second headset while connected to the first, the first headset will remain connected. - Page 63 Warning! The usage displayed on the data usage settings screen is measured by your handset. Your carrier's data usage accounting may differ. Usage in excess of your carrier plan's data limits can result in steep overage charges. The feature described here can help you track your usage, but is not guaranteed to prevent additional charges.
- Page 64 7.5 More… Airplane mode on/off: When airplane mode is selected, all wireless connectivity will down to off. This icon will display in the status bar when airplane mode is selected. VPN: VPN stands for Virtual Private Mode. Using this feature, you can connect to your private network through a public network in a secured way.
- Page 65 phone or tablet with other devices such as laptops. Sharing internet connection using USB cable is called USB tethering. Bluetooth Tethering: Tethering refers to connecting one device to another. Tethering allows sharing the Internet connection of the phone with other devices such as laptops. Connection of the phone with other devices can be done over Bluetooth and is known as Bluetooth tethering.
-
Page 66: Audio Profiles
7.6 Audio profiles There are four types of user profiles available, they are General, Silent, Meeting and outdoor. Select one user profile and enter the following options: • Vibrate: Select to have your phone vibrate for incoming calls. • Volume: Select to open the volume control, and then drag your finger along the volume bar to set an incoming call ring volume or alarm, playing back music, videos. - Page 67 sound when you lock the screen. Also, you can select the option for vibration every time you select any item by touching the screen. 7.7 Display Lock Screen Notification: It will show you a notification on Lock Screen Theme: You can select a theme out of the four themes provided. Wallpaper: Select to choose the type of wallpaper you want on your home screen.
- Page 68 7.8 Storage View and manage the data storage on your phone. Memory card: Monitor and manage the use of your Memory card from this screen: 1. View how much space you are using on your memory card. 2. Select to use your memory card as USB mass storage when your phone is connected to your computer (selected by default) 3.
- Page 69 2. The phone U-disk function to the actual configuration of the mobile phone, please take to the actual mobile phone. Erase Internal Storage: Through this you can erase all data of your internal storage in single tap. Unmount SD Card: You can unmount the inserted SD card for safety purpose.
- Page 70 Warning! : If you stop some apps or services, your device may not work correctly. Battery status (charging, discharging) and level (as a percentage of fully charged) are displayed at the top of the screen. The discharge graph shows battery level over time since you last charged the device, and how long you've been running on battery power.
-
Page 71: Location Access
3. Uninstall - If you’ve downloaded an application from Android Market, you will be able to uninstall it from this screen by selecting Uninstall. Personal 7.11 Location Access My Location: Select a source for determining your location: Wireless networks, or GPS satellites. Typically GPS will be more accurate (to street level) but it consumes more battery power. - Page 72 Screen Lock: Create a pattern you will be asked to draw before your screen will unlock. You can select to make the pattern visible or invisible as you draw it. Slide provides no protection, but lets you get to the Home screen quickly, or open Camera and start.
- Page 73 Password requires four or more letters or numbers. This is the most secure option, as long as you create a strong password. Owner info: The information of the owner can be stored and then can be displayed on the lock screen. Set upSIM card lock: Lock your SIM card for extra security.
- Page 74 Clear credentials: On selecting this option, it removes all the certificates. 7. 13Language & input Language: On selecting this option you can choose the required language of the phone from the given list of languages. Spelling correction: On selecting this option you can turn on the spell check feature on your phone.
- Page 75 Google voice typing: On selecting this option, you can convert the voice message into a text message. Voice search: You can make Google Searches by giving a voice input. Text-to-Speech output: It controls the rate at which the words are to be spoken for the search engine to understand and provide a correct translation into words.
-
Page 76: Add Account
Factory Data Reset: You can select to reset your phone to factory settings. This will erase all your data from the phone and require you to sign in and go through the set-up screens to use any of the applications. It will erase your contacts, Messages, Apps, Google account and all data with all settings. - Page 77 • Automatic time zone: The time zone will detect automatically with this option. If you not select this, than you have to set the date & time with zone manually. • Click Date setting, then click upper or down button to adjust date, month, and year, click setting when you finish selection.
- Page 78 7.18 Accessibility These are certain special features which help people with certain disabilities. • Talk back: Using this function your device provide spoken feedback to help blind & low vision user. • Magnification gestures: Using this feature you can zoom in & out by triple tapping the screen.
-
Page 79: Developer Option
• Touch & hold delay: Lets you adjust the delay required for the phone to notice that you're touching and holding an item (for example, to move an app to a Home screen). Enhance web accessibility: This feature allows apps to install scripts from Google that make their web content more accessible. - Page 80 Power menu bug report: Include option in power menu for taking a bug report. Allow mock locations: Allow mock location and service information to be sent to a location manager service for testing. Select debug app: Using this you can set a debug application. Wait for debugger: debugged application waits for debugger to attach before executing.
- Page 81 Show hardware layers update: Flash hardware layers green when they update. Shows GPU overdraw: from best to worst: blue, green, light red, red. Show surface updates: Flash entire window surfaces when they update. Window animation scale: The ratio by which the animation scale is applied. Transition Animation Scale: To speed up transitions (and your phone’s reaction time), either turn off animations, or reduce the scale.
- Page 82 Background processes: Set the standard limit of processes which run in the background. Show all ANRs: Show apps not responding dialog for background apps. 7.20 About iBall mobile View the model number and version information for your phone. Status: You will get the current status like Battery status, Battery level Network, Signal strength, Mobile network type, my phone number, IMEI, IP address, Wi-Fi MAC address, Bluetooth address, Serial number &...
-
Page 83: Internet
Legal information: You will get open source licenses & Google legal information. Phone Model Number: It will show you model number of your handset. CPU: You can view the CPU details. Android version: It will show you current version of Android. 8. - Page 84 Wi-Fi Wi-Fi provides wireless Internet access over distances of up to 100 meters (300feet). To use Wi-Fi on your device, you need access to a wireless access point or “hotspot”. Note: The availability and range of your device’s Wi-Fi signal depends on the number, infrastructure, and other objects through which the signal passes.
- Page 85 To open the Browser, touch and select Browser icon. The Browser always opens to the last Web page you were viewing. The first time you enter the Browser after powering on, your home page will display. You can change your home page by pressing MENU > Settings >General > Set homepage.
- Page 86 • Confirm the URL and name, and then select ‘OK’. To view all your bookmarks, press MENU and select Bookmarks. 3. Refresh a Web page: To refresh the contents of the current page, press MENU and select ‘Refresh’. Open pages in separate windows You can keep more than one Web page open by using multiple windows to display the pages.
- Page 87 1. Bookmark any page: Select ‘Add’. Type a name and location (URL) in the dialog box. Select ‘OK’. 2. Send bookmarked page’s URL: Touch & hold the bookmark you want to open. The context menu opens. Select ‘Share link’. An email Compose screen opens with the URL as the message.
- Page 88 You set your home page from the Settings screen: 1. Press MENU and select More > Settings. The Settings screen opens. 2. In the Page content section, select ‘Set home page’ to open the dialog box. 3. Type the URL of the page you want to set as home, and then select ‘OK’. Download Web files and applications Before you download any files or applications using the Browser, note the following:...
-
Page 89: Experiencing Multimedia
3. The Browser will only allow you to download items that are supported by an application installed on the phone. Warning! Applications downloaded from the Web can be from unknown sources. To protect your phone and personal data, only download applications from sources you trust, such as Android Market. - Page 90 All the pictures you can capture or view on your phone are stored on memory card, which must be installed in your phone. Before you can use the Camera or view pictures in Pictures, make sure you have a card installed.
-
Page 91: Take A Picture
Read the instructions below to add pictures to your Memory card or the phone storage. 1. Mount your memory card to your computer by doing one of the following: Remove the memory card and insert it into a card reader attached to your computer. -
Page 92: View Your Pictures
Tip: Before you take a picture, wipe the sensor window (on the back cover) to remove any small amounts of oil. 1. To open the Camera, on the Home screen, touch and select Camera icon. 2. The Camera opens in capture mode. Frame your picture within the screen and hold the phone steady. -
Page 93: Music
2. Depending on how many pictures you’ve stored, they may take a few minutes to load. 3. If you’ve stored your pictures in folders on your Memory card, then the folders will display as separate “albums”. The top left album always contains all the pictures in all the albums. - Page 94 To open your music Library, on the Home screen, touch and select the Music icon. Your music is organized into four categories: Artists, Albums, Songs, and Playlists. Select a category to view the lists within each. Once in a category, keep selecting until you reach the music you want to play.
- Page 95 10.1 Load music onto your Memory card All the music you can listen to on your phone is stored on memory card. Read the instructions below to add music to your memory card. 1. Mount your memory card to your computer by doing one of the following: Remove the memory card and insert it into a card reader attached to your computer;...
-
Page 96: Play Back Music
Note: If you do not want a ringtone to appear in your music Library but you do want it to be available as a ringtone, and then create the “ringtones”, “notifications”, or “alarms” folder outside your “music” folder. 5. When finished copying, close the USB drive window and unmounts or eject the drive as required by your computer's operating system. - Page 97 4. Playback control: from left to right icons: Go to beginning song, Pause/ resume play and Go to next of song. If a song is playing while you are on the Library screen, you can switch to the Playback screen quickly by selecting the lower song bar. 10.3 Playlists You can create as many playlists as you wish.
- Page 98 5. The song(s) are added. • Manage your playlists Go to the Library screen and select ‘Playlists’. All your playlists appear. Touch & hold the playlist to open the context menu. You can do the following from this screen: Play, Edit (rearrange songs), Delete and Rename.
-
Page 99: Video Player
11. Video Player Choose application in main menu. From the list choose the video you want to play. Tap on the video to select and then play it. You can play/pause the video by single tapping on the screen. By tapping on the option key you will get two options stop and loop using which you can either stop the video or can make it play in loop over and over again. -
Page 100: Fm Radio
12. FM Radio This device provides radio function. Note: Within doors or shielded environment, the receiving effect of radio may be affected. You can improve the effect in the following ways: Near window, adjust the position of earphone cable or adopt manual adjustment. -
Page 101: Sound Record
13. Sound record The phone can be used as a sound recorder. You can record your voice. -
Page 102: Other System Apps
14. Other System Apps 14.1 Calendar Calendar views You can view multiple calendars on your phone, so each calendar event is coded with a color. - Page 103 You can view your calendar in a variety of ways. Touch the date on the left-top of the screen to select from Day, Week, Month or Agenda. 1. Month view Days are shown in a month grid. Busy time slots are shown as vertical bars in the corresponding part of the day.
- Page 104 2. Event Events in the current month are shown vertically in a list, one event after the other. Days with no events are not displayed. Repeating events - Marked with icon following the time or date. View event details - Select the event to view its details. Edit an event - First, select the event to view its details.
- Page 105 Edit an event - Assuming you have write privileges on an event, touch and hold the event to open the context menu, then select ‘Edit event’. Navigate within the current week -Swipe your fingertip up/down. Navigate to a past or future week - Swipe your fingertip left/right. 4.
- Page 106 Create new event - Touch an empty time slot to open the new Event details screen. Create an event From any of the views, press MENU and select ‘New event’ to open the new Event details screen. • Type the information in the fields. •...
- Page 107 When finished, select ‘Done’. Pressing BACK also saves the event. Tip: Create an event quickly in the Day or Week view by selecting an empty time slot. A new Event details screen appears. The ‘From’ field contains the selected time slot. Edit an event To edit an event, you must have the View event screen open and you must have created, or have write privileges, for the event.
- Page 108 • Calendar settings From any of the calendar views, press MENU and select Settings. 1. Calendar view setting Hide declined events: Select this check box if you want all the events you decline to be hidden from all calendar views. 2.
-
Page 109: Alarm Clock
Default reminder time: Select to open the default reminder menu. The time you select will appear by default in the Reminder section when you create a new event. 14.2 ToDo It allows you to quickly and easily track and organize all of your to-do tasks. You can also set the expiry date of the task. - Page 110 To open Alarm Clock, on the Home screen, then touch and select Clock icon. The Alarm clock offers as many alarms as you want. Set an alarm Three alarms are set up for you, ready to customize. All two alarms are turned off by default.
- Page 111 alarm is shown on the Alarm Clock screen without any days under the set time. Ring tone: The current ring tone selection is shown. Select Ring tone to pick another ring tone that will play when the alarm rings. (When you select a ring tone, it plays briefly.) Note that when your alarm goes off, the ring tone will play a maximum of five minutes.
- Page 112 2. Touch the clock with your fingertip to open the Clock selection screen. 3. Drag your fingertip horizontally along the bottom clock face row and touch the face you want to display. Change date & time display You can change the format of the time displayed in your alarms from the global Settings screen: 1.
- Page 113 14.4 Calculator To open Calculator, on the Home screen, then touch and select the Calculator icon. The Calculator offers two panels: basic and advanced. Switch back and forth between panels by pressing MENU and selecting...
- Page 114 ‘Advanced panel’ or ‘Basic panel’, as you wish. Calculator panels Two calculator’s panels are available: basic and advanced. Use the Basic panel to enter numbers and perform basic addition, subtraction, multiplication, and division. Use the Advanced panel to insert advanced operators or delimiters, such as sine, cosine, tangent, square root, parentheses, etc.
- Page 115 Google Maps is a built-in app which helps you find a location, the distance to that location from your current location, and the directions to that location. Enter a keyword for the location and select to search for a location. 14.6 Local Using local, you can search for Places around you.
-
Page 116: File Manager
This application provides you with the latest news and the weather information of your surroundings. You can change your current location, by following these steps: Setting > Weather Settings > and then allow access to use your current location. You can manage your news topics by following these steps: Settings > News Settings >... -
Page 117: Backup And Restore
File Manager is an application which provides you easy access to all your media files, images, documents present in your phone and in your SD card. You can create, view, share, and delete, copy, paste files on your phone using this application. 14.10 Backup and Restore Backup and Restore is an application which is useful to backup &... -
Page 118: Sim Toolkit
14.12 Gallery Gallery option shows all pictures & videos stored in phone & external storage. We can preview & access pictures & videos directly from here. 15. SIM Toolkit SIM Application Toolkit (commonly referred to as STK) is a standard of the GSM system which enables the SIM to initiate actions which can be used for various value added services. -
Page 119: Other User Apps
16. Other User Apps 16.1 Gmail Gmail is a free advertising supported email service provided by Google. Users may access Gmail as secure webmail as well as via POP3 or IMAP4 protocols. Gmail has a search oriented interface. Gmail runs on Google GFE/2.0 on Linux. - Page 120 Search for Android implements Google Now, Google's voice recognition and intelligent personal assistant software for Android, into a Google Search application. Users can speak to their phone in the app to search. Users can, alongside normal Google Search results, receive interactive weather results and flight information, among calculations and more features.
- Page 121 17. Hungama Explore all of Hungama's music library of 2 million+ official songs spread across Bollywood, Tamil, Telugu, Malayalam, Punjabi, Devotional, Regional music and Popular International music and videos. The unique Discovery Engine serves up music based on user’s mood. Use this to find the perfect music mix of your choice.
- Page 122 * You can also download the latest chartbuster music from the app at a great value. 18. iBall Life Box This application is like SIM toolkit containing various categories like cricket, Bollywood, horoscope etc. This is a SIM dependent application and for every message the user has to pay either Re1 or Rs3.
- Page 123 category to the list. In search anything you can directly search for any option. In options you will find the information about the application. 19. Money Control The Markets on Mobile app is your gateway to all critical real-time information about the Indian and global markets through your Android device.
-
Page 124: Opera Mini
20. Opera Mini Opera mini is a web browser designed primarily for mobile phones, smartphones and personal digital assistance. Opera mini requests web pages through Opera software’s servers which process and compress them before sending them to the mobile phone, speeding up transfer by two to three times and dramatically reducing the amount of data transferred, chargeable on many mobile phone data plans. - Page 125 Use this application to purchase and download applications and games that are able to run your handset. Tap on Play Store application. Installing Applications: Browse the play store & search the require contents with keywords. Select an application tap the price & follow on screen instructions to complete the purchase process.
- Page 126 hold-to-talk voice messaging, broadcast (one-to-many) messaging, photo/video sharing, location sharing, and contact information exchange. WeChat supports social networking via shared streaming content feeds and location-based social plug-ins ("Shake", "Look Around", and "Drift Bottle") to chat with and connect with local and international WeChat users. User data is protected via an on-demand contact list backup and retrieval to/from the cloud.
Need help?
Do you have a question about the Andi 3.5 Classique and is the answer not in the manual?
Questions and answers