
Related Manuals for Kuppersbusch EEB 6860.1


Summary of Contents for Kuppersbusch EEB 6860.1
- Page 1 GEBRAUCHS- und Einbauanweisung Instructions for use and installation Instructions d’utilisation et de montage Gebruiks- en montageaanwijzingen EEB 6860.1...
-
Page 2: Table Of Contents
What you will fi nd here Active safety function Eco-function Fast heating mode Read the instructions in this manual carefully before turning on your oven. Memory function Here you will fi nd the most important instructions regarding the safety, Roasting ............use, care and maintenance of your appliance, so that it will give you Setting a programme lasting enjoyment. -
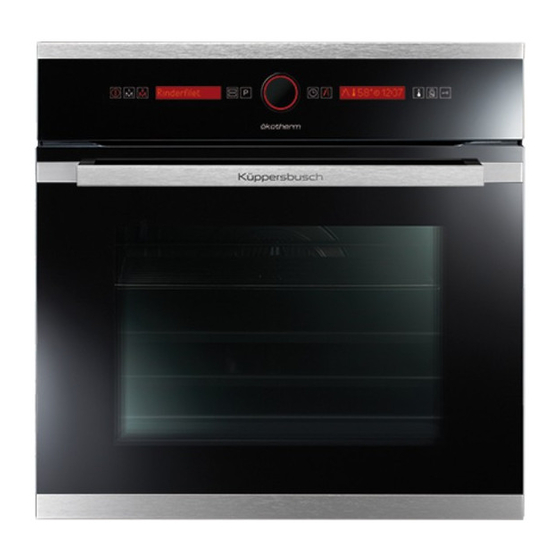
Page 3: Oven Features
Oven features 1 Control panel 2 Fold down grill (Top heat/Grill) 3 Socket for roasting thermoprobe 4 Hot air fan 5 Shelf levels 6 Oven door Accessories included: Grid shelf Enamel roasting tray Enamel baking tray Control Panel - Sensor keys and instructions The control panel operates all oven settings. -
Page 4: Safety Warnings
Safety Warnings Thermoprobe Only use the original thermoprobe. Connection and use Do not trap the thermoprobe cable in the oven door. Remove from the oven if it is not being used. Only KÜPPERSBUSCH hobs have been manufactured and tested for use over a KÜPPERSBUSCH oven. -
Page 5: First Cleaning
The electronic clock features Touch-Control technology. To operate, Touch the symbol. This will light simply touch the glass control symbols with your fi ngertip. The touch up in red. control sensitivity continuously adapts to changing conditions. Make By turning the function selector you sure that the glass surface of the control panel is clean and free of any can see the clock functions. -
Page 6: Oven Use
Oven Use Selecting a conventional cooking setting Turn the oven on by touching General instructions Touch , which will light up on the control panel. The symbol will change to red. Turn The fan turns itself on and off with some settings; this does not mean the function selector to the right or it is damaged. -
Page 7: Conventional Oven Cooking Functions
Conventional oven cooking functions There are many conventional oven cooking functions and they are described below. Symbol Cooking function Suitable for This function is for use when baking cakes where the heat should be even to give a Top/bottom heat spongy texture. -
Page 8: Automatic Cooking
Automatic cooking The oven should be pre-heated for white and rye bread and thin-crust and thick-crust pizza base recipes. In this way the oven will be at the Touch to turn the oven on. ideal temperature for the best results. Pre-heating is not needed for the other recipes. -
Page 9: Changing/Setting The Cooking Time
When the programmed end time is reached, the oven will switch itself Changing/setting the cooking time off, an alarm will sound briefl y and will start fl ashing. Touch to stop the alarm. The oven will display the current time and The cooking time is pre-programmed for the automatic cooking recipes lit up in white. -
Page 10: Special Settings
Special settings Memory function These settings can be accessed by pressing the function selector for The oven has a memory function you can use to store two programmes 6 seconds. The setting is changed by pressing the function selector or you have composed yourself as additional programmes. -
Page 11: Roasting On The Grid Shelf
The cooking time for meat with a layer of fat may increase to twice the Roasting on the grid shelf length. If roasting several small pieces of meat or small birds in the oven, the Use tray and grid shelf. cooking time should be increased by about 10 minutes per piece. -
Page 12: Automatic Cooking Recipe Chart
Automatic cooking recipe chart Your oven offers the possibility of cooking with the following recipes. You only need to set the desired recipe, specify the weight of the food to be cooked and put it in the oven. There is no need to worry about anything else; the oven will cook it for you, with perfect results. Available recipes are shown below: SYMBOL RECIPES... -
Page 13: Suggested Roast Settings For Conventional Oven Cooking
Suggested roast settings for conventional oven cooking Fan-forced Hot air Top/bottom heating hot air Grilling Cooking time Recommended Meat type roasting setting Per cm meat height Temperature in °C in mins. Roast veal 170-190 Roast beef 200-220 180-200 8-10 Steak 200-220 180-200 Rose veal... -
Page 14: Thermoprobe And Inside Temperature Function
Thermoprobe and inside If you wish to modify the thermoprobe temperature setting at any time symbol. Next, turn the function selector during cooking, touch the temperature function to change the cooking temperature. Finally, after pressing the function selector, two beeps will then confi rm that the new time has been set. The thermoprobe measures the inside temperature of the food being roas- ted. -
Page 15: Slow Cooking
Slow cooking You should be present when the cooking fi nishes as the roast is just right for serving. If you leave the roast in the oven, it will continue to Cooking at low temperatures leaves the meat especially tender, even cook with the heat inside the oven and the result will not be as ideal. -
Page 16: Suggested Settings For Slow Cooking
Suggested settings for slow cooking Meat type Weight Sealing (mins) Cooking time (mins) Temperature (ºC) Pork Steak 400-600g 60-90 Pork fi llet 800-1,000g 90-105 1,000-1,500g 10-12 230-250 Chops 800-1,000g 8-10 120-140 Spareribs 1,000-1,500g 10-12 120-150 Beef Steak 700-1,200g 100-140 Rib steak 1,500-1,800g 10-12 150-180... -
Page 17: Baking With Cooking Settings
Baking with cooking settings If baking a small round pizza, put the tray in the oven to preheat too. – Roll out the dough, place it on the oven tray and shape an edge. Hot air – Cover the dough with the topping of your choice but do so quickly so that the dough does not become too moist. -
Page 18: Suggested Baking Settings
Suggested baking settings The values for the modes that should preferentially be used are highlighted. Hot air Top/bottom heat Recommended Fan-forced hot air Cooking time baking setting Pizza Mode Cakes and pastries Height Setting Height Temperature in °C Height Temperature in °C Height Temperature in °C In mins Sponge cake recipe Flat sponge cake in mould... -
Page 19: Grilling
Grilling 2. Turn the function selector to select either HI or LO defrost function. Next press the function selector. Grill with the oven door closed only. 3. You will then hear 2 beeps confi rming your setting. Select heating mode When defrosting, remember: Set the temperature to 250°C. -
Page 20: Child Safety Lock
Cleaning and care Select Pizza Mode Only use fresh produce and prepare according to the usual recipes. Please read this chapter before using the appliance for the fi rst time. If it Make no more than 6 jars holding 1 litre each. is cleaned properly and regularly cared for, the oven should stay beautiful Use the same size jars. -
Page 21: Using An Oven Spray - Instructions
Door glass Do not scratch with the corners of the scraper and be careful not to damage the gaskets with the Inside of the door-glass fi nishing scraper. Avoid using oven spray because regularly use may destroy the glass fi nish. A scraper is suitable for removing stubborn dirt. -
Page 22: Shelf Runner Assembly And Disassembly
Attaching the oven door. Regeneration of the ökotherm® – Hold the oven door with both hands and insert the hinges in the corres- catalyst ponding slots. The hinge should fi t snugly. – Slowly open the door fully. The ökotherm® catalyst dissolves the grease particles and smells produced when roasting with the Hot Air cooking setting. -
Page 23: Maintenance
... The glass in the door is broken. Changing the halogen lamp Switch off the oven and ask the after-sales service to change the door. – Remove the shelf runners..The door gasket is damaged. Replace the door gasket. See ‘Change the door gasket’. Do not use the oven if the door gasket is damaged. -
Page 24: Technical Information
Technical information Electricity If you need to contact the after-sales service or order spare parts, you The appliance must be connected to a socket connected to the power grid. must provide the technical information supplied. Total power: at 230 V: 3.6 kW The oven’s technical information is on at 235 V: 3.7 kW the right, on the side frame. -
Page 25: Assembly In Kitchen Unit
Assembly in kitchen unit Assembly of oven in kitchen unit – Insert the plug into the socket. – Fully insert the oven into the cupboard unit. Take care not to trap the cable of the appliance. Securing the oven to the kitchen unit –... - Page 26 EEB 6860.1 0.88 kWh/cycle* 0.64 kWh/cycle* 42 kg...
- Page 27 KÜPPERSBUSCH HAUSGERÄTE AG Postfach 10 01 32, D-45801 Gelsenkirchen, Küppersbuschstr. 16, D-45883 Gelsenkirchen Telefon: (02 09) 4 01-0, Telefax: (02 09) 4 01-3 03 www.kueppersbusch.de Küppersbusch Ges.m.b.H. Eitnergasse 13, 1231 Wien, Telefon: 01 / 8 66 80-0, Telefax: 01 / 8 66 80 72 www.kueppersbusch.at ·...
Need help?
Do you have a question about the EEB 6860.1 and is the answer not in the manual?
Questions and answers