Table of Contents
Advertisement
Quick Links
INSTRUCTION MANUAL
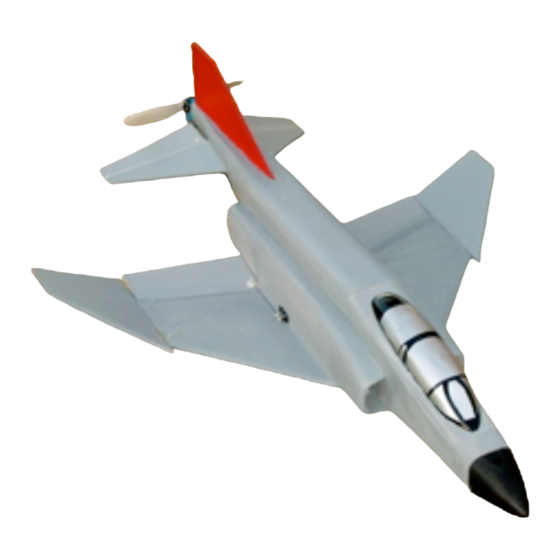
F-4 Phantom II
Specs: Length: 38.5" Wingspan: 28.5" Weight: 19-24oz
Wing area: 297 sq inches
Wing Loading: 10.67 oz/sq foot
Center of Gravity Location: 5 7/8" to 6 1/4" measured back from the leading edge of the
wing were it connects to fuselage
6mmFlyRC.com
Get Ready To Fly
The parts template page should be used as a guide only for part recognition and as a
general guide. Your kit has been modified from these plans. 6mmFlyRC thanks
Matti Houviala for his permission to use his design for the F-4 Phantom II.
Advertisement
Table of Contents

Related Manuals for 6mmFlyRC F-4 Phantom II

Summary of Contents for 6mmFlyRC F-4 Phantom II
-
Page 1: Instruction Manual
The parts template page should be used as a guide only for part recognition and as a general guide. Your kit has been modified from these plans. 6mmFlyRC thanks Matti Houviala for his permission to use his design for the F-4 Phantom II. - Page 2 Review the entire construction manual before you start building. 2. Take your two fuselage sides and make sure you make a right and left Fuselage Side Construction side. Lightly spray the 3M Super 77 Adhesive on the edges of the fuselage First, assemble the two fuselage sides by pieces and on the doubler strips.
- Page 3 It may be necessary to apply a small amount of epoxy to hold the doubler strips around the curves. 3. Next, apply doublers strips to the intake sides using the same techniques. Again, it may be necessary to use a small amount of epoxy on the curves to Intake Sides with doublers installed.
- Page 4 Wing Assembly Fuselage Assembly 1. The wing of the F-4 is composed of 1. You will need the two fuselage sides several parts. Main wing (1 piece), wing you prepared earlier and the three (3) tips (2), and the ailerons (2). You will bulkheads.
- Page 5 2. Next, apply epoxy to the other side of the bulkheads so you may put the other fuselage side together. Dry fit and trim any bulkhead that doesn’t allow for a good fit. Fuselage sides assembled. Wing to Fuselage 1. The first step is to take the bottom- front fuselage piece and attach it to the fuselage piece.
- Page 6 2. Now we will attach your wing assembly to your fuselage piece. With the fuselage piece you just assembled turned over so the bottom of the fuselage is up, place the wing assembly on it for a dry fitting. Align the piece from the nose back.
- Page 7 3. Next, attach the rear fuselage piece to Intake Assembly the bottom using the same techniques. This piece is almost square, but tapers WARNING: SOME slightly, make sure to dry fit this piece FOLLOWING PICTURES first as one side does match up to the INCORRECT! TAKE NOTE OF THE main wing assembly.
- Page 8 Intake side placement. Make sure to have the intake sides flush with the outside intake edge. 1. With your fuselage and wing assembly completed, place the model right side up. You will now attach the previously assembled intake sides with the doubler strips to the wing assembly parallel to the fuselage body.
- Page 9 3. Repeat for other side. Top Intake Assembly 1. Next you will be installing the intake top. NOTE: If you want to avoid fishing your servo wires later, servos can be installed at this point for ease of wiring. SERVO INSTALLATION page later in the instructions to see our recommended placement.
- Page 10 Intake lips angle out 2. Apply epoxy to one side of the fuselage body edges and attach one side of the rear lower tail piece. After drying, repeat and gently bend the fuselage tail to form the triangle shape. Completed top intake installation. Tail Assembly 1.
- Page 11 Wing Tip Installation braces, making sure the edges of the braces are flush against the table. This 1. Now it’s time to install the wing tips. will insure that the angle of all the braces The wing tips cant up. For this step you will be the same.
- Page 12 Vertical Tail Installation Next, you will need the vertical tail and the top fuselage piece that receives the tail. You will also need the motor stick mount. 1. First, apply adhesive to the tabs in the Centered and straight motor mount. vertical tail and butting edge and insert into the corresponding slots in the fuselage top piece.
- Page 13 3. Next, to install the top fuselage piece For the next step you will need the and vertical tail, apply epoxy to the triangular piece that bridges between the fuselage side edges and place the top main fuselage and the tail. fuselage piece on top of your model.
- Page 14 the front side fuselage to be pinched in slightly. The use of pins to secure the 3. Sand the nosecone into shape now or fuselage sides place before painting. necessary. Elevator/Horizontal Tail Assembly The tails of the F-4 Phantom cant down at about a 23 degree angle.
- Page 15 3. Remove the tails and bevel the inboard edge of the horizontal tail to achieve a tight fit against the fuselage. Be sure not to remove too much material. 4. Install one side of the tail by applying epoxy to the butting edge of the tail and to the angle brace.
- Page 16 Motor Installation Installing the motor is very simple using the stick mount you previously installed. It may be necessary to trim the stick mount during this process. In addition, it may be necessary to trim back portions of the foam in the tail. It is important to get the motor as far forward as possible.
- Page 17 More pictures on next page. Motor fitted onto the stick. Ready for mounting. Aileron servo and control horn installed Servo Locations and Control Horn Elevator Servo Location Tips To install the elevator, we used two The servos for the ailerons can be servos and mounted them to the tail installed along the intake sides about sides near the leading edge of the...
- Page 18 Holes lined up over butting edge of aileron or elevator Canopy Installation See canopy installation guide in your instruction CD. With the F-4, you will be using 1 piece of depron (precut) instead of the 2 indicated in the canopy Elevator servo location instruction guide.
- Page 19 Refer to pictures. Repeat with a fine grit sandpaper to achieve a smooth finish and paint with a foam safe paint. Always test a small piece of foam to insure the Additional support at www.6mmFlyRC.com. Additional tips and modifications at: http://www.rcgroups.com/forums/showthread.php?t=537312 Modify at your own risk.
Need help?
Do you have a question about the F-4 Phantom II and is the answer not in the manual?
Questions and answers