Kenwood NEXEDGE NX-740H Instruction Manual
Vhf/uhf digital transceiver
Hide thumbs
Also See for NEXEDGE NX-740H:
- Service manual (54 pages) ,
- Instruction manual (18 pages) ,
- Function reference (235 pages)
Table of Contents
Advertisement
Available languages
Available languages
Quick Links
Download this manual
See also:
Service Manual
Advertisement
Chapters
Table of Contents

Related Manuals for Kenwood NEXEDGE NX-740H


Summary of Contents for Kenwood NEXEDGE NX-740H
-
Page 1: Instruction Manual
INSTRUCTION MANUAL VHF DIGITAL TRANSCEIVER NX-740H NX-740HV UHF DIGITAL TRANSCEIVER NX-840H NX-840HU © B5A-0031-10 (K) -
Page 3: Thank You
THANK YOU We are grateful you have chosen KENWOOD for your personal mobile applications. This instruction manual covers only the basic operations of your mobile radio. Ask your dealer for information on any customized features they may have added to your radio. -
Page 4: Table Of Contents
◆ The transceiver operates in 12 V negative ground systems only! Check the battery polarity and voltage of the vehicle before installing the transceiver. ◆ Use only the supplied DC power cable or a KENWOOD optional DC power cable. ◆ Do not cut and/or remove the fuse holder on the DC power cable. -
Page 5: Getting Started
GETTING STARTED Note: The following instructions are for use by your KENWOOD dealer, an authorized KENWOOD service facility, or the factory. SUPPLIED ACCESSORIES Carefully unpack the transceiver. We recommend that you identify the items listed below before discarding the packing material. If any items are missing or have been damaged during shipment, fi... - Page 6 ■ Installing the Transceiver For passenger safety, install the transceiver securely using the supplied mounting bracket and screw set, so the transceiver will not break loose in the event of a collision. Note: Before installing the transceiver, check how far the mounting screws will extend below the surface.
-
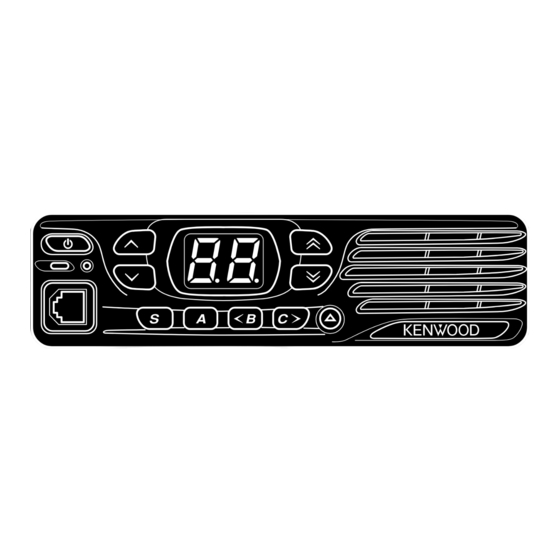
Page 7: Getting Acquainted
GETTING ACQUAINTED FRONT/ REAR PANEL ACC. (Power) switch Press to switch the transceiver ON or OFF. keys Press to activate their programmable functions {page 6}. Display Refer to page 4. keys Press to activate their programmable functions {page 6}. TX/RX Indicator Lights red while transmitting. - Page 8 DISPLAY The display shows the zone/ channel number and the 2 dots show various modes of operation. Display Description Page Zone Display (Zone 1) Zone Display (Zone 2) Channel Display (Channel 16) Appears during Site Roaming. (ro) Appears when switch the transceiver ON. The Transceiver Password function is programmed.
- Page 9 Display Description Page Appears when the Operator Selectable Tone mode is on. (ot) Appears when the Lone Worker function is on. (Ln) Appears when the Talk Around function is on. (tA) Appears when the Scrambler function is on. (Sr) Appears when the Encryption function is on. (Ec) Appears when the Scrambler/ Encryption code mode is on.
-
Page 10: Programmable Functions
PROGRAMMABLE FUNCTIONS The , , , S, A, <B, C>, and keys can be programmed with the functions listed below. Ask your dealer for details on these functions. • None • Priority Zone-Channel Select • Autodial • Squelch Off • •... - Page 11 ■ Transceiver Password To enter the password: 1 Press to select a digit. • When using an optional microphone with a keypad, simply enter the password digits and proceed to step 3. 2 Press C> to accept the entered digit and move to the next digit. •...
-
Page 12: Nxdn
NXDN NXDN is a general term for the NXDN wireless communication protocol which uses 4 Level FSK. Various data communications, including individual and group voice communications, Status calls, and GPS data transmission, are possible. INDIVIDUAL/ GROUP CALLS Each channel is set up with an individual or group ID list number. To make a call, select the channel with the ID list number you wish to call, then press the PTT switch to start the call. -
Page 13: Dtmf Calls
PRIORITY SCAN If a Priority channel has been programmed, the transceiver will automatically change to the Priority channel when a call is received on that channel, even if call is being received on a normal channel. • “P” appears on the display to indicate the Priority channel (depending on dealer setting). TEMPORARY CHANNEL LOCKOUT During scan, you can temporarily remove specifi... -
Page 14: Signaling
STUN This function is used when a transceiver is stolen or lost. When the transceiver receives a call containing a stun code, the transceiver becomes disabled. The stun code is canceled when the transceiver receives a call with a revive code. •... -
Page 15: Fleetsync: Alphanumeric 2-Way Paging Function
FleetSync: ALPHANUMERIC 2-WAY PAGING FUNCTION FleetSync is an Alphanumeric 2-way Paging Function and is a protocol owned by JVC KENWOOD Corporation. Note: If set up by your dealer, your transceiver may use the MDC-1200 feature in place of FleetSync. MDC-1200 and FleetSync cannot be operated simultaneously. -
Page 16: Advanced Operations
ADVANCED OPERATIONS EMERGENCY CALLS If your transceiver has been programmed with the Emergency function, you can make emergency calls. 1 Press and hold the key programmed as [Emergency]. • Depending on the delay time programmed into your transceiver, the length of time you must hold the Emergency] key will vary. - Page 17 1 Press and hold the key programmed as [Scrambler/Encryption code] for 1 second. • “co” (code) appears on the display, followed by the current scrambler/ encryption code. 2 Press <B and C> to select your desired scrambler/ encryption code. 3 Press S or to store the new setting.
-
Page 18: Background Operations
BACKGROUND OPERATIONS TIME-OUT TIMER (TOT) The Time-out Timer is used to prevent you from using a channel for an extended duration. If you continuously transmit for a preset time, the transceiver will stop transmitting and a warning tone will sound. Release the PTT switch to stop the tone. AUXILIARY PORT Press the key programmed as [AUX] to activate the auxiliary port. - Page 19 MANUAL DE INSTRUCCIONES TRANSCEPTOR DIGITAL VHF NX-740H NX-740HV TRANSCEPTOR DIGITAL UHF NX-840H NX-840HU...
- Page 21 MUCHAS GRACIAS Le agradecemos que haya seleccionado KENWOOD para sus aplicaciones móviles personales. Este manual de instrucciones abarca únicamente las operaciones básicas de su radio móvil. Solicite a su proveedor información acerca de las funciones personalizadas que haya podido añadir a su radio.
- Page 22 • Si detecta un olor anormal o humo procedente del transceptor, desconecte inmediatamente la alimentación y póngase en contacto con su proveedor KENWOOD. • El uso del transceptor mientras conduce puede infringir las leyes de tráfico. Consulte y respete el reglamento de tráfico de su país.
-
Page 23: Introducción
INTRODUCCIÓN Nota: Las siguientes instrucciones son para su proveedor KENWOOD, un centro de reparaciones autorizado KENWOOD o la fábrica. ACCESORIOS SUMINISTRADOS Desembale el transceptor con cuidado. Recomendamos que antes de desechar el material de embalaje, identifique los elementos indicados en la lista siguiente. Si falta algo o se ha producido algún daño durante el transporte, presente inmediatamente una... - Page 24 ■ Instalación el Transceptor ADVERTENCIA Para la seguridad de los pasajeros, instale el transceptor de forma segura utilizando el soporte de montaje y el juego de tornillos de forma que el transceptor no se suelte en caso de colisión. Nota: Antes de instalar el transceptor, compruebe cuanto se extienden los tornillos por debajo de la superficie.
-
Page 25: Disposición Física
DISPOSICIÓN FÍSICA PANEL FRONTAL/ TRASERO ACC. Interruptor (encendido) Púlselo para encender o apagar el transceptor. Teclas Púlselas para activar sus funciones programables {página 6}. Pantalla Consulte la página 4. Teclas Púlselas para activar sus funciones programables {página 6}. Indicador de transmisión/recepción Se ilumina en rojo durante la transmisión. - Page 26 PANTALLA En la pantalla se muestra el número de zona/ canal y los 2 puntos indican varios modos de funcionamiento. Descripción Página Pantalla Pantalla de zona (zona 1) Pantalla de zona (zona 2) Pantalla de canal (canal 16) Aparece durante la Itinerancia de Emplazamiento. (ro) Aparece cuando encender el transceptor.
- Page 27 Descripción Página Pantalla Aparece cuando se activa al modo de Tono seleccionable por operador. (ot) Aparece cuando se activa la función Trabajador solitario (Ln) Aparece cuando se activa la función Circunvalación. (tA) Aparece cuando se activa la función Mezclador. (Sr) Aparece cuando se activa la función Cifrado.
-
Page 28: Funciones Programables
FUNCIONES PROGRAMABLES Las teclas , S, A, <B, C> y pueden programarse con las funciones que se detallan a continuación. Consulte a su proveedor para más información acerca de estas funciones. • Ninguno • Selección de canal-zona prioritario • Autodiscado •... -
Page 29: Ajuste Del Volumen
■ Contraseña del transceptor Para introducir la contraseña: 1 Pulse para seleccionar un dígito. • Si utiliza un micrófono opcional dotado del teclado, simplemente introduzca los dígitos de la contraseña y vaya al paso 3. 2 Pulse la tecla C> para aceptar el digito especificado y pasar al siguiente dígito. •... -
Page 30: Nxdn
NXDN NXDN es un nombre genérico del protocolo de comunicaciones inalámbricas NXDN que emplea tecnología FSK de 4 niveles. Permite realizar distintos tipos de comunicaciones de datos, como comunicaciones por voz en grupo e individuales, llamadas de estado y transmisión de datos GPS. LLAMADAS INDIVIDUALES/ DE GRUPO Cada canal está... -
Page 31: Llamadas Dtmf
EXPLORACIÓN PRIORITARIA Si se ha programado un canal prioritario, el transceptor pasa automáticamente al canal prioritario cuando se recibe una llamada en dicho canal, aunque ya se esté recibiendo una llamada en un canal normal. • “P” aparece en la pantalla para indicar el canal prioritario (según la configuración del proveedor). BLOQUEO DE CANAL TEMPORAL Durante la exploración, puede borrar temporalmente canales específicos de la secuencia de exploración pulsando la tecla programada con la función [Supr/Añadir exploración]... -
Page 32: Señalización
BLOQUEO DEL TRANSCEPTOR Esta función se utiliza cuando se sufre la pérdida o el robo de un transceptor. Cuando el transceptor recibe una llamada que contiene un código de bloqueo, el transceptor se desactiva. El código de bloqueo del transceptor se anula cuando el transceptor recibe una llamada con un código de reactivación. - Page 33 ALFANUMÉRICA DE 2 VÍAS FleetSync es una función de localización alfanumérica de 2 vías y a su vez es un protocolo patentado por JVC KENWOOD Corporation. Nota: Si lo ha programado el proveedor, el transceptor podrá utilizar la característica MDC-1200 en lugar de FleetSync.
-
Page 34: Operaciones Avanzadas
OPERACIONES AVANZADAS LLAMADAS DE EMERGENCIA Si su transceptor ha sido programado con la función emergencia, podrá hacer llamadas de emergencia. 1 Pulse prolongadamente la tecla programada con la función [Emergencia]. • El tiempo de retardo programado en el transceptor determina el tiempo que debe mantener pulsada la tecla Emergencia]. - Page 35 1 Pulse prolongadamente la tecla programada con la función [Código de Mezclador/Cifrado] durante 1 segundo. • “co” (código) aparece en la pantalla, seguido del código de mezclador/ cifrado actual. 2 Pulse <B y C> para seleccionar el código de mezclador/ cifrado que desee. 3 Pulse S o para guardar la nueva configuración.
-
Page 36: Operaciones De Fondo
OPERACIONES DE FONDO TEMPORIZADOR DE TIEMPO LÍMITE (TOT) El temporizador de tempo límite sirve para evitar que utilice un canal durante un periodo de tiempo prolongado. Si transmite ininterrumpidamente durante un periodo de tiempo predefinido, el transceptor dejará de transmitir y sonará un tono de aviso. Suelte el conmutador PTT para detener el tono.
Need help?
Do you have a question about the NEXEDGE NX-740H and is the answer not in the manual?
Questions and answers