
Related Manuals for Block VR 100


Summary of Contents for Block VR 100
- Page 1 Instruction Manual 14--25 1--13 Hi-Fi Stereo Receiver VR 100 Hi-Fi Stereo Receiver VR 100 VR 100...
- Page 2 VR 100 9-10...
- Page 5 Halten Sie das Gerät fern von Feuchtigkeit Achten Sie darauf, dass keine Gegenstände ins Gerät fallen Bitte halten Sie das Gerät fern von Hitze- quellen. Sorgen Sie für genügend Luftzirkulation bei dem Einbau in einem Rack Nehmen Sie das Gerät vom Netz, wenn es Achten Sie darauf, dass keine Sprays oder lange Zeit nicht genutzt wird Chemie an Ihr Gerät kommen...
- Page 6 Sie können Ihren VR 100 über die Systemfernbedienung (optional) fern bedienen. Richten Sie von Ihrer Sitzposition aus die Fernbedienung in Richtung Ihres Gerätes. 1. Nehmen Sie die Batterien aus ihrer Verpackung Achtung: 2. Legen Sie die 2 „AAA“ Batterien unter Beachtung der Polarität seitenrichtig ein.
- Page 7 1. Funktionstaste Mit dieser Taste können Sie Standby: AMP STANDBY SPK A/B SPK A+B Einstellungen wie Bass, Drücken Sie diese Taste, um das Gerät auszuschalten. Hochton, Balance und Reset (FUNCTION) (INPUT) Drücken Sie die Taste erneut, um das Gerät wieder vornehmen.
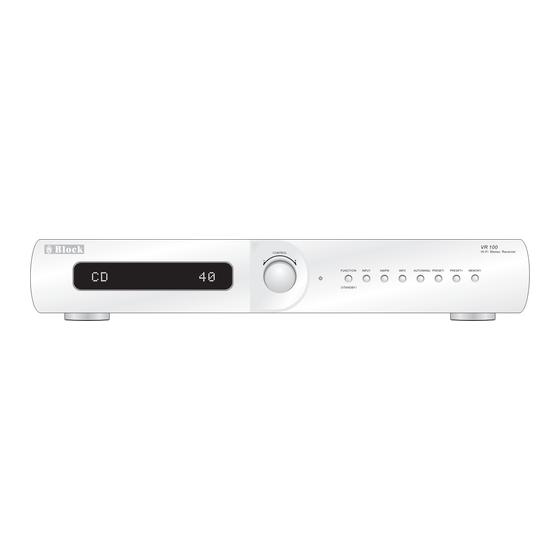
- Page 8 Bedienung am Gerät VR 100 Schalten Sie das Gerät mit der Power-Taste auf der Rückseite ein! 1. VFD Display: Im Display sehen Sie, welche Lautstärke 8. AUTO/MANU: Drücken Sie diese Taste länger als 2 sec. um und welche Quelle Sie gewählt haben.
- Page 9 Model: VR 100 Hi-Fi Stereo Receiver Power Rating:AC 230V 50Hz Max Power Consumption: 150W 11. DAB S-8-...
- Page 10 Model: VR 100 Hi-Fi Stereo Receiver Power Rating:AC 230V 50Hz Max Power Consumption:150W R 100 AM/FM RDS PLL Tuner CONTROL S-9-...
- Page 12 S-11-...
- Page 13 S-12-...
- Page 14 S-13-...
-
Page 15: Table Of Contents
INTRODUCTION & CONTENTS Introduction Contents Introduction & Contents Congratulations on purchasing this VR 100 Receiver. It has been developed following an extensive research and development program 15,16 that has culminated in what we regard as an exceptional mid-range Safety instructions hi-fi product. -
Page 16: Safety Instructions
SAFETY INSTRUCTIONS Safety Instructions CAUTION: To reduce the risk of electric shock, do not remove any cover. N O U S E R - S E R V I C E A B L E PA R T S I N S I D E , R E F E R A N Y SERVICING TO QUALIFIED SERVICE PERSONNEL. - Page 17 SAFETY INSTRUCTIONS Notes On Use...
-
Page 18: Remote Control
REMOTE CONTROL BATTERY INSTALLATION By using the provided remote control unit the VR 100 can be controlled from your listening position. To use the remote control unit, point it at the REMOTE SENSOR window of the 1. Remove the battery compartment cover. - Page 19 REMOTE CONTROL 1.FUNCTION BUTTON. Allows access to menu features such STANDBY: AMP STANDBY SPK A/B SPK A+B as bass, treble, balance, reset. Press this button to turn the unit into standby mode, press Use vol+/- button to adjust the level. (FUNCTION) (INPUT) again to turn on the unit.
-
Page 20: Front Panel Controls
FRONT PANEL CONTROLS VR 100 POWER SWITCH ON REAR PANEL, TURN IT ON BEFORE USE THE UNIT. 1. VFD DISPLAY. Will give the indication of level control and 8. AUTO/MANU. Press and hold for 2 seconds to active AUTO input source selected. -
Page 21: Rear Panel Connections
REAR PANEL CONNECTIONS Model: VR 100 Hi-Fi Stereo Receiver Power Rating:AC 230V 50Hz Max Power Consumption: 150W 1. POWER SWITCH: Switches mains power on/off to internal 8. TV INPUT SOCKET. components, however please note that mains power is still applied to this unit even though this switch may be off. -
Page 22: Making The Connections
MAKING THE CONNECTIONS TURNTABLE Model: VR 100 Hi-Fi Stereo Receiver Power Rating:AC 230V 50Hz Max Power Consumption:150W CD PLAYER SPEAKER CONNECTIONS DAB TUNER R 100 AM/FM RDS PLL Tuner CONTROL OTHER AUDIO SOURCE AUDIO RECORDER Protect ! CASSETTE DECK If the speaker cable is shorted during working, V 100 will automatically come to protection mode, and VFD will display "... -
Page 23: Antenna Connections
ANTENNA CONNECTIONS FM aerial Connect an aerial to the FM 75 ohm socket ( a simple wire aerial is supplied for temporary use). Extend the lead and move the aerial around until you get the best reception. For continued use, we strongly recommended using a 75 ohm outdoor FM aerial. AM loop aerial Connect each end of the single length antenna to the antenna terminals. -
Page 24: Installation And Position
INSTALLATION AND POSITION V 100 V 1 0 0... -
Page 25: Trouble Shooting
TROUBLE AND SHOOTING Noise is excessive in both Poor location and/or direction of the stereo and monaural antenna. Transmitted station is too far broadcasts. away. An unusual hissing noise is A slight noise may be heard because the heard when listening to the method used for modulation of FM broadcast in stereo, but not heard when listening... -
Page 26: Specifications
SPECIFICATIONS FM TUNER SECTION Frequency Range: 87.5 - 108MHz 0.05MHz step Antenna Terminal: 75 ohm (unbalanced) Preset Stations AM TUNER SECTION 300mV Frequency Range: 522 - 1611KHz 9KHz step (CD, DAB, AUX, TAPE, TV) Antenna Terminal: Loop Antenna Preset Stations RECOR OUT 480mV RECOR OUT...
Need help?
Do you have a question about the VR 100 and is the answer not in the manual?
Questions and answers