Table of Contents
Advertisement
ATAD-P0112
手動圧着工具
Manual crimping tools
取扱説明書 / INSTRUCTION MANUAL
注意
CAUTION :
Be sure to read this Instruction Manual carefully before using it to secure safe operation.
Save this Instruction Manual so that it is available whenever necessary.
第 2 版 / / Second edition
HT302 型
安全に使用していただくために使用前に、必ずこの取扱説明書をお読みください。
また、いつでもすぐに読めるように、この取扱説明書を保管してください。
Type HT302
Advertisement
Table of Contents

Related Manuals for HRS HT302

Summary of Contents for HRS HT302
-
Page 1: Instruction Manual
ATAD-P0112 第 2 版 / / Second edition 手動圧着工具 HT302 型 Manual crimping tools Type HT302 取扱説明書 / INSTRUCTION MANUAL 注意 安全に使用していただくために使用前に、必ずこの取扱説明書をお読みください。 また、いつでもすぐに読めるように、この取扱説明書を保管してください。 CAUTION : Be sure to read this Instruction Manual carefully before using it to secure safe operation. -
Page 2: Safety Instructions
2. To protect against personal injury, assure that screws and nuts are properly tightened after the completion of repair/ adjustment works or replacement of the parts. 3. periodical cleaning of the tool is recommended. 4. In the event that your tool fails to perform satisfactory after repair or adjusting immediately stop the work and contact HRS for service. -
Page 3: Table Of Contents
はじめに / Forward この度は、手動圧着工具をご購入いただき誠にありがとうございます。 ご使用前に必ず本書をよくお読みいただき十分ご理解の上、正しくご使用くださいますようお願い致します。 Thank you for purchase of our manual crimping tool. For safe operation read, understand and follow this Instruction Manual. 目 次 1. 工具使用上の注意及び保守 ......1 2-7-2. 組立手順(例) ..........7 2-7-3. ハウジング組立状態の確認 .......7 2. 圧着作業基本要領 ........2 2-7-4. 端子の引き抜き方法 ........7 2-1. -
Page 4: 工具使用上の注意及び保守
【 Repair of the tools 】 Contact the place of purchase or nearest HRS representative. Describe exact nature of the problem. Do not diss-assembly the tool. If instructed, ship the tool in a secure package, with a written description of the problem. -
Page 5: 圧着作業基本要領
2. 圧着作業基本要領 / Basic outline of crimp operation 圧着作業の基本的な一般事項について説明します。 General description of the crimp process. 2-1. 圧着端子各部の名称及び機能 / Configuration and function of crimp contact 2-1-1. 圧着端子各部名称 / Configuration of crimp contact コンタクト部分 / Contact section ベルマウス / 芯線 / 被覆 / Bellmouth Conductor Outer insulation セレーション / ワイヤーバレル / Serrations Wire barrel インシュレーションバレル... -
Page 6: 電線被覆のストリップ
2-2. 電線被覆のストリップ / Stripping of wire outer insulation 2-2-1. ストリップ長さの適否 / ストリップ長さの適否 / / Correct stripping length 電線のストリップ長さは、端子ごとに設定されています。ストリップ長さの加工精度により圧着の作業性品質が左 右されますので注意してください。 Stripping length of the wire is specified for each contact. Correct crimping depends on accurate stripping of the wire. Correct crimping depends on accurate stripping of the wire. Correct crimping depends on accurate stripping of the wire. -
Page 7: 圧着部の引っ張り強度及び測定方法
2-5. 圧着部の引っ張り強度及び測定方法 / Tensile strength of crimped section and measuring method 2-5-1. 圧着部引っ張り強度 / 圧着部引っ張り強度 / / Tensile strength of crimped section 芯線圧着部(ワイヤーバレル部)の電線を引っ張った時に耐えられる強さのことで、端子ごと、電線ごとに許容値 を設定しています。 Retention strength of the crimped wire when the pull force (N) is applied to it. The pull force is defined for each style of the con- tact. -
Page 8: 圧着不良例
2-6-2. 圧着不良例 / Example of defective crimping 1 ベルマウス無し、過大 / None or excessive bellmouth 工具の調整状態や、工具への端子のセットの仕方により発生する事が ベルマウス無し / ベルマウス過大 / 有ります。ベルマウスが無かったり大き過ぎる事により、芯線の断線 No bellmouth. Excessive bellmouth. や引っ張り強度の不足、電気的接続の不安定となる恐れがあります。 Caused by incorrect positioning of the contact in the crimping section of the tool. Can cause conductor break, low pull-out force or electrical connection failure. - Page 9 8 端子変形(ツイスト) Deformed contact (Twist) 工具の調整状態や、工具への端子のセット状態、端子の取り扱いに より発生する事があります。ツイストが著しいと、ハウジングへの ツイスト / Twist 挿入が行えない事があります。 Can be caused by the wear of the tool, positioning of the contacts in the crimping sections of the tool or handling of the contact. Excessive deformation of the contact will prevent insertion in the corre- sponding insulator (housing).
-
Page 10: 端子のハウジングへの挿入
2-7. 端子のハウジングへの挿入 / Insertion of contact into housing 2-7-1. ランス高さの確認 / ランス高さの確認 / Checking the lance height 圧着した端子のランスの高さが所定の寸法内にあるか確認 してください。 Lance height must be as specified on applicable drawing. 2-7-2. 組立手順(例)/ Assembling procedure (example) 1) 端子より 10 cm 以内の電線の部分をつかみ挿入を 行ってください。 2) 端子は、ハウジングに対して水平となるように挿入し てください。... -
Page 11: その他、注意事項
2-8. その他、注意事項 / Other precautions 2-8-1. 電線結束時の注意事項 電線結束時の注意事項 / precautions when tying the wire precautions when tying the wire 電線を結束する際は、電線に余裕を持って行い、端子に直接負荷が掛からないように注意してください。 電線の両端を結束する際は、最初に結束した側の端子に負荷が掛からないように注意してください。 Tie at sufficient distance from the connector to assure that there are no forces applied to the inserted contacts. 2-8-2. -
Page 12: 工具の外観及び各部の名称
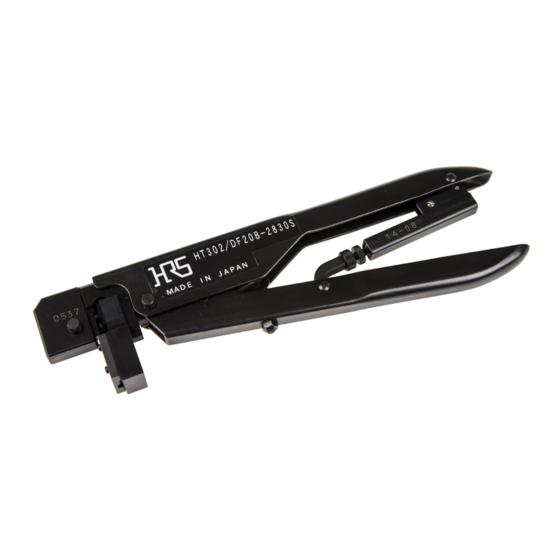
3. 工具の外観及び各部の名称 / Configuration of the tool (230) 232 ± 5 製造年月日 / 製造番号表示 / 製品名表示 / 固定ハンドル / Date of manufacture Serial number Tool number Stationary handle 適合電線 AWG No. 表示 / Marking of applicable wire キャリアカッター / AWG No. Carrier cutter 可動ハンドル... -
Page 13: 工具一覧表
子ガイド部に通します。 (注意) 変形した端子は通りません。使用しないでください。 端子を通すと、 「カチ」と手応えがあります。端子が アンビル上に来たとき「カチ」と手応えがあった位 置が圧着位置です。 Hold the tool with HRS logo and HRS tool number facing up. 端子ガイド / Compress the handle until the moving handle releases and Contact guide is fully open. Place the contact on the anvil and insert it into the contact holder until it comes in contact with the stopper in the contact holder. -
Page 14: キャリアカス除去方法
4) 所定の長さに被覆をストリップしたケーブルを芯線が解か ( 圧着部拡大図 )/ れないように端子の位置に合わせてください 。(被覆スト (Enlarged view of the crimping section) リップ長さは「8. 圧着条件及び圧着品質基準表」をご 参照ください。 ) 端子 / Contact (注意) 圧着不良となる可能性がありますので、ケーブルで ケーブルストッパー / ケーブル / Wire Wire stop 直接端子を押さないでください。 Strip the covering of the cable by a given length. Then match the cable to the position of contact while taking care 端子ストッパー... -
Page 15: クリンパの交換方法
2) 端子ガイドを矢印の向きに沿って引き抜いてくださ い。 Pull out the contact guide following the direction of the ar- row. 3) 丸印を付けたところにキャリアカスがたまっているよ うであれば、取り除いてください。 キャリアカスの除去が終わったら分解したときと逆に 組み立ててください。組立後は必ず圧着品質確認して ください。 If carriers and carrier chips gather in the circled parts, re- move them. After completion of removal of carriers and carrier chips, assemble the manual crimping tool by reversing the disas- sembly procedure. -
Page 16: 圧着条件及び圧着品質基準
7. 圧着条件及び圧着品質基準 / Crimping conditions and crimping quality standard 1) 本 工具により圧着した端子のクリンプハイト及び引張り強度が「8. 圧着条件及び圧着品質基準表」の規格を満足し ているかをご確認ください。 2) 本工具により圧着した端子の形状が良品の基準にある事をご確認ください。 ( 注意 )1. 標準電線と異なる被覆径の電線をご使用の際は、弊社営業または代理店様にご相談ください。 2. 下図は端子形状の一例です。各部名称の参考にしてください。 Check to be sure that the contact that has been crimped using the tool satisfies the standerd described in “8.Table of crimping conditions and crimping quality standard"... -
Page 17: 圧着条件及び圧着品質基準表
− −... - Page 19 取扱説明書番号 ATAD-P0112 発行年月 2009 年 5 月 改定年月 2010 年 10 月 版 数 第 版 注意 (1) 本書の一部または全部を無断転載する事は固くお断り致します。 (2) 本書の内容について、将来予告なしに変更することがあります。 (3) 当社では、本製品の運用を理由とする損失、逸失利益などの請求につきましては、責任を負い兼ねま すのでご了承ください。 (4) 本製品がお客様により不適切に使用されたり、本書の内容に従わずに取り扱われたり、またはヒロセ 電機株式会社以外の第三者により修理、変更された事などに起因して生じた損害などにつきましては、 責任を負い兼ねますのでご了承ください。 (5) 本製品仕様について、改良のため将来予告なしに変更することがあります。 2010 CAUTION (1) No part of this manual may be reproduced without the written permission of Hirose Electric Co., Ltd. (2) Descriptions in this manual are subject to change without notice.
- Page 20 本社 � � � 141-8587 東京都品川区大崎 5-5-23 本製品に関するお問い合わせは下記までご連絡下さい。 生産技術部 � 222-8566 神奈川県横浜市港北区菊名 7-3-13 TEL:045(414)1406 FAX:045(402)7861 http://www.hirose.co.jp 本取扱説明書は、当社ホームページからダウンロードできます。 5-23, OSAKI 5-CHOME, SHINAGAWA-KU, TOKYO 141-8587, JAPAN PHONE : 81-03-3491-9741 FAX: 81-03-3493-2933 http://www.hirose.com 10 • 10 Printed in Japan...
Need help?
Do you have a question about the HT302 and is the answer not in the manual?
Questions and answers