
Subscribe to Our Youtube Channel
Related Manuals for Num'axes Canicom 5


Summary of Contents for Num'axes Canicom 5
- Page 1 Guide d’utilisation Fr - User’s guide Gb - 19 Manual de instrucciones Es - 35 Gebrauchsanleitung D - 51 Manuale d’uso - 67...
- Page 2 / declares that les colliers d’éducation / the training collars CANICOM 5.201 / CANICOM 5.202 / CANICOM 5.500 / CANICOM 5.800 / CANICOM 5.1500 satisfont à toutes les dispositions de la Directive R&TTE N° 1999/5/CE du Conseil Européen comply to all dispositions of the European Council R&TTE Directive below N°...
- Page 3 Tout porteur d’appareil individuel d’assistance cardiaque (stimulateur cardiaque, pacemaker ou défibrillateur) est invité à prendre les précautions d’usage dans l’utilisation des produits de la gamme CANICOM 5. Ces appareils émettent des champs magnétiques statiques (aimant situé dans les télécommandes et dans l’accessoire multifonctions) ainsi que des ondes électromagnétiques hautes fréquences.
- Page 4 - un collier CANICOM 5 équipé d’électrodes courtes et d’une sangle - une pile lithium 3 Volts CR2 pour le collier - une télécommande CANICOM 5.201 équipée d’une pile lithium 3 Volts CR2450 OU une télécommande CANICOM 5.202 équipée d’une pile lithium 3 Volts CR2450 OU une télécommande CANICOM 5.500 équipée d’une pile lithium 3 Volts CR2...
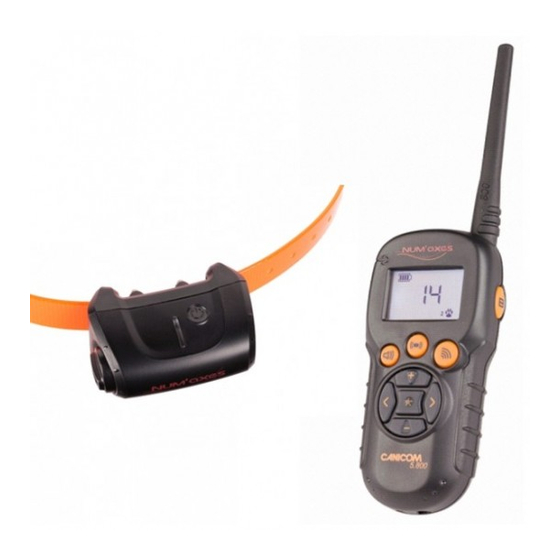
- Page 5 Touche Touches de sélection du chien Touches ‹ › Touches inactives sur la télécommande CANICOM 5.201 (1 seul chien) Touches Touches de réglage du niveau des stimulations Touche Touche Booster programmable pour les situations d’urgence Indicateur de position de l'aimant permettant la mise en...
- Page 6 (intensité = niveau programmé sur la touche Booster) indique le niveau d’intensité des stimulations délivrées ● Première mise en service ● Mise en place de la pile dans le collier CANICOM 5 ATTENTION Respectez bien les polarités indiquées sur le collier Fig. 4...
- Page 7 Fr - 7 ● Mettre en/hors service la télécommande La pile est déjà présente dans la télécommande lorsque vous achetez le produit. - Mise en service : appuyez pendant au moins une seconde sur le bouton Marche/Arrêt situé au centre de la télécommande. Des indications apparaissent sur l’écran LCD. - Mise hors service : appuyez pendant au moins une seconde sur le bouton Marche/Arrêt situé...
- Page 8 IMPORTANT : avant de débuter le codage, assurez-vous qu’aucune autre personne proche de vous n’utilise son CANICOM 5 ou tout autre produit de la gamme NUM’AXES : votre collier pourrait enregistrer le code d’une télécommande voisine. Si cela se produit, procédez à un recodage de la télécommande avec le collier.
- Page 9 LCD. - sur la télécommande CANICOM 5.1500, le symbole apparait en bas de l’écran LCD. NOTA : pour l’ensemble CANICOM 5.201, vous n’avez pas de collier à sélectionner puisqu’il n’y en a qu’un. ● Touche : signal sonore L’appui sur la touche...
- Page 10 1 (collier à sangle orange) : - allumez la télécommande - sélectionnez le collier 1 (si vous possédez le CANICOM 5.201 vous n’avez pas à sélectionner le chien) jusqu’à ce que l’indication du niveau de stimulation - appuyez pendant environ 5 secondes sur la touche...
- Page 11 Commencez toujours par le niveau de stimulation le plus faible. Sur la télécommande CANICOM 5.201, 10 niveaux de stimulations sont disponibles. Niveau 1 : stimulation très faible – Niveau 10 : stimulation forte Sur la télécommande CANICOM 5.202, 10 niveaux de stimulations sont disponibles.
- Page 12 Fr - 12 Le signe « + » Le signe « + » inscrit sur la pile inscrit sur la pile doit être visible. doit être visible. ATTENTION : Respectez bien les polarités Fig.7 - Remplacement de la pile dans la télécommande...
- Page 13 • Sur la télécommande CANICOM 5.1500, le symbole apparait en bas de l’écran LCD. • Pour l’ensemble CANICOM 5.201, vous n’avez pas de collier à sélectionner puisqu’il n’y en a qu’un. - Appuyez sur la touche de la télécommande : le collier doit émettre un signal sonore.
- Page 14 - environ 500 mètres pour CANICOM 5.500 - environ 800 mètres pour CANICOM 5.800 - environ 1 500 mètres pour CANICOM 5.1500 La portée est variable selon l’environnement et le relief dans lesquels vous évoluez. Les performances de votre produit seront optimales si vous respectez les recommandations suivantes : •...
-
Page 15: Entretien
• Il convient de surveiller les enfants pour s’assurer qu’ils ne jouent pas avec l’appareil. • Le collier CANICOM 5 est un produit parfaitement étanche à l’immersion. Votre chien peut traverser les cours d’eau sans souci. - Page 16 85 g (sans la sangle) - Collier réglable à l’encolure de 6 cm à 20 cm de Poids (avec la pile) diamètre Télécommandes CANICOM 5.201 : 1 pile lithium 3 Volts CR2450 CANICOM 5.202 : 1 pile lithium 3 Volts CR2450 Alimentation CANICOM 5.500 : 1 pile lithium 3 Volts CR2 CANICOM 5.800 : 1 pile lithium 3 Volts CR2...
- Page 17 Température d’utilisation Entre – 20°C et +40°C CANICOM 5.201 : 105 x 51 x 21 mm CANICOM 5.800 : 105 x 51 x 24 mm Dimensions CANICOM 5.202 : 105 x 51 x 21 mm CANICOM 5.1500 : 109 x 56 x 30 mm CANICOM 5.500 : 105 x 51 x 24 mm...
- Page 18 Fr - 18 3. Si le produit est reconnu défectueux, NUM’AXES le réparera ou l’échangera selon son choix. 4. NUM’AXES garantit le délai d’intervention de 48 heures (hors délais postaux). 5. NUM’AXES ne pourra être tenu pour responsable des dommages qui pourraient résulter d’une mauvaise utilisation ou d’une panne du produit.
-
Page 19: User's Guide
These devices emit some static magnetic fields (a magnet is located in the remote controls and in the all-in- one accessory). Frequency = 869.525 MHz Typical emission power = 3 mW for CANICOM 5.201 and CANICOM 5.202 Typical emission power = 10 mW for CANICOM 5.500 Typical emission power = 125 mW for CANICOM 5.800 Maximum emission power = 500 mW for CANICOM 5.1500... - Page 20 ● Contents of the product - 1 CANICOM 5 receiver collar fitted with short contact points and a strap - 1 lithium 3-V CR2 battery for the collar - 1 CANICOM 5.201 remote control equipped with 1 lithium 3-V CR2450 battery OR 1 CANICOM 5.202 remote control equipped with 1 lithium 3-V CR2450 battery...
- Page 21 On / Off button + LCD screen back-lightning Dog selection buttons ‹ › buttons Inactive buttons on the CANICOM 5.201 remote control (only 1 dog) Static stimulations level control buttons buttons button Programmable booster button for emergency situations Magnet position indicator: this magnet allows you to switch...
- Page 22 Definition indicates the remote control battery level indicates the selected collar for CANICOM 5.202, CANICOM 5.500 and CANICOM 5.800: collar Nr 1 with orange strap / collar Nr 2 with fluorescent green strap indicates the selected collar for CANICOM 5.1500:...
- Page 23 Gb - 23 ● Activate/deactivate the remote control Remote control is supplied with battery fitted. - Activate: press the On/Off button located on the remote control for 1 second. Indications appear on the LCD screen. - Deactivate: press the On/Off button located on the remote control for 1 second.
- Page 24 The coding of the remote control with the receiver collar enables the two units to work together. IMPORTANT: before beginning the coding procedure, make sure no other person is using his CANICOM 5 or other products from the NUM’AXES range close by. Your receiver collar could accidentally record the code of his remote control.
- Page 25 If you have several collars, renew the same procedure for each one. ● Reprogram a receiver collar The CANICOM 5 receiver collar can be re-coded indefinitely, either with the same remote control, or with a new remote control from the CANICOM 5 range (Ref. Coding procedure). ●...
- Page 26 Nr 1 (collar with orange strap): - Activate the remote control - Select the collar Nr 1 (for CANICOM 5.201 you don't have to select a collar) - Press the button for approximately 5 seconds until the stimulation level flashes on the LCD screen...
- Page 27 Always start with the lowest level of stimulation. 10 levels of stimulation are available on the CANICOM 5.201 remote control. Level 1: very weak stimulation – Level 10: strong stimulation 10 levels of stimulation are available on the CANICOM 5.202 remote control.
- Page 28 - flashes quickly red: weak battery. Be prepared to replace battery. Replace the old battery with a new one (See § First use from new: Fitting the battery in the CANICOM 5 receiver collar) then check the collar operates correctly.
- Page 29 • On the CANICOM 5.1500 remote control, the symbol appears on the LCD screen. • For CANICOM 5.201, you don’t have to select a collar because there is only one. - Press the button on the remote control: the collar must emit beep sounds.
- Page 30 • Children should be supervised to ensure they do not play with the appliance. • The CANICOM 5 receiver collar is totally waterproof. Your dog can swim in water.
- Page 31 If the remote control falls into the water, it could be damaged in an irreversible way. • Your dog should not wear a tag, metallic collar, or any other kind of collar together with the CANICOM 5 training collar.
-
Page 32: Technical Specifications
CANICOM 5.202: approx. 240 days - CANICOM 5.1500: approx. 120 days CANICOM 5.500: approx. 530 days CANICOM 5.201: approximately 200 m - CANICOM 5.800: approximately 800 m CANICOM 5.202: approximately 200 m - CANICOM 5.1500: approximately 1 500 m Range CANICOM 5.500: approximately 500 m... - Page 33 Gb - 33 CANICOM 5.201: 71 g CANICOM 5.202: 71 g Weight (with battery) CANICOM 5.500: 77 g CANICOM 5.800: 78 g CANICOM 5.1500: 131 g ● Guarantee NUM’AXES guarantees the products against production defects for two years after purchase.
- Page 34 Gb - 34 ● Spare parts You can purchase spare parts (batteries, strap, contact points …) from your supplier at any time. ● Collection and recycling of your device at the end of its life The pictogram which appears on your product means that this one can not be thrown with household refuse. You have to bring the device to a collection location suitable for treatment, development, recycling of electronic wastes or bring it back to your distributor.
- Page 35 Se recomienda a todo portador de un aparato individual de asistencia cardio vascular (estimulador cardíaco, marcapasos, desfibrilador) tomar precauciones en la utilización de los productos de la gama CANICOM 5. Estos aparatos emiten campos magnéticos estáticos (imán situado en los mandos a distancia y en el accesorio multifunción) así...
- Page 36 - una pila de litio 3 Volts CR2 para el collar - un mando a distancia CANICOM 5.201 equipado con una pila de litio 3 V CR2450 O un mando a distancia CANICOM 5.202 equipado con una pila de litio 3 V CR2450 O un mando a distancia CANICOM 5.500 equipado con una pila de litio 3 V CR2...
- Page 37 Tecla Teclas de selección del perro Teclas ‹ › Teclas inactivas sobre el mando CANICOM 5.201 (sólo 1 perro) Teclas de ajuste del nivel de los estímulos Teclas Tecla Booster programable para órdenes de urgencia Tecla Indicador de posición del imán para la puesta En/Fuera de servicio del...
- Page 38 CANICOM 5.202, CANICOM 5.500, CANICOM 5.800 : collar 1 con correa naranja / collar 2 con correa verde fluorescente indicador de selección del collar para CANICOM 5.1500 :...
- Page 39 Es - 39 ● Puesta en/fuera de servicio del mando a distancia La pila se encuentra ya en el mando cuando adquiere el producto. - Puesta en servicio: presionar durante 1 segundo el botón Encendido/Apagado situado en el centro del mando a distancia. Aparecen las indicaciones sobre la pantalla LCD. - Puesta fuera de servicio: presionar durante 1 segundo el botón Encendido/Apagado situado en el centro del mando a distancia.
- Page 40 IMPORTANTE: antes de empezar con la codificación, se debe tener en cuenta que ninguna otra persona cercana esté utilizando un CANICOM 5 o cualquier otro producto de la gama NUM’AXES: su collar receptor podría registrar el código de ese mando a distancia vecino. Reprogramar de nuevo el mando con el collar si ocurre esta situación.
- Page 41 El mando a distancia CANICOM 5.800 ha sido diseñado para controlar 1 o 2 collares. El mando a distancia CANICOM 5.1500 ha sido diseñado para controlar 1, 2, 3 o 4 collares. Para los aparatos CANICOM 5.202, CANICOM 5.500, CANICOM 5.800 y CANICOM 5.1500, antes de cualquier acción de adiestramiento (aviso sonoro, vibraciones o estímulos), debe seleccionar el perro al que desean educar.
- Page 42 Programación de la tecla Booster para el perro 1 (collar con correa naranja): - poner en servicio el mando a distancia - seleccionar el collar 1 (si usted tiene el CANICOM 5.201, no tiene que seleccionar el collar) - pulsar la tecla alrededor de 5 segundos hasta que el indicador del nivel de estímulo parpadee sobre la...
- Page 43 Empiece siempre con el nivel de estímulo más bajo. Dispone de 10 niveles con el mando CANICOM 5.201. Nivel 1: indica el más suave – Nivel 10: indica el más fuerte Dispone de 10 niveles con el mando CANICOM 5.202.
- Page 44 Es - 44 El siglo « + » escrito El siglo « + » escrito sobre la pila debe sobre la pila debe estar visible. estar visible. ATENCIÓN : Respetar las polaridades indicadas Fig. 7 Sustitución de la pila en el mando a distancia ●...
- Page 45 Sustituir la pila gastada por una pila nueva siguiendo el procedimiento indicado al principio de este manual de instrucciones (ver § Primera puesta en servicio: colocar la pila en el collar CANICOM 5). Comprobar el buen funcionamiento de su collar.
- Page 46 Es - 46 - aproximadamente 800 m por CANICOM 5.800 - aproximadamente 1 500 m por CANICOM 5.1500 Estas distancias pueden variar según el entorno y la configuración del terreno donde se encuentre. Las prestaciones de su producto serán óptimas si respetan las siguientes recomendaciones: •...
- Page 47 • No es conveniente utilizar una medalla metálica u otro collar cuando su perro lleve su collar CANICOM 5. • Alejar el mando y el accesorio multifunción de objetos sensibles a los campos magnéticos: el mando y el accesorio integran un imán permanente que causaría daños irreparables.
-
Page 48: Características Técnicas
CANICOM 5.201 : cerca de 200 m - CANICOM 5.800 : cerca de 800 m Alcance radio CANICOM 5.202 : cerca de 200 m - CANICOM 5.1500 : cerca de 1 500 m CANICOM 5.500 : cerca de 500 m... - Page 49 Es - 49 Temperatura de utilización Entre – 20°C y +40°C CANICOM 5.201 : 105 x 51 x 21 mm CANICOM 5.202 : 105 x 51 x 21 mm Dimensiones CANICOM 5.500 : 105 x 51 x 24 mm CANICOM 5.800 : 105 x 51 x 24 mm CANICOM 5.1500 : 109 x 56 x 30 mm...
- Page 50 Es - 50 No se podrá recurrir contra el fabricante NUM’AXES en caso de daños resultados de una mala utilización del producto o de una avería. NUM’AXES se reserva el derecho de modificar las características de sus productos para realizar mejoras técnicas o respetar nuevas normativas.
-
Page 51: Gebrauchsanleitung
Gebrauch Ihres Gerätes die Anweisungen dieser Anleitung sorgfältig durchlesen und diese zur Konsultation bei später auftretenden Fragen aufbewahren. Wir empfehlen Ihnen, vor dem Einsatz eines CANICOM 5-Trainers einen Tierarzt aufzusuchen, der Ihren Hund auf gesundheitliche Einschränkungen untersucht. Die wiederholte Reibung der Kontakte auf der Haut kann zu Hautirritationen führen. Überprüfen Sie den Hals Ihres Hundes bitte regelmäßig auf wunde Stellen oder Reizungen. - Page 52 - Das CANICOM 5-Halsband mit einem Gurt und kurzen Kontakten - Eine 3V Lithium Batterie CR2 für das CANICOM 5-Halsband - Einen Handsender CANICOM 5.201 mit einer Lithium Batterie 3V CR2450 oder Einen Handsender CANICOM 5.202 mit einer Lithium Batterie 3V CR2450 oder Einen Handsender CANICOM 5.500 mit einer Lithium Batterie 3V CR2...
- Page 53 Taste Ein-/Ausschaltenstaste + Beleuchtung des Bildschirms Wahltasten Hunde Tasten ‹ › Inaktive Tasten auf Sender CANICOM 5.201 (1 Hund) Einstelltasten der Impulsstärke Tasten Taste Programmierbare Booster-Taste für Notfälle Stellanzeige des Magnets zum Ein-/Ausschalten des Halsbandes und die Abstimmung des Halsbandes mit Sender...
- Page 54 Bildschirm Handsender Batteriestandsanzeige Zeigt das gewählte Halsband an für CANICOM 5.202, CANICOM 5.500, CANICOM 5.800: Halsband 1 mit orangem Band / 2. Halsband mit Leuchtfarbegrünen Band Zeigt das gewählte Halsband an für CANICOM 5.1500: Halsband 1 mit orangem Band / 2. Halsband mit Leuchtfarbegrünen Band / 3.
- Page 55 D - 55 Den Sender Ein-/Ausschalten ● Beim Kauf des Gerätes befindet sich die Batterie bereits im Sender. - Zum Einschalten: Drücken Sie eine Sekunde lang auf die Ein-/Ausschalt-Taste , die auf der Mitte des Senders liegt. Auf dem LCD-Display erscheinen die Anzeigen. - Zum Ausschalten: Drücken Sie eine Sekunde lang auf die Ein-/Ausschalt-Taste , die auf der Mitte des Senders liegt.
- Page 56 Jeder Sender hat seine eigene, einzigartige Funk-Kodierung. Das Halsband muss auf diese Kodierung abgestimmt werden. WICHTIG: Bitte vergewissern Sie sich vor der Frequenzabstimmung, dass sich kein CANICOM 5 oder kein anderes NUM’AXES Gerät in Ihrer Umgebung in Betrieb befindet. Es könnte ansonsten zu Falschprogrammierungen durch die Kodierung der fremden Komponente kommen.
- Page 57 ● Neue Programmierung eines Empfänger-Halsbandes Sie können Ihr Empfänger-Halsband ohne Beschränkung neu programmieren. Diese neue Programmierung können Sie entweder mit dem gleichen Handsender oder mit einem neuen Handsender des CANICOM 5 – Sortiments durchführen (Siehe Verfahren zur Frequenzabstimmung). ● Bedienung des Handsenders Die CANICOM 5.201 Handsender arbeitet mit 1 Empfänger-Halsband.
- Page 58 Halsband vibriert solange Sie auf dieser Taste drücken (maximal jedoch 8 Sekunden). Falls Sie länger als 8 Sekunden auf die -Taste drücken, Ihr CANICOM 5 Halsband stellt sich für einige Sekunden in den Sicherheits-Modus und startet ist dann wieder Betriebsbereit.
- Page 59 - Schalten Sie den Handsender ein: Drücken Sie auf den Ein-/Aus Knopf eine Sekunde lang. - Wählen Sie auf dem Handsender das Halsband, das Sie programmieren wollen (Entfällt bei CANICOM 5.201). - Drücken Sie auf die Taste so lange, bis die Anzeige der Impulsstärke auf dem LCD blinkt (ca. 5 Sek.).
- Page 60 D - 60 Das „+“ Das „+“ Zeichen der Zeichen der Batterie ist sichtbar. Batterie ist sichtbar. VORSICHT : Achten Sie bitte auf die Polarität Abb. 7 - Auswechseln der Batterie in das Handsender ● Zustand/Auswechseln der Batterie des Empfänger-Halsbandes Den Ladezustand der im Halsband befindlichen Batterie zeigt die auf der Vorderseite des Gehäuses des Empfänger-Halsbandes liegende LED an: - Langsames grünes Blinken: die Batterie ist in gutem Zustand.
- Page 61 D - 61 Ersetzen Sie die verbrauchte Batterie mit einer neuen Batterie (Siehe § Erste Inbetriebnahme: Legen Sie die Batterie in das CANICOM 5 Empfänger-Halsband ein). Prüfen Sie das einwandfreie Funktionieren des Empfänger- Halsbandes. ● Auswechseln der Kontakte Es werden 2 Sätze Kontakte unterschiedlicher Länge mit dem Gerät geliefert. Achten Sie bitte darauf, dass die Länge der Kontakte ausreichend ist, damit Sie in Kontakt mit der Haut des Hundes sind.
- Page 62 - bis zu 500 Metern für das CANICOM 5.500 - bis zu 800 Metern für das CANICOM 5.800 - bis zu 1 500 Metern für das CANICOM 5.1500 Je nach Geländebeschaffenheit können die Distanzen reduziert werden. Achten Sie bitte auf folgende Hinweise, um die besten Leistungen Ihres Gerätes zu erzielen: •...
- Page 63 • Versichern Sie sich, dass Kinder nicht mit dem System spielen. • Das CANICOM 5 Empfänger-Halsband ist wasserdicht. Ihr Hund kann daher ohne Probleme auch mal in einen See springen. • Der Handsender ist spritzwassergeschützt. Ein leichter Regenguss kann ihm nichts anhaben. Stärkere Wassereinwirkung könnte ihn jedoch irreparabel zerstören.
- Page 64 Gewicht (mit der Batterie) Einstellbares Halsband von 6 cm bis 20 cm Diameter Handsenders CANICOM 5.201 : 1 Batterie Lithium 3 Volts CR2450 CANICOM 5.202 : 1 Batterie Lithium 3 Volts CR2450 Spannungsversorgung CANICOM 5.500 : 1 Batterie Lithium 3 Volts CR2 CANICOM 5.800 : 1 Batterie Lithium 3 Volts CR2...
- Page 65 D - 65 CANICOM 5.201 : Ca. 240 Tage - CANICOM 5.800 : Ca. 80 Tage Durchschnittliche CANICOM 5.202 : Ca. 240 Tage - CANICOM 5.1500 : Ca. 120 Tage Batterieleistung CANICOM 5.500 : Ca. 530 Tage CANICOM 5.201 : Ca. 200 m CANICOM 5.800 : Ca.
- Page 66 D - 66 2. Die Garantie erstreckt sich nicht auf folgende Bereiche: • Erneuerung der Batterie oder des Gurts. • Transportrisiken direkter oder indirekter Art, die durch Rücksendung des Produkts an NUM’AXES entstehen. • Beschädigungen des Produkts, die durch Fahrlässigkeit oder Bedienungsfehler bedingt sind (unsachgemäße Bedienung, Nichtbeachtung der Betriebsanleitung oder ungewollte Schäden z.B.
-
Page 67: Manuale Istruzioni
Tutti i portatori di apparecchi per l’assistenza cardiaca (stimolatori cardiaci, pacemaker o defibrillatori) sono invitati a prendere le precauzioni d’uso nell’utilizzo dei prodotti della gamma CANICOM 5. Questi apparecchi emettono dei campi magnetici statici (magnete situato nel telecomando e nell’accessorio multifunzione) oltre a onde elettromagnetiche ad alta frequenza. -
Page 68: Manuale D'uso
- Collare CANICOM 5 con cinghia dotato di elettrodi corti - Pila litio CR2 da 3 Volt per il collare - Telecomando CANICOM 5.201 dotato di una pila al litio 3 Volt CR2450 O Telecomando CANICOM 5.202 dotato di una pila al litio 3 Volt CR2450 O Telecomando CANICOM 5.500 dotato di una pila al litio 3 Volt CR2... - Page 69 Pulsante Pulsanti selezione collare Pulsanti ‹ › Sul telecomando CANICOM 5.201 i tasti sono disattivati (1 solo collare) Pulsanti per la regolazione del livello di stimolazione Pulsanti Pulsante Pulsante Booster (stimolazione d’emergenza programmabile) Indicatore posizione magnete utilizzato per Accensione/Spegnimento collare e...
- Page 70 CANICOM 5.202, CANICOM 5.500, CANICOM 5.800 : collare 1 con cinghia arancio / collare 2 con cinghia verde fluo indica il collare selezionato per CANICOM 5.1500 :...
- Page 71 It - 71 ● Accensione e spegnimento del telecomando La pila è già installata nel telecomando quando acquistate il prodotto. - Accensione: premere per un secondo il pulsante situato al centro del telecomando. - Spegnimento: premere per un secondo il pulsante situato al centro del telecomando.
- Page 72 − CANICOM 5.202, CANICOM 5.500 e CANICOM 5.800 : sullo schermo LCD compare il simbolo − CANICOM 5.1500 : sullo schermo LCD compare il simbolo − Sul telecomando CANICOM 5.201 i pulsanti sono disattivi perché avete 1 solo collare a disposizione.
- Page 73 − CANICOM 5.202, CANICOM 5.500 e CANICOM 5.800 : sullo schermo LCD compare il simbolo − CANICOM 5.1500 : sullo schermo LCD compare il simbolo NOTA : per CANICOM 5.201 non dovete selezionare alcun collare perché ne avete solo uno a disposizione. ●...
- Page 74 Programmazione del pulsante per il cane 1 (collare con cinghia arancio): - Accendere il telecomando. - Selezionare il collare 1 (per CANICOM 5.201 non dovete selezionare alcun collare). - Premere e mantenere premuto il pulsante fino a quando il display lampeggia.
- Page 75 E’ buona norma cominciare sempre da un livello di stimolazione basso e aumentate solo in funzione della percezione del vostro cane. Sul telecomando CANICOM 5.201 sono disponibili 10 livelli. Il livello 1 equivale ad una stimolazione appena percettibile, il livello 10 alla massima stimolazione.
- Page 76 It - 76 Il segno « + » Il segno « + » della pila deve della pila deve essere visibile. essere visibile. ATTENZIONE : Rispettare la polarità come indicato nel vano pila. Fig. 7 - Sostituzione pila telecomando ● Verifica/sostituzione della pila del collare Per verificare lo stato della pila, osservate il LED luminoso con il collare acceso: - Con la pila in buono stato, il LED verde lampeggia ogni 2 secondi.
- Page 77 It - 77 - Con la pila quasi scarica, il LED si colora di rosso e lampeggia rapidamente. Dovete quindi sostituire la pila. Per sostituire la pila, fare riferamento al § Primo utilizzo : Inserimento della pila nel collare CANICOM 5. ●...
- Page 78 It - 78 ● Per ottenere le migliori prestazioni Il telecomando CANICOM 5.201 ha una portata di circa 200 metri. Il telecomando CANICOM 5.202 ha una portata di circa 200 metri. Il telecomando CANICOM 5.500 ha una portata di circa 500 metri.
- Page 79 Attenzione: se il telecomando cade in acqua, l’immersione totale potrebbe causare danni irreversibili non coperti in garanzia. • Quando utilizzate il collare CANICOM 5, togliete dal collo del cane qualsiasi altro collare di metallo, catenelle o medaglie che possono provocare malfunzionamenti del prodotto.
- Page 80 CANICOM 5.500 : 1 pila litio 3V tipo CR2 CANICOM 5.800 : 1 pila litio 3V tipo CR2 CANICOM 5.1500 : 2 pile alcaline da 1,5V tipo LR06 CANICOM 5.201 : circa 8 mesi CANICOM 5.202 : circa 8 mesi Autonomia CANICOM 5.500 : circa 17 mesi...
- Page 81 Temperatura d’utilizzo Tra – 20°C e +40°C CANICOM 5.201 : 105 x 51 x 21 mm - CANICOM 5.800 : 105 x 51 x 24 mm Dimensioni CANICOM 5.202 : 105 x 51 x 21 mm - CANICOM 5.1500 : 109 x 56 x 30 mm CANICOM 5.500 : 105 x 51 x 24 mm...
- Page 82 It - 82 Se il prodotto è riconosciuto difettoso, NUM’AXES lo riparerà o lo sostituirà a suo insindacabile giudizio. Contro NUM’AXES non è ammesso alcun ricorso, in particolare in caso di cattivo uso, manomissione o uso non conforme del prodotto. NUM’AXES si riserva il diritto di modificare le caratteristiche del prodotto, al fine di apportare miglioramenti tecnici o adeguarlo a nuove regolamentazioni.
- Page 84 www.numaxes.com...
Need help?
Do you have a question about the Canicom 5 and is the answer not in the manual?
Questions and answers