Axis M1011 Installation Manual
Hide thumbs
Also See for M1011:
- Installation manual (92 pages) ,
- User manual (61 pages) ,
- Specifications (2 pages)

Related Manuals for Axis M1011


Summary of Contents for Axis M1011
- Page 1 INSTALLATION GUIDE AXIS M1011 Network Camera AXIS M1011-W Network Camera AXIS M1031-W Network Camera Distributed by Communications Supply Corporation 1.877.462.7279 www.gocsc.com...
- Page 2 Radio Transmission Regulatory Information & EMC, Search by product, category, or phrases on page 87 for more information on this product’s • report problems to Axis support by logging in to your compliance with radio frequency and safety private support area.
-
Page 3: Installation Steps
AXIS M1011/-W & AXIS M1031-W Installation Guide This installation guide provides instructions for installing the AXIS M1011/-W / AXIS M1031-W Network Camera on your network. For all other aspects of using the product, please see the User’s Manual, available on the CD included in this package, or from www.axis.com/techsup Installation steps 1. -
Page 4: Hardware Overview
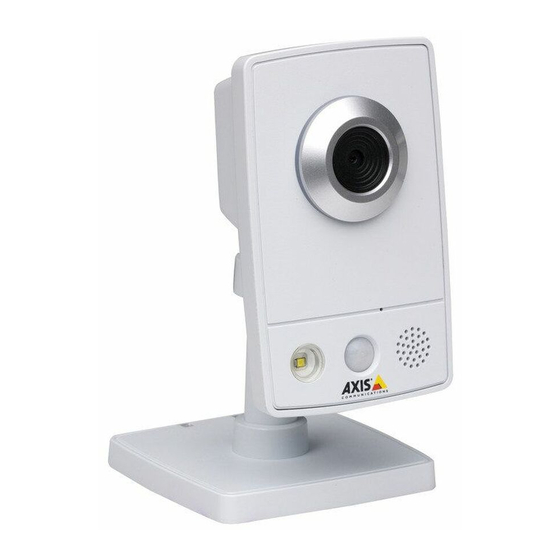
Page 4 AXIS M1011/M1011-W/M1031-W Installation Guide Hardware overview AXIS M1031-W Front view AXIS M1011/-W Lens with Lens with Status Indicator Status Indicator Microphone Light Speaker sensor Rear view (both models) Network connector Power connector Lock ring Product number (P/N) &... -
Page 5: Install The Hardware
AXIS M1011/M1011-W/M1031-W Installation Guide Page 5 Install the hardware IMPORTANT! AXIS M1011/M1011-W/M1031-W is not approved for outdoor use - the product may be installed in indoor environments only. Mount the camera AXIS M1011/M1011-W/M1031-W is shipped with the stand and extension section mounted. -
Page 6: Assign An Ip Address
192.168.0.90 as the default IP address. If you would like to assign a static IP address, the recommended method in Windows is either AXIS IP Utility or AXIS Camera Management. Depending on the number of cameras you wish to install, use the method that best suits your purpose. -
Page 7: Axis Ip Utility - Single Camera/Small Installation
AXIS IP Utility automatically discovers and displays Axis devices on your network. The application can also be used to manually assign a static IP address Note that the computer running AXIS IP Utility must be on the same network segment (physical subnet) as the AXIS M1011/M1011-W/M1031-W. - Page 8 Automatic discovery 1. Check that the camera is connected to the network and that power has been applied. 2. Start AXIS Camera Management. When the camera appears in the window, right-click the link and select Live View Home Page. 3. See page 9 for instructions on how to set the password.
-
Page 9: Set The Password
To gain access to the product, the password for the default administrator user root must be set. This is done in the ‘Configure Root Password’ dialog, which is displayed when the AXIS M1011/M1011- W/M1031-W is accessed for the first time. -
Page 10: Access The Video Stream
The Live View page of the network camera is displayed, with links to the Setup tools which allow you to customize the camera. If required, click Yes to install AMC (AXIS Media Control), which allows viewing of the video stream in Internet Explorer. You will need administrator rights on the computer to do this. -
Page 11: Status Of Wireless Networks
Go to Setup > Basic Setup > Wireless in the camera’s internal web pages. This list is the result of a network scan. The network the AXIS M1011-W/M1031-W is currently linked to is shown in blue. A network using unsupported security is shown in grey. The following information is provided: SSID - The name of a wireless network (or ad-hoc device). -
Page 12: Wireless Settings
1. Select an access point or ad-hoc device under Status of Wireless Networks, some of the required information will automatically be entered under Wireless Settings. 2. SSID is the name of the selected wireless network. Leave this field blank if AXIS M1011-W/ M1031-W is to access the nearest unsecured network. - Page 13 2. Disconnect the network cable from the camera. 3. Refresh the web page after 20-30 seconds to confirm the wireless connection. If the camera cannot be accessed, run AXIS IP Utility and select it from the list. Note: • To establish communication, the wireless settings must be exactly the same in the camera as in the access point or ad-hoc device.
-
Page 14: Other Methods Of Setting The Ip Address
Bonjour bookmark in your browser (e.g. Safari) and click on the link to access the camera’s web pages. A free service from Axis that allows you to quickly and simply AXIS Dynamic DNS install your camera. Requires an Internet connection with no Service HTTP proxy. -
Page 15: Unit Connectors
Microphone/ speaker for half duplex audio. For more information, see the AXIS M1011/M1011-W/M1031-W User’s Manual located on the Axis web site at www.axis.com or on the Axis Network Video Product CD. Distributed by Communications Supply Corporation 1.877.462.7279... -
Page 16: Resetting To The Factory Default Settings
Please refer to the documentation for your router for further instructions. For more information on this and other topics, visit the Axis Support Web at www.axis.com/techsup Further information The user’s manual is available from the Axis Web site at www.axis.com or from the Axis Network Video Product CD supplied with this product. Tip! Visit www.axis.com/techsup to check if there is updated firmware available for the... -
Page 17: Guide D'installation
AXIS M1011/-W & AXIS M1031-W Guide d’installation Ce guide d’installation explique comment installer la caméra AXIS M1011/-W / AXIS M1031-W Caméra réseau sur votre réseau. Pour toute autre question relative à l’utilisation de ce produit, reportez-vous au manuel d’utilisation, que vous trouverez sur le CD joint ou sur le site Web www.axis.com/techsup. -
Page 18: Vue D'ensemble Du Matériel
Page 18 AXIS M1011/M1011-W/M1031-W Guide d’installation Vue d’ensemble du matériel Vue de devant AXIS M1031-W AXIS M1011/-W Objectif avec Objectif avec témoin DEL d’état témoin DEL d’état Microphone Projecteur Haut-parleur Capteur infrarouge passif Vue de dos (les deux modèles) Connecteur réseau Connecteur d’alimentation... -
Page 19: Installation Du Matériel
AXIS M1011/M1011-W/M1031-W Guide d’installation Page 19 Installation du matériel IMPORTANT ! L’AXIS M1011/M1011-W/M1031-W n’est pas conçue pour un usage à l’extérieur. Elle ne peut être installée qu’en intérieur. Montage de la caméra L’AXIS M1011/M1011-W/M1031-W est fournie avec support et rallonge montés. Démontez le support suivez les consignes ci-après pour monter la caméra sur un mur ou sur une étagère, selon le... -
Page 20: Attribution D'une Adresse Ip
à installer. Ces deux applications gratuites sont disponibles sur le CD de la caméra réseau Axis fourni avec ce produit. Vous pouvez également les télécharger à partir du site www.axis.com/techsup. -
Page 21: Axis Ip Utility - Une Seule Caméra/Petites Installations
Page 21 AXIS IP Utility – Une seule caméra/petites installations AXIS IP Utility détecte automatiquement les périphériques Axis de votre réseau et les affiche. Cette application permet également de définir manuellement une adresse IP statique. Notez que l’ordinateur exécutant l’application AXIS IP Utility doit se trouver sur le même segment de réseau (sous-réseau physique) que l’AXIS M1011/M1011-W/M1031-W. -
Page 22: Axis Camera Management - Plusieurs Caméras/Grandes Installations
1. Vérifiez que la caméra est connectée au réseau et sous tension. 2. Démarrez AXIS Camera Management. Lorsque la caméra apparaît dans la fenêtre, cliquez sur le lien à l’aide du bouton droit de la souris et sélectionnez Live View Home Page (Page d’accueil –... -
Page 23: Configuration Du Mot De Passe
Pour accéder au produit, le mot de passe de l’administrateur par défaut, root, doit être configuré. Vous pouvez effectuer cette opération via la boîte de dialogue Configure Root Password (Configurer le mot de passe root) qui s’affiche la première fois que vous accédez à l’AXIS M1011/ M1011-W/M1031-W. -
Page 24: Accès Au Flux De Données Vidéo
être rétablis. Reportez-vous à la section Rétablissement des paramètres d’usine par défaut, à la page 33. AXIS M1011 : l’installation est terminée. AXIS M1011-W/M1031-W : passez à la section Configuration de la connexion sans fil, à la page 25. Distributed by Communications Supply Corporation 1.877.462.7279... - Page 25 Allez dans Setup (Configuration) > Basic Setup (Configuration de base) > Wireless (Sans fil) sur les pages Web internes de la caméra. La liste d’options suivante est le résultat d’un balayage réseau. Le réseau auquel la caméra AXIS M1011-W/M1031-W est actuellement associée est affiché en bleu. Si un réseau utilise une fonction de sécurité...
-
Page 26: Paramètres Sans Fil
2. SSID est le nom du réseau sans fil sélectionné. Laissez ce champ à blanc si vous voulez que l’AXIS M1011-W/M1031-W accède au réseau non sécurisé le plus proche. 3. Network type (Type de réseau) : sélectionnez Master (Maître) pour accéder au réseau par un point d’accès ou Ad-hoc pour accéder à... - Page 27 AXIS M1011/M1011-W/M1031-W Guide d’installation Page 27 EAP-TLS • Identity (Identité) : saisissez l’identité de l’utilisateur à présenter au réseau. • Private key password (Mot de passe pour la clé privée) : saisissez le mot de passe de votre identité d’utilisateur.
- Page 28 2. Débranchez le câble réseau de la caméra. 3. Actualisez la page Web au bout de 20 à 30 secondes afin de valider la connexion sans fil. Si vous ne pouvez pas accéder à la caméra, exécutez AXIS IP Utility et sélectionnez-la dans la liste. Remarque : •...
-
Page 29: Autres Méthodes De Configuration De L'adresse Ip
1. Trouvez une adresse IP sur le même segment de réseau que celui de votre ordinateur. 2. Repérez le numéro de série (S/N) sur l’étiquette de l’AXIS M1011/M1011-W/M1031-W. 3. Ouvrez une invite de commande sur votre ordinateur et saisissez les commandes suivantes :... - Page 30 Page 30 AXIS M1011/M1011-W/M1031-W Guide d’installation Remarques : • Pour ouvrir une invite de commande sous Windows : dans le menu Démarrer, sélectionnez Exécuter… et tapez cmd. Cliquez sur OK. • Pour utiliser la commande ARP sous Mac OS X, utilisez l’utilitaire Terminal dans Application >...
-
Page 31: Connecteurs De L'appareil
AXIS M1011/M1011-W/M1031-W Guide d’installation Page 31 Connecteurs de l’appareil Connecteur réseau - Connecteur Ethernet RJ-45. Il est conseillé d’utiliser des câbles blindés. Connecteur d’alimentation - Miniconnecteur CC 5,0-5,1 V CC, max. 1,5 A. Broche centrale +. Témoins DEL Témoin DEL... - Page 32 Microphone/haut-parleur – Pour la transmission audio semi-duplex. Pour tout complément d’information, reportez-vous au manuel d’utilisation de l’AXIS M1011/ M1011-W/M1031-W que vous trouverez sur le site Web d’Axis, à l’adresse www.axis.com, ou sur le CD accompagnant votre caméra réseau Axis. Distributed by Communications Supply Corporation 1.877.462.7279...
-
Page 33: Rétablissement Des Paramètres D'usine Par Défaut
à l’adresse www.axis.com/techsup. Plus d’informations Le manuel de l’utilisateur est disponible sur le site Web d’Axis (www.axis.com) et sur le CD fourni avec ce produit. Conseil : Visitez le site www.axis.com/techsup pour vérifier si des mises à... - Page 34 Distributed by Communications Supply Corporation 1.877.462.7279 www.gocsc.com...
- Page 35 AXIS M1011/-W & AXIS M1031-W Installationsanleitung In dieser Anleitung wird die Installation der AXIS M1011/-W / AXIS M1031-W Netzwerk-Kamera in einem Netzwerk beschrieben. Alle weiteren Hinweise zur Verwendung des Produkts finden Sie im Benutzerhandbuch, das auf der mitgelieferten CD oder auf unserer Website unter www.axis.com/ techsup zur Verfügung steht.
- Page 36 Seite 36 AXIS M1011/M1011-W/M1031-W Installationsanleitung Hardwareübersicht AXIS M1031-W Vorderansicht AXIS M1011/-W Objektiv mit Objektiv mit Statusanzeige Statusanzeige (LED) (LED) Mikrofon Licht PIR- Lautsprecher Sensor Rückansicht (beide Modelle) Netzwerkanschluss Netzanschluss Verschlussring Produktnummer (Artikelnr.) und Steuertaste Seriennummer (S/N). Betriebsanzeige (LED) Die Seriennummer wird für Netzwerkanzeige (LED) die Installation benötigt.
-
Page 37: Hardware Installieren
Kamera darf nur in Innenräumen installiert werden. Kamera befestigen AXIS M1011/M1011-W/M1031-W Die Kamera wird mit montiertem Standfuß und mit Verlängerung ausgeliefert. Wenn Sie die Kamera an der Wand oder an einem Regal befestigen möchten, demontieren Sie den Standfuß und befolgenden Sie die folgenden Anweisungen zur Wand- bzw. - Page 38 Seite 38 AXIS M1011/M1011-W/M1031-W Installationsanleitung 3. Überprüfen Sie, ob die LED-Anzeigen die Betriebszustände korrekt angeben. Weitere Informationen finden Sie in der Tabelle auf Seite 50. Beachten Sie, dass LEDs deaktiviert sein können und deshalb nicht leuchten. 4. Fahren Sie mit IP-Adresse zuweisen, auf Seite 39 fort.
-
Page 39: Ip-Adresse Zuweisen
AXIS M1011/M1011-W/M1031-W die Standard-IP-Adresse 192.168.0.90 verwendet. Zum Zuweisen einer statischen IP-Adresse stehen unter Windows die Programme AXIS IP Utility und AXIS Camera Management zur Verfügung. Verwenden Sie die Methode, die für die gewünschte Anzahl der zu installierenden Kameras geeignet ist. -
Page 40: Axis Ip Utility - Einzelne Kamera/Kleine Installation
AXIS IP Utility erkennt automatisch im Netzwerk vorhandene Axis-Geräte und zeigt diese an. Die Anwendung kann außerdem zur manuellen Zuweisung einer statischen IP-Adresse verwendet werden Beachten Sie, dass sich die AXIS M1011/M1011-W/M1031-W und der Computer, auf dem AXIS IP Utility ausgeführt wird, im gleichen Netzwerksegment (d. h. physischen Subnetz) befinden müssen. Automatische Erkennung 1. -
Page 41: Axis Camera Management - Mehrere Kameras/Große Installation
1. Stellen Sie sicher, dass die Kamera an das Netzwerk und die Stromversorgung angeschlossen ist. 2. Starten Sie AXIS Camera Management. Wenn das Symbol der Kamera angezeigt wird, klicken Sie mit der rechten Maustaste darauf und wählen Sie Live View Home Page. -
Page 42: Kennwort Festlegen
Kennwort festlegen Für den Zugriff auf das Produkt muss das Kennwort für den standardmäßigen Administrator- Benutzer root festgelegt werden. Beim erstmaligen Zugriff auf AXIS M1011/M1011-W/M1031-W wird das Dialogfeld „Configure Root Password“ (Root-Kennwort konfigurieren) geöffnet. In diesem Dialogfeld können Sie das Kennwort festlegen. - Page 43 Die Seite „Live-View“ (Live-Ansicht) Netzwerk-Kamera enthält Links zu Setup-Tools, mit denen Sie die Kamera Ihren Bedürfnissen entsprechend anpassen können. Klicken Sie bei Bedarf auf Yes (Ja), um AMC (AXIS Media Control) zu installieren. Nach Abschluss der Installation können Sie Videoströme in Internet Explorer anzeigen. Hierzu müssen Sie über Administratorrechte für den Computer verfügen.
- Page 44 Wählen Sie auf den internen Webseiten der Kamera Setup > Basic Setup > Wireless (Setup > Basiskonfiguration > Drahtlos). Diese Liste ist das Ergebnis einer Netzwerksuche. Das Netzwerk, mit dem AXIS M1011-W/M1031-W verbunden ist, wird blau angezeigt. Netzwerke mit nicht unterstützten Sicherheitsfunktionen werden grau angezeigt.
- Page 45 (Status von WLAN-Netzwerken) aus. Einige Felder unter Wireless Settings (Einstellungen für die WLAN-Verbindung) werden automatisch ausgefüllt. 2. SSID ist der Name des ausgewählten WLAN-Netzwerks. Lassen Sie dieses Feld leer, wenn AXIS M1011-W/M1031-W auf das nächstgelegene ungesicherte Netzwerk zugreifen soll. 3. Network type (Netzwerktyp) - Wählen Sie Master, wenn die Kamera über einen Access Point auf das Netzwerk zugreifen soll, oder wählen Sie Ad-hoc, um eine Verbindung zu einem...
- Page 46 Seite 46 AXIS M1011/M1011-W/M1031-W Installationsanleitung EAP-TLS • Identity (Identität) - Geben Sie die Benutzeridentität für das Netzwerk ein. • Private key password (Privater Schlüssel) - Geben Sie das Kennwort für die Benutzeridentität ein. • EAPOL version (EAPOL-Version) - Wählen Sie die vom Access Point verwendete Version (1 oder 2).
- Page 47 2. Ziehen Sie das Netzwerkkabel von der Kamera ab. 3. Aktualisieren Sie die Webseite nach 20–30 Sekunden, um die drahtlose Verbindung zu bestätigen. Wenn Sie nicht auf die Kamera zugreifen können, führen Sie AXIS IP Utility aus und wählen Sie die Kamera in der Liste aus.
-
Page 48: Andere Methoden Zum Festlegen Der Ip-Adresse
1. Wählen Sie eine IP-Adresse aus dem Netzwerksegment, in dem sich auch Ihr Computer befindet. 2. Suchen Sie nach der Seriennummer (S/N) auf dem AXIS M1011/M1011-W/M1031-W- Produktetikett. 3. Öffnen Sie auf Ihrem Computer die Eingabeaufforderung und geben Sie die folgenden Befehle... - Page 49 AXIS M1011/M1011-W/M1031-W Installationsanleitung Seite 49 6. Starten Sie einen Browser, geben Sie im Adressfeld „http://<IP-Adresse>“ ein, und drücken Sie die Eingabetaste auf der Tastatur. Hinweise: • So öffnen Sie die Eingabeaufforderung unter Windows: Wählen Sie im Startmenü die Option „Ausführen...“ und geben Sie „cmd“ ein. Klicken Sie auf „OK“.
-
Page 50: Led-Anzeigen
Seite 50 AXIS M1011/M1011-W/M1031-W Installationsanleitung Geräteanschlüsse Netzwerkanschluss - RJ-45-Ethernetanschluss. Die Verwendung von abgeschirmten Kabeln wird empfohlen. Netzanschluss - Mini-Gleichstromanschluss 5.0-5.1 V Gleichstrom, max. 1,5 A. Mittlerer Anschluss +. LED-Anzeigen Farbe Bedeutung Netzwerk Grün Leuchtet dauerhaft bei Verbindung mit einem 100-MBit/s-Netzwerk. Blinkt bei Netzwerkaktivität. - Page 51 View Config > Light buttons) gesteuert werden. Beachten Sie, dass dieses Licht nur gelegentlich und nicht dauerhaft verwendet werden sollte. Mikrofon/Lautsprecher für Halbduplex-Audio. Weitere Informationen hierzu finden Sie im AXIS M1011/M1011-W/M1031-W-Benutzerhandbuch. Das Benutzerhandbuch ist auf der Axis Website unter „http://www.axis.com“ und auf der CD für Axis-Netzwerkvideoprodukte verfügbar. Distributed by Communications Supply Corporation 1.877.462.7279...
-
Page 52: Zugriff Auf Die Kamera Über Das Internet
• HTTP-Port (standardmäßig Port 80) für die Anzeige und Konfiguration • RTSP-Port (standardmäßig Port 554) für die Anzeige von H.264-Videoströmen Ausführliche Informationen dazu finden Sie in der Dokumentation des Routers. Weitere Informationen zu diesem und anderen Themen erhalten Sie auf der Axis Support-Website unter „www.axis.com/techsup“. Weitere Informationen Das Benutzerhandbuch ist auf der Axis Website unter „http://www.axis.com“... -
Page 53: Guida All'installazione
AXIS M1011/-W & AXIS M1031-W Guida all'installazione Questo documento fornisce le istruzioni necessarie per installare la videocamera AXIS M1011/-W / AXIS M1031-W Videocamera di rete nella rete in uso. Per ulteriori informazioni sull’utilizzo del prodotto, consultare la Guida per l'utente disponibile sul CD incluso nella confezione oppure visitare il sito Web all’indirizzo www.axis.com/techsup. -
Page 54: Panoramica Dell'hardware
Pagina 54 Guida all'installazione AXIS M1011/M1011-W/M1031-W Panoramica dell’hardware AXIS M1031-W Vista anteriore AXIS M1011/-W Obiettivo con Obiettivo con indicatore di stato indicatore di stato Microfono Luce Sensore Altoparlante Vista posteriore (entrambi i modelli) Connettore di rete Connettore di alimentazione Anello di fissaggio... -
Page 55: Installazione Dell'hardware
Montaggio della videocamera La videocamera AXIS M1011/M1011-W/M1031-W viene fornita con la base e la sezione allungabile pre-montate. Smontare la base e, a seconda della configurazione di installazione, seguire le istruzioni riportate di seguito per montare la videocamera al muro o su un ripiano. - Page 56 Pagina 56 Guida all'installazione AXIS M1011/M1011-W/M1031-W 3. Verificare che i LED indichino le condizioni di funzionamento corrette. Per ulteriori dettagli, vedere la tabella a Pagina 68. Si noti che alcuni LED possono essere disabilitati o spenti. 4. Passare a Assegnazione di un indirizzo IP, alla pagina 57.
-
Page 57: Assegnazione Di Un Indirizzo Ip
Assegnazione di un indirizzo IP La maggior parte delle reti dispone di un server DHCP che automaticamente assegna gli indirizzi IP alle periferiche connesse. Se la rete non dispone di un server DHCP, per la videocamera AXIS M1011/M1011-W/M1031-W viene utilizzato l'indirizzo IP predefinito 192.168.0.90. -
Page 58: Axis Ip Utility: Videocamera Singola/Piccole Installazioni
L'applicazione può inoltre essere utilizzata per assegnare manualmente un indirizzo IP statico. Si tenga presente che la videocamera AXIS M1011/M1011-W/M1031-W deve essere installata sullo stesso segmento di rete (subnet fisica) del computer sul quale è in esecuzione AXIS IP Utility. Rilevamento automatico 1. -
Page 59: Axis Camera Management: Più Videocamere/Grandi Installazioni
Rilevamento automatico 1. Verificare che la videocamera sia collegata alla rete e alimentata correttamente. 2. Avviare AXIS Camera Management. Appena viene visualizzata la videocamera, fare clic con il pulsante destro sul collegamento e selezionare Live View Home Page (Immagini dal vivo). -
Page 60: Impostazione Della Password
Questa operazione può essere effettuata nella finestra di dialogo ‘Configure Root Password’ (Configura password root), che viene visualizzata quando si accede alla videocamera AXIS M1011/M1011-W/M1031-W per la prima volta. Per evitare l'interruzione della connessione di rete durante l'impostazione della password root, è... -
Page 61: Accesso Al Flusso Video
Viene visualizzata la pagina Live View (Immagini dal vivo) con i collegamenti agli strumenti di configurazione che consentono di personalizzare la videocamera. Se necessario, fare clic su Yes (Sì) per installare AMC (Axis Media Control) che consente di visualizzare il flusso video in Microsoft Internet Explorer. A questo scopo è necessario disporre dei privilegi di amministratore. - Page 62 Selezionare Setup > Basic Setup > Wireless (Configurazione – Configurazione di base – Wireless) nelle pagine Web interne della videocamera. Questo elenco viene visualizzato al termine della ricerca delle reti. La rete a cui la videocamera AXIS M1011-W/M1031-W è attualmente collegata viene visualizzata in blu. Le reti che presentano una protezione non supportata vengono visualizzate in grigio.
-
Page 63: Impostazioni Wireless
2. SSID è il nome della rete wireless selezionata. Lasciare questo campo vuoto per permettere alla videocamera AXIS M1011-W/M1031-W di accedere alla rete non protetta più vicina. 3. Network type (Tipo di rete) - Selezionare Master (Principale) per accedere alla rete tramite un punto di accesso oppure Ad-hoc (Ad hoc) per accedere a una qualunque delle periferiche wireless e creare una rete locale (vedere la nota riportata di seguito). - Page 64 Pagina 64 Guida all'installazione AXIS M1011/M1011-W/M1031-W EAP-TLS • Identity (Identità) – Inserire l'ID utente da presentare alla rete. • Private key password (Password basata su chiave privata) – Inserire la password da usare per l'ID utente. • EAPOL version (Versione EAPOL) –...
- Page 65 2. Scollegare il cavo di rete dalla videocamera. 3. Aggiornare la pagina Web dopo circa 20-30 secondi per confermare l'utilizzo della connessione wireless. Se non è possibile accedere alla videocamera, eseguire AXIS IP Utility e selezionare la videocamera dall'elenco. Nota: •...
-
Page 66: Altri Metodi Di Impostazione Dell'indirizzo Ip
Impostazione dell'indirizzo IP con ARP/Ping 1. Acquisire un indirizzo IP sullo stesso segmento di rete cui è connesso il computer in uso. 2. Individuare il numero di serie indicato sull'etichetta della videocamera AXIS M1011/M1011-W/ M1031-W. 3. Aprire una finestra MS-DOS sul computer e digitare i seguenti comandi:... - Page 67 Guida all'installazione AXIS M1011/M1011-W/M1031-W Pagina 67 Note • Per aprire una finestra MS-DOS in Windows: dal menu Start, scegliere Esegui... e digitare cmd. Fare clic su OK. • Per utilizzare il comando ARP in un sistema operativo Mac OS X, usare l'utility Terminal, in Applicazioni >...
-
Page 68: Indicatori Led
Solo per il modello AXIS M1031-W La videocamera AXIS M1031-W è munita anche di: Sensore PIR - Sensore a infrarossi passivo che misura la luce a infrarossi che attraversa gli oggetti presenti nel campo visivo. Se la videocamera è configurata in modo appropriato, è in grado di accendere automaticamente le luci su richiesta del sensore PIR. -
Page 69: Ripristino Delle Impostazioni Predefinite
Web per il supporto Axis all'indirizzo www.axis.com/ techsup. Ulteriori informazioni La Guida per l’utente è disponibile sul sito Web di Axis all’indirizzo www.axis.com oppure sul CD fornito con il prodotto. Suggerimento Visitare il sito di Axis all'indirizzo www.axis.com/techsup per verificare se sono stati pubblicati aggiornamenti del firmware per la videocamera AXIS M1011/M1011-W/ M1031-W. - Page 70 Distributed by Communications Supply Corporation 1.877.462.7279 www.gocsc.com...
-
Page 71: Guía De Instalación
AXIS M1011/-W & AXIS M1031-W Guía de instalación Esta guía de instalación incluye las instrucciones necesarias para instalar la AXIS M1011/-W / AXIS M1031-W Cámara de red en su red. Para obtener información sobre cualquier cuestión relacionada con el uso del producto, consulte el Manual del usuario, disponible en el CD que se incluye en este paquete, o la página www.axis.com/techsup. -
Page 72: Presentación Del Hardware
Página 72 AXIS M1011/M1011-W/M1031-W Guía de instalación Presentación del hardware AXIS M1031-W Vista frontal AXIS M1011/-W Objetivo con Objetivo con LED indicador LED indicador Micrófono Altavoz sensor Vista posterior (ambos modelos) Conector de red Conector de alimentación Anillo de bloqueo Referencia (N/P) y Botón de control... -
Page 73: Instale El Hardware
Montaje de la cámara AXIS M1011/M1011-W/M1031-W se suministra con el soporte y la pieza extensora montados. En función de la instalación que necesite, desmonte el soporte y siga las instrucciones que indicamos a continuación para montar en pared o en estante. -
Page 74: Asignación De La Dirección Ip
AXIS Camera Management. En función del número de cámaras que desee instalar, deberá utilizar el método que se adapte mejor a sus necesidades. Ambas aplicaciones son gratuitas y están disponibles en el CD del producto de vídeo en red de Axis suministrado con este producto o pueden descargarse de www.axis.com/techsup. -
Page 75: Axis Ip Utility: Para Cámaras Individuales O Instalaciones Pequeñas
AXIS IP Utility detecta y muestra automáticamente los dispositivos Axis que existen en la red. Además, puede utilizarse para asignar manualmente una dirección IP estática. Recuerde que el equipo que ejecute AXIS IP Utility debe instalarse en el mismo segmento de red (subred física) que la AXIS M1011/M1011-W/M1031-W. - Page 76 1. Compruebe que la cámara esté conectada a la red y que recibe alimentación. 2. Inicie AXIS Camera Management. Cuando la cámara aparezca en la ventana, haga clic con el botón derecho en el enlace y seleccione Página inicial de Live View.
-
Page 77: Configuración De La Contraseña
2. Proporcione la información que se le solicita y haga clic en OK. Se creará el certificado y se podrá configurar la contraseña con seguridad. Todo el tráfico hacia y desde AXIS M1011/ M1011-W/M1031-W estará cifrado a partir de este momento. -
Page 78: Acceda Al Vídeo Continuo
La página Live View de la cámara de red aparece con enlaces a las herramientas de configuración que le permiten personalizar la cámara. En caso necesario, haga clic en Yes (Sí) para instalar el AMC (AXIS Media Control) y así permitir la visualización del vídeo continuo en Internet Explorer. Para ello, debe tener derechos de administrador en su equipo. -
Page 79: Configuración De La Conexión Inalámbrica
La siguiente lista es el resultado de examinar las redes. La red a la que se encuentra asociada en ese momento la AXIS M1011-W/M1031-W se muestra en color azul. Una red que utiliza seguridad no compatible se muestra en color gris. Se proporciona la siguiente información: SSID: el nombre de una red inalámbrica (o dispositivo ad hoc). - Page 80 1. Seleccione un punto de acceso o dispositivo ad hoc en Estado de las redes inalámbricas. Parte de la información necesaria se introducirá automáticamente en Valores inalámbricos. 2. SSID es el nombre de la red inalámbrica seleccionada. Deje este campo en blanco si la AXIS M1011-W/M1031-W tendrá acceso a la red no segura más próxima.
- Page 81 2. Desconecte el cable de red de la cámara. 3. Actualice la página Web tras 20 ó 30 segundos para confirmar la conexión inalámbrica. Si no se puede acceder a la cámara, ejecute AXIS IP Utility y selecciónelo en la lista. Nota: •...
- Page 82 Así se garantiza que la cámara siempre estará accesible cuando realice cambios. • SSID (Service Set Identifier o “identificador de conjunto de servicios”) en ocasiones se escribe ESSID (Extended Service Set Identifier o “identificador de conjunto ampliado de servicios”). AXIS M1011-W/M1031-W: La instalación ha finalizado. Distributed by Communications Supply Corporation 1.877.462.7279...
-
Page 83: Otros Métodos Para Configurar La Dirección Ip
1. Adquiera una dirección IP en el mismo segmento de red en el que está conectado su equipo. 2. Localice el número de serie (S/N) en la etiqueta de la AXIS M1011/M1011-W/M1031-W. 3. Abra una línea de comando en su equipo y escriba los comandos siguientes:... -
Page 84: Indicadores Led
Página 84 AXIS M1011/M1011-W/M1031-W Guía de instalación Notas: • Para abrir una línea de comando en Windows: desde el menú Inicio, seleccione Ejecutar... y escriba cmd. Haga clic en OK (Aceptar). • Para utilizar el comando ARP en un sistema operativo Mac OS X, utilice la herramienta Terminal, que se encuentra en Aplicaciones >... -
Page 85: Restablecimiento De La Configuración Predeterminada De Fábrica
Micrófono/altavoz para audio semidúplex. Para más información, consulte el manual del usuario de la cámara AXIS M1011/M1011-W/ M1031-W en el sitio web de Axis (www.axis.com) o en el CD del producto de vídeo en red de Axis. Restablecimiento de la configuración predeterminada de fábrica... -
Page 86: Más Información
Página 86 AXIS M1011/M1011-W/M1031-W Guía de instalación Más información El manual del usuario está disponible en el sitio Web de Axis, www.axis.com, o en el CD de productos de vídeo en red de Axis suministrado con este producto. Un consejo: Visite www.axis.com/techsup para comprobar si existe algún firmware actualizado... - Page 87 Tested to comply with FCC Standards FOR HOME OR OFFICE USE. This product must be installed and used in strict accordance with the instructions given in the user documentation. This Axis product complies with the following radio frequency and safety standards:...
- Page 88 Installation Guide Ver.1.10 AXIS M1011/-W/M1031-W Printed: February 2009 © Axis Communications AB, 2008-2009 Part No. 34807 Distributed by Communications Supply Corporation 1.877.462.7279 www.gocsc.com...
Need help?
Do you have a question about the M1011 and is the answer not in the manual?
Questions and answers