Advertisement
Available languages
Available languages
MISSION
CRITICAL
WIRELESS
MOTOROLA, MOTO, MOTOROLA SOLUTIONS
and the Stylized M logo are trademarks or
registered trademarks of Motorola Trademark
Holdings, LLC and are used under license.
All other trademarks are the property
of their respective owners.
© 2011, 2012, 2013 Motorola Solutions, Inc.
All rights reserved.
*68009468001*
68009468001-D
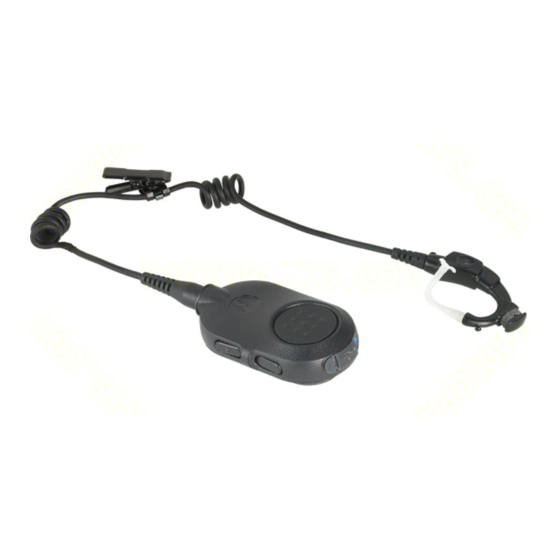
ASSEMBLY
1. Place the clip horizontally in the
clip track area.
2. Slide the clip upward until a click
is heard.
3. After assembly.
MISSION CRITICAL WIRELESS
Collar Clip
Flower Tip
PTT
Recess on
Front Housing
Volume Up
Volume Down
Battery LED
Power
Ear Tube
Swivel Clothing Clip
PAIRING YOUR DEVICE
1. To function in audio mode, ensure the earpiece portion of the Wireless Device is
plugged into the POD portion. To function as a Standalone PTT Device, remove
the earpiece.
DISASSEMBLY
1. Rotate the clip 90 °C (clockwise/
anti-clockwise).
2. Lift up the metal spring and slide
the clip out of the back cover.
3. While lifting the metal spring, slide
the clip out of the back cover with
your thumb.
2. Ensure both the radio and the device are powered on.
3. If not previously selected, the device will instruct the user to select language or
Earpiece
tone.
Portion
4. Confirm the Blue LED on the device is blinking.
5. Place the blue dot (secure pairing spot) on the device within one inch of the blue
dot (secure pairing spot) on the radio/adapter.
6. Refer to Table 1 for pairing LED and Tone indicators.
State
Microphone
Not Paired
Pairing Starting
Blue Dot - Ideal
Paired Successfully
Pairing Location
USB and
Wireless Link
Charger
Connected with Host
Wireless Link
Ear Strap
Disconnected from Host
PAIRING YOUR REMOTE PTT
First time connection steps:
1. Ensure that device and host are in pairing mode.
Wind Screen
2. Both the wireless device and wireless host must be within pairing range.
3. Once the device is successfully connected to host, a connection successful tone
indication is heard on audio device.
Note: Please refer to the host manual to put the host in pairing mode.
When a wireless device has been paired with the radio/adapter, the wireless device
continues to communicate with the radio/adapter upon the next power up. Refer to the
radio/adapter user manual for more details on the pairing programmable options.
ACOUSTIC SAFETY
Exposure to loud noises from any source for extended periods of time may
temporarily or permanently affect your hearing. The louder the radio's volume, the
less time is required before your hearing could be affected. Hearing damage from loud
noise is sometimes undetectable at first and can have a cumulative effect.
To protect your hearing:
•
Use the lowest volume necessary to do your job.
•
Turn up the volume only if you are in noisy surroundings.
•
Turn down the volume before adding headset or earpiece.
•
Limit the amount of time you use headsets or earpieces at high volume.
•
When using the radio without a headset or earpiece, do not place the radio's
speaker directly against your ear.
Note: Refer to the Mission Critical Wireless User Guide (68012002054) for additional
safety information.
FM Approved as intrinsically safe as Division 1, Class I, II, II. Group C, D, E, F, G,
T3C.
Waste (disposal) of your Electronic and Electric Equipment
Note: Refer to the Mission Critical Wireless User Guide (68012002054) for
additional waste disposal information.
Printed in USA
LED Indication
Tone Indication
Voice Prompt
(Audio and
(Audio Device)
(Audio Device)
Standalone PTT Device)
Blue LED Blinking
Pairing Ready Tone
"To Pair, Touch
Blue Dot"
Blue LED Rapid Blinking –
"Connecting"
Blue LED Solid for 2
Pairing Successful Tone –
seconds
Blue LED Heartbeat:
Connected Tone
"Headset
Long OFF and ON
Connected"
Blue LED Solid ON
Disconnected Tone
"Headset
every 2 minutes for 10
Disconnected"
minutes
Table 1: Wireless Link and Pairing Indicators
EN
Advertisement
Table of Contents

Related Manuals for Motorola MISSION CRITICAL WIRELESS NTN2570


Summary of Contents for Motorola MISSION CRITICAL WIRELESS NTN2570
- Page 1 Holdings, LLC and are used under license. All other trademarks are the property of their respective owners. PAIRING YOUR REMOTE PTT © 2011, 2012, 2013 Motorola Solutions, Inc. All rights reserved. First time connection steps: Power 1. Ensure that device and host are in pairing mode.
- Page 2 “耳机已断开” 耳挂带 Holdings, LLC and are used under license. 钟响一次,持续 10 分 All other trademarks are the property 钟 of their respective owners. © 2011, 2012, 2013 Motorola Solutions, Inc. 表 无线连接和配对指示灯 All rights reserved. *68009468001* 对数据设备进行配对 (远程 PTT) 68009468001-D 首次连接步骤:...
- Page 3 響起一次,歷時 10 分鐘 Holdings, LLC and are used under license. 耳朵固定帶 All other trademarks are the property 表 :無線連結與配對指示 of their respective owners. © 2011, 2012, 2013 Motorola Solutions, Inc. All rights reserved. 配對您的數據裝置 (遠端 PTT) *68009468001* 首次連線步驟: 1. 確認裝置與轉接器已於配對模式中。 68009468001-D 電源...
- Page 4 Holdings, LLC and are used under license. All other trademarks are the property Tableau 1 : Lien sans fil et indicateurs d'appariement of their respective owners. © 2011, 2012, 2013 Motorola Solutions, Inc. All rights reserved. POUR APPARIER VOTRE DISPOSITIF DE DONNÉES (ALTERNAT Alimentation DÉPORTÉ)
- Page 5 2 minutos por 10 minutos desconectado” All other trademarks are the property Tabla 1: Indicadores de enlace inalámbrico y asociación of their respective owners. © 2011, 2012, 2013 Motorola Solutions, Inc. All rights reserved. ASOCIACIÓN DE DISPOSITIVO DE DATOS (PTT REMOTO) *68009468001* Encendido Pasos de conexión la primera vez:...
- Page 6 All other trademarks are the property ASOCIACIÓN DE DISPOSITIVO DE DATOS (PTT REMOTO) of their respective owners. © 2011, 2012, 2013 Motorola Solutions, Inc. Pasos de conexión la primera vez: All rights reserved. 1. Asegúrese de que el dispositivo y el adaptador estén en modo de asociación.
- Page 7 무선 링크 및 페어링 표시등 Holdings, LLC and are used under license. All other trademarks are the property of their respective owners. EM데이터 장치 페어링(원격 PTT) © 2011, 2012, 2013 Motorola Solutions, Inc. All rights reserved. 최초 연결 단계: 이어 튜브 바람막이...
- Page 8 POUR APPARIER VOTRE DISPOSITIF DE DONNÉES (ALTERNAT All other trademarks are the property of their respective owners. DÉPORTÉ) © 2011, 2012, 2013 Motorola Solutions, Inc. All rights reserved. Etapas da conexão inicial: Alimentação 1. Verifique se o dispositivo e o adaptador estão em modo de emparelhamento.
Need help?
Do you have a question about the MISSION CRITICAL WIRELESS NTN2570 and is the answer not in the manual?
Questions and answers