Table of Contents
Advertisement
Quick Links
Advertisement
Table of Contents

Related Manuals for Tenda 4G301


Summary of Contents for Tenda 4G301
- Page 1 3G/4G Wireless Router User Guide...
-
Page 2: Copyright Statement
Tenda does not assume any liability that may occur due to the use or application of the product or circuit layout(s) described herein. Every effort has been made in the... -
Page 3: Preface
3G/4G Wireless Router User Guide Preface Thank you for choosing Tenda ! Please read this user guide before you start! This user guide instructs you to install and configure your device. This user guide applies to 4G300, 4G301 and 4G302. The 4G301 is used as an example throughout this user guide. -
Page 4: Table Of Contents
3G/4G Wireless Router User Guide Table of Contents Copyright Statement............................I Disclaimer ................................I Preface ................................. II This user guide uses the following formats to highlight special messages: ............II Technical Support ..............................II Table of Contents ............................. III I Product Overview ............................1 1 Package Contents.............................. - Page 5 3G/4G Wireless Router User Guide 2.6. DHCP ..............................39 2.7 DHCP Client List ............................. 40 3 Wireless Settings ............................42 3.1 Wireless-Basic ............................42 3.2 Wireless Security ............................. 44 3.3 Access Control ............................45 3.4 Connection Status ............................ 47 4 Security ................................47 4.1 Client Filter ..............................
-
Page 6: Product Overview
Unpack the package. Your box should contain the following items: If any of the parts are incorrect, missing, or damaged, contact your Tenda dealer. Keep the carton, including the original packing materials, in case you need to return the product for repair. - Page 7 Light Green The amount of electrical energy capacity is more than Dark Green The device is charging Blue The unit is fully charged up 4G301 Status Description The power level is very low Battery Meter Green Display real-time level of power capacity...
-
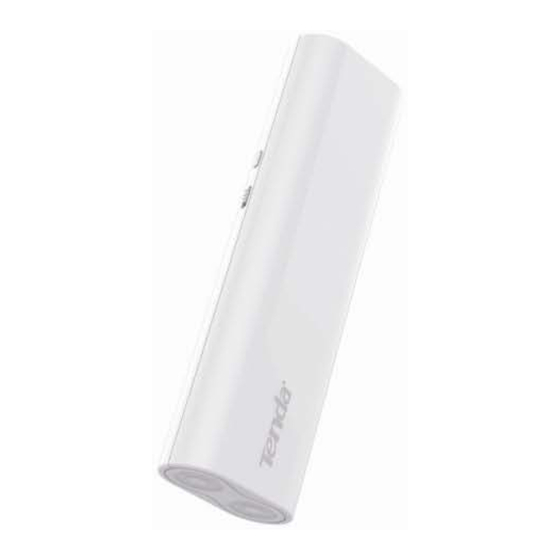
Page 8: Button & Interface
I Product Overview Status Description The power level is very low Battery Meter Green Display real-time level of power capacity The unit is starting up System LED Blinking Solid The unit is functioning correctly 2.2 Button & Interface 4G300... - Page 9 I Product Overview Button/Interface Description Micro USB For charging the unit via a USB cable For connecting to a 3G/4G Modem or charging a terminal device (such as iPad, iPhone) Power button to turn the unit on or off. The unit functions as a 3G/4G ON/OFF Switch wireless router when turned on or a power bank when turned off Pressing it with a needle for about 10 seconds resets the unit to the...
- Page 10 I Product Overview 4G301 Button/Interface Description For charging the unit via a USB cable Micro USB Port For connecting to a 3G/4G Modem or charging a terminal device (such as iPad, iPhone) Power button to turn the unit on or off. The unit functions as a 3G/4G...
-
Page 11: I Product Overview
I Product Overview 4G302 Button/Interface Description Micro USB For charging the unit via a USB cable For connecting to a 3G/4G Modem or charging a terminal device (such as iPad, iPhone) Power button to turn the unit on or off. The unit functions as a 3G/4G ON/OFF Switch wireless router when turned on or a power bank when turned off Press it to view power level... -
Page 12: Label
I Product Overview 2.3 Label 1→Product Model 2→Default Login IP address. This IP address is to be used to access the router’s settings through a web browser. If you change it, you have to open a new connection to the new IP address and log in again. -
Page 13: Quick Internet Setup
II Quick Internet Setup II Quick Internet Setup 1 Getting Prepared Before you start the installation process, you need to prepare the following: Item Description Router Find it in your package Should have a installed IE8 or higher browser DHCP, PPPoE or Static IP Internet Connection Type: 1. -
Page 14: Hardware Install
II Quick Internet Setup 2. Hardware Install 2.1 Charging Router Turn on the router and check the power level indicator LED. (For LED description, see LED) It is advisable to fully charge up the device if the amount of electrical energy capacity is less than 20%. Charge Method: Note---------------------------------------------------------------------------------------------------------------------- Please use the USB cable that comes in the package to charge this device. - Page 15 II Quick Internet Setup ----------------------------------------------------------------------------------------------------------------------------------------- If you want to access and configure this device via a wired connection, simply attach a 3G modem to its USB port and system will automatically switch to the 3G Router mode. The RJ45 port will then function as a LAN port so that you can connect to it using an Ethernet cable.
- Page 16 II Quick Internet Setup...
-
Page 17: Connect To Router
II Quick Internet Setup WISP Mode In this mode, the RJ-45 port on this device functions as a WAN port. You can connect to this device using an Ethernet cable. 3 Connect to Router In the Wireless Router (DHCP, PPPoE, Static IP) mode, clients (such as computers, smart phones and tablets) can only connect to this device wirelessly for sharing Internet access. - Page 18 II Quick Internet Setup Windows 7 Click the icon on the notification area on the bottom right corner. ① ① ① ① Select the wireless network you wish to connect and click Connect. ② ② ② ②...
- Page 19 II Quick Internet Setup If you see the screen below, you are connecting to the wireless network. ③ ③ ③ ③ Enter the security key and click OK. ④ ④ ④ ④ When you see Connected displayed next to the wireless network you selected, you have connected to the wireless network successfully.
- Page 20 II Quick Internet Setup Windows XP Right click My Network Places from your PC's desktop and select Properties. Right click Wireless Network Connection and select View Available Wireless Networks.
- Page 21 II Quick Internet Setup Double click the wireless network you wish to connect. Enter the security key and click Connect.
-
Page 22: Connect To Device Using An Ethernet Cable
II Quick Internet Setup When you see Connected displayed next to the wireless network you selected, you have connected to the wireless network successfully. 3.2 Connect to Device Using an Ethernet Cable If your computer is set to a static or fixed IP address (this is uncommon), change it to "Obtain an IP address automatically"... -
Page 23: Manual Internet Setup
II Quick Internet Setup and automatically detects and switches between PPPoE and DHCP. If you use the DHCP (Dynamic IP) connection type, you can simply access Internet via a wireless connection to this device, or if you use PPPoE, access this device wirelessly and then set up Internet. See PPPoE. - Page 24 II Quick Internet Setup Enter the login password and click Login. The default password is admin. ③ ③ ③ ③ You will come to the setup wizard interface. Here you can quickly set up Internet. ④ ④ ④ ④ ------------------------------------------------------------------------------------------------------------------------------------------- If you access Internet by connecting to the Ethernet cable from the incoming Internet side, see Static IP.
-
Page 25: Manual Internet Setup& Wireless Security Setup
II Quick Internet Setup 5.2 Manual Internet Setup& Wireless Security Setup Read the following and determine your Internet connection type. Then follow the right setup wizard. If your ISP provides you with an Ethernet cable from the incoming Internet side but no ISP login account or IP information, your ISP uses a DHCP connection. - Page 26 II Quick Internet Setup DHCP Select Hotel Mode: Dynamic IP and click Next. Configure your wireless network: SSID, channel, security settings and then click Next. SSID:Tenda_762038 Channel: 6 Security Mode: WPA-PSK Cipher Type: AES Security Key: Myrouter...
- Page 27 II Quick Internet Setup MAC Clone Setup: Enter the computer or broadband modem authorized by your ISP. Then click Next. Click Finish and wait for the device to restart automatically. After reboot, reconnect to this device wirelessly and you will be able to access Internet. Tip------------------------------------------------------------------------------------------------------------------------- Upon successful configuration, the RJ-45 port on the device functions as a WAN port and clients must only access the device wirelessly.
- Page 28 II Quick Internet Setup PPPoE Select Residence Mode: PPPoE and click Next. Configure your wireless network: SSID, channel, security settings and then click Next. SSID:Tenda_762038 Channel: 6 Security Mode: WPA-PSK Cipher Type: AES Security Key: Myrouter...
- Page 29 II Quick Internet Setup Internet Setup & MAC Clone: Enter your ISP login user name and password (case sensitive) and the MAC address of the computer or broadband modem authorized by your ISP. Then click Next. Click Finish and wait for the device to restart automatically. After reboot, reconnect to this device wirelessly and you will be able to access Internet.
- Page 30 II Quick Internet Setup 3G/4G Router Mode Tip------------------------------------------------------------------------------------------------------------------------- In this mode, you only need to configure the router. No additional configurations are required on the 3G/4G modem. Select 3G/4G Router Mode and click Next. Select your 3G ISP and click Next.
- Page 31 II Quick Internet Setup Configure your wireless network: SSID, channel, security settings and then click Next. SSID:Tenda_762038 Channel: 6 Security Mode: WPA-PSK Cipher Type: AES Security Key: Myrouter Click Finish and wait for the device to restart automatically. After reboot, reconnect to this ④...
- Page 32 II Quick Internet Setup WISP Select WISP Mode: WISP and click Next. WISP Setup: Enter or specify the SSID, MAC, channel, security settings provided by your WISP and then click Next.
- Page 33 II Quick Internet Setup Configure your wireless network: SSID and security settings and then click Next. SSID:Tenda_762038 Security Mode: WPA-PSK Cipher Type: AES Security Key: Myrouter ------------------------------------------------------------------------------------------------------------------------------------------- In WISP mode, your wireless network must be set to operate on the same channel as your WISP Internet Setup: Configure the Internet connection settings and then click Next.
- Page 34 II Quick Internet Setup Click Finish and wait for the device to restart automatically. After reboot, reconnect to this device wirelessly or using an Ethernet cable and you will be able to access Internet. Tip------------------------------------------------------------------------------------------------------------------------- Upon successful configuration, the RJ-45 port on the device functions as a LAN port and clients can access the device either wirelessly or via a wired connection.
-
Page 35: Features & Configurations
III Features & Configurations III Features & Configurations 1 Status This section includes the following: WAN Status LAN Status Wireless Status System Status Click Status to enter the page. -
Page 36: Wan Status
III Features & Configurations 1.1 WAN Status WAN Status in Wireless Router Mode & WISP Mode (WISP Client Router Mode): WAN Status in 3G/4G Router Mode: -------------------------------------------------------------------------------------------------------------------------------------------- IP Address/Subnet Mask/WAN subnet mask/Gateway/Primary DNS Server/Secondary DNS Server: This type of information appears only if the router successfully connects to Internet via a PPPoE or DHCP (dynamic IP) connection. -
Page 37: Lan Status
III Features & Configurations 1.2 LAN Status 1.3 Wireless Status... -
Page 38: System Status
III Features & Configurations 1.4 System Status Knowledge Center ---------------------------------------------------------------------------------------------- 1. WAN MAC Address: The device’s current WAN MAC address. 2. System Time: Current system time on this device. The device automatically synchronizes the system time with Internet time servers. 3. -
Page 39: Lan Settings
III Features & Configurations To set up Internet, see WAN Setup. To set up speed and duplex mode for the WAN port, see WAN Speed Setup. To configure DNS server, see DNS Setup. To clone MAC address, see MAC Clone. To configure DHCP server, see DHCP Server. -
Page 40: Wan Settings
III Features & Configurations 2.2 WAN Settings Click Basic -> WAN Setup to configure your Internet connection settings. 3G/4G Router Mode Configuration Procedures: Configuration Procedures: Configuration Procedures: Configuration Procedures: Country: Select your country. Country: Country: Country: ① ① ① ① Service Provider: : : : Select your 3G/4G ISP. - Page 41 III Features & Configurations Connect Manually: Require the user to manually connect to the Internet before each session. Connect On Demand: Re-establish connection to the Internet only when there is data transmitting. Connect During Specified Time Period: Connect automatically to the Internet during a specified time length.
- Page 42 III Features & Configurations PPPoE Configuration Procedures: Internet Connection Type: Select PPPoE. ISP Username: Enter the ISP login name. ISP Password: Enter the ISP login password. Click Save to save your settings. Knowledge Center ---------------------------------------------------------------------------------------------- 1. MTU: The MTU (maximum transmission unit) is the largest data packet a network device transmits.
- Page 43 III Features & Configurations 3. Server Name: This is the descriptive name of the server. Only enter it if your ISP provides it. Static IP Configuration Procedures: Internet Connection Type: Select Static IP. IP Address/Subnet Mask/WAN subnet mask/Gateway/Primary DNS Server/Secondary DNS Server: Enter the ISP information you gathered in 1GettingPrepared.
- Page 44 III Features & Configurations DHCP Configuration Procedures: Internet Connection Type: Select DHCP. Click Save to save your settings. WAN MTU Setup The MTU (maximum transmission unit) is the largest data packet a network device transmits. The normal MTU value for most Ethernet networks is 1500 bytes, or 1492 bytes for PPPoE connections.
- Page 45 III Features & Configurations A secure website that does not open, or displays only part of a web page Yahoo email MSN portal You use VPN and encounter serious performance problems. You used a program to optimize MTU for performance reasons, and now you have connectivity or performance problems.
-
Page 46: Wan Speed
III Features & Configurations The common MTU sizes and applications are listed in the table below. Application Typical for connections that do not use PPPoE or VPN. 1500 1492 Used in PPPoE environments. 1472 Maximum size to use for pinging. (Larger packets are fragmented.) 1468 Used in some DHCP environments. -
Page 47: Dns Settings
III Features & Configurations 2.4 DNS Settings Click Basic -> DNS Settings to enter the DNS configuration interface. Configuration Procedures: DNS Settings: Check to enable the DNS settings. Primary DNS Server: Enter the IP address of your ISP’s primary DNS server. Secondary DNS Address: If a secondary DNS server address is available, enter it here. -
Page 48: Mac Clone
III Features & Configurations 2.5 MAC Clone Some ISPs (Internet Service Providers) require end-user's MAC address to access their network. This feature copies your current PC's MAC address to the router. Click Basic -> MAC Clone to enter the MAC Clone screen. Knowledge Cente------------------------------------------------------------------------------------------------ 1. -
Page 49: Dhcp
III Features & Configurations Click Save to save your settings. 2.6. DHCP DHCP (Dynamic Host Configuration Protocol) assigns an IP address to each device on the LAN/private network. When you enable the DHCP Server, the DHCP Server will automatically allocate an unused IP address from the IP address pool specified in this screen to the requesting device as long as the device is set to "Obtain an IP Address Automatically". -
Page 50: Dhcp Client List
III Features & Configurations Lease Time: The lease time is a time length that the IP address is assigned to each device before it is refreshed. Click Save to save your settings. -------------------------------------------------------------------------------------------------------------------------------------------- By default, the router functions as a DHCP server. Do not disable the DHCP server feature unless you want to manually configure the TCP/IP settings for all PCs on your LAN. - Page 51 III Features & Configurations 192.168.2.123. Configuration Procedures: Enter the last number of the IP address you want to reserve, for example, 123. Enter the MAC address of 44:37:E6:4F:37:3B. Click Add. Click Save to save your settings. ------------------------------------------------------------------------------------------------------------------------------------------- 1. If the IP address you have reserved for your PC is currently used by another client, then you will not be able to obtain a new IP address from the device's DHCP server, instead, you must manually specify a different IP address for your PC to access Internet.
-
Page 52: Wireless Settings
III Features & Configurations 3 Wireless Settings This section includes the following: Basic Security Access Control Connection Status To configure wireless network name, channel and other basic wireless settings, see Wireless - Basic. To secure your wireless network, see Wireless Security. To restrict access to your wireless network, see Access Control. - Page 53 III Features & Configurations Configuration Procedures: SSID: This is the public name of your wireless network. Channel: Select a channel or select Auto to let system automatically select one for your wireless network to operate on if you are unsure. The best selection is a channel that is the least used by neighboring networks.
-
Page 54: Wireless Security
III Features & Configurations 3.2 Wireless Security Click Wireless -> Security to enter the Security screen. Here you can define a security key to secure your wireless network against unauthorized accesses. Configure security mode, cipher type and security key. Click Save to save your settings. Knowledge Center----------------------------------------------------------------------------------------------- 1. -
Page 55: Access Control
III Features & Configurations 8. WPA/WPA2-PSK mixed: If selected, both WPA-PSK and WPA2-PSK secured wireless clients can join your wireless network. 9. AES: If selected, wireless speed can reach up to300Mbps. 10. TKIP: If selected, wireless speed can reach up to 54Mbps. 11.TKIP+AES: If selected, both AES and TKIP secured wireless clients can join your wireless network. - Page 56 III Features & Configurations Wireless Access Control Application Example: To only allow your own notebook at the MAC address of C8:3A:35:CC:34:25 to join your wireless network Configuration Procedures: Select Allow. Enter the MAC address of the wireless device you want to restrict. Here in this example, enter C8:3A:35:CC:34:25.
-
Page 57: Connection Status
III Features & Configurations 3.4 Connection Status Click Wireless -> Connection Status. Here you can see a list of wireless devices connected to the router. --------------------------------------------------------------------------------------------------------------------------------------------- 1. The bandwidth here refers to the channel bandwidth instead of wireless connection rate. You can know whether there are unauthorized accesses to your wireless network by viewing the wireless client list. -
Page 58: Client Filter
III Features & Configurations 4.1 Client Filter This section allows you to set the times specific clients can or cannot access the Internet via the devices’ assigned IP addresses and service port. Click Security to enter the configuration screen. Knowledge Center----------------------------------------------------------------------------------------------- 1. - Page 59 III Features & Configurations Configuration Procedures: Click Add to add a filter rule. Filter Mode: Select Deny. Description: Briefly describe the current rule. This field is optional. IP: Enter a starting IP address. Here in this example, enter 192.168.2.110. Enter an ending IP address.
- Page 60 III Features & Configurations Tip------------------------------------------------------------------------------------------------------------------------- 1. The valid service port number range is from 1 to 65534. 2. Up to 10 filter rules can be configured. 3. If you have not set up the system time for this device, click Tools -> Time & Date to set up correct time and date for the rules to be effective.
-
Page 61: Mac Filter
III Features & Configurations 4.2 MAC Filter This section allows you to restrict specific clients to access the Internet via the devices’ MAC addresses. Each PC has at least an installed network adapter with a unique MAC address. Click Security -> MAC Filter to enter the configuration screen. Knowledge Center ---------------------------------------------------------------------------------------------- 1. - Page 62 III Features & Configurations Click Add to add a filter rule. Filter Mode: Select Allow. Description: Briefly describe the current rule. This field is optional. MAC Address: Specify the MAC address of the computer that you want to restrict, 00:E4:A5:44:35:69. -------------------------------------------------------------------------------------------------------------------------------------------- If the device already connects to your router, you can simply select its MAC address from the MAC address list drop-down list.
- Page 63 III Features & Configurations Enable MAC Filter: Check to enable or uncheck to disable the MAC filter feature. Select Deny from the Default drop-down list and then click Save.
-
Page 64: Url Filter
III Features & Configurations -------------------------------------------------------------------------------------------------------------------------------------------- 1. Up to 10 MAC filter rules can be configured. 2. If you have not set up the system time for this device, click Tools -> Time & Date to set up correct time and date for the rules to be effective. 4.3 URL Filter This section allows you to control URL access. - Page 65 III Features & Configurations Configuration Procedures: Click Add to add a filter rule. ① ① ① ① Filter Mode: Select a filter mode. Here in this example, select Deny. ② ② ② ② Description: Briefly describe the current rule. This field is optional. ③...
-
Page 66: Remote Web Management
III Features & Configurations Enable URL Filter: Check to enable or uncheck to disable the URL filter feature. ⑧ ⑧ ⑧ ⑧ Select Allow from the Default drop-down list and then click Save. ⑨ ⑨ ⑨ ⑨ --------------------------------------------------------------------------------------------------------------------------------------------- 1.Different URL strings must be separated with a comma. To match all websites, use * (asterisk). 2. - Page 67 III Features & Configurations security, we suggest that only enter the IP address of the PC for remote management. Remote Web Management Application Example: To access your router (WAN IP address: 102.33.66.88) at your home from the PC (218.88.93.33) at your office via the port number 8090 Configuration Procedures: Enable: Check to enable the remote Web management feature.
-
Page 68: Advanced Applications
III Features & Configurations 5 Advanced Applications This section includes the following: DDNS Port Forwarding DMZ Host UPnP Routing Table To remotely access the device via a domain name or access a server on a LAN PC, see DDNS . To let an Internet user access a server on your LAN PC, see Port Forwarding. - Page 69 User Name: Enter the DDNS user name registered with your DDNS service provider. Here in ③ ③ ③ ③ this example, enter tenda. Password: Enter the DDNS Password registered with your DDNS service provider. Here in ④ ④ ④ ④...
-
Page 70: Port Forwarding
Internet by typing your router’s domain name into your browser’s address or location field on your PC (218.58.98.3) followed by a colon (:) and the remote management port number. Here in this example, enter http://tenda.dyndns.org:8090. 5.2 Port Forwarding You want to share resources on your PC with your friends who are not in your LAN. - Page 71 III Features & Configurations Click Advanced -> Port Forwarding to enter the configuration screen. Application Example: As shown in the figure above, your PC at 192.168.0.10 connects to the router and runs a FTP server on port number 21. Your friends want to access this FTP server on your PC from external network.
- Page 72 III Features & Configurations Configuration Procedures: Start Port: Enter the starting port number for the service. Here in this example, enter 21. End Port: Enter the ending port number for the service. Here in this example, enter 21. Internal IP: Enter the IP address of your local computer that will provide this service. Here in this example, enter 192.168.2.10.
-
Page 73: Dmz Host
III Features & Configurations 5.3 DMZ Host The DMZ (De-Militarized Zone) function disables the firewall on the router for one device for a special purpose service such as Internet gaming or video conferencing applications that are not compatible with NAT (Network Address Translation). Click Advanced -> DMZ Host to enter the DMZ Host screen. -
Page 74: Upnp
III Features & Configurations --------------------------------------------------------------------------------------------------------------------------------------------- 1. Be sure to statically set the IP Address of the computer that serves as a DMZ host for this function to be consistent. 2. Security softwares such as anti-virus software and OS built-in firewall, etc may affect the DMZ host feature. -
Page 75: Route Table
III Features & Configurations 5.5 Route Table Click Advanced -> Route Table to view the router's route table. Knowledge Center ---------------------------------------------------------------------------------------------- 1. Destination IP: The IP address of the final destination. "0.0.0.0" indicates any network segment. 2. Subnet Mask: The subnet mask for the specified destination. 3. - Page 76 III Features & Configurations large volume of data from Internet, which sharply frustrates your Internet surfing experience; you can use this feature to set limits for the volume of Internet traffic he can get. For example, you can split the 4M into two, so your neighbor can only use up to 2M Internet traffic and you can enjoy 2M. Configuration Procedures: Enable Bandwidth Control: Check the Enable box to enable the Bandwidth Control feature.
-
Page 77: Tools
III Features & Configurations 7 Tools This section explains the following: Time & Date Firmware Upgrade Backup & Restore Restore Factory Default Change Password Logs Reboot To configure system time, see Time & Date. To upgrade firmware, see Firmware Upgrade. To backup or restore configurations, see Backup &... - Page 78 III Features & Configurations A. Sync with Internet time servers Configuration Procedures: nternet Time Server: If enabled, time and date will be updated automatically from ① ① ① ① the Internet. Check to enable the feature. Sync Interval: Specify a time interval for periodic update of time and date ②...
-
Page 79: Firmware Upgrade
III Features & Configurations B. Set Time and Date Manually/Sync with Your PC Configuration Procedures: Internet Time Server: If enabled, time and date will be updated automatically from the Internet. Uncheck to disable the feature. Specify the time and date manually or click the Copy Your PC's Time to automatically copy your PC's time to the device. - Page 80 III Features & Configurations ---------------------------------------------------------------------------------------------------------------------- Note 1. Before you upgrade the firmware, make sure you are having a correct firmware. A wrong firmware may damage the device. 2. It is advisable that you upgrade the device's firmware over a wired connection. DO NOT interrupt the power to the router when the upgrade is in process otherwise the router may be permanently damaged.
-
Page 81: Backup & Restore
III Features & Configurations 7.3 Backup & Restore Once you have configured the device the way you want it, you can save these settings to a configuration file on your local hard drive that can later be imported to your device in case that the device is restored to factory default settings. - Page 82 III Features & Configurations Click Save on the File Download window. Select a local hard drive to save the file and click Save.
- Page 83 III Features & Configurations To Restore Configurations: Click Browse. Select the configuration file that is saved previously to your local hard drive and click Open.
-
Page 84: Restore To Factory Default Settings
III Features & Configurations Click the Restore button to reset your device to previous settings. 7.4 Restore to Factory Default Settings Click Tools -> Restore Factory Default to enter the configuration screen. Here you can reset the device to factory default settings. Note --------------------------------------------------------------------------------------------------------------------- 1. -
Page 85: Change Password
III Features & Configurations The factory default settings are listed below: IP Address: 192.168.2.1 Subnet Mask: Enter 255.255.255.0. Password: admin For device's factory default settings, see Appendix 3 Factory Default Settings. 7.5 Change Password Click Tools -> Change Password to enter the configuration screen. It is strongly recommended that you change the factory default login password. -
Page 86: Logs
III Features & Configurations 7.6 Logs Click Tools -> Logs to enter the logs screen. Here you can view the history of the device’s actions upon system startup. Three types of logs are available: System, sntp and ddns. 7.7 Reboot When a certain feature does not take effect or the device fails to function correctly, try rebooting the device. -
Page 87: Appendix
IV Appendix IV Appendix 1 Configure PC TCP/IP Settings Windows 7 Click Start -> Control Panel. - Page 88 IV Appendix Click Network and Internet. Click Network and Sharing Center.
- Page 89 IV Appendix Click Change adapter settings. Click Local Area Connection and select Properties.
- Page 90 IV Appendix Select Internet Protocol Version 4 (TCP/IPv4) and click Properties.
- Page 91 IV Appendix Select Obtain an IP address automatically and click OK.
- Page 92 IV Appendix Click OK on the Local Area Connection Properties window to save your settings.
-
Page 93: Windows Xp
IV Appendix Windows XP Right-click My Network Places and select Properties. Right click Local Area Connection and select Properties. - Page 94 IV Appendix Select Internet Protocol Version 4 (TCP/IPv4) and click Properties. Select Obtain an IP address automatically and click OK.
- Page 95 IV Appendix Click OK on the Local Area Connection Properties window to save your settings.
-
Page 96: Faqs
We will be more than happy to help you out as soon as possible. 1. Q: I cannot access the device's management interface. What should I do? Make sure the power LED on the device's front panel is on and the SYS LED blinks normally. -
Page 97: Factory Default Settings
IV Appendix Make sure the statically assigned IP addresses to the PCs on LAN are not used by others PCs. 4. Q: I have problems connecting to Internet/Secure websites do not open or displays only part of a web page. What should I do? This problem mainly happens to users who use the PPPoE or Dynamic IP Internet connection type. -
Page 98: Remove Wireless Network From Your Pc
IV Appendix Remote Web Management Disabled Bandwidth Control Disabled Others DMZ Host Disabled UPnP Enable Internet Access Management Disabled 4 Remove Wireless Network from Your PC If you change wireless settings on your wireless device, you must remove them accordingly from your PC;... - Page 99 IV Appendix Select the wireless network and click Remove network.
-
Page 100: Windows Xp
IV Appendix Windows XP Right-click My Network Places and select Properties. Right click Wireless Network Connection and then select Properties. - Page 101 IV Appendix Click Wireless Networks, select the wireless network name under Preferred networks and then click the Remove button.
-
Page 102: Safety And Emission Statement
IV Appendix 5 Safety and Emission Statement CE Mark Warning This is a Class B product in a domestic environment, this product may cause radio interference, in which case the user may be required to take adequate measures. This device complies with EU 1999/5/EC. - Page 103 IV Appendix Connect the equipment into an outlet on a circuit different from that to which the receiver is connected. Consult the dealer or an experienced radio/TV technician for help. FCC Caution: Any changes or modifications not expressly approved by the party responsible for compliance could void the user's authority to operate this equipment.
Need help?
Do you have a question about the 4G301 and is the answer not in the manual?
Questions and answers