
Summary of Contents for Ellion HMR-350H
- Page 1 USER'S MANUAL HD MEDIA RECORDER & PLAYER HMR-350H www.elliondigital.com P/N : 63020013800...
- Page 2 Precautions IMPORTANT The exclamation point within an The lightning flash with arrowhead symbol, within CAUTION : TO PREVENT THE RISK equilateral triangle is intended to alert an equilateral triangle, is intended to alert the user OF ELECTRIC SHOCK, DO NOT the user to the presence fo important- to the presence of uninsulated dangerous voltage REMOVE COVER (OR BACK).
-
Page 3: Important Safety Instructions
Important Safety Instructions • READ THESE INSTRUCTIONS - All the safety • POWER-CORD PROTECTION - Protect the and operating instructions should be read before power cord from being walked on or pinched the product is operated. particularly at plugs, convenience receptacles, and the point where they exit from the apparatus. -
Page 4: Table Of Contents
Table of Contents File Copy Before You Start What’s in the box ..........5 As an External HDD - Putting the batteries in the remote control ..5 Connecting HMR to PC through USB Using the remote control ........5 target Port ............ -
Page 5: Before You Start
Before You Start Insert two AAA/R03 batteries into What's in the box the battery compartment following the indications Thank you for buying this product. Please confirm (+, -) inside the that the following accessories are in the box when compartment. you open it. -
Page 6: File System
Before You Start USB connected external HDD File System You may find 3 file systems during enjoying HD FAT 32 (File Allocation Table 32Bit) Media Recorder (HMR) You can copy, record (less than 4GB in Installed HDD single file size) and enjoy time shift as well as you can playback the contents inside UDF (Universal Disk Format) NTFS (NT File System) -
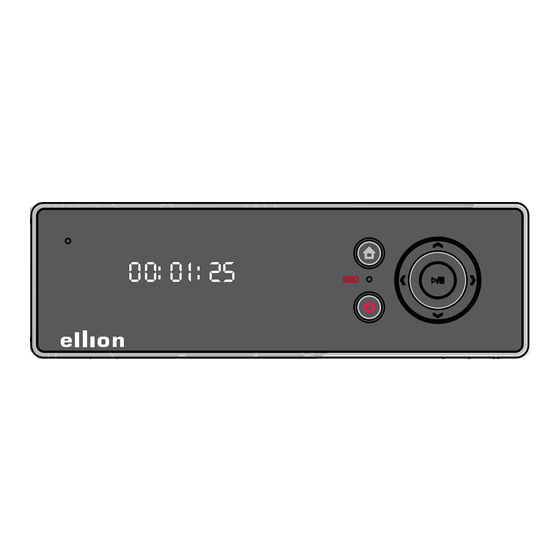
Page 7: Control & Name
Control & Name Front Power LED Arrow button To move ◄,►,▲,▼ VFD Display REC LED IR receiving part Stand by/ Power On To receive IR signal from remote control To Switch HMR Power On or into Stand by mode Guide To display Guide Menu. -
Page 8: Rear-Scart Version
Control & Name Rear - Euro Scart Verion 9 10 EXT. IR DC IN (12V) For the extension IR cable To Connect Power Adapter cable COAXIAL DV In To Connect to Coaxial Input of Digital Amplifier Digital Input jack (IEEE1394) for Digital Camcorder COMPONENT VIDEO OUT USB HOST... -
Page 9: Rear-Standard Version
Control & Name Rear - Standard Version 9 10 EXT. IR Power S/W For the extension IR cable Mechanical Power Switch to supply power to HMR or to cut it off DV In Digital Input jack (IEEE1394) for Digital DC IN (12V) Camcorder To Connect Power Adapter cable USB HOST... -
Page 10: Remote Control
Control & Name Remote Control To repeat a certain section. ARROW ( ▲▼◄ ► To select an item of menu. AUDIO To select Audio language or Audio channel CM SKIP To jump to 30 seconds forward DISPLAY To view the information on current working status. To make it disappear pressing one more time To go to DV input mode for Digital Camcorder EDIT... - Page 11 Control & Name GOTO NEXT To go back or forward to the specific point To jump to next chapter or next pre-specified point GUIDE NUMERIC (0~9) To show the guide menu To select number or to type the number PAUSE/STEP To go to REC list To pause playing to view the still picture.
- Page 12 Control & Name TV/HMR To select TV signal or HMR signal when they are connected with Scart Cable. SCAN-FWD It works only they are connected with Scart cable. To go forward fast during playback It is useful especially if your Scart TV has Scart Auto Detect function SCAN-REV To go backward fast during playback...
-
Page 13: Connection
Connection Rear - Euro Scart Verion Connection to TV HDMI A/V (Composite Video and 2ch Audio) NOTE • Most of HDMI TV do not support interlaced signal (576i/480i) which is default video output setting in this unit. Please press TV system button on remote control in order to get the right signal when you connect TV with HDMI cable. - Page 14 Connection Connection to AV Input with AV device (Satelite, Digital Terestrial, or Cable Set Top box, VCR etc.) Scart Input AV Input (Composite Video and 2ch Audio) Connection...
- Page 15 Connection Connection to Digital Amplifier Connection to Computer Coaxial Audio Out Optical Audio Out NOTE • Please connect HMR to USB 2.0 port in order to get the high speed (Upto 480Mbps) file transfer. • HMR shall work only USB 1.1 speed if it is connected to USB 1.1 port in your computer Connection...
- Page 16 Connection Connection to USB external HDD or USB Connection with LAN Memory (2 port) NOTE NOTE • You can also connect the Digital TV USB Dongle and • Please refer to Network explanation in Using the SET UP Wireless Dongle which are optional accessories. Menu (Network Section) Connection...
- Page 17 Connection Connection for Power Adaptor Connection...
-
Page 18: Rear-Standard Version
Connection Rear - Standard Version Connection to TV HDMI A/V (Composite Video and 2ch Audio) NOTE • Most of HDMI TV do not support interlaced signal (576i/480i) which is default video output setting in this unit. Please press TV system button on remote control in order to get the right signal when you connect TV with HDMI cable. - Page 19 Connection Connection to AV Input with AV device Connection to Digital Amplifier (Satelite, Digital Terestrial, or Cable Set Top box, VCR etc.) AV Input (Composite Video and 2ch Coaxial Audio Out Audio) Optical Audio Out Connection...
- Page 20 Connection Connection to Computer Connection to USB external HDD or USB Memory (2 port) NOTE NOTE • Please connect HMR to USB 2.0 port in order to get the • You can also connect the Digital TV USB Dongle and high speed (Upto 480Mbps) file transfer.
- Page 21 Connection Connection with LAN Connection for Power Adaptor NOTE • Please refer to Network explanation in Using the SET UP Menu (Network Section) Connection...
-
Page 22: Hdd Installation
HDD Installation HDD Installation Turn the unit upside down. Take out the HDD bracket by pressing the push point and pulling the handle out after uncrewing the handle (only if there is screw fastened) Open the HDD door case by pressing it down after unscrewing it (only if there is Push the HDD into the bracket and screw fastened) - Page 23 HDD Installation Push the HDD into the bracket and Screw the handle of bracket and the unit connect power cable and Data cable and close door case. Screw the Door Case and the unit (if necessory) NOTE • When you disconnect the cables in order to change HDD, please disconnect them while the holding stick is locked in order to prevent the connectors from damages.
-
Page 24: Hdd Format
HDD Format Press in order to set the Time Shift ▲,▼ HDD Format Butter time from 1 hour to 4 hours When you turn on the HMR after installing the Press ► button and select Next by new HDD or you select HDD Format in Set Up pressing Enter or OK button on the front Menu, the following OSD will appear. - Page 25 HDD Format Selection of Multimedia Disc Space Format execution Press ▲,▼ in order to select each Press button and select Format by ► capacity of FAT32 and NTFS in Multimedia pressing Enter or OK button on the front disc space. Key, Format will start.
-
Page 26: Initial Setting
Initial Setting Select OK and press Enter when you are Initial Setting asked again. Select Cancel and press Enter if you want to cancel the setting. When you have finished HDD format after HDD installation or when you power on the HMR first Select DHCP IP (Auto) or Fix IP (Manual) time without HDD installation, you can set your according to your IP status by pressing... -
Page 27: Guide Menu
GUIDE Menu You can enjoy HMR very easily by simply pressing Guide button on your remote control or on front key Browser Video In Select it if you want to play and edit AV files Select it if you want to make the recording in the device connected in HMR. -
Page 28: File Copy
File Copy You can copy the AV contents by As an External HDD - Connecting computer to HMR as an external HDD HMR to PC through USB target Port drive * FAT 32 has the limit of one file size less You can enjoy HMR as an external HDD than 4GB. -
Page 29: As A Host - Multi Way File Copy
File Copy Cursor will go to the right Destination As a Host - Multi way file copy table. You can enjoy the multi way file copy among installed HDD (Source & Destination), LAN (Source Only) and USB storage (Source & Destination) NOTE •... - Page 30 File Copy Press button to go to Destination ► directory Press in order to select the ▲,▼ destination directory you want to copy to and Press --> button to execute the copy. Select OK to execute or No to cancel. NOTE •...
-
Page 31: Recording
Recording Please make sure that recording device (HDD or USB storage) is connected well and it has enough free space for recording. You can record AV contents from various AV device such as Set Top box, Camcorder and VCR. You can record them to installed HDD or USB connected storage which has FAT32 file system. The default recording target is installed HDD. -
Page 32: Basic Recording(Scart Version)
Recording Each source is showing on the top right Basic Recording (Scart version) corner of TV Screen. Press Guide button on Remote Control or on front key Select Video In by pressing button ◄,► and press Enter button on Remote Control or OK button on Front Key Press REC button to start your recording. -
Page 33: Basic Recording(Standard Version)
Recording Each source is showing on the top right Basic Recording corner of TV Screen. (Standard version) Press Guide button on Remote Control or on front key Select Video In by pressing button ◄,► and press Enter button on Remote Control or OK button on Front Key Press REC button to start your recording. -
Page 34: Otr ( On Touch Recording)
Recording OTR ( One Touch Recording) Recording From Digital Camcorder During basic recording, Press REC button. You can record from Digital Camcorder Each time you press REC button, Recording enjoying the control by HMR remote control time changes 30 min., 60 min., 90 min., 120 when it is connected in DV Input. -
Page 35: Recording From Tv
Recording Recording and Time Shift from TV You may record or enjoy time shift from TV direclty. It is only available with TV which has AV output function through Scart and Scart version of this unit. Please check if your TV is supporting it first. Go to the Set up Menu and change the TV input On (refer to the Set Up Menu, Video setting in this manual) Your TV is not supporting AV out function through... -
Page 36: Editing
Editing You can enjoy various editing function on the Select OK you want to delete by pressing contents button and press Enter button on ▲,▼ Remote Control or OK button on Front Key Editing recorded contents in HDD Select Return you do not want to delete (in UDF Partition) by pressing button and press Enter... - Page 37 Editing Press ▲,▼ button to select the condition Select the letter and number by pressing you want to sort the titles. and enter one by one until you ◄,►,▲,▼ finish the new name. Select OK and Press Enter button after finishing the renaming You can see the name has been changed on the title in the list.
- Page 38 Editing % Press Play, Select REC List by pressing button button on ◄,► ◄ ◄ ► ► and press Enter button on Remote Control remote control to find the frame of or OK button on Front Key picture you want to use as thumbnail picture of the title.
- Page 39 Editing e. Title Merge : You can merge a titles with next title. % Select the title in the list under Title Edit you want to merge with the next title and press Enter button to show up Title Edit menu. &...
- Page 40 Editing % Choose the point you want to add h. Copy to FAT32 Partition it on by pressing Enter button ◄,► after selecting ADD by pressing In order to have the easy file transfer with button while watching the title by Computer, you can copy your recorded and pressing Play, and Pause...
- Page 41 Editing NOTE • File name shall be made according to the time setting on HMR. (Set Up Menu time setting) ex) 20070521_1415.mpg when it is copied to FAT32 partition on 14:15 May 21, 2007. • Copy Speed : The copy time is depending on the file size and you can find the estimation time in the below table. •...
-
Page 42: Editing Av File (In Fat32 File System)
Editing Press button to select what you ▲,▼ Editing AV File want to proceed and then press Enter (in FAT32 File System ) button to execute it. You can edit the AV files in installed HDD in HMR, a. Return : You shall go back without editing USB external HDD and USB Memory. - Page 43 Editing & Select the letter and number by Select the directory where the required files are located in the directory list by pressing and enter one by ◄,►,▲,▼ pressing ▲,▼ button. one until you finish the new name. Press the Enter button on your remote control or OK button on front key.
-
Page 44: Time Shift
Time Shift During the time shift, you can find the Time Shift follow Timeshift Bar. When Set Top box (Terrestrial, Satellite or Cable) is • connected to AV input of HMR, You can enjoy Time ► 23:22:15 22:44:47/00:07:41 shift function. Press Guide button on Remote Control or on front key Current Viewing Time... - Page 45 Time Shift NOTE • If you are at the end of Timeshift section by pressing ► ► ❚ button, Timeshift bar will disappear and some of above key is not working except ❚ ◄ ◄ , Instant Replay, Pause. Press Stop button in order to stop the Timeshift.
-
Page 46: Playback
Playback Select the directory where the required AV File Playback files are located in the directory list by pressing ▲,▼ button. You can play back various Audio, Video and Photo Press the Enter button on your remote files in installed HDD, USB Storage and Network. control or OK button on front key. - Page 47 Playback You can find the same name of 'Full Computer Name' you set in your computer. It can be any name like 'Computername' in below picture Select the folder you shared in the computer and enjoy the AV files. Transcode Server You may enjoy some of AV files through You can find the same name of LAN playback which this unit do not...
- Page 48 Playback % Net User ID LAN playback in My Shortcuts You can connect to computer directly with Enter and then type your user ID if LAN cable or via router for sharing the folder assigned. You can skip it without typing and files.
-
Page 49: Recorded Title Playback
Playback Recorded Title Playback Press Guide button on Remote Control or on Front key Select REC List by pressing button ◄,► and press Enter button on Remote Control or OK button on Front Key Please refer to the following descriptions for the above OSD. -
Page 50: Advanced Playback
Playback Advanced Playback You can enjoy the following advanced playback with your remote control while playback. AV file Playback Icon in Name Description Recorded Title Playback Video File Audio File Photo File Previous Jump back to Previous chapter Previous file Next Jump to Next Chapter... -
Page 51: Using Set Up Menu
Using Set Up Menu Press Guide button and select Set Up Menu by TV input-Scart version only pressing Enter button You can select On and Off. If it is On, It set EURO AV Out (TV) to Euro AV In and out Video so that recording and time shift may be available from TV. - Page 52 Using Set Up Menu Video Output You can change Video Output Component Please change it if you connects HMR to TV with Component Cable(Y. Cb, Cr). Scart Please change it if you connects HMR to TV with Scart Cable (RGB). * Composite Video is always available in both setting.
-
Page 53: Record
Using Set Up Menu Permanent Time Shift Record You can select Permanent Time Shift off and on. Please refer to Time Shift Section in this manual Recording Device You can select recording device from HDD and USB. Please refer to Recording Section in this manual. - Page 54 Using Set Up Menu % Fix IP (Manual) USB : Time shift will be done in USB storage which is connected to HMR. You can type the IP address, Subnet Please make sure it should have FAT file Mask, Default Gateway manually system.
-
Page 55: Additional Information
Additional Information F/W upgrading How to find F/W version You can find the F/W version while pressing 7 - 7 Unzip the F/W upgrade Zip file. - ENTER button in AV input mode. Copy the F/W upgrade file into USB Memory Connect USB Memory into an USB input of HMR after turning the Power Off of... -
Page 56: Specification
Additional Information Specification HDD Type SATA Upto 1TB Recording Partition: UDF User's Selection Copy File Format File Partition : FAT32/NTFS from UDF to FAT32 Input : AC 100V-240V, 50/60Hz Power Adapter General Output : DC 12V, 3.5A Power Consumption 3 W (Standby) , 45 W (Recording) Mechanical S/W Compatible OS Window 98, ME, 2000, XP... -
Page 57: Troubleshooting
Additional Information Troubleshooting Incorrect operation is often mistaken for trouble or malfunction. If you think that there is something wrong with this component, check the points below. Sometimes the trouble may lie in another component. Inspect the other components and electrical appliances being used. If the trouble cannot be rectified after checking the items below, ask your nearest authorized service center or your dealer to carry out repair work. - Page 58 Additional Information Problem Solution • Please check if the program you want to record is copy protected. Copy protected contents can not be recorded. • Please check if your recording device (Installed HDD or connected USB storage) are correctly connected or if it is correctly selected. Recording is not possible.
Need help?
Do you have a question about the HMR-350H and is the answer not in the manual?
Questions and answers