Table of Contents
Advertisement
Available languages
Available languages
Advertisement
Chapters
Table of Contents

Subscribe to Our Youtube Channel
Related Manuals for switel DF 1401


Summary of Contents for switel DF 1401
-
Page 1: Operating Instructions
Strahlungsarmes schnurloses DECT−GAP−Telefon Téléphone DECT/GAP sans fil à faible rayonnement Telefono cordless DECT/GAP a basse radiazioni Low−radiation cordless DECT/GAP telephone DF 140x Bedienungsanleitung Mode d’emploi Istruzioni per l’uso Operating Instructions... - Page 2 DF 140x Bedienungsanleitung ....Mode d’emploi ....Istruzioni per l’uso ....Operating Instructions .
-
Page 3: Table Of Contents
Sicherheitshinweise ... . Telefon in Betrieb nehmen ..Bedienelemente ....Einführende Informationen . -
Page 4: Sicherheitshinweise
1 Sicherheitshinweise Lesen Sie diese Bedienungsanleitung sorgfältig durch. Bestimmungsgemäße Verwendung Dieses Telefon ist geeignet zum Telefonieren innerhalb eines Telefonnet- zes. Jede andere Verwendung gilt als nicht bestimmungsgemäß. Eigen- mächtige Veränderungen oder Umbauten sind nicht zulässig. Öffnen Sie das Gerät in keinem Fall selbst und führen Sie keine eigenen Reparatur- versuche durch. -
Page 5: Telefon In Betrieb Nehmen
Entsorgung Wollen Sie Ihr Gerät entsorgen, bringen Sie es zur Sammelstelle Ih- res kommunalen Entsorgungsträgers (z. B. Wertstoffhof). Nach dem Elektro− und Elektronikgerätegesetz sind Besitzer von Altgeräten ge- setzlich verpflichtet, alte Elektro− und Elektronikgeräte einer ge- trennten Abfallerfassung zuzuführen. Das nebenstehende Symbol bedeutet, dass Sie das Gerät auf keinen Fall in den Hausmüll wer- fen dürfen! Gefährdung von Gesundheit und Umwelt durch... - Page 6 Stromverbrauch Die Leistungsaufnahme der Basisstation beträgt: − im Betrieb (Bereitschaft/Gespräch): ca. 1,2 W − während der Ladung des Mobilteils: ca. 2 W. Die Nulllast des Netzteils beträgt ca. 0,15 W. Die durchschnittliche Effizienz beträgt ca. 60 %. Die Leistungsaufnahme der Ladestation beträgt: −...
-
Page 7: Datum Und Uhrzeit Des Mobilteils Einstellen
Akkupack einlegen Schieben Sie den Akkufachdeckel abwärts und nehmen Sie ihn anschlie- ßend ab. Stecken Sie den Stecker des Akkupacks in die Buchse im Akku- fach. Legen Sie das Akkupack in das Akkufach ein. Verwenden Sie nur das mitgelieferte Akkupack. Achten Sie darauf, dass Sie das Kabel nicht ein- klemmen. -
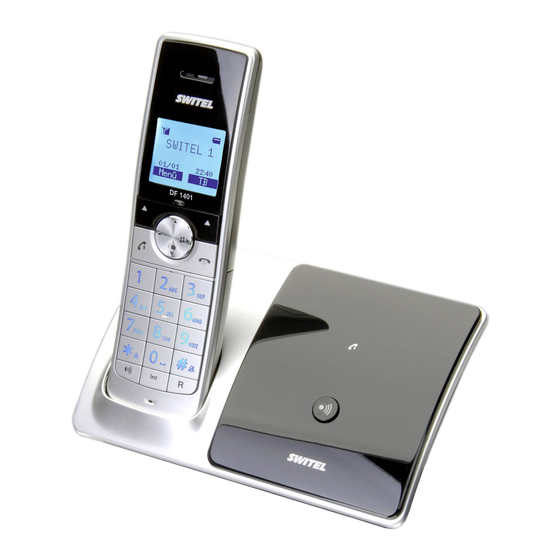
Page 8: Bedienelemente
3 Bedienelemente Die Tasten Ihres Telefons werden in dieser Bedienungsanleitung nachfol- gend mit vereinheitlichten umrandeten Symbolen dargestellt. Leichte Ab- weichungen der Tastensymbole Ihres Telefons gegenüber den hier verwen- deten Tastensymbolen sind daher möglich. Mobilteil Hörkapsel Display Lautstärke + / Navigationstaste aufwärts Softkey−Taste rechts Anrufliste / Navigationstaste rechts... -
Page 9: Einführende Informationen
Basisstation LED: Gesprächsanzeige Mobilteil suchen (Paging) c Ladekontakte 4 Einführende Informationen In diesem Kapitel finden Sie grundlegende Informationen zur Handhabung der Bedienungsanleitung und des Telefons. Darstellungsweise in der Bedienungsanleitung Abgebildete Taste drücken 2 Sek. * Abgebildete Taste 2 Sekunden drücken ë... - Page 10 Symbole im Display des Mobilteils Symbol Beschreibung Konstant: Verbindung zur Basisstation. Blinkend: Keine Verbindung zur Basisstation. Konstant: Anzeige der Akkukapazität. Durchlaufend während Mobilteil in der Basis: Der Akku wird geladen. Anzeige des Datums . Seite 19. TT−MM Anzeige der Uhrzeit . Seite 19. SS:MM Freisprechbetrieb ist aktiviert.
- Page 11 In der unteren Displayzeile werden zugehörig zu den beiden Softkeys die abhängig vom Betriebszustand verfügbaren Funktionen angezeigt. Menü Aufruf des Menüs. Aufruf des Telefonbuchs. Wähle Auswahl des markierten Menüpunkts / Eintrags. Bestätigung einer Einstellung. Zurück Zurück zum übergeordneten Menü bzw. Abbruch der Programmierung.
-
Page 12: Telefonieren
Im Bereitschaftszustand: langer Tastendruck schaltet Mobilteil−Tonruf ein/aus. Bei Namenseingaben: langer Tastendruck schaltet zwischen Groß− und Kleinschreibung um. Bereitschaftsmodus Alle Beschreibungen in dieser Bedienungsanleitung gehen davon aus, dass sich das Mobilteil im Bereitschaftsmodus befindet. Den Bereitschafts- modus erreichen Sie, indem Sie die Taste B drücken. Strahlungsreduzierung (ECO−Mode) Sowohl im Geprächs−... -
Page 13: Aus Der Anrufliste Anrufen
Anrufen ë Geben Sie die Rufnummer ein. Fehler bei der Eingabe mit Lösche korrigieren. A / L Rufnummer wird gewählt. Sie können auch zuerst die Abnehmetaste drücken und erhalten damit das Freizeichen. Die eingegebenen Ziffern Ihrer ge- wünschten Rufnummer werden sofort gewählt. Eine Korrektur einzelner Ziffern der Rufnummer ist bei dieser Form des Ges- prächsaufbaus nicht möglich. -
Page 14: Ausschalten
Aus dem Telefonbuch anrufen Das Telefonbuch kann 50 Einträge aufnehmen. Zum Anlegen von Einträgen siehe Abschnitt „Telefonbuchˆ. Öffnen Sie das Telefonbuch. F / H Wählen Sie einen Eintrag aus. A / L Rufnummer wird gewählt. Anzeige der Gesprächsdauer Während eines Gesprächs wird die Gesprächsdauer in Stunden, Minuten und Sekunden angezeigt. - Page 15 Externes Gespräch vermitteln Während eines Externgesprächs... Drücken Sie die Taste I. Wählen Sie ggf. mit der Navigationstaste E / G das gewünschte Mobilteil aus und drücken Sie Wähle. Das externe Gespräch wird gehalten. Wenn das gerufene Mobilteil eingeschaltet wird, ggf. Gespräch ankündigen.
-
Page 16: Weitere Leistungsmerkmale
6 Weitere Leistungsmerkmale Tastensperre Die Tastensperre verhindert ein unbeabsichtigtes Betätigen der Tasten. Eintreffende Anrufe können wie gewohnt entgegenge- nommen werden. Drücken und halten Sie die Stern−Taste, bis im Display das Symbol für die Tastensperre erscheint. Zum Entsperren der Tastatur drücken und halten Sie die Raute−Taste erneut, bis das Symbol wieder erlischt. -
Page 17: Anrufliste / Wahlwiederholung
7 Anrufliste / Wahlwiederholung Anrufliste bearbeiten Öffnen Sie die Anrufliste. F / H Wählen Sie einen Eintrag aus und drücken Sie Wähle. Datum und Uhrzeit des Anrufs werden angezeigt. Menü Drücken Sie den Softkey Menü. F / H Wählen Sie aus den folgenden Möglichkeiten und bestätigen Sie mit Wähle: In TB speichern Die Rufnummer wird im Telefonbuch gespeichert. -
Page 18: Telefonbuch
8 Telefonbuch Im Telefonbuch können Sie 50 Rufnummern und zugehörige Na- men speichern. Sie können jedem Eintrag eine eigene Melodie zuordnen, mit der ein Anruf signalisiert werden soll. Geben Sie die Rufnummern immer mit der Ortsvorwahl ein; das ermöglicht eine korrekte Anzeige des jeweiligen Anrufers, für den ein Ein- trag angelegt ist und dessen Übertragung der Rufnummer an Ih- rem Anschluss verfügbar ist. -
Page 19: Telefon Einstellen
Lesen Alle Einträge werden angezeigt. Blättern Sie zum gewünschten Eintrag. Mit Wähle sehen Sie Name, Rufnummer und Melodie. Mit Menü können Sie den Eintrag bearbeiten oder löschen. Hinzufügen Sie können einen neuen Eintrag anlegen. Bearbeiten Alle Einträge werden angezeigt. Blättern Sie zum gewünschten Eintrag. - Page 20 Alarm Menü Drücken Sie den Softkey Menü. F / H Wählen Sie Uhrzeit/Alarm und drücken Sie Wähle. F / H Wählen Sie Alarm und drücken Sie Wähle. F / H Wählen Sie Alarm ein und drücken Sie Wähle. ë Geben Sie mit den Zifferntasten die Weckzeit ein und drücken Sie Ok.
-
Page 21: Mobilteilnamen Einstellen
Melodie intern Wählen Sie eine Melodie für die Signalisierung eines internen Anrufes aus. Melodie extern Wählen Sie eine Melodie für die Signalisierung eines externen Anrufes aus. Tonruflautstärke Wählen Sie die Lautstärke für den Tonruf aus. Wählen Sie Tonruf aus, wird das Symbol im Display angezeigt. -
Page 22: Kontrast Einstellen
Kontrast einstellen Menü Drücken Sie den Softkey Menü. F / H Wählen Sie MT einstellen und drücken Sie Wähle. F / H Wählen Sie Kontrast und drücken Sie Wähle. F / H Wählen Sie den gewünschten Kontrast aus und drücken Sie Wähle. Automatische Rufannahme (Direktannahme) einstellen Menü... -
Page 23: Wahlverfahren Einstellen
Wahlverfahren einstellen Menü Drücken Sie den Softkey Menü. F / H Wählen Sie Basis einstellen und drücken Sie Wähle. F / H Wählen Sie Wahlverfahren und drücken Sie Wähle. F / H Wählen Sie Tonwahl (DTMF) oder Pulswahl und bestätigen Sie mit Wähle. Für die meisten Anschlüsse ist Tonwahl (DTMF) die richtige Einstellung. -
Page 24: Mobilteile An−/Abmelden
Basisstation in den Auslieferungszustand zurücksetzen Menü Drücken Sie den Softkey Menü. F / H Wählen Sie Basis einstellen und drücken Sie Wähle. F / H Wählen Sie Basis rücksetzen und drücken Sie Wähle. ë Geben Sie die aktuelle PIN ein und drücken Sie Ok. Bestätigen Sie auch die nachfolgende Sicherheitsabfrage mit Ok. -
Page 25: Betrieb An Telefonanlagen / Zusatzdienste
Mobilteil löschen Menü Drücken Sie den Softkey Menü. F / H Wählen Sie Basis einstellen und drücken Sie Wähle. F / H Wählen Sie MT löschen und drücken Sie Wähle. ë Geben Sie die aktuelle PIN ein und drücken Sie Ok F / H Wählen Sie eines der angezeigten Mobilteile aus und drücken Sie Wähle. -
Page 26: Menüstruktur
12 Menüstruktur Anrufliste In TB speichern Löschen Alle löschen Telefonbuch Lesen Hinzufügen Bearbeiten Löschen Alle löschen Telbuch−Status Uhrzeit/Alarm Datum/Zeit Datumsformat Zeitformat Datum eingeben Zeit eingeben Alarm Alarm ein / Alarm aus / Alarm Melodie MT einstellen Audioeinstellung FS−Lautstärke Hörerlautstärke Tonrufeistellung Melodie intern Melodie extern Tonruflautstärke... -
Page 27: Fehlersuche
Intern: Melodie 2 Extern: Melodie 1 Tonruflautstärke: 3 Hinweistöne: Tastenton: Ein Akku leer: Ein Ausser Reichweite: Ein Sprache: Deutsch Mobilteilname: DF 1401 Autom. Rufannahme: Ein Datum & Zeit: Datumsformat: TT−MM−JJJJ Zeitformat: 24 Stunden Wahlverfahren: Tonwahl Flash−Zeit: Kurz (100 ms) PIN:... -
Page 28: Technische Daten
− Verordnung 278/2009 „Netzteile bei Nulllast sowie ihre durchschnittliche Effizienz im Betriebˆ. Die Konformität mit den o. a. Richtlinien wird durch das CE− Zeichen auf dem Gerät bestätigt. Für die komplette Konformitätserklärung nutzen Sie bitte den kostenlosen Download von unserer Website www.switel.com. -
Page 29: Garantie
Reinigen Sie die Gehäuseoberflächen mit einem weichen und fusselfreien Tuch. Verwenden Sie keine Reinigungs− oder Lösungsmittel. 15 Garantie SWITEL − Geräte werden nach den modernsten Produktionsverfahren hergestellt und geprüft. Ausgesuchte Materialien und hoch entwickelte Technologien sorgen für einwandfreie Funktion und lange Lebensdauer. - Page 30 Notizen...
- Page 31 Consignes de sécurité ... Mettre votre téléphone en service . . . Éléments de manipulation ..Introduction ....Téléphoner .
-
Page 32: Consignes De Sécurité
1 Consignes de sécurité Lisez très attentivement ce mode d´emploi. Utilisation conforme aux prescriptions Ce téléphone convient pour téléphoner à l´intérieur d´un réseau téléphoni- que. Tout autre utilisation est considérée comme non conforme à l´usage. Des modifications ou changements effectués d´un propre gré ne sont pas autorisés. -
Page 33: Mettre Votre Téléphone En Service
Élimination Si vous voulez mettre votre appareil au rebut, veuillez l´apporter au centre de collecte de l´organisme d´élimination des déchets de votre commune (par ex. centre de recyclage). D´après la loi relative aux appareils électriques et électroniques, les propriétaires d´appareils électriques et électroniques usagés sont tenus de les déposer dans un collecteur séparé. -
Page 34: Raccorder La Base
Puissance absorbée Puissance absorbée de la station de base : − en mode de fonctionnement (disponible/conversation) : env. 1,2 W − pendant le chargement du combiné : env. 2 W. Sans charge, le courant d´alimentation à découpage entrant s`élève à env. 0,15 W. - Page 35 Mettre en place le pack de piles rechargeables Poussez le cache batterie vers le bas et retirez−le. Enfoncez la fiche du pack de piles rechargeables dans la prise située dans le compartiment à piles. Insérez le pack dans le compartiment. N´utilisez que le pack de piles rechargeables fourni avec l´appareil.
-
Page 36: Éléments De Manipulation
3 Éléments de manipulation Dans ce mode d´emploi, les touches de votre téléphone sont représentées par des icônes encadrées standardisées. Il peut donc y avoir de légères différences entre les icônes des touches de votre téléphone et celles des touches utilisées ici. Combiné... -
Page 37: Introduction
Base LED : affichage de communications Chercher le combiné (Paging) c Contacts de chargement 4 Introduction Dans ce chapitre, vous trouverez des informations de base vous expliquant comment vous servir du mode d´emploi et du téléphone. Mode de représentation dans le mode d´emploi Appuyer sur la touche représentée 2 sec. - Page 38 Icônes à l´écran du combiné Icône Description Constant : la liaison avec la base est bonne. Clignotant : la liaison avec la base s´interrompt. Constant : affichage de la capacité des piles. Segments continus quand le combiné est sur la base : Les piles rechargeables se rechargent.
- Page 39 Dans les lignes de l´écran ci−dessous sont indiquées les fonctions disponi- bles liées aux deux touches softkeys dépendamment de l´état de fonc- tionnement. Menu Ouvrir le menu principal. Répert Ouvrir le répertoire. Sélect Ouvrir le menu affiché. Confirmation d´un réglage. Retour Retour au menu supérieur ou interruption de la programmation.
-
Page 40: Téléphoner
En mode veille : une pression longue de la touche active/désactive la sonnerie du combiné. Pendant l´entrée d´un nom : une pression longue change entre majuscules et minuscules. Mode veille Toutes les descriptions dans ce mode d´emploi partent du principe que le combiné... - Page 41 Appeler ë Entrez le numéro de téléphone. Corrigez une erreur d´entrée avec Efface. A / L Le numéro de téléphone est composé. Vous pouvez aussi appuyer d´abord sur la touche communica- tion et vous obtenez ainsi la tonalité. Les chiffres entrés du numéro de téléphone choisi sont aussitôt composés.
- Page 42 Appeler depuis le répertoire Le répertoire peut recevoir 50 entrées. Pour mémoriser des entrées voir le paragraphe « Répertoire ». Répert Ouvrir le répertoire. F / H Sélectionner l´enregistrement. A / L Le numéro est composé. Affichage de la durée de la communication Pendant une communication, sa durée est affichée en heures, minutes et secondes.
- Page 43 Transfert d´une communication externe Pendant une communication externe. . . Appuyez la touche I. Sélectionnez le combiné souhaité avec la touche fléchée E / G et appuyer sur Sélect. La communication externe est maintenue. Si le combiné appelé est activé, annoncer la communication le cas échéant.
-
Page 44: Fonctions Spéciales
6 Fonctions spéciales Verrouillage du clavier La touche verrouillage empêche une manipulation involontaire des touches. Les appels peuvent être reçus comme d´habitude. Appuyez et maintenez la touche étoile jusqu´à l´apparition du symbole de verrouillage des touches. Pour déverrouiller le clavier, appuyez et maintenez de nouveau la touche étoile jusqu’à... -
Page 45: Liste D´appels
7 Liste d´appels / Répétition des derniers numéros Utiliser la liste d´appels Ouvrez la liste d´appels. F / H Sélectionnez une entrée et appuyez sur Sélect. Date et heure de l´appel sont affichées. Menu Appuyez sur touche softkey Menu. F / H Sélectionnez l´une des options suivantes et confirmez avec Sélect: Ajouter au rép. -
Page 46: Répertoire
8 Répertoire Dans le répertoire, vous pouvez mémoriser 50 numéros et noms correspondants. Vous pouvez associer à chaque entrée une mélodie propre par laquelle un appel doit être signalé. Entrez toujours les numéros avec le préfixe ; ceci permet un affichage correct de chaque appelant dont il existe une entrée et dont le transfert de numéro à... -
Page 47: Réglage Du Téléphone
Ajouter Vous pouvez effectuer une nouvelle entrée. Editer Toutes les entrées sont affichées. Feuilletez jusqu’à l´entrée souhaitée. Après Sélect, vous pouvez modifier l´entrée. Effacez les lettres et chiffres avec Annule, entrez de nouvelles lettres et chiffres avec les touches de chiffres. Pour plus de détails, voir « insérer nouvelle entrée ». - Page 48 F / H Sélectionnez Alarme On et appuyer sur Sélect. ë Entrez l´heure de réveil avec les touches de chiffres et appuyez sur Ok. F / H Sélectionnez Snooze on ou Snooze off et appuyez sur Sélect. Si Snooze est activé, cela signifie que le signal de réveil sera répété...
- Page 49 Sonnerie Externe Sélectionnez une mélodie pour la signalisation d´un appel externe Volume Sonnerie Sélectionnez le volume de la sonnerie. Sélectionnez Volume Off, le symbole s´affiche sur l´écran. Régler la tonalités d´information Menu Appuyez sur touche softkey Menu. F / H Sélectionnez Réglages Combiné...
- Page 50 Régler le contraste Menu Appuyez sur touche softkey Menu. F / H Sélectionnez Réglages Combiné et appuyer sur Sélect. F / H Sélectionnez Contraste et appuyer sur Sélect. F / H Sélectionnez le contraste souhaité et appuyez sur Sélect. Régler la réponse d´appel automatique Menu Appuyez sur touche softkey Menu.
- Page 51 Régler le processus de numérotation Menu Appuyez sur touche softkey Menu. F / H Sélectionnez Réglages Base et appuyer sur Sélect. F / H Sélectionnez Numérotation et appuyez sur Sélect. F / H Sélectionnez FV ou DC et confirmez avec Sélect. Pour la plupart des raccordements, le réglage correct est FV.
-
Page 52: 10 Déclarer/Retirer Un Combiné
10 Déclarer/retirer un combiné Sur une base, vous pouvez déclarer jusqu´à 5 combinés. Les combinés livrés avec votre téléphone sont déjà déclarés sur la base. Pour déclarer un combiné « étranger », consultez aussi la notice d´utilisation de ce com- biné. -
Page 53: Installations À Postes Supplém. / Services Confort
11 Installations à postes supplém. / Services confort Installations à postes supplémentaires Si votre téléphone est raccordé à une installation à postes supplémentai- res, vous pouvez au moyen de la touche R tirer profit de certaines fonc- tions comme par ex. le transfert d´appels et le rappel automatique. Veuillez lire le mode d´emploi de votre installation à... -
Page 54: Structure Du Menu
12 Structure du menu Liste des appels Ajouter au rép. Effacer Tout effacer Répertoire Voir Ajouter Editer Effacer Tout effacer Etat répertoire Heure/Alarme Date & Heure Format date Format Heure Réglage Date Réglages Heure Alarme Alarme On / Alarme Off / Sonnerie alarme Réglages Combiné... -
Page 55: Recherche Erronée
Alertes son.: Bips touches: en service Batt. faible: en service Hors portée: en service Langue: Allemand Nom combine: DF 1401 Reponse auto: en service Date & Heure: Format date: JJ−MM−AAAA Format heure: 24 heures Mode de numerotation: Tonalité Temps Flash:... -
Page 56: Caractéristiques Techniques
− Règlement 278/2009 « Sources d´alimentation hors charge et leur rendement moyen en mode actif ». La conformité avec les directives mentionnées ci−dessus est confirmée sur l´appareil par la marque CE. Pour obtenir toute la déclaration de conformité, veuillez utiliser le téléchargement gratuit de notre site Internet www.switel.com. -
Page 57: Garantie
Nettoyez les surfaces du boîtier avec un chiffon doux et non pelucheux. N´utilisez pas de produits d´entretien ou de solvants. 15 Garantie SWITEL Les appareils sont fabriqués selon les procédes les plus moder- nes et sont contrôlés. Des matériels sélectionnés et des technologies de pointe ont pour effet un fonctionnement irréprochable et une longue durée... - Page 58 Notes...
- Page 59 Indicazioni di sicurezza ..Mettere in funzione il telefono ..Elementi di comando ... . Informazioni introduttive .
-
Page 60: Indicazioni Di Sicurezza
1 Indicazioni di sicurezza Leggere attentamente le presenti istruzioni per l´uso. Impiego conforme agli usi previsti Il presente telefono consente di svolgere telefonate all´interno di una rete telefonica. Qualsiasi altro impiego è considerato come non conforme agli usi previsti. Non sono consentite modifiche o trasformazioni non autoriz- zate. -
Page 61: Mettere In Funzione Il Telefono
Smaltimento Procedere allo smaltimento dell´apparecchio esaurito consegnan- dolo presso uno dei punti di raccolta istituiti dalla propria società di smaltimento rifiuti comunale (ad es. centro di riciclo materiali). Se- condo quanto previsto dalla legge sugli apparecchi elettrici ed elet- tronici, i proprietari di apparecchi esauriti sono per legge tenuti alla consegna di tutti gli apparecchi elettrici ed elettronici presso un cen- tro di rilievo rifiuti in raccolta differenziata. - Page 62 DF 140X−Modello Contenuto 1401 1402 1403 1404 Unità portatile Cavo di collegamento telefonico Accumulatore ricaricabile Istruzioni per l´uso Potenza assorbita La potenza assorbita dalla stazione base ammonta a: − in servizio (stand−by/conversazione): ca. 1,2 W − durante la carica dell’unità mobile: ca. 2 W. Il carico nullo de circuito di alimentazione rete è...
- Page 63 Inserire l´accumulatore ricaricabile Spingere il coperchio del vano accumulatore in basso, quindi rimuoverlo. Innestare il connettore dell´accumulatore ricaricabile nella presa presente all´interno del vano accumulatore. Inserire l´accumulatore ricaricabile nell´apposito vano. Utilizzare esclusivamente l´accumulatore ricaricabile fornito. Fare attenzione a non incastrare il cavo. Riposizionare il coperchio sul vano accumulatore spingendolo verso sopra fino a quando scatta in po- sizione.
-
Page 64: Elementi Di Comando
3 Elementi di comando I tasti del telefono riportati nel presente manuale d´istruzioni sono raffigurati sotto forma di simboli uniformi all´interno di un riquadro. Sono possibili lievi scostamenti dei simboli dei tasti sul telefono rispetto ai simboli qui raffigura- Unità portatile Altoparlante Display Aumento volume /... -
Page 65: Informazioni Introduttive
Stazione base LED: visualizzazione di chiamata Cercare l´unità portatile (funzione di paging) c Contatti di carica 4 Informazioni introduttive In questo capitolo sono riportate le principali informazioni riguardo l´uso delle presenti istruzioni e del telefono. Modi di rappresentazione delle istruzioni per l´uso Premere il tasto raffigurato 2 sec. - Page 66 Simboli sul display dell´unità portatile Simbolo Descrizione Costante: Collegamento con la stazione base. Lampeggiante: Il collegamento con la stazione base si interrompe. Costante: Indicazione dello stato di carica delle bat- terie. Segmenti che scorrono quando l´unità portatile è collegata all´unità base: le batterie ricaricabile è in fase di carica.
- Page 67 Nelle seguenti descrizioni del display vengono visualizzate le funzioni dis- ponibili per entrambi i softkey a seconda della modalità. Menu Aprire il Menu. Rubri. Accesso alla Rubrica. Selez Selezionare tra le voci del menu evidenziate. Confermare una selezione. Indiet Ritornare al livello precedente del menu o terminare la funzione.
-
Page 68: Compiere Telefonate
In modalità stand−by: attivare/disattivare il tono chiamata dell´unità portatile tenendo premuto il tasto. Nell´inserimento di un nominativo: passare da maiuscolo a minuscolo e viceversa tenendo premuto il tasto. Modalità di stand−by In tutte le descrizioni del presente manuale di istruzioni si considera l´unità portatile in modalità... - Page 69 Telefonare ë Immettere un numero di chiamata. In caso di immissione errata, correggere Canc. A / L Il numero di chiamata viene selezionato. E´ altresì possibile premere prima il tasto di chiamata e ricevere il segnale di linea libera. Le cifre immesse per la composizione del numero desiderato verranno così...
- Page 70 Effettuare delle chiamate dalla rubrica La rubrica può contenere fino a 50 voci. Per immettere una voce vedere la sezione „Rubrica Telefonicaˆ. Rubri. Aprire la rubrica telefonica. F / H Selezionare la voce. A / L Il numero di chiamata viene selezionato. Visualizzazione della durata di conversazione Durante lo svolgimento di una chiamata, la durata della telefonata è...
- Page 71 Trasferire chiamate esterne Nel corso di una chiamata esterna. . . Premere il tasto I. Selezionare con i tasti freccia E / G l´unità portatile desiderata e confermare con Selez. La chiamata esterna verrà trattenuta. Se l´unità portatile chiamata è accesa, verrà eventualmente annunciata la comunicazione.
-
Page 72: Funzioni Speciali
6 Funzioni speciali Blocco tastiera Il blocco tastiera impedisce la digitazione involontaria dei tasti. Le chiamate in arrivo possono essere ricevute come di consue- Tenere premuto il tasto asterisco fino a quando appare sul display il simbolo del blocco tastiera. Per sbloccare la tastiera tenere premuto nuovamente il tasto asterisco fino a quando il simbolo non scompare di nuovo. -
Page 73: Elenco Chiamate / Ripetizione Di Selezione
7 Elenco chiamate / Ripetizione di selezione Modificare l´elenco chiamate Accedere all´elenco chiamate. F / H Selezionare una voce e premere il softkey Selez per visualizzare data e ora della chiamata. Menu Premere il softkey Menu. F / H Selezionare una delle seguenti opzioni e confermare con Selez: Agg a Rubrica Il numero di chiamata verrà... -
Page 74: Rubrica Telefonica
8 Rubrica telefonica Nella rubrica è possibile memorizzare fino a 50 numeri di tele- fono e relativi nomi. E` possibile associare ad ogni voce una suo- neria, con la quale verrà segnalata la chiamata. Immettere sem- pre il numero di telefono con il relativo prefisso; questo permet- terà... -
Page 75: Impostazioni Telefono
Leggi Per visualizzare tutte le voci della rubrica. Sfogliare l´elenco fino alla voce desiderata. Premere Selez per visualizzare Nome, Numero di Telefono e Suoneria. Modificare o eliminare la voce con Menu. Aggiungi Per aggiungere una nuova voce alla rubrica. Modifica Tutte le voci della rubrica vengono visualizzate. - Page 76 Sveglia Menu Premere il softkey Menu. F / H Selezionare Ora/Sveglia e premere Selez. F / H Selezionare Sveglia e premere Selez. F / H Selezionare Sveglia Attiva e premere Selez. ë Inserire l´ora della sveglia con i tasti cifra e premere F / H Selezionare Snooze On o Snooze Off e premere Selez.
- Page 77 Suonerie Int. Selezionare una suoneria per la segnalazione di una chiamata interna. Suoneria esterna Selezionare una suoneria per la segnalazione di una chiamata esterna. Volume Suoneria Selezionare il volume per il tono chiamata. Se viene selezionato Volume Off, apparirà sul display il simbolo relativo.
- Page 78 Regolare il contrasto Menu Premere il softkey Menu. F / H Selezionare Imposta Port. e premere Selez. F / H Selezionare Contrasto e premere Selez. F / H Selezionare il contrasto desiderato e premere Selez. Impostazione Risposta automatica Menu Premere il softkey Menu. F / H Selezionare Imposta Port.
- Page 79 Impostazione modalità di selezione Menu Premere il softkey Menu. F / H Selezionare Imposta Base e premere Selez. F / H Selezionare Modo Composiz. e premere Selez. F / H Selezionare Toni o Decadica e confermare con Selez. Per la maggior parte degli impianti telefonici, l´impostazione giu- sta è...
-
Page 80: Registrare/Cancellare Un´unità Portatile
Reimpostare l´unità base come da impostazioni predefinite Menu Premere il softkey Menu. F / H Selezionare Imposta Base e premere Selez. F / H Selezionare Reset imp predef e premere Selez. ë Inserire il codice PIN attuale e premere OK. Confermare anche la successiva richiesta di conferma con OK. -
Page 81: Impianti Telefonici Interni / Servizi Addizionali
Cancellare un´unità portatile Menu Premere il softkey Menu. F / H Selezionare Imposta Base e premere Selez. F / H Selezionare Cancella Port. e premere Selez. ë Inserire il codice PIN attuale e premere OK F / H Selezionare una delle unità portatili registrate e premere Selez. -
Page 82: Struttura Di Menu
12 Struttura di menu Liste Chiamate Agg a Rubrica Cancella Cancella tutto Rubrica Visualizza Aggiungi Modifica Cancella Cancella tutto Stato Rubrica Ora/Sveglia Data e ora Formato data Formato Ora Imposta Data Imposta Ora Sveglia Sveglia Attiva / Sveglia Disatt. / Melodia Sveglia Imposta Port. -
Page 83: Localizzazione Guasti
Esterno: Melodia 1 Volume: 3 Imposta toni: Toni tasti: Attivato Toni batt: Attivato Fuoriportata: Attivato Lingua: Tedesco Nome portatile: DF 1401 Risposta aut.: Attivato Data e ora: Formato data: GG−MM−AAAA Formato ora: 24 ora Proc selezione: Toni Tempo flash: Breve (100 ms) -
Page 84: Dati Tecni
La conformità con la direttiva di cui sopra viene confermata dal marchio CE applicato sull´apparecchio. Per la dichiarazione di conformità completa si prega di voler usufruire del servizio gratuito di download dal nostro sito Internet www.switel.com. -
Page 85: Garanzia
Pulire le superfici degli apparecchi con un panno morbido e antipilling. Non utilizzare mai detergenti o solventi. 15 Garanzia SWITEL Gli apparecchi sono costruiti e collaudati in osservanza dei pro- cessi di produzione più moderni. L´impiego di materiali selezionati e tecno- logie altamente sviluppate sono garanti di una perfetta funzionalità... - Page 86 Appunti...
- Page 87 Safety Information ....Preparing the Telephone ..Operating Elements ... . . Preliminary Information .
-
Page 88: Safety Information
1 Safety Information Please read this operating instruction manual thoroughly. Intended use The telephone is suitable for telephoning within a public telephone network system. Any other use is considered unintended use. Unauthorised modifi- cation or reconstruction is not permitted. Under no circumstances open the device or complete any repair work yourself. -
Page 89: Preparing The Telephone
Disposal In order to dispose of your device, take it to a collection point provi- ded by your local public waste authorities (e.g. recycling centre). Ac- cording to laws on the disposal of electronic and electrical devices, owners are obliged to dispose of old electronic and electrical devi- ces in a separate waste container. -
Page 90: Connecting The Base Station
Electrical consumption The electrical consumption of the base is: − in operation mode (idle/call): approx. 1.2 W − during charging of the handset: approx. 2 W. The adaptor input power without load is approx. 0.15 W. The average effi- ciency is approx. 60 %. The electrical consumption of the charger is: −... -
Page 91: Inserting The Battery Pack
Inserting the battery pack Slide the battery compartment cover downwards and then remove it. Con- nect the plug on the battery pack in the socket in the battery compartment. Insert the battery pack in the battery compartment. Only use the battery pack supplied. -
Page 92: Operating Elements
3 Operating Elements The buttons in this operating manual are subsequently depicted with a uni- form contour. Therefore, slight deviations in the appearance of the symbols on the telephone buttons compared to those depicted here are possible. Handset Earpiece Display Increase volume / Navigation key Softkey... -
Page 93: Base Station
Base station LED: call indicator Locate handset (Paging) c Charge contacts 4 Preliminary Information This chapter provides basic information on using the operating instruction manual and the telephone. Description of operating sequences in the manual Press the button depicted 2 sec. * Press the button depicted for 2 seconds ë... - Page 94 Icons in the handset display Icon Description On: The connection to the base station is good. Flashing: The connection to the base station is lost. On: Indicates the battery charge status. Scrolling while handset in base: Battery is being charged. Displays the date;...
- Page 95 The functions assigned to the two softkeys are shown in the lowest line of the display. The key function changes automatically according to the opera- ting status of the handset. Menu Accessing the menu. Accessing the phonebook. Select Selecting the respective entry/menu item. Confirmation.
-
Page 96: Telephoning
Standby mode All descriptions in this operating manual assume that the handset is in Standby mode. The system switches to Standby mode by pressing the B button. Low−radiation operation (ECO mode) Both in Call mode as well as in Standby mode, the radiation is reduced considerably when ECO mode is activated as compared to standard, cordless DECT telephones. -
Page 97: Making A Call
Making a call ë Enter the telephone number. Delete wrong characters pressing Clear. A / L The telephone number is being dialled. You can also press the Off Hook button and you will hear the dial- ling tone. The entered number will be dialled immediately. It is not possible to correct wrong digits individually using this dialling procedure. -
Page 98: Making A Call From The Phone Book
Making a call from the phone book You can store up to 50 entries in the phone book. For creating entries see section ˆPhone book˜. Open the telephone book. F / H Select the name of the person you wish to call. A / L Dial out the telephone number. -
Page 99: Transferring An External Call To Another Handset
Transferring an external call to another handset During an external call . . . Press the I key. Select the handset using the arrow keys E / G and press Select. The external call is put on hold. When the called handset answers you can announce the call transfer. -
Page 100: Call List / Redial
Switching the handset ringer on/off You can turn off the ringer via the menu item HS Settings > Ring Setup > Ring Volume > as well. Press and hold down the #−key until the icon appears in the display. For turning the ringer on again press and hold down the #−key until the icon disappears. -
Page 101: Phone Book
F / H Select one of the following options and confirm with Select: Add to PB The telephone number will be stored in the telephone book. Enter a name, confirm or edit the telephone number and select a ringtone melody for the entry. Delete The entry will be deleted. -
Page 102: Editing Telephone Book Entries
Editing telephone book entries Menu Press the Menu softkey. F / H Select Phonebook and press Select. F / H Select one of the following options and confirm with Select: Read All entries are shown. Scroll to the desired entry. Press Select to view the details of the selected entry. -
Page 103: Setting The Ringer For The Handset
Alarm Menu Press the Menu softkey. F / H Select Clock/Alarm and press Select. F / H Select Alarm and press Select. F / H Select Alarm On and press Select. ë Enter the alarm time using the digit keys and press OK. F / H Select Snooze On or Snooze Off and press Select. -
Page 104: Setting The Alert Tones
Internal Ring Select a melody for internal calls. External Ring Select a melody for external calls. Ring Volume Select the volume. If you select Volume Off, the respective icon appears in the display. Setting the alert tones Menu Press the Menu softkey. F / H Select HS Settings and press Select. -
Page 105: Resetting The Handset
Setting Auto Answer Menu Press the Menu softkey. F / H Select HS Settings and press Select. F / H Select Auto Answer and press Select. F / H Select whether the automatic answer function will be on or off and confirm with Select. Select a base station Menu Press the Menu softkey. -
Page 106: Registering/De−Registering Handsets
Setting the Flash Time Menu Press the Menu softkey. F / H Select Base Settings and press Select. F / H Select Flash Time and press Select. F / H Select Short (100 ms), Medium (300 ms) or Long (600 ms) and confirm with Select. -
Page 107: Deleting A Handset
outlined characters. The relevant base is marked with a *. ë Enter the relevant PIN for the base, the new handset should be registered on, and press OK. Press and hold down the paging key on the base station until a short beep is to be heard (approx. 5 sec). After a few seconds the antenna icon on the display is on. -
Page 108: Menu Structure
12 Menu Structure Call List Add to PB Delete Delete All Phonebook View Edit Delete Delete All PB Status Clock/Alarm Date & Time Date Format Time Format Set Date Set Time Alarm Alarm On / Alarm Off / Alarm Melody HS Settings Audio Setup Speaker Volume... -
Page 109: In Case Of Problems
Volume: 3 Tone setup: Key tone: On Battery tone: On Out of range: On Language: German Handset name: DF 1401 Auto answer: Date & Time: Date format: DD−MM−YYYY Time format: 24 hours Dial mode: Tone Flash time: Short (100 ms) -
Page 110: Technical Data
Conformity with the above mentioned directives is confirmed by the CE symbol on the device. To view the complete Declaration of Conformity, please refer to the free download available on our web site www.switel.com. -
Page 111: Guarantee
Clean the housing surfaces with a soft, fluff−free cloth. Do not use any cleaning agents or solvents. 15 Guarantee SWITEL − equipment is produced and tested according to the latest pro- duction methods. The implementation of carefully chosen materials and highly developed technologies ensure trouble−free functioning and a long... -
Page 112: Declaration Of Conformity
Quest’apparecchiatura è conforme alla direttiva europea R&TTE. Per la dichiarazione di conformità completa si prega di voler usufruire del servizio gratuito di download dal nostro sito Internet www.switel.com. This equipment complies with the European R&TTE directive. To view the complete Declaration of Conformity, please refer to the free download available at our web site: www.switel.com.
Need help?
Do you have a question about the DF 1401 and is the answer not in the manual?
Questions and answers