
Summary of Contents for Currys Essentials CFSEWH12
- Page 1 FREE STANDING ELEC TRIC COOK ER I N S TRUC T IO N / I N S TAL L ATI ON MA N UA L CF S E W H 12 / C F S E S V 1 2...
-
Page 3: Table Of Contents
Contents Unpacking ............................. 4 Product Overview ......................... 5 Front View ...................................5 Top View ..................................5 Control Panel ................................6 Before Using Your Cooker ......................6 Using Your Hotplates ........................6 First Time Use of the Hotplates ..........................6 Choosing the Right Cookware ..........................6 Controlling Your Hotplates ............................7 Using the Oven .......................... -
Page 4: Unpacking
Thank you for purchasing your new Currys Essentials Freestanding Electric Cooker. You must read this manual in order to fully understand how to operate your appliance correctly. This cooker must be installed by a competent engineer. Please allow the installer to view the installation section of this manual. -
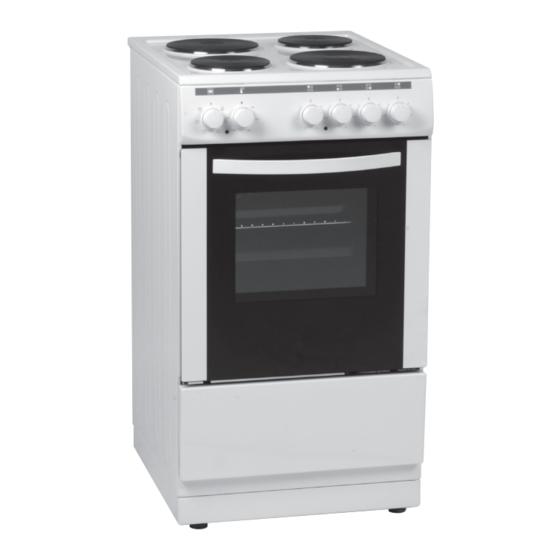
Page 5: Product Overview
Product Overview Front View Cooktop Control Panel Oven Shelf Oven Tray Oven Door Oven Handle Levelling Feet Top View Large Hotplate Small Hotplate * All images are for indication only; please refer to your individual unit for actual item. -
Page 6: Control Panel
Control Panel Oven Function Selector Control Hotplate Controls Thermostat lamp Hotplate Warning Lamp Temperature (Thermostat) Control Before Using Your Cooker Before using your new cooker, please: • Make sure all the controls are turned off. • Read this Instruction/Installation Manual, taking special note of the “Safety Warnings” section. • Turn the mains power on. -
Page 7: Controlling Your Hotplates
Controlling Your Hotplates Rotate the control to the heat level you wish to use for the selected hotplate. LEVEL 1 LEVEL 2 LEVEL 3 LEVEL 4 LEVEL 5 LEVEL 6 145 mm 100 W 165 W 250 W 500 W 750 W 1000 W 180 mm... -
Page 8: Shelf Positions
Shelf Positions To get the best results, the smallest distance allowed between the food and the upper heating element is 30 mm. Guide 1 On the wall of the inner cavity there are 5 different shelf guide slots. You can place the shelf at different Guide 2 heights to achieve the best cooking performance Guide 3... -
Page 9: Oven Function Selector Control
Oven Function Selector Control This control is used to select the cooking functions available, which are: The oven’s lamp will be switched on. The oven’s thermostat, indicator lamp and the lower and upper heating elements will be switched on. The oven’s thermostat, indicator lamp and the lower heating element will be switched on. -
Page 10: Cleaning Instructions
Cleaning Instructions Before you start cleaning your cooker, please: • Read the cleaning instructions and the ‘Safety Warnings’ sections. • Turn the cooker off at the wall. • Allow the cooker to cool fully before cleaning. • Do not use a steam cleaner. • Wipe the oven clean after every use. -
Page 11: Removing The Oven Door
Removing the Oven Door • Ensure the door has cooled down. • Take care when handling glass. The oven door can easily be removed as follows: Open the door completely. The swivel retainers of the right hand and left hand hinges are hooked onto the metal bar above them. Lift the retainers as shown. Close the oven door gently until it meets the open retainer. -
Page 12: Replacing The Oven Lamp
Replacing the Oven Lamp Ensure that the cooker is switched off before replacing the lamp to avoid the possibility of electric shock. Let the oven cavity and the heating elements cool down. • Remove the glass lens by turning anti-clockwise. • Unscrew and replace the bulb with a new one suitable for high temperatures (300°C). -
Page 13: Specifications
Specifications Model CFSEWH12 / CFSESV12 Overall Dimension (WxDxH) 500 x 600 (640 to handle) x 900 - 930 (foot adjustment) mm Usable Volume 53 Litre Oven Lamp 25 W, E14 (300 °C) Thermostat 50-285 C Bottom Heating Element 1000 W... -
Page 14: Installation
Installation • The cooker must be installed by a competent person, if in doubt consult a qualified technician, and in compliance with local electrical, safety and building regulation standards. • If the cooker is installed adjacent to furniture which is higher than the hob, a gap of at least 100 mm must be left between the side of the cooker and the furniture unless non-combustible materials (ceramic tiles, metal splashback, etc.) are used which then allows this distance to be reduced to 20 mm. -
Page 15: Adjusting The Feet
Adjusting the Feet Your oven stands on 4 adjustable feet. When the oven is placed where it will be used, check if the oven is level. If it is not level, you can adjust by turning the feet clockwise if required. It is possible to raise the appliance a maximum of 30mm using the feet. -
Page 16: Electrical Connection
Electrical Connection Electric cookers come without a power supply cable. The cooker is designed to operate on an electricity supply which conforms to the electrical data shown on the Rating Plate. The cooker can be connected to the mains only after you complete the connections in the terminal box.. -
Page 17: Safety Warnings
Safety Warnings Installation Operation and Maintenance • This appliance must be earthed. • This appliance is for Domestic / Household Use only • It is recommended that this appliance is installed by • Keep the electrical cables of your other appliances a qualified electrical engineer. - Page 18 • Close supervision is necessary during grilling of food. • Take care when handling parts with glass; knocks, chips, heavy handling and dropping could cause the glass to shatter. • The glass oven door uses toughened glass and is designed to shatter into many ‘nugget’ sized pieces if it breaks.
- Page 20 If you require a replacement for any of the items listed below, please quote their corresponding part numbers: Replacement Part Part Number Oven Shelf 37015284 Oven Tray 20613041 Grill Pan 20643831 Grill Pan Rack 37006132 Grill Pan Handle 37004739 Visit Partmaster.co.uk today for the easiest way to buy electrical spares and accessories.
Need help?
Do you have a question about the CFSEWH12 and is the answer not in the manual?
Questions and answers