Table of Contents
Advertisement
Owner's Manual
Rev: 12.22108
Thank you for purchasing a ProVari Radius personal vaporizer.
We hope you get many years of enjoyment from this device.
www.ProVape.com
Introduction
A personal vaporizer (PV) is a battery-powered device that provides inhaled doses of nicotine by way of a vaporized
solution. In addition to the nicotine delivery, this vapor also provides a flavor and physical sensation similar to that
of inhaled tobacco smoke. Vaporizers do not contain tar and have just a few ingredients compared to several
thousand found in traditional cigarettes. There is no tobacco or combustion involved in its operation. There is no ash
and no smell. Vaping is the 21st century alternative to smoking tobacco products. Just please keep in mind that
personal vaporizers are not meant to be a smoking cessation device. This device can also be used without nicotine.
The ProVari Radius featuring the ProVape Radius chip is a powerful microprocessor controlled PV that lets you
adjust and fine tune the device to your exact preferences by adjusting the wattage, along with a number of other
parameters which we will explain later in this manual. The ProVari Radius uses the latest technology to bring you
some new and exciting features. The ProVari Radius has regulated power output which keeps the wattage the same
with each puff regardless of your remaining battery power. As the battery drains, the device will keep the power
output consistent, giving you the perfect vapor all day long. Now you can dial-in the perfect settings for your tank or
atomizer and e-liquid!
(Please note that due to ongoing software updates, improvements and changes based on customer
feedback, some of the features or screen images shown in this manual may be slightly different)
1
Advertisement
Table of Contents

Related Manuals for Provape Provari Radius

Summary of Contents for Provape Provari Radius
-
Page 1: Introduction
The ProVari Radius uses the latest technology to bring you some new and exciting features. The ProVari Radius has regulated power output which keeps the wattage the same with each puff regardless of your remaining battery power. -
Page 2: Table Of Contents
Table of Contents Introduction ........................1 Warnings ......................... 3 ProVari Radius Features ....................4 ProVari Radius Feature Details ..................5 ProVari Radius Components ................... 8 ProVari Radius Adapter ....................9 Batteries .......................... 9 Charging a Battery Using a Standard Battery Charger ............ 9 Charging a Battery Using the Built-in Charger .............. -
Page 3: Warnings
● Do not remove the circuit board. Doing so will void your warranty. ● Remove the battery from the ProVari Radius if you plan to store it for long periods of time. ● The ProVari Radius operates on a single battery. NEVER stack two batteries or use batteries that are not recommended for use in the ProVari Radius. -
Page 4: Provari Radius Features
ProVari Radius Features ● The ProVari Radius wattage can be adjusted from 3 – 40* in 0.2 watt increments. ● Flat top design provides a clean hybrid look with the latest tanks. ● Self-adjusting center contact pin ensures maximum compatibility with tanks and atomizers. -
Page 5: Provari Radius Feature Details
* Limits - The Provari Radius will go down to .5 ohms and up to 40 watts. It's also capable of running lower ohm tanks but the unit is then limited to 9.5 amps. As an example, you could run .4 ohms up to 36 watts. - Page 6 After spending a little time with the new ProVari Radius menu, you will find it’s easy to make changes and adjust your settings to customize the device to your liking. ● Three button design. With the additional two buttons, you can quickly adjust your power level up or down using these dedicated controls.
- Page 7 ● The Amperage limiting system protects against over-current situations. The ProVari Radius is capable of outputting up to 9.5 amps. If you want to use the ProVari Radius at maximum power, you will need to ensure you use the approved batteries sold by ProVape or use the battery that came with your device. If you install a battery that cannot safely handle the full power output, the ProVari Radius will not allow the device to work at those levels and the power limit will be reduced.
-
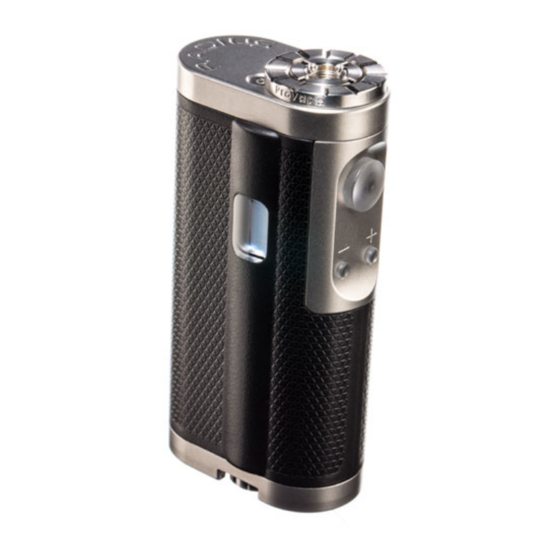
Page 8: Provari Radius Components
The main Button (2) activates the heating element inside the tank which creates the vapor. This button is also used to change the user settings on the ProVari Radius. The two smaller buttons are used to change power settings. There are some shortcuts to turning the device on/off and locking the adjustment of power using these smaller buttons. -
Page 9: Provari Radius Adapter
If you use a poor quality battery, the ProVari Radius will reduce the output power to match what the battery is capable of safely providing. If you plan to store the Radius for more than 10 days, we recommend you remove the battery or plug-in to charge. -
Page 10: Charging A Battery Using The Built-In Charger
Questions? Problems? If you have any questions or problems with your ProVari Radius, please feel free to contact us or visit the retail location where you purchased your device. To contact ProVape, visit www.ProVape.com... -
Page 11: Menu Flow Chart
Menu Flow Chart Note: Menu items can change slightly due to new features or ongoing improvements. See Page 28 for new features since release. -
Page 12: Push Buttons
Push Buttons The ProVari Radius has three buttons located on the front of the unit. The large main button is used to power the device when vaping. It's also used to get into the menu to change settings by pressing it 4 times in a row. -
Page 13: Screen Layout
Screen Layout You can enter the main menu by pressing the button 4 times. When the menu appears, you will notice there are several icons and options available to include "SET", "RCL", "Info", "Exit". In the following pages, we will walk you through all of the different icons and how each one allows you to select various options. -
Page 14: Warning System
Warning System The Radius has a warning system that alerts you about a problem. Anytime there is an issue that needs attention, this icon will appear on the status screen. In this example, the device is detecting OP (Open) meaning there is no atomizer installed or the atomizer is burned out. -
Page 15: Menu Options And Functions
In this section, we will discuss all the various functions of the ProVari Radius and what they do. While the ProVari Radius is a very powerful device and there are a lot of options, you will find that it’s easy to operate and use with a little practice. - Page 16 4 Button Presses Info Exit RCL (Recall) – Recall allows you to load a saved profile. A profile consists of all of the unique settings in use at a particular time. This makes it easy to retrieve special settings for different e-liquids or accessories.
- Page 17 Back Cigarette Exit BOOST Arrow Counter When selecting SET, this will take you into the menu options where you can adjust the master settings for the device. Sav (Save) – Save allows you to save a user specific profile. A profile consists of all of the unique settings in use on the device at a particular time.
- Page 18 Back Cigarette Exit BOOST Arrow Counter Scrolling Display Left/Right Status Speed Brightness Mode Time Left Handed Right 1 Seconds Handed Back Arrow 5 Seconds 10 Seconds 20 Seconds Back Arrow Back Arrow Back Arrow Exit Exit Exit Dis (Display) – In the Display menu there are numerous different settings that allow you to customize the appearance of the OLED display.
- Page 19 Scroll Speed - This section allows you to adjust the speed of the scrolling menu. When entering this menu area, you will be presented with speed selections 1 through 5. Each time you press the button to select a number, the display will scroll faster or slower depending on what setting you have selected.
- Page 20 L/R - Left or Right screen display – This setting changes the orientation of the display. This feature is used to switch the device for use in either the right or left hand. As you select the two options, you will see the display flip from left to right handed mode.
- Page 21 Back Cigarette Exit BOOST Arrow Counter LED Menu - This menu section allows you to turn the LED button on and off and lets you change the color of the LED button. Once you have selected the LED option, you will be taken to the LED screen where you can select either the LED On/Off option or the LED Color option.
- Page 22 On/Off – LED Button On/Off Option. This toggles the LED button on or off. When you press the button to heat up your atomizer, if the LED is turned on, then the button will light up the color of your choice. When this function is turned off, the LED button will not turn on.
- Page 23 9 watts. Note that turning the ProVari Radius up to max wattage and boost up to 5 will not exceed the maximum output of the unit which is up to 40 watts. Boost will give you a 5 watt increase all the way up to 35 watts, which hits the 40 watt limit.
-
Page 24: Money Saved Counter - Cigarette Counter
Money Saved Counter ‐ Cigarette Counter This feature calculates money saved, cigarettes avoided and vape counter. In the SET menu you will see this cigarette icon. Selecting this will take you into the settings and information for the Money Saved area. Money Saved - The first icon is a money saved status. Based on the dollar per pack that you set in the below settings and the number of puffs, we calculate how much you have saved. -
Page 25: Error Messages And Fixes
Error Messages and Fixes Error Message Suggested Fix REDUCE VOLTS / WATTS OR REPLACE OUTPUT TOO HIGH OR BAD ATOMIZER [1] >>> ATOMIZER OUTPUT CURRENT HIGH [2] >>> REPLACE ATOMIZER AND TRY AGAIN OUTPUT TOO HIGH [3] >>> REDUCE VOLTS / WATTS TEMPERATURE HIGH [4] >>>... - Page 26 Error Message Details In the event that you get an error message, the Radius will alert you on screen as to the reason for the error and the suggested fix. Below is a list of the error messages that can occur. Check Battery, Contacts and Spring - This can happen if you are using a bad battery or the spring is not making a good connection with the battery.
-
Page 27: Radius Energy Gauge
This is NOT the case with the Radius. Because of this, ProVape engineering has designed a special energy gauge algorithm to be more useful to the Radius user. It displays the true gauge of available energy more accurately. -
Page 28: Software Revision
1) The energy gauge displayed could go up or down. That is TOTALLY different from other power gauge displays but perfectly normal for the Radius. It is important to remember that the Radius power gauge is NOT displaying the amount of energy that is in the battery but instead, the amount of Energy that is Available to the atomizer. -
Page 29: Additional Warnings
Every effort has been made to ensure that the information in this manual is accurate. ProVape is not responsible for printing, clerical errors or updates to the manual or functionality that may happen after the manual has been distributed. Please use product at your own risk. - Page 30 11. Vape away from the vicinity of people and pets. The effects of second hand vapor have not been scientifically confirmed. However, Propylene Glycol is an allergen and Nicotine is known to cause reproductive harm. 12. Use this product in moderation. Failure to do so may nicotine overdose which can lead to an irregular heart beat and other symptoms listed below.
- Page 31 23. Children and Pets: Keep away from children and pets. Small parts and or e-juice may be ingested and may lead to suffocation, injury, poisoning, and/or death. 24. Do not dispose of in trash containers nor litter the environment. Please recycle. 25.
- Page 32 40. Never attempt to charge directly from the wall outlet. Always use a surge protector. 41. Do not throw batteries into fire. 42. Do not connect improperly. 43. Do not use any charger other than the one provided to you to charge your device 44.
Need help?
Do you have a question about the Provari Radius and is the answer not in the manual?
Questions and answers