
Subscribe to Our Youtube Channel
Related Manuals for Aquatic AQ-IP-3B-X


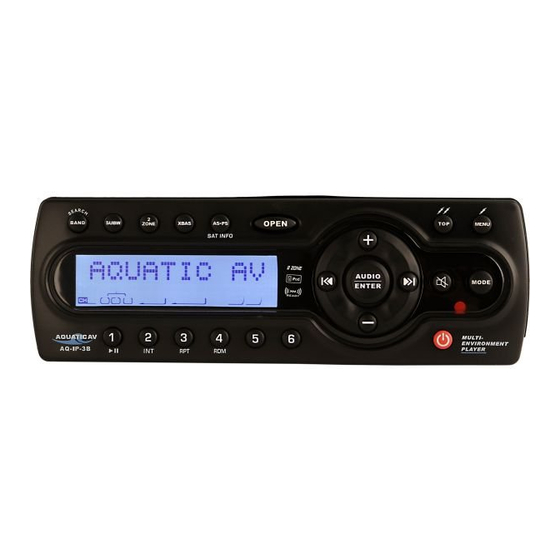
Summary of Contents for Aquatic AQ-IP-3B-X
- Page 1 AQ-IP-3B-X iPod Digital Media Center AM / FM Radio INFO MULTI- ENVIRONMENT PLAYER AQ-IP-3B-...
-
Page 2: Mounting Precautions
1. MOUNTING PRECAUTIONS The AQ-IP-3B-X is designed for a multi environment application. For easy system set-up, mount the Media Center so the front panel controls will be easily accessible. In addition, observe the following precautions: 1. Check clearances on both sides of a planned installation before drilling any holes or installing any screws. - Page 3 2. Slide backing brackets into position and tighten center bolts. Remove backing brackets handles by bending backing bracket handles until they break off. 3. Slide Media Center into mounting bracket. Secure Media Center using supplied SS hardware and back strap. E - 2...
-
Page 4: Wiring Diagram
2. WIRING DIAGRAM VIEW B-B WIRE INSERTION VIEW FUSE +12V CABLE YELLOE FUSE REMOTE PIN NO. WIRE COLOR DESCRIPTION ACCESSORY (+12V) GREEN/BLACK LEFT REAR SPEAKER (-) GREEN LEFT REAR SPEAKER (+) YELLOW BATTERY (+12V) WHITE/BLACK LEFT FRONT SPEAKER (-) WHITE LEFT FRONT SPEAKER (+) BLUE POWER ANTENNA... -
Page 5: Ipod Operation
3. iPod OPERATION ALWAYS COVER THE iPOD CONNECTOR WARNING: When the docking is not in use, always cover the iPod connector with the protective rubber cover provided with this unit, in order to prevent moisture, corrosion or damage to the iPod connector. E - 4... - Page 6 3. iPod OPERATION INSTALLING iPod INTO THE BUILT-IN iPod DOCKING STATION Always follow the below steps to install the iPod into the docking station. Incorrect or improper installation may cause permanent damage to the docking station or the iPod unit. Step 5 Step 1 Press down the button as indicated...
- Page 7 REMOVE iPod FROM THE BUILT-IN iPod DOCKING STATION To take out the iPod from the docking station, user can first detach the front panel, and repeat step 1 to step 8 to take out the iPod & return the iPod docking inside the unit’s cabinet.
- Page 8 iPod FULL CONTROL / OPERATION This unit is equipped with iPod Ready function which allows end user to have direct control of the iPod on the front panel control button and display iPod song information on the unit's LCD display. Please read below for more details operation Turning iPod Power On and Off The iPod power turns on automatically as soon as it is connected to the 30 Pin Connector and as...
-
Page 9: Song Select
Once the desire searching method is selected, within 10 second press the AUDIO button to confirm & access into the searching mode, then press the volume ( ) and ( ) button to navigate thru the Album or Artist or Song contained in the iPod. Press the AUDIO button to confirm &... -
Page 10: Control Panel Function
4. CONTROL PANEL FUNCTION INFO MULTI- ENVIRONMENT PLAYER AQ-IP-3B- OPERATIONS: SYSTEM TUNER Short Long Short Long Short Long Press Press Press Press Press Press Power OPEN (Panel release button) Open Open Open 12V_2 Mute Menu 12V_1 Audio Enter Menu Volume Parking Volume Down... - Page 11 5. REMOTE FUNCTION (OPTIONAL,THE AQ-RF-3 REMOTE CONTROL IS OPTIONAL, NOT INCLUDED IN THIS UNIT, SOLD SEPARATELY ) OPERATIONS: SYSTEM TUNER iP od Short Long Short Long Short Long Press Press Press Press Press Press Power Mute Light Audio Enter Me nu Mode Volume Volume...
-
Page 12: Basic Operations
6. BASIC OPERATIONS 2) PANEL OPEN BUTTON (OPEN) Press this button to open the control panel. 1) POWER ON/OFF BUTTON ( Press the POWER button or Short Press any other button on the front of the unit (except the Open) to turn On the unit. Press and hold the POWER button to turn Off the unit. 4) MUTE BUTTON ( Press the MUTE button to mute the audio output, and “Mute ( )”... -
Page 13: Menu Operations
Menu Operations 18) MENU FUNCTION LIST (MENU) When you press the MENU button for < 3 seconds, the following list of items are inside the MENU: Contrast – Display Low Batt – 10.5V low battery alert On/Off Dimmer – High/Low Distant / Local –... - Page 14 Area “USA” is the default setting. User now has 5 seconds to select “USA” “LATIN” / “EUROPE” or “ORIT” by pressing the VOLUME +/- Rear Speaker On/Off Rear speaker is turned’ ON’ by default. If OFF is selected, the rear speaker's audio output will be TURNED OFF.
-
Page 15: Dual Zone Operation
7. DUAL ZONE OPERATION This unit is equipped with the advance feature “Dual Zone”. This function is useful if the user want to select different modes of the audio output source for Front and Rear Speakers. The details operation as follow; On/Off operation “Off”... -
Page 16: Audio Operation
8. AUDIO OPERATION Audio Menu Press “AUDIO“ button to access the Audio Menu. User can navigate thru the Audio Menu items by pressing the “AUDIO” button repeatedly, or by pressing the Tuning Up or Tuning Down Button. Once the desired menu item appears on the display, adjust that option by using the Volume Up or Down button within 5 seconds. - Page 17 MIDDLE (Middle Level) User has 5 seconds to use the Volume ) or Down( button to adjust the desired Middle level range from -6 to +6. MID-CFQ (Middle Center Frequency) User has 5 seconds to use the Volume ) or Down( button to adjust the desired Middle Range Center Frequency to 500Hz, 1KHz, 1.5KHz, or 2.5KHz.
-
Page 18: Tuner Operation
10. TUNER OPERATION 10) BAND BUTTON (BAND) Press BAND to change between FM bands and AM(MW) bands. 21/22)TUNING UP/DOWN BUTTON ( Manual Tuning Press the Up Tuning( ) or Down Tuning ( )button for more than 3 seconds to move the radio frequency number up or down by one step. -
Page 19: Optional Accessories
11. OPTIONAL ACCESSORIES Wired Remote AQ-WR-3 (Silver) Wireless Remote AQ-RF-3FB (Black) AQ-RF-3 Wireless Remote Control AQ-IRR Infarred Remote Control E - 18... -
Page 20: Specification
12. SPECIFICATION Auxiliary Input Section Frequency response 20Hz to 20KHz -3dB Input Maximum Voltage 1200 mV Input Impedance 4.7k ohm Radio Section 87.5-107.9 MHz (200 KHz Space) Frequency Range < 15dB at S/N 30 dB Usable Sensitivity 25 dB at 1KHz Stereo Separation 50 dB S/N Ratio... -
Page 21: Troubleshooting
13. TROUBLE SHOOTING Before going through the check list, check wiring connection. If any of the problems persist after check list has been made, consult your nearest service dealer. Symptom Cause Solution The ignition is not on. No power If the power supply is properly connected to the car accessory terminal, switch the ignition key to “ACC”...
Need help?
Do you have a question about the AQ-IP-3B-X and is the answer not in the manual?
Questions and answers