Advertisement
Available languages
Available languages
STAINLESS STEEL TOASTER
HOrnO
TOSTADOR DE ACERO INOXIDABLE
Customer
Care
USA 1-800-231-9786
Accessories/Parts (USA)
1-800-738-0245
For online customer service
and to register your product, go to
www.prodprotect.com/applica
Model/Modelo
❍ To1491S
Line:
Oven
Servicio
para el cliente:
México 01-800 714-2503
Accesorios/Partes (ee.UU)
1-800-738-0245
Para servicio al cliente y para
registrar su garantía, visite
www.prodprotect.com/applica
Advertisement
Table of Contents

Related Manuals for Black & Decker TO1491S


Summary of Contents for Black & Decker TO1491S
- Page 1 Oven STAINLESS STEEL TOASTER HOrnO TOSTADOR DE ACERO INOXIDABLE Customer Care Line: Servicio para el cliente: México 01-800 714-2503 USA 1-800-231-9786 Accesorios/Partes (ee.UU) Accessories/Parts (USA) 1-800-738-0245 1-800-738-0245 For online customer service Para servicio al cliente y para registrar su garantía, visite and to register your product, go to www.prodprotect.com/applica www.prodprotect.com/applica Model/Modelo ❍ To1491S...
-
Page 2: Important Safeguards
Please Read and Save this Use and Care Book. ❍ do not store any material, other than manufacturer's recommended IMPORTANT SAFEGUARDS accessories, in this oven when not in use. ❍ do not place any of the following materials in the oven: paper, cardboard, plastic, and the like. When using electrical appliances, basic safety precautions should always be followed including the following: ❍ do not cover crumb tray or any part of this oven with metal foil. This will cause overheating of the oven. ❍ Read all instructions before using. SAVE THESE INSTRUCTIONS. ❍ do not touch hot surfaces. Use handles or knobs. ❍ To protect against electrical shock do not immerse cord, plugs or This product is for household use only. appliance in water or other liquid. ❍ Close supervision is necessary when any appliance is used by or near children. GROUNDED PLUG As a safety feature, this product is equipped with a grounded plug, which ❍ Unplug from outlet when not in use and before cleaning. Allow to cool will only fit into a three-prong outlet. do not attempt to defeat this safety before putting on or taking off parts. -
Page 3: How To Use
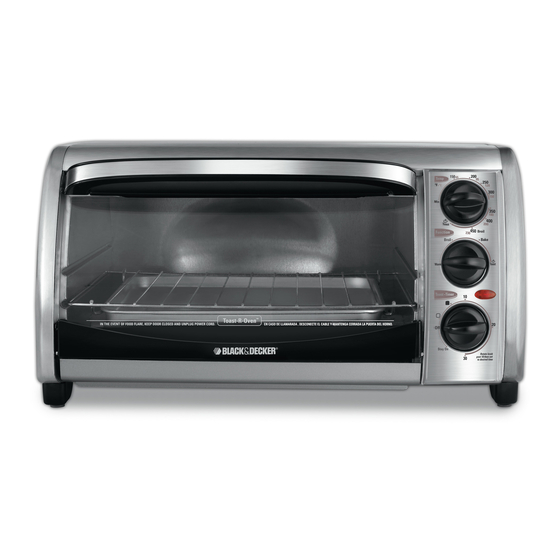
• Plug unit into electrical outlet. 1. Curved glass door IMPORTANT INFORMATION ABOUT YOUR OVEN † 2. Temperature selector knob (TEMP ˚F/˚C) (Part # TO1491S-01) • T his oven gets hot. When in use, always use oven mitts or potholders when touching any outer or inner surface of the oven. † 3. Cooking FUNCTION selector knob (Part # TO1491S-02) • d uring first few minutes of use you may notice smoke and a slight odor. 4. Power ON indicator light This is normal and should cause no concern. -
Page 4: Care And Cleaning
6. For best results, on first toasting cycle set the toast selector knob to medium which Important: Food should not extend beyond the edges of the bake pan/drip tray to will be midway between light and dark setting, then re-adjust for next cycle to lighter avoid drippings from falling onto the heating elements. or darker to suit your preference. 5. Cook food according to recipe or package instructions and check at minimum time 7. The on indicator light comes on and remains on until toasting cycle is complete. to see if it is done. 8. When toast cycle is complete, there will be an audible signal. The oven and the on 6. When finished broiling, the signal bell sounds. Turn the ToAST/TIMeR selector to indicator light will go off. the oFF position. The power indicator light goes off. 9. open the oven door. Using oven mitts or pot holders, slide the rack out to remove the 7. Using an oven mitt or pot holder, slide out broiling rack together with bake pan to toast. -
Page 5: Need Help
Por favor lea este instructivo antes de usar el producto. NEED HELP? For service, repair or any questions regarding your appliance, call the appropriate INSTRUCCIONES IMPORTANTES 800 number on cover of this book. Please DO NOT return the product to the place of purchase. Also, please DO NOT mail product back to manufacturer, nor bring it DE SEGURIDAD to a service center. You may also want to consult the website listed on the cover of this manual. TWO-YEAR LIMITED WARRANTY Cuando se usan aparatos eléctricos, siempre se deben respetar las (Applies only in the United States and Canada) siguientes medidas básicas de seguridad: What does it cover? ❍ Por favor lea todas las instrucciones. - Page 6 ENCHUFE DE TIERRA ❍ A fin de evitar el riesgo de incendio o choque eléctrico, jamás introduzca alimentos demasiado grandes ni utensilios de metal Como medida de seguridad, este producto cuenta con un enchufe de tierra adentro del aparato. que tiene tres contactos. no trate de alterar esta medida de seguridad. la conexión inapropiada del conductor de tierra puede resultar en un riesgo de ❍ existe el riesgo de incendio si el aparato permanece cubierto mientras choque eléctrico. Si tiene alguna duda, consulte con un eléctricista calificado se encuentra en funcionamiento o si éste llegase a entrar en contacto para asegurarse de que el tomacorriente sea uno de tierra. con cualquier material inflamable, incluyendo las cortinas y las paredes. Asegúrese de no colocar nada sobre el aparato mientras se TORNILLO DE SEGURIDAD encuentre en uso. Advertencia: Este aparato cuenta con un tornillo de seguridad para evitar la remoción de la cubierta exterior del mismo. A fin de reducir el riesgo de ❍ Para apagar el aparato, gire el control ToAST/TIMeR a la posición de incendio o de choque eléctrico, por favor no trate de remover la cubierta apagado (oFF).
-
Page 7: Primeros Pasos
4. Luz indicadora de funcionamiento • este horno se calienta cuando está en funcionamiento. Asegúrese de usar siempre guantes o agarraderas de ollas al tocar cualquier superficie † 5. Selector de tostado/reloj automático (TOAST / TIMER ) (Pieza no. TO1491S-03 ) interior o exterior del aparato. † 6. Bandeja para migas removible (Pieza no. TO1491S-04 ) † 7. Bandeja para hornear/de goteo (Pieza no. TO1491S-05 ) • el aparato podría emitir humo y un ligero olor. esto es normal y no debe ser motivo... -
Page 8: Guía Para Asar
3. Abra la puerta del aparato e inserte la parrilla corrediza adentro de las ranuras. PARA ASAR 4. Coloque el pan o los bagels directamente sobre la parrilla del horno y cierre la 1. Gire el control selector de temperatura a la posición de asar (450/BRoIl). puerta. 2. Gire el control selector de la función de cocción a la posición de asar (BRoIl). 5. Gire el control del grado de tostado al nivel 10 y luego, ajústelo según el grado de 3. Abra la puerta del horno y utilice la bandeja de hornear como bandeja de goteo, tostado que desea. instalándola debajo de la parrilla corrediza. Nota: Uno debe ajustar el grado de tostado, a fin de que e horno tueste los alimentos. 4. Ajuste el reloj automático (ToAST/TIMeR) a la posición 10 (incluyendo el período 6. Para mejores resultados, se recomienda el nivel medio para el primer ciclo de de precalentamiento de 5 minutos) o seleccione la posición de funcionamiento tostado y después, ajustar el siguiente ciclo entre ligero y oscuro, al gusto. continuo (STAY oN). 7. la luz indicadora de funcionamiento se ilumina y permanece encendida hasta Importante: Al utilizar la función de tostado/ reloj automático (TOAST/TIMER), gire finalizar el ciclo de tostado el horno y la luz indicadora se apagan. siempre el selector pasando el nivel 10, y luego gírelo a la izquierda o a la derecha hasta alcanzar el nivel deseado. -
Page 9: Cuidado Y Limpieza
Cuidado y limpieza ¿NECESITA AYUDA? Para servicio, reparaciones o preguntas relacionadas al producto, por favor llame este producto no contiene piezas reparables por el consumidor. Para servicio, acuda al número del centro de servicio que se indica para el país donde usted compró su a personal calificado. producto. LIMPIEZA DEL HORNO No devuélva el producto al fabricante. llame o lleve el producto a un centro de servicio Importante: Apague el aparato, desconecte del tomacorriente y permita que se enfríe autorizado. antes de limpiar cualquier pieza. Después de lavar las piezas, sequelas bien antes de DOS AÑOS DE GARANTÍA LIMITADA utilizarlas. - Page 10 NOTES/NOTAS NOTES/NOTAS...
- Page 11 © 2011 Applica Consumer Products, Inc. 2011/3-28-114e/S...
Need help?
Do you have a question about the TO1491S and is the answer not in the manual?
Questions and answers