Table of Contents
Advertisement
Quick Links
Advertisement
Table of Contents

Related Manuals for Lava IRIS 349


Summary of Contents for Lava IRIS 349
- Page 3 User Manual Lava iris 349 Sleek ...
- Page 4 You can read the manual to understand how to use LAVA mobile phone and experience the well‐established functions and simple operation method. Please use the original accessory in order to achieve the best use of effects. Lava ...
-
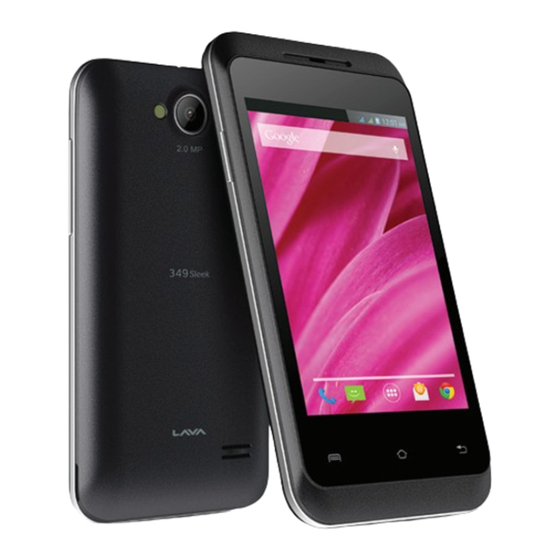
Page 5: Phone-Front View
PHONE‐FRONT VIEW YOUR PHONE‐BACK VIEW ... - Page 6 ...
-
Page 7: Charge The Battery
CHARGE THE BATTERY Connect this end to phone’s USB port. Tip: Please make sure to charge your phone’s battery for 4hours after inserting it in the phone for the first time. INSERT SIM AND MicroSD CARD Please insert the SIM card(s) according to the label on the phone. Make sure that the clipped corner of the SIM card and the metallic contacts are facing the correct direction. Slide the SIM card into the until it doesn't move up any further. On the right most side(refer diagram above)is the micro SD card slot. The direction in which the microSD card has to be inserted into the designated slot is shown by an arrow in the above diagram Tip: For additional media storage insert a microSD card. ... -
Page 8: Turn The Phone On And Off
TURN THE PHONE ON& OFF Hold the power button to turn the phone on. Hold down the power button, then touch Power off to turn the phone off DIM LOCK & WAKE THE PHONE When the power is on and you want to dim the screen, press the power button. When the screen is dimmed and you want to wake the phone, press the power button and then drag the lock to the right. ... - Page 9 HOME SCREEN Phone status bar and notifications. Touch and hold an empty spot to change the wallpaper ...
-
Page 10: Status Bar
STATUS BAR The status bar shows your phone’s status and notifications. (Notifications are described on the next page.) Notification icons Status icons Status icons The following status icons may appear on your screen: Icon Statement Icon Statement SIM ... -
Page 11: Notification Panel
NOTIFICATION PANEL The notification panel is your center for new events: like new e‐mail, voicemail, updates, and more. Drag down to display notifications Touch a notification to respond MAKE & ANSWER A CALL 1.From the Hom screen.touch 2.Dial a number using the dial pad. 3.Touch to initiate the call ... - Page 12 Answer a call ...
- Page 13 Manage your wireless connections and connections Wireless & settings. Let you configure and networks manage connections to networks and devices by Using Wi‐Fi, Bluetooth, and mobile networks. Let you configure phone call settings, such as call forwarding, Call settings call barring, and other special features offered by your carrier. Configure how your phone rings, Audio vibrates, or alerts you in other profiles ways when you receive communications, etc. Let you set the screen brightness, select to switch orientation when Display you rotate your phone, and configure other screen settings. Set location preferences. Protect Location & your phone by setting up Security different locks and passwords. Applications Manage installed applications. Accounts & Let you add, remove and manage sync supported accounts. ...
- Page 14 Let you manage your personal information, restore your settings and other data when you install Privacy an application, and erase all of your personal data from internal phone storage. Let you check out available space Storage on your phone’s internal storage and on your T‐Flash card. Let you select the language for Language & the text on your phone and for keyboard configuring the onscreen keyboard. Voice input Configure the voice input feature & output to enter text by speaking. Enable your installed accessibility Accessibility applications and adjust related settings. Let you choose preferences such Data & time as format and time zones. Timer Switch Schedule automatic powering Machine on/off of the phone. View information about your About phone phone, such as system updates, status, and battery use. ...
-
Page 15: Music Player
SET A RINGTONE Press Audio profiles, select the profiles you want to set, you can customize the ringtone and volume of incoming call, notification ringtone in this interface. MULTIMEDIA listen it, watch it, capture it, enjoy it! FM RADIO 1. Insert earphone, then Tap the Power icon to stop or play FM. 2. Tap the forward by 0.1 MHz or scroll the knob icon to change channel frequency. Press volume key to adjust the volume. 3. Tap Auto search, Settings, Record and Favorites icon to adjust. MUSIC PLAYER Controls Play/Pause Touch Previous/Next Touch ... -
Page 16: Take A Picture
Touch and hold Rewind/Forward Volume adjust Press side key Now playing: Touch to Touch open the current playlist. Shuffle: Touch to shuffle Touch the current playlist. Repeat: Touch to repeat the current playlist; touch Touch again to repeat the current track. TAKE A PICTURE 1. Press and hold the camera button and then release 2. In the camera app, tap the screen to focus on a specific area. 3. Press the camera button all the way down to take a picture. TIP: Also launch the camera by pressing the camera icon on the home screen, capture the photo using on the screen camera button. ... -
Page 17: Share A Photo
SHARE A PHOTO 1. From the Home screen, touch then touch 2. Touch an album to open it, and then touch the picture you want to share. 3. Now touch 4. Select a medium for sending the photo(Such as Gmail to mail the photo, or Message to send the photo via messaging). CONNECT TO Wi‐Fi NETWORKS Wi‐Fi is a wireless networking technology that can provide Internet access at distances of up to 100 meters, depending on the Wi‐Fi router and your surroundings. ... -
Page 18: Troubleshooting
Troubleshooting Check www.Lavamobiles.com web site for additional information, downloads, and services related to your LAVA product. To check for the nearest LAVA service center location for maintenance services, you may like to visit www.lavamobiles.com/support-services Service Center number No.:+919560394002 Kindly note please send area code of place through SMS to this No. -
Page 19: E-Waste Disposal Mechanism
2011 www.moef.nic.in Do’s and Don’ts for disposal e‐waste Do’s: a. Ensure that an Authorized Person repairs your Lava products b. Call Our Local Authorized Collection Centers to Dispose Lava products c. Always drop your used electronic products, batteries or any accessories thereof after the end of their life at nearest Authorized Collection Point or Collection Center. d. Separate the packaging material according to responsible ... -
Page 20: Lava Warranty Certificate
Please refer the list of our Services Centers on Pan India basis on our website www.lavamobiles.com or please view this link for the details of Service Centers http://www.lavamobiles.com/support‐services. LAVA WARRANTY CERTIFICATE Limited warranty: LAVA international Ltd. (LAVA) provides limited warranty for your mobile phone and original accessories delivered with your mobile phone (hereinafter referred to as “product”) The warranty period for the transceiver is one (1) year and for battery, charger and headset is six (6) months from the date of purchase. LAVA Warranty Subject to the conditions of this Limited Warranty, LAVA ... - Page 21 The seals of the product’s battery enclosure have been broken or shown evidence of tempering or the product’s battery has been used in equipment other than that for which it has been specified usable by LAVA. All plastic surfaces and all other externally exposed part that is scratched or damaged due to normal use. To get maximum of your new product, we recommend you to: Read the guidelines for safe and efficient use as mentioned in the manual. Read the terms and conditions of your Lava warranty in the ...
- Page 22 Keep your original receipt; you will need it for warranty services if asked to produce. Present this Lava Warranty Certificate along with original proof of purchase whenever you require any warranty services. In case Lava product needs service, please visit the nearest Lava service centers given in the service guide. Please visit our Website www.lavamobiles.com for updated list of Authorized Service Centers near to your location. Important note: for your warranty to be valid, all information on the warranty certificate has to be completed ...
Need help?
Do you have a question about the IRIS 349 and is the answer not in the manual?
Questions and answers