
Related Manuals for Audio enhancement K-STD14

Summary of Contents for Audio enhancement K-STD14
- Page 1 XD Pendant Microphone K-STD14 | 1.9 GHz 14241 S. Redwood Rd., Bluffdale, UT 84065 • Phone 1.800.383.9362 • AudioEnhancement.com Rev.1.25...
-
Page 2: Safety Precautions
1.9 GHz Wireless Teacher Microphone, model K-STD14 has been tested and found to comply with FCC radiation exposure limits set forth for an uncontrolled environment and meets the FCC radio frequency (RF) Exposure Guidelines. - Page 3 MEDICAL: Consult the manufacturer of any personal medical devices, such as pacemakers, to determine if they are adequately shielded from external RF (radio frequency) energy. The unit operates in the frequency range of 1.92 GHz to 1.93 GHz. Do not use the unit in health care facilities if there are any regulations posted in the area instruct you not to do so.
-
Page 4: Table Of Contents
Contents Important Safety Instructions ......................5 Precautions ............................6 Major operating controls and their functions ..................8 Inserting a battery ..........................12 Fitting the microphone ........................13 Using the microphone ........................14 Adjusting the volume ......................... 15 ... -
Page 5: Important Safety Instructions
Important Safety Instructions 1) Read these instructions. 2) Keep these instructions. 3) Heed all warnings. 4) Follow all instructions. 5) Do not use this apparatus near water. 6) Clean only with dry cloth. 7) Do not block any ventilation openings. Install in accordance with the manufacturer's instructions. 8) Do not install near any heat sources such as radiators, heat registers, stoves, or other apparatus (including amplifiers) that produce heat. -
Page 6: Precautions
Precautions Turn off the power supply when inside an aircraft. The product might interfere with operational safety of the aircraft. Do not attempt to disassemble or short-circuit rechargeable batteries. An exploding battery or leaking battery fluid may result in fire, injury and burns. Avoid placing the product in unstable conditions. -
Page 7: Precautions For Use
[Precautions for use] • Operating temperature: 5 °C - 35 °C {41 °F - 95 °F} When calculating the battery life, note that temperatures below 10 °C {50 °F} shorten the battery duration. • Do not disassemble the product or touch internal parts. •... -
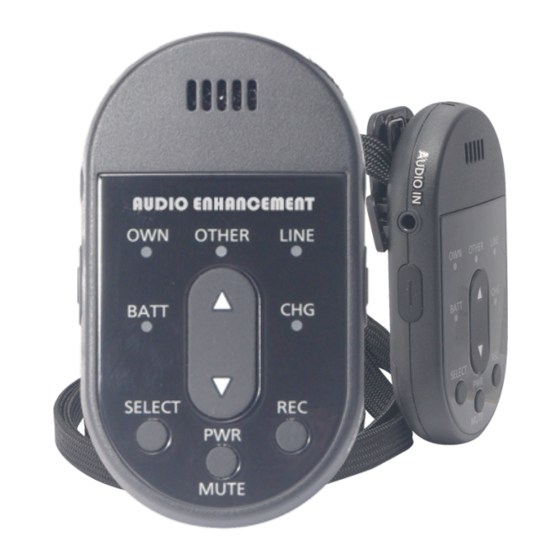
Page 8: Major Operating Controls And Their Functions
Major operating controls and their functions Rear View Battery cover removed (Inside the battery cover) Rev.1.25... - Page 9 [1] Microphone opening This opening picks up the speaker’s voice. [2] [OWN] Microphone selection indicator (green) Lights when [OWN] (audio from [1], [6], or [13]) is selected for adjusting the volume. Blinking indicates that the microphone is muted. [3] [OTHER] Microphone selection indicator (green) [OTHER] microphone refers to another microphone receiving audio at the same receiver.
- Page 10 Blinking (500 milliseconds interval lights): Charge Error. Likely indicating that the temperature of the battery may be out of the acceptable range. Confirm that the temperature is within the acceptable range. OFF: Microphone is off, not connected to a charger or no battery installed. [8] [DC IN] DC input terminal (side) Used to connect the charger for charging the battery installed in the microphone.
- Page 11 [13] [AUDIO IN] External input terminal (side) Transmits the audio from a connected external device to the receiver. When an external device is connected to this terminal, audio from the [1] microphone opening and [6] microphone input terminal is muted. [14] E2 Button (both sides) Press and hold both side E2 buttons simultaneously for 2 seconds or more to activate the E2 output (alert).
-
Page 12: Inserting A Battery
Inserting a battery • To insert a battery, turn off the power of the microphone, and make sure that the microphone is not connected to the charger. • To replace a battery, refer to the "Replacing a Battery" section on page 21. Note: •... -
Page 13: Fitting The Microphone
Fitting the microphone When fitting, removing, or adjusting the position of the microphone, turn off the power and make sure that the microphone is not connected to the charger. 1) Place the microphone around the neck of the person speaking. Widen the looped part of the strap above the microphone and place it around the speaker’s neck, with the front of the... -
Page 14: Using The Microphone
Using the microphone Battery indicator [PWR/MUTE] button To turn on the microphone, press its [PWR/MUTE] button for 1 second or more. The battery indicator of the microphone lights. To turn off the power, press the button for 2 seconds or more. The battery indicator of the microphone turns off. Memo: When [BATT] indicator blinks yellow (except when outside), the pairing registration to a receiver is... -
Page 15: Adjusting The Volume
Adjusting the volume The microphone can control the volume of all audio signals that come from the receiver (K-SRC14). Selection indicator Volume button Selector button 1) Press the selector button When the SELECT button is pressed for the first time after turning on the power, the [OWN] selection indicator lights. - Page 16 • When [OTHER] is lit User adjusts the volume of another paired microphone. • When [LINE] is lit User adjusts the volume of the external device (CD player or MP3 player) that is connected to the line input connector of the receiver that receives audio from the microphone. Note: •...
-
Page 17: Muting
Muting If you want to temporarily stop the audio transmitted from this microphone to the receiver without turning off the microphone, you can temporarily mute the audio signals. [OWN] selection indicator [PWR/MUTE] button 1) Press the [PWR/MUTE] button. Press the [PWR/MUTE] button once. The microphone mutes and the [OWN] selection indicator starts blinking. -
Page 18: Connecting An External Microphone
Connecting an external microphone This function allows you to use an external microphone instead of the microphone opening of this microphone. Connect an external microphone (for example, an electret condenser microphone) to the microphone input terminal of the microphone, and transmit the audio to the receiver. Electret condenser microphone (commercially available) φ3.5 mini-plug... - Page 19 • The microphone input terminal of the microphone is a monaural terminal. If a stereo external microphone is plugged into the microphone input terminal, either the right or the left channel audio will be transmitted. • When fine-tuning the volume of an external microphone using this microphone, select [OWN] by pressing the selector button.
-
Page 20: Connecting An External Device
Connecting an external device You can connect an external device (for example, a portable CD player) to the external input terminal and transmit the audio to the receiver. External input terminal [PWR/MUTE] button 1) Turn off the power of the microphone and the external device. 2) Connect an external device. -
Page 21: Replacing A Battery
Replacing a battery • Carefully read the "Precautions" section on page 6 and proceed accordingly. • To replace the battery, turn off the power, and ensure that the mic is not connected to the charger. Note: • Do not touch the battery poles with hands. Otherwise poor contact or noise may result. If dirty, wipe off with a dry soft cloth. -
Page 22: Charging A Battery
Charging a battery Charge indicator Micro-USB plug (Charge only Micro-USB Cable) [PWR/MUTE] button DC input terminal 1) Turn off the microphone. 2) Connect the micro-USB plug of the charger to the DC input terminal of the microphone. After connecting the microphone to the charger, the charge indicator (red) indicates the charging status as follows: Blinking (2 seconds interval lights): Charging * In the case of a complete discharge state, the LED lights red for the first minute. -
Page 23: Replacing The Neck Strap
Replacing the neck strap • When replacing the neck strap, turn off the power of the microphone, and make sure that the microphone is not connected to the charger. Remove the neck strap from the microphone. 1) Using a screwdriver, remove the back screw on the microphone’s clip. -
Page 24: Troubleshooting
Troubleshooting Before asking for repairs, check the symptoms with the following table. Contact a dealer if the suggested remedies do not correct the problem or if the problem is not described below. Symptom Cause/solution • Is there a battery in the microphone? >>... - Page 25 Is the volume of the [OWN] microphone turned down? >> With the [OWN] selection indicator lit, press Volume too low (No sound) volume button to increase the volume. Is the receiver set up correctly? >> Check the settings. Is any external device connected to the external input terminal or microphone input terminal? >>...
- Page 26 Has the battery deteriorated? >> A deteriorated rechargeable battery will shorten the battery duration or cannot turn on the microphone. Replace the deteriorated battery with a new rechargeable one. Are you charging it from a computer? >> Please charge it from a charger connected to power outlet.
-
Page 27: Specifications
Specifications Radio Standard Frequency Range: 1,920.0 ~ 1,930.0 MHz Coverage 20 m (NORMAL) (*1) 30 m (Hi POWER) Microphone type Unidirectional electret condenser microphone Audio Frequency Response 100Hz to 7 kHz (From Microphone to receiver) External input level –55 dBV ø3.5 mini jack (plug-in power compatible) External input –14 dBV ø3.5 stereo mini jack (monaural mix) Battery...
Need help?
Do you have a question about the K-STD14 and is the answer not in the manual?
Questions and answers