
Related Manuals for Audio enhancement K-SHH14

Summary of Contents for Audio enhancement K-SHH14
- Page 1 XD Handheld Microphone K-SHH14 | 1.9 GHz 14241 S. Redwood Rd., Bluffdale, UT 84065 • Phone 1.800.383.9362 • AudioEnhancement.com Rev.1.3...
-
Page 2: Safety Precautions
1.9GHz Wireless Handheld Microphone, model K-SHH14 has been tested and found to comply with FCC radiation exposure limits set forth for an uncontrolled environment and meets the FCC radio frequency (RF) Exposure Guidelines. - Page 3 MEDICAL: Consult the manufacturer of any personal medical devices, such as pacemakers, to determine if they are adequately shielded from external RF (radio frequency) energy. The unit operates in the frequency range of 1.92 GHz to 1.93 GHz. Do not use the unit in health care facilities if there are any regulations posted in the area instruct you not to do so.
-
Page 4: Table Of Contents
CONTENTS Important Safety Instructions ......................5 Precautions ............................6 Major operating controls and their functions ..................8 Inserting a battery ..........................10 Using the microphone ........................11 Connecting an external device ......................12 Replacing a battery ........................... -
Page 5: Important Safety Instructions
Important Safety Instructions 1) Read these instructions. 2) Keep these instructions. 3) Heed all warnings. 4) Follow all instructions. 5) Do not use this apparatus near water. 6) Clean only with dry cloth. 7) Do not block any ventilation openings. Install in accordance with the manufacturer's instructions. 8) Do not install near any heat sources such as radiators, heat registers, stoves, or other apparatus (including amplifiers) that produce heat. -
Page 6: Precautions
Precautions Turn off the power supply when inside an aircraft. The product might interfere with operational safety of the aircraft. Do not attempt to disassemble or short-circuit rechargeable batteries. An exploding battery or leaking battery fluid may result in fire, injury and burns. Avoid placing the product in unstable conditions. -
Page 7: Precautions For Use
[Precautions for use] • Operating temperature: 5 °C - 35 °C {41 °F - 95 °F} When calculating the battery life, note that temperatures below 10 °C {50 °F} shorten the battery duration. • Do not disassemble the product or touch internal parts. •... -
Page 8: Major Operating Controls And Their Functions
Major operating controls and their functions [Inside the battery cover] PWR LINK BATT AUDIO IN DC IN TALK [11] [10] [LINK] Switch Selects link mode [OFF] [ON] [side] [rear] OFF [Same receiver connection] ON [Different receiver connection] Default [1] Microphone opening This opening picks up the speaker’s voice. - Page 9 [5] [TALK] switch [ON]: Usable classroom audio condition (Microphone is operational.) [OFF]: Standby condition (Microphone is not operational.) [6] [PWR LINK] button (rear) When pairing this microphone with the receiver, press this button at the same time as the TALK push button or TALK switch.
-
Page 10: Inserting A Battery
Inserting a battery • To insert a battery, turn off the power of the microphone, and make sure that the microphone is not connected to the charger. • To replace a battery, refer to “Replacing a battery” on page 13. Note: •... -
Page 11: Using The Microphone
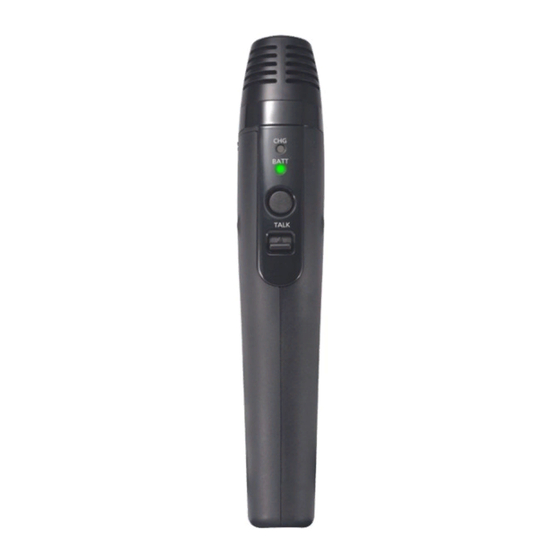
Using the microphone Battery indicator BATT TALK push button TALK TALK switch 1 TALK push button ON. Pressing the TALK button turns the microphone on, allowing users to use the microphone. (MIC1 or MIC2 indicator of the receiver lights green. Default indicator is MIC2.) Memo: When [BATT] indicator blinks yellow, the microphone must be paired to the receiver. -
Page 12: Connecting An External Device
Connecting an external device You can connect an external device (for example, MP3 player or computer) to the external input terminal and transmit the audio to the receiver. PWR LINK AUDIO IN External input terminal DC IN Headphone output 1 Turn off the power by sliding the [TALK] switch down or releasing the [TALK] button. -
Page 13: Replacing A Battery
Replacing a battery • To replace the battery, turn off the power of the microphone, and make sure that the microphone is not connected to the charger. Note: • Do not touch the battery poles with hands. Otherwise poor contact or noise may result. If dirty, wipe off with a dry soft cloth. -
Page 14: Charging A Battery
Charging a battery DC input terminal PWR LINK Charge indicator BATT AUDIO IN DC IN TALK push-button TALK Micro-USB plug (Charge only Micro-USB Cable) [rear] 1 Turn off microphone. 2 Connect the micro-USB plug of the charger to the DC input terminal of the microphone. - Page 15 • Charging at a temperature outside the normal range may result in significantly longer charging times. Note, however, that charging times may become longer even within the operating temperature range, if the temperature of the mic is higher or lower than the normal condition. •...
-
Page 16: Troubleshooting
Microphone LINK switch (inside the battery cover) is ON. (Different receiver connection) (Please read the operating instructions of the Handheld Microphone (K-SHH14).) Pressing [PWR LNK] button and [TALK] button for one second or more will register for receiver. Pairing registration with a receiver has not been performed. - Page 17 Is the ø3.5 stereo mini-plug connected to the external input terminal? No sound >> Disconnect the ø3.5 stereo mini-plug from the external input terminal. • Is a battery installed? >> Install a rechargeable battery. Does not charge • Is the micro-USB plug of the charger inserted (charge indicator is off) all the way into the DC input terminal? >>...
-
Page 18: Specifications
Specifications Radio Standard Frequency Range 1,920.0 ~ 1,930.0 MHz Coverage 20 m (NORMAL) (*1) 30 m (Hi POWER) Microphone type Unidirectional electret condenser microphone Audio Frequency Response 100 Hz to 7 kHz (from Microphone to receiver) External input –24 dBV ø3.5 stereo mini jack (monaural mix) Battery Lithium Ion Battery (chargeable) Battery life...
Need help?
Do you have a question about the K-SHH14 and is the answer not in the manual?
Questions and answers