Table of Contents
Advertisement
Quick Links
Advertisement
Chapters
Table of Contents

Related Manuals for Olympia Millennium-E

Summary of Contents for Olympia Millennium-E
- Page 1 Owner’s Manual...
- Page 2 Welcome to the OLYMPIA Advantage The OLYMPIA MILLENNIUM – E has been designed and built to deliver trouble free performance. Like all mechanical equipment however, trouble free operation is based on complete and ongoing maintenance procedures being adhered to in order to validate your Resurfice Corp.
- Page 3 Owner´s Name: ................... Address: ..................................................Serial Numbers: Ice Resurfacer: ................... Battery Charger: ................... Batteries.: ................... Water Cart.: ................... Controllers.: FL ........FR ........RL ........RR ........Auger Vertical ................... Auger Horizontal ................... Hydraulic ................... Motors: FL ........FR ........
-
Page 4: Table Of Contents
Table of Contents Foreword ...................... 1 Declaration of conformity .................. 2 1 SAFETY Pictograms Used ................3 Generally Applicable Safety Instructions ..........4 Proper Use .................. 6 Improper Use ................6 Organisational Measures ..............6 Personnel Qualifications ..............7 Obligations of the User ..............9 Operator’s Workplace .............. - Page 5 3 ON-SITE CONDITIONS Ground Conditions ............... 25 Room Ventilation ................. 25 Water Connections ............... 25 Water Quality ................25 Charger ..................26 Garage Temperature ..............26 Snow Dump ................26 4 DESIGN AND FUNCTION Ice Resurfacer Design and Chassis ............. 27 Snow Conveyor (Auger) ..............
- Page 6 6 START UP OF THE OLYMPIA ICEBEAR Charge the Batteries ..............49 Installation of the Squeegee ............52 Blade Installation ................. 53 6.3.1 Blade Level Adjustment ..............57 Horizontal and Vertical Augers ............60 6.4.1 Horizontal Auger Adjustment ............60 6.4.2...
- Page 7 8 CLEANING AND MAINTENANCE Cleaning and Maintenance Safety Instructions ........81 Maintenance Checks ..............83 8.2.1 Daily ..................83 8.2.2 Every Time the Blade is changed or Weekly.......... 83 8.2.3 After 5 Hours ................84 8.2.4 After 50 Hours ................84 8.2.5 Monthly ..................
- Page 8 The Ultimate Ice Resurfacer...
- Page 9 Dear User! Before you put your OLYMPIA Ice Resurfacer into operation, please take the time to carefully read this operating manual. Pay particular attention to the safety instructions given throughout the manual and to Chapter 1, Safety. This is a prerequisite for…...
- Page 10 Note: We reserve the right to make changes in content. Resurfice Corp. accepts no liability for any errors, omissions and or misinterpretations of the material in this documentation. Liability for indirect damages arising from the supply and use of this documentation is excluded, unless required by law.
-
Page 11: Safety
1 SAFETY 1.1 Pictograms Used Throughout the texts in this manual and in part, on the ice resurfacer itself, you will find, among other things, the following pictograms: Imminent danger that can result in death, serious bodily injury, or major material damage. Warning about dangerous electrical voltage. -
Page 12: Generally Applicable Safety Instructions
• To operate the ice resurfacer safely, you must follow the safety instructions. • The OLYMPIA may only be operated when there are no people on the ice and no objects on the ice surface. • Sound the horn when you drive through areas in which pedestrians may be present, where your view is restricted, and when you drive onto the ice surface or leave the ice surface again. - Page 13 • The OLYMPIA must be inspected at least once a day for visible signs of damage! Any changes, including changes in the operating behaviour must be reported to the responsible department or person immediately! The ice resurfacer must be switched off and secured immediately if necessary (e.g.
-
Page 14: Proper Use
1.3 Proper Use The OLYMPIA ice resurfacer has been manufactured exclusively for the resurfacing of ice surfaces. Do not use the OLYMPIA for any other purpose. Only duly authorized and trained drivers may operate the OLYMPIA. All information and instructions given in this documentation must be adhered to without fail. -
Page 15: Personnel Qualifications
1.6 Personnel Qualifications • Every OLYMPIA has a variety of built-in safety functions. To prevent accidents from occurring, everyone that deals with the operation and maintenance of the machine must carefully read the instruction manuals provided by Resurfice Corp. before they operate or service the OLYMPIA. - Page 16 • Resurfice Corp. recommends that the user holds regular training courses, in which special emphasis must be placed on the hazards and safety measures. The service personnel must be instructed about the specific hazards in association with the maintenance and repair of the ice resurfacer.
-
Page 17: Obligations Of The User
1.7 Obligations of the User The User must ensure that… • The ice resurfacer is only used in the proper manner, • The ice resurfacer is only operated when it is in perfect working order, • The integrated safety devices are regularly maintained and checked for proper function, •... -
Page 18: Operator's Workplace
Operator Presence switch at the driver’s seat There is an Operator Presence switch at the driver’s seat on the OLYMPIA that must not be bypassed. When the driver leaves the seat, the ice resurfacer is stopped after a delay of 8 seconds, so that the OLYMPIA cannot be operated without the driver in the seat. - Page 19 Switch-On: To switch the ice resurfacer back on again, pull out the knob until it locks into place. The normal switch-on procedure must then be executed from the beginning. ( section 7.1.1 ) Fig. 1.1: Emergency Shut off switch on the OLYMPIA The Emergency Shut off switch turns off the whole ice resurfacer, except for the battery discharge indicator.
- Page 20 Do not attempt to operate the ice resurfacer until the reason for the shut down has been discovered and corrected. If the EMERGENCY STOP circuit is activated, all power to the OLYMPIA is switched off. The brake accumulator remains under pressure, but can be depressurised by simply pressing the brake pedal several times.
-
Page 21: Horn Button
Horn Button The horn button is located on the upper dash panel. The horn sounds as soon as you press this button. Fig. 1.2: Horn button on the OLYMPIA Warning Signals • Warning lamp indicating that there is not enough water in the water tank •... -
Page 22: Maintenance And Repair Regulations
1.10 Maintenance and Repair Regulations In terms of this manual, maintenance work means all … • maintenance jobs that have to be done periodically on the OLYMPIA. • lubrication. • cleaning. • setup and retooling, changing of components / sub-assemblies. -
Page 23: Waste Disposal
After completing the maintenance jobs and before switching on the ice resurfacer, make sure that: • There is nobody in the danger zone. • There are no more tools or other parts in the vehicle. • All safety devices/guards have been duly re-installed and are in proper working order. •... -
Page 24: Remaining Hazards
NEVER leave the OLYMPIA unattended when filling it with water, because hot water could leak out and injure someone. The Ultimate Ice Resurfacer... - Page 25 Risk of Injury! Make sure that there are no people or objects in the work and driving area. Danger! Do not spray the machine with a water hose to clean it, because this can lead to electrical faults. Risk of Explosion! Ensure proper ventilation during the charging process.
- Page 26 Risk of Injury! Before switching on the OLYMPIA , it is necessary to make a complete circle check of the ice resurfacer. Always use extreme caution when driving the OLYMPIA from the service area onto the ice surface (and vice-versa), as there could be people on the connecting routes.
- Page 27 When driving in areas with a restricted view or in narrow spaces, drive with a reduced speed. When driving off-ice, the vehicle lighting must be switched on. The OLYMPIA must not be driven on public roads, as it is not licensed for use on public roads and highways. Risk of Getting Crushed!
-
Page 28: Technical Data
2 TECHNICAL DATA Dimensions With snow bin closed: Width with 84 inch Conditioner ............88” / 224cm Width with 96 inch Conditioner ............100” / 254cm Length ..................162” / 411cm Height ..................77” / 195cm With snow bin open: Length ..................228” / 579cm Height ..................142”... -
Page 29: Noise Emission
Gross weight (incl. 770 Ah batteries and full water tanks) ..... 12,853 lbs / 5,830 kg Front axle ................. 4,828 lbs / 2,190 kg Rear axle ................8,025 lbs / 3,640 kg 2.3 Noise Emission Note: Ambient noise level 56 dB (A) Readings taken on ice with dasher gates closed Standing noise (hydraulic pump running only) ........... -
Page 30: Brake Systems
2.6 Brake Systems Operating principle: ..........Full disk brake at each wheel Brake pads: ................asbestos-free Application: Main brake: ..................Hydraulic Parking brake: ................Mechanical 2.7 Hydraulic System Hydraulic fluid: ................ATF 55 F-30589 Oil change interval: ............Approx. every 3 years Oil filter: ..............Exchangeable filter, 20 Micron Oil cooling: ............ -
Page 31: Tires
Wash water: ................Impeller pump 51.3 Imp gal/min (234 L/min) at 1,750 rpm 2.9 Tires Tire size: Tubeless: ..............HANKOOK DYNAPRO M/T LT225/75R16 10 ply Tungsten tip studs Aluminium alloy wheels Tire pressure: ..............Front: 85 psi / 5.8 bar Back: 85 psi / 5.8 bar 2.10 Conditioner 2.10.1 Blades... -
Page 32: Materials Used
2.11 Materials Used Stainless Steel: ................AISI 304L-316 Aluminium: ..................5052H32 Steel: ................Hot-dip galvanized Electro zinc plating Hard-chrome plating painted Plastics: ..............Glass fibre-reinforced plastic Polyamide Polyurethane The Ultimate Ice Resurfacer... -
Page 33: On-Site Conditions
3 ON-SITE CONDITIONS 3.1 Ground Conditions Level, solid floor covering, preferably with spike-friendly overlay. Maximum permitted incline: 15 % 3.2 Room Ventilation In accordance with OSHA (North America), VDE (Europe) and local codes, the battery rooms should be designed such that natural ventilation is adequate (see OSHA 1926.441 or VDE 510). 3.3 Water Connections •... -
Page 34: Charger
3.5 Charger Mains connection: North America: 208, 480, 550, 600 volt, 3 phase fused disconnect. Europe: Wall socket : 400 V/3~+N+PE 32 A 5-pol. CEE-Norm. Charger cable: 15’ (4.5m) long, battery connection plug is located under snow dump tank, directly in front of drivers platform. -
Page 35: Design And Function
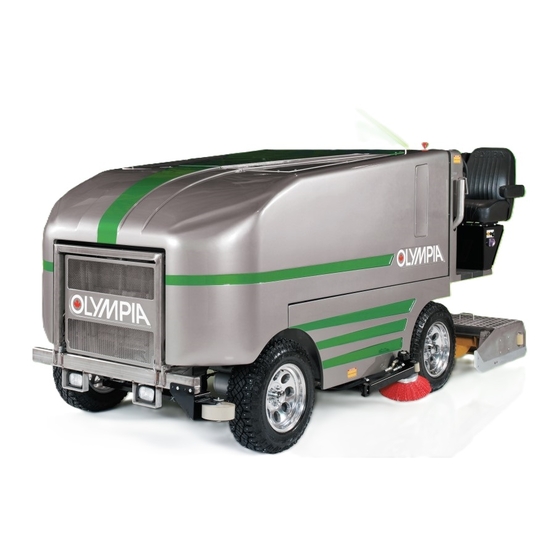
4 DESIGN AND FUNCTION 4.1 Ice Resurfacer Design and Chassis Fig. 4.1: Front view with open hood Item 1 EMERGENCY SHUT OFF switch Item 2 Steering wheel Item 3 Driver’s seat Item 4 Ice making water fill station Item 5 Conditioner Item 6 Step for climbing up to the driver’s seat... - Page 36 Fig. 4.2: Rear view of the OLYMPIA ICEBEAR Item 1 Handle for climbing up to the driver’s seat Item 2 EMERGENCY SHUT OFF switch Item 3 Steering wheel Item 4 Top control panel Item 5 Manual Ice Making Water tap handle...
- Page 37 The OLYMPIA is available in either mainly structural stainless steel, or structural black steel chassis design. This applies to the chassis, the conditioner, the snow dump tank, the frame of the snow tank cover, the steel structure of the driver’s platform and all metal parts that, for technical reasons, should not be manufactured from any other material.
-
Page 38: Snow Conveyor (Auger)
OLYMPIA’S snow dump tank. To switch on the horizontal and vertical augers, press the switch ELEVATOR ON on the dashboard. -
Page 39: Controls
5 CONTROLS Fig. 5.1: EMERGENCY Shut Off Switch The ice resurfacer is equipped with an EMERGENCY SHUT OFF SWITCH that is installed above the steering wheel, at the left. To get power from the batteries to the ice resurfacer, pull the red knob up. To disconnect the batteries from the ice resurfacer, depress the red knob. -
Page 40: Top Control Panel
5.2 Top Control Panel Fig. 5.2: Top control panel Item 1 Horn Button Press this button to sound the horn. Item 2 Lights This button turns the headlights and tail lights on and off. Push and release to turn on, repeat to turn off. The Ultimate Ice Resurfacer... - Page 41 Item 3 Ice Making Water Indicator When the tank is full the green light will come on. If equipped, simultaneously the auto water fill valve will shut off the flow of water filling the tank. The yellow light will stay on until ½ of the tank capacity is used.
- Page 42 Item 6 Dashboard Display Item 1 Display field for display of the speed. Item 2 Operating hours counter: can be activated using the display buttons. Item 3 Soft keys to set functions such as service intervals, operating hours counter and the customer information field.
-
Page 43: Bottom Control Panel
5.3 Bottom Control Panel Fig. 5.3: Bottom control panel The Ultimate Ice Resurfacer... - Page 44 The bottom control panel has been configured that the top row of switches is on ice and in a specific order to maintain the proper sequence of engagement. From Left to right. Item 7 Conditioner Up/Down Raises and lowers the conditioner To raise the conditioner, push and hold the switch UP until the conditioner is in the full up position.
- Page 45 Item 9 Board Brush Raises and lowers the board brush. To lower the board brush push the switch down. When the brush is lowered, it will automatically start to rotate. To raise the board brush lift and hold the switch in the up position until the board brush is fully raised.
- Page 46 Item 12 Snow Bin Up/Down Opens and closes the snow dump tank. To open the snow dump, lift and hold the switch up until the snow dump tank is fully open. Before opening the snow dump tank make sure there is sufficient clearance as the snow dump tank will move forward and up.
- Page 47 Item 14 Snowbreaker Override Is a backup system which allows for the manual operation of the snowbreaker. Pushing the switch down will move the snow breaker down. Lifting the switch up will raise the snow breaker. Item 15 Power On Light When you turn the ignition key to the ON position the power on light will illuminate, indicating the ice resurfacer is turned on.
- Page 48 Item 17 Gear Shift Lever Unless moving the ice resurfacer, always make sure the gear shift selector is in the neutral position. To move the ice resurfacer forward move the gear shift selector to the forward position. To reverse the ice resurfacer, move the gear shift selector to the reverse position.
-
Page 49: Ice Making Water Control Panel
5.4 Ice Making Water Control Panel Optional Fig. 5.4: Ice Making Water control panel Item 19 Indicator lamp for water tank level HALF FULL Item 20 Selector switch Item 21 Indicator lamp for water tank level FULL This panel controls how much hot water can be put into the ice resurfacer. The ice resurfacer is supplied with an electric water valve, to be mounted onto the water supply line in the building. - Page 50 The filling process can be interrupted or stopped at any time by turning the selector switch to the centre position. The control panel function can be used even when the ignition key is turned off, provided the battery connector is plugged in. Connection of the Ice Making Water Line First connect the water line to the water fill pipe on the side of the dash and then connect the solenoid valve to the supply socket on the panel.
-
Page 51: Wash Water Control Panel
When the solenoid valve is open, a pressure difference of at least 0.5 bar (7 psi) must prevail at the valve to ensure safe and speedy switching of the pilot-controlled solenoid. A smaller valve on a low-pressure supply pipe with a larger water hose therefore works better than a large valve in a small pipe at low pressure! 5.5 Wash Water Control Panel Fig. - Page 52 The water hose behind the solenoid valve should not be too big in relation to the water pressure and pipe size, because a pressure difference of 0,5 bar (7 psi) is needed to close the solenoid valve. The solenoid valve of the cold water supply line is connected at the Wash Water panel. To switch the wash water supply ON or OFF, turn the switch (Fig.
-
Page 53: Foot Pedals And Parking Brake
The right foot pedal is the accelerator pedal and is used to control the driving speed of the machine. Initially press the foot pedal just a little to switch on the hydraulic motor for the power steering. The more you press down on the pedal, the faster the OLYMPIA travels. The Ultimate Ice Resurfacer... - Page 54 The left foot pedal is the main brake pedal. The foot brake acts simultaneously on all four drive wheels. ABS is not installed. The OLYMPIA braking system has a pressure accumulator, so that the brakes can be applied at least another two times after the hydraulic system has been switched off.
-
Page 55: Controls For The Water
5.7 Controls for the Water There must always be enough wash water available to be vacuumed up. The pump must not be allowed to run dry, because the impeller and shaft seal assembly is water-lubricated. The wash water is sprayed directly out of the water tank onto the ice by a spray pipe on the back inside wall of the conditioner. -
Page 56: Controls For The Hydraulic System
Manual Ice Making Water Flow The manual water function allows water to be applied to the ice at a constant rate, regardless of the speed at which the ice resurfacer is travelling. It can also be used to supplement the speed related water. -
Page 57: Charge The Batteries
6 START UP OF THE OLYMPIA MILLENNIUM - E 6.1 Charge the Batteries Before you can start work with the OLYMPIA, you must charge the battery. A battery charger is supplied with the ice resurfacer for this purpose. This charger is designed to fully recharge a battery that has been drained as close to 0% on the accumeter as possible. - Page 58 If the charging operation has to be interrupted for any reason, turn off the charger before disconnecting the charger plug. Reconnect the OLYMPIA’s internal power supply cables. Pull the EMERGENCY SHUT OFF switch. The batteries must not come into contact with water, as this could cause them to short out.
- Page 59 Watering The Batteries: A battery watering cart is supplied with each ice resurfacer. Connect the hose coupling to the respective battery trays. Turn on the pump in the cart. The batteries are automatically filled with distilled water until the float valve at the individual battery cells stop the filling process.
-
Page 60: Installation Of The Squeegee
6.2 Installation of the Squeegee Mount the squeegee on the inside of the conditioner with the bolts and nuts provided. . If not already trimmed, carefully trim the ends of the squeegee so that it fits tightly against the runners of the conditioner, as in the picture: Squeegee Trimming Snow that is pushed by the squeegee must stay within the area between the squeegee... -
Page 61: Blade Installation
6.3 Blade Installation Insert safety blocks under the conditioner before attempting to work under it. Place the blade on small wood blocks(4) at the rear of the conditioner, remove it from the wood sheath and install the magnetic protector supplied with the tool kit. Using the blade hook, lift and slide the blade underneath the conditioner and lift against the bladeholder until the attachment holes line up. - Page 62 Install the blade bolts and finger tighten remembering to utilize the row of holes closest to the cutting edge. The second row of holes should be used when the blade has been ground down to 4 inch (approx. 10.16 cm) overall width. The Order is Important Following the diagrams below, begin to install the blade bolts.
- Page 63 There are two ways of properly tightening the blade bolts: Blade Bolt Sequence “A” Sequence A – starting at one end of the blade, tighten the bolts consecutively across the blade to the opposite end. Remove the blade hooks and insert the remaining two blade bolts and tighten. Blade Bolt Sequence “B”...
- Page 64 Wrong Sequence Please note: Tightening the bolts in any other order, such as from the end to the middle or at random will result in a warped blade and uneven ice. The blade holder is feathered by 1/16“ (approx 1,6 mm) over the last 6” to 7" (15.2 to 17.78 cm) at each end.
-
Page 65: Blade Level Adjustment
6.3.1 Blade Level Adjustment The next step is to adjust the angle of the blade. The blade adjustment crank, located on the tower to the right of the operator, raises and lowers the blade. The adjustment crank is turned until the indicator arm completely fills the sight hole at the side of the conditioner as shown below. - Page 66 Then turn the nuts to raise or lower the blade into the proper position, which is exactly level with the bottom of the runner. Once the blade is at the proper level tighten the nuts on the blade level adjuster nuts. When the ends of the blade are flush with the runners, the majority of the blade will extend 1/16”...
- Page 67 The sharp tip of the blade should be flush with the runners on both sides. If the blade is flush the coin will slide smoothly over the blade edge. Blade/ Coin check Fig. 6.4: Place a coin underneath Item 1 Blade Item 2 Coin...
-
Page 68: Horizontal And Vertical Augers
Test drive the OLYMPIA doing a dry cut. If the blade is properly set up you will see a feathered edge on the ice surface on both sides of the conditioner. If the feathered edge on both sides of the conditioner is not an equal distance from the runners on both sides of the conditioner, stop, dismount, and adjust the driver’s side , up or down, until the feathered edge is equal distance... - Page 69 Auger Height Adjustment The horizontal auger is adjusted by loosening the four outer bolts on the bearing adjustment plate on each end of the auger and the four bolts for the auger motor mount. This can be checked by running a piece of string between the runners and observing the distance between the string and the auger.
-
Page 70: Auger Drive Chain Adjustment
6.4.2 Auger Drive Chain Adjustment The horizontal auger drive chain should be kept at a reasonable tension at all times. If too loose, the sprockets and chain will wear out prematurely. If too tight, the sprockets, chain and auger bearings will also wear out prematurely. To adjust the chain tension, loosen the motor mount plate bolts and adjust the motor mount until you get the proper tension. -
Page 71: Down Pressure Check
For proper traction and control the rear tires of the OLYMPIA should be in full contact with the ice surface, the entire width and 5” (12.7cm) of the circumference of the tire should be flat on the ice. -
Page 72: Down Pressure Adjustment
6.4.4 Down Pressure Adjustment To adjust the down pressure, stop the OLYMPIA, place it in park and lower the conditioner until it is almost touching the ice surface. Properly dismount and turn the down pressure stop bolts in (clockwise) 5 full turns. -
Page 73: Top Link Adjustment
To test the top linkage, first loosen the lock nuts on both top links. Now loosen both top links by turning them counter clockwise until there is no tension. Remount the OLYMPIA and drive forward six feet (2 meters), stop, turn off the OLYMPIA and dismount. - Page 74 Proper Top Link Adjustment Top Link too short Top Link too long The Ultimate Ice Resurfacer...
-
Page 75: Spreader Cloth Installation
Attach towel lift chains between the towel bar and towel lift arm. 6.6 Water Filling Procedure Always fill the ice making water tank with hot water, always fill the wash water tank with cold water. Never leave the OLYMPIA unattended during the water filling procedure. The Ultimate Ice Resurfacer... -
Page 76: Ice Making Water Filling Procedure
To fill the ice making water tank, insert the hot water hose into the filling inlet (Item 1) on the left hand side of the OLYMPIA. Plug the solenoid valve plug into the socket on the Ice making water fill station (Item 2). -
Page 77: Wash Water Filling Procedure
Plug the solenoid valve plug into the socket on the Wash water fill station (Item 2) on the exterior right hand side of the OLYMPIA’s control cabinet. Turn the switch to the ON position, the water then begins to flow. -
Page 78: Safety Circle Check
6.7 Safety Circle Check Do a smell check Turn on the lights Be sure battery charge is complete. Check to make sure battery charger is turned off. Remove the ignition key. Depress Emergency Shut Off switch. Disconnect the battery cables and store. Reconnect the internal power supply cables. - Page 79 Check the bottom of the runners again for burrs or nicks. If your OLYMPIA is equipped with the optional edger on the conditioner, check the cutting tips for damage and make sure the plate is securely attached.
- Page 80 Test the elevator system. First, make sure the toggle switch is in the FORWARD position, then push the ON OFF switch for the elevator. While it is still running turn the toggle switch to the REVERSE position. The augers should come to a stop and then reverse direction.
-
Page 81: Driving
7.1 Driving 7.1.1 Starting To start the OLYMPIA you must be seated in the driver`s seat. The red EMERGENCY SHUT OFF switch must be in the UP position. Turn the ignition key to the right and you will hear the switches turn on inside the electrical panel. -
Page 82: Brakes
7.1.3 Brakes To stop the OLYMPIA, take your foot off the accelerator pedal and carefully press the brake pedal. Always apply the hand brake (parking brake), set the gear lever to neutral and turn the ignition switch to the off position before dismounting the OLYMPIA. -
Page 83: Driving With The Board Brush
Operation and start-up must only take place from the driver’s seat! Before driving onto the ice surface make sure pedestrian doors in the dasher boards are closed. Before leaving the driver’s seat, always turn off all functions! 7.2.1 Driving with the Board Brush Normally the brush is used for the first lap around the boards at the beginning of each ice cleaning process. -
Page 84: Water Application
7.2.2 Water Application Ice Making Water Procedure Fill the tank with hot water through the fill pipe located on the driver`s side. Note: A ½ full tank is more than sufficient for a single resurfacing. Water flow can be turned on and off two ways. A: Gravity flow regulates the flow of water by opening or closing the water tap mounted just in front of the blade adjustment hand wheel on the conditioner. - Page 85 Always use cold water in the wash water system. To turn on the wash water system during the resurfacing operation, depress the Wash Water switch. The water begins to flow. After 10 seconds, the wash water pump begins to vacuum up the water.
-
Page 86: Resurfacing Procedure
7.3 Resurfacing Procedure Once you have taken on sufficient water, before driving onto the ice surface, turn on the tire wash to rinse the tires of any debris. Now carefully drive onto the ice surface and carry out the normal ice making procedure as follows: •... - Page 87 ¾ of a lap prior to completion of the resurfacing, turn off the wash water. Just prior to finishing the resurfacing, turn off the ice making water. Bring the OLYMPIA to a complete stop while the rear wheels are still on the ice surface.
-
Page 88: Cleaning The Ice Resurfacer After An Ice Resurfacing Operation
• Red/white cordons at the left and right of the unloading area, with pictograms. • Yellow/black threshold on the floor that is high enough to prevent the OLYMPIA from falling into the dump. • Guard at the front of the snow dump to prevent people from falling in. -
Page 89: Cleaning And Maintenance
6.1. Put up a warning notice there that says: DO NOT PLUG IN BATTERY CONNECTOR! WORK IN PROGRESS IN THE DANGER ZONE! Before starting the work, the OLYMPIA must also be secured with wheel chocks to prevent it from rolling away. The red/white plastic chains must be clearly visible at the sides of the machine. - Page 90 Only after the OLYMPIA has been secured in the described manner may any isolating guards be removed (if necessary). Only duly authorized personnel are permitted to be in the vicinity of the machine when maintenance and repair work is being performed.
-
Page 91: Maintenance Checks
8.2 Maintenance Checks Failure to carry out the basic maintenance checks can lead to damage and downtime as well as possible personal injury. 8.2.1 Daily • Carry out circle check as described in section 5.8. • Recharge the battery (if necessary). •... -
Page 92: After 5 Hours
• Clean the entire ice resurfacer thoroughly with a damp cloth. • Water the batteries using only distilled or RO. treated water. Never spray an open jet of water into the ice resurfacer, as electrical components will be damaged. 8.2.3 After 5 Hours •... -
Page 93: Monthly
8.2.5 Monthly • Have the battery voltage measured and battery acid density checked by a battery specialist. Add distilled water, if necessary. • Check whether the battery box is dry. • Inspect the hydraulic system for any sign of leaks. •... -
Page 94: Annually Or Before Storage
Oil the blade holder on the conditioner. • Clean the ice resurfacer: Wash the OLYMPIA with luke- warm water and a mild soap. Make sure that you rinse off the soap with cold water before it dries and causes streaking on the surface of the OLYMPIA. - Page 95 8.2.7 Lubrication to be Done Weekly and Before Long Term Storage The lube points are shown on the separate lubrication chart in the appendix The Ultimate Ice Resurfacer...
- Page 96 The Ultimate Ice Resurfacer...
-
Page 97: Every 3 Years
8.2.8 Every 3 Years • Change the wheel drive gear box oil (Dexron III) • Change the hydraulic oil and filter To put the OLYMPIA back into operation at the beginning of the season, perform the weekly maintenance procedure The Ultimate Ice Resurfacer... -
Page 98: Self- Help And Troubleshooting
9 SELF- HELP AND TROUBLESHOOTING 9.1 Squeegee Replacement If the squeegee needs to be replaced, it should be mounted on the inside of the conditioner with hex head bolts (3/8” x 1-1/4”) and locknuts. Install the squeegee such that the ends fit tightly against the sides of the conditioner. -
Page 99: Appendix
10 APPENDIX Hydraulic Drawings Documentation provided by the company DMC (Controllers) Documentation provided by the company Victron Documentation provided by the company Siemens Documentation provided by the company Safe T Alert Documentation provided by the company DMC (Converter) Electric Drawings Grease Plan Battery Information The Ultimate Ice Resurfacer... - Page 100 The Ultimate Ice Resurfacer...
- Page 101 The Ultimate Ice Resurfacer...
- Page 102 5281 2/2-way Solenoid Valve with servo-diaphragm • Universal version up to 232 PSI • NBR, EPDM or FKM servo-diaphragms • Waterhammer-free, low noise • NC circuit function • Brass and stainless steel body • Threaded port or flange connections • Approvals: Type 5281 can be combined with...
- Page 103 5281 Dimensions [mm] Threaded port version Type 2509 dimensions [mm] 0.71 2.32 Torque 0.74 ft-lb 1.10 without circuitry Threaded port NPT 1/2 100.0 120.0 NPT 3/4 107.5 127.5 NPT 1 116.0 136.0 NPT 1 1/4 126.5 146.5 NPT 1 1/2 135.5 155.5 NPT 2...
- Page 104 5281 Materials 1 Coil: Polyamide Epoxy 2 Plunger: 1.4105 3 Plunger-seal: NBR, EPDM, FKM 4 O-rings: NBR, EPDM, FKM 5 Cover: Brass 6 Spring: 1.4310 7 Diaphragm: NBR, EPDM, FKM 8 Valve body: Brass with NBR-sealing with EPDM-, FPM-sealing Further versions on request Approvals UL/UR/CSA, ATEX-Ex, UL-fire protection, European gas approval Voltage...
- Page 111 0290 2/2-way Solenoid Valve for gases and fl uids • Universal valve with coupled diaphragm system • Switches without differential pressure • For gases and liquids • Brass and stainless steel bodies • Seal material NBR, EPDM and FKM • Approvals: Type 0290 can be combined with...
- Page 112 0290 Solenoid valves Ordering chart for valves (other versions on request) – all valves with cable plugs, brass bodies and various diaphragm materials A 2/2–way valve NC 2/2–way valve NC 2/2–way valve NC 2/2–way valve NC 2/2–way valve NC 2/2–way valve NC 2/2–way valve NC 2/2–way valve NC NPT 1/2...
- Page 113 0290 Dimensions [mm] Dimensions [mm] according to DIN 2501 NPT 1/2 95.5 73.0 74.5 NPT 3/4 122.0 86.5 100.0 NPT 1 131.0 91.5 115.0 NPT 1 1/4 145.0 99.0 126.0 NPT 1 1/2 154.0 99.0 126.0 NPT 2 211.0 126.0 164.0 Threaded port...
- Page 114 0290 In case of special application conditions, We reserve the right to make technical 0602/2_USen please consult for advice. changes without notice. Page 4/4...
- Page 115 Model: ES3 EnForcer™ SCR Battery Charger Service Manual I.B. 1561 Rev B...
- Page 116 EnForcer™ SCR Service Manual I.B. 1561 TABLE OF CONTENTS AC Line Voltage Letter Codes ......3 DATA LOGGING ……………………………………….23 Specialty Charger Options List ......3 Important Safety Instructions....... 4 SCR TRANSFORMER TYPE BATTERY CHARGERS Installation ............5 Watchdog Circuits (If installed) ........24 Location............
-
Page 117: Ac Line Voltage Letter Codes
EnForcer™ SCR Service Manual I.B. 1561 AC LINE VOLTAGE LETTER CODES The following table describes the code letters to be used in new charger part numbers to indicate the AC line voltage(s) and AC line frequency at which the charger can be operated. Code Voltages(s) (volts Line Frequency... -
Page 118: Important Safety Instructions
EnForcer™ SCR Service Manual I.B. 1561 IMPORTANT SAFETY INSTRUCTIONS 1) This manual contains important safety and operating instructions. Before using the battery charger, read all instructions, cautions, and warnings on the battery charger, the battery, and the product using the battery. 2) These chargers were designed to charge industrial batteries, flooded and sealed cell. -
Page 119: Installation
EnForcer™ SCR Service Manual I.B. 1561 INSTALLATION WARNING: The shipping pallet must be removed for proper and safe operation. LOCATION For maximum trouble-free service, choose a location that is free of excess moisture, dust, and corrosive fumes. Also, avoid locations where temperatures are high or where liquids will drip on the charger. Allow six (6) inches of clearance at rear and sides of the charger for air circulation. -
Page 120: Connecting Input Power
EnForcer™ SCR Service Manual I.B. 1561 CONNECTING INPUT POWER WARNING: Make sure the disconnect is in the OFF position and the battery is disconnected before connecting the input power to the terminals of the charger. Connect the input power to the appropriate terminals, including ground. Follow your local electrical or National Electric Code in making these connections. -
Page 121: Theory Of Operation
EnForcer™ SCR Service Manual I.B. 1561 THEORY OF OPERATION INTRODUCTION EnerSys™ EnForcer™ SCR Battery Chargers are three phase 50 or 60 Hz, and SCR/Diode Block-controlled. EnForcer™ SCR chargers use the control board known as “ES3”. See Replacement Parts Lists for complete part numbers. SCR/Diode Blocks are used to control the output and yield tight regulation over the whole operating curve. -
Page 122: Control Circuitry
EnForcer™ SCR Service Manual I.B. 1561 memory. If AC power is lost during a charge cycle, the charge cycle will resume after a random delay when AC power is restored. This allows the charger to return to where it left off when power is restored. NOTE: There are no trimming potentiometers located in this charger. -
Page 123: Enforcer™ Scr Features Front Panel
EnForcer™ SCR Service Manual I.B. 1561 EnForcer™ SCR Features Front Panel POWER Light on when control board powered CALL SERVICE Light on when serious fault occurs during charge cycle, usually requiring field assistance. TIME LIMIT EXCEEDED Light on when charger time fault occurs BATTERY DISCONNECTED Light on when battery disconnected during charge cycle before normal termination START/STOP... -
Page 124: Charger Features
EnForcer™ SCR Service Manual I.B. 1561 CHARGER FEATURES GENERAL The standard ES3 charger has a wide range of charging features for both flooded and sealed cell batteries. The ES3 is capable of charging various cell sizes and ampere-hour ratings as listed on the charger nameplate. Some of the basic features are described below. -
Page 125: Auto Start/Delayed Start
EnForcer™ SCR Service Manual I.B. 1561 AUTO START/DELAYED START Auto Start enables the charger to start the charge cycle automatically after the battery is connected to the charger. A programmable delay can be programmed so that Auto Start will begin after a set time period. This delay can be set through the front panel display. -
Page 126: Ac Disconnect (Optional)
EnForcer™ SCR Service Manual I.B. 1561 equally divided between both batteries provided that batteries % of discharge and ages are equal. Make sure both batteries are connected before charge cycle starts. The charger must be set for parallel cable and have Auto Cell sizing disabled in the service settings. Contact your sales/service representative. - Page 127 EnForcer™ SCR Service Manual I.B. 1561 Starting Charger Charging will begin. The START/STOP LED will light steadily. The ES3 will now enter the Auto Cell Sizing Test Charge indicated by the displayed text message on the LCD and the ‘bouncing ball’ on the bar graph. After two minutes in the test phase, the charger will shut off and enter the Auto Cell Selection phase.
-
Page 128: User Parameter Configuration
EnForcer™ SCR Service Manual I.B. 1561 If Cool Down is selected, at the end of charge the display will read: Cool Down In: 00:59 For the duration of the cool down period. After the cool down period has expired, the display will read “Done/Battery Available”. - Page 129 EnForcer™ SCR Service Manual I.B. 1561 Contrast Adjust Contrast 10-1100 Select the LCD contrast between characters and background. Adjust Do not adjust unless order acknowledgement specifies a change. Display mode The following selection determines the parameters that are displayed during the charge cycle. 3 = displays current, A-H retuned, charge time and battery voltage Display Mode 2 = displays current and voltage only...
- Page 130 EnForcer™ SCR Service Manual I.B. 1561 Time to Gassing Limit T i m e t o If the battery does not reach the gassing voltage within this time (in hours G a s s i n g :01 – 12:00 6:00 and minutes), the charger will shut off.
- Page 131 EnForcer™ SCR Service Manual I.B. 1561 chosen above. Do not adjust unless order acknowledgement specifies a change. Delta Voltage- dv/dt D e l t a The change in battery voltage over time limit that the charger monitors, in V o l t a g e - order to determine charge completion.
- Page 132 EnForcer™ SCR Service Manual I.B. 1561 Auto Cell Enable A u t o C e l l 0(NO) Enable/Disable automatic cell sizing routine. S i z i n g 1(YES) Do not adjust unless order acknowledgement specifies a change. Enable Battery Select E n a b l e Enable/Disable automatic battery select routine.
-
Page 133: Charger Faults
EnForcer™ SCR Service Manual I.B. 1561 CHARGER FAULTS The charger control circuitry constantly monitors for several fault conditions. If a fault should occur, the charge in progress is interrupted, and a fault message is displayed on the LCD. A list of the faults and their descriptions follow. Displayed Fault Description Fault LED... -
Page 134: Field Calibration
EnForcer™ SCR Service Manual I.B. 1561 DEFAULT SETTINGS To set the control board to the default control board settings, perform the following actions. Note that default values will not necessarily match the charger nameplate values. Entering Service Parameters and resetting selected parameters may be necessary. -
Page 135: Termination Methods
EnForcer™ SCR Service Manual I.B. 1561 You can check the battery voltage during start rate on a discharged battery. The battery voltage should gradually increase to 2.37 volts/cell (v/c) with the charging current at 16% of the charger nameplate rating. Example: If you are using a 550 AH charger, the charging current during start current mode will be 16% of 550, which is 88 amperes. -
Page 136: Charge Profiles
EnForcer™ SCR Service Manual I.B. 1561 Charge Profiles There are six choices for charge profiles. These profiles have default time and level settings that are detailed below. The profile’s settings can also be modified various ways in Service Parameters for custom applications to satisfy a customer’s needs. IEI (Flooded) IEI is the standard flooded profile. -
Page 137: Data Logging
EnForcer™ SCR Service Manual I.B. 1561 Data Logging While in Idle Mode or Done mode, hold down the DOWN and UP buttons (approximately 10 seconds) until the display reads Data Logging Selections. Release the buttons and the display will read “Number of Records:”. Toggle the EQUALIZE button and the display will read Display a Record? The last record number will be shown at the bottom right of the display. -
Page 138: Watchdog Circuits (If Installed)
EnForcer™ SCR Service Manual I.B. 1561 CAUTION: To prevent arcing and burning at the connector or a possible battery explosion, press the START/STOP pushbutton first to stop the charge cycle before removing a battery that is currently on charge. WATCHDOG CIRCUITS There are two watchdog circuits on the Enforcer SCR control board –... -
Page 139: Fault Recovery
EnForcer™ SCR Service Manual I.B. 1561 SUBSEQUENT FAULT INDICATION If the main processor locks-up again before the next control board power-down, LED2 will flash as shown below. LED2 state Main Processor ON steady No lock-ups or failures since last power-up. Flash every 4 seconds 1 lock-up since last power-up. -
Page 140: Scr/Diode Block
EnForcer™ SCR Service Manual I.B. 1561 SCR/DIODE BLOCK WARNING: Faulty SCR/Diode Blocks may cause voltage to be present at the DC cables. Physical Test If you do not have a clamp-on meter to check for current in the 3 SCR/Diode Blocks, you can perform the following to locate a fault in the secondary phase: 1) Start the charger, and run it for 5 minutes with a battery connected. -
Page 141: Diode Test
EnForcer™ SCR Service Manual I.B. 1561 3) Connect the negative potential of your tester to the positive buss bar. 4) Connect the positive potential of your tester to the input connection of the SCR/Diode Block under test. Then by using a jumper wire touch the SCR/Diode Block gate pin (white lead connects there) to the SCR/Diode Block input connection. -
Page 142: Snubber Assembly
EnForcer™ SCR Service Manual I.B. 1561 SNUBBER ASSEMBLY Please follow these steps before testing the snubber assembly: Disconnect the battery Disconnect the AC power. The snubber assembly consists of a series resistor and a capacitor. Before taking measurements on the Snubber assembly 1) Verify that the mounting wire is sound-properly screwed on and not broken. -
Page 143: Scr/Diode Block
EnForcer™ SCR Service Manual I.B. 1561 WARNING: Be sure to install phase A, phase B, and phase C wires to their proper terminals in the front of the charger (A is on the left, C is on the right). When installing primary leads into the terminal blocks, take special precaution in preparing the double-wire leads (wires #2 and #5) for insertion into the terminal blocks. -
Page 144: Printed Circuit Board
EnForcer™ SCR Service Manual I.B. 1561 Since you have removed the SCR / Diode Block gate leads from the harness, take special care in reconnecting the SCR / Diode Blocks firing lead connections making sure that: 1) Phase A is connected to phase A. 2) Phase B to phase B. - Page 145 EnForcer™ SCR Service Manual I.B. 1561 WIRE CONNECTION CHARTS (3 PHASE SCR CHARGERS) MODEL B * 208 VOLT INPUT 240 VOLT INPUT 480 VOLT INPUT WIRE MARKER CONNECTION CONNECTION CONNECTION F1 TO A1 F1 TO A1 F1 TO A1 F1 TO C5 F1 TO C6 F1 TO C6 F2 TO A5...
- Page 146 EnForcer™ SCR Service Manual I.B. 1561 WIRE CONNECTION CHARTS (3 PHASE SCR CHARGERS con’t) MODEL D 220 VOLT INPUT 380 VOLT INPUT 440 VOLT INPUT WIRE MARKER CONNECTION CONNECTION CONNECTION F1 TO A1 F1 TO A1 F1 TO A1 F1 TO C6 F1 TO C5 F1 TO C6 F2 TO A6...
-
Page 147: Maintenance
EnForcer™ SCR Service Manual I.B. 1561 MAINTENANCE The charger requires a minimum of maintenance. Connections and terminals should be kept clean and tight. The unit should be periodically cleaned with an air hose to prevent any excessive dirt build up on components. Care should be taken not to bump or move any adjustments during cleaning. -
Page 148: Schematics
EnForcer™ SCR Service Manual I.B. 1561 REPLACEMENT PARTS SCHEMATICS... - Page 149 EnForcer™ SCR Service Manual I.B. 1561 REPLACEMENT PARTS CAUTION: THERE ARE DANGEROUS VOLTAGES WITHIN THE BATTERY CHARGER CABINET. ONLY QUALIFIED PERSONNEL SHOULD ATTEMPT TO ADJUST OR SERVICE THIS BATTERY CHARGER. PRINTED CIRCUIT BOARDS (CONTROL) X1060-09-ES3-1 STANDARD MODELS X1060-09-ES3-2 41-80 CELL DESCRIPTION PART NUMBER DOOR...
- Page 150 EnForcer™ SCR Service Manual I.B. 1561 SHUNT REPLACEMENT AMPERE HOURS VALUE PART NUMBER 0-680 150A X117-99-2 681-1200 X117-99-1 1201 & UP 2 X 300 X117-99-1 DC FUSE REPLACEMENT AMPERE HOURS VALUE PART NUMBER X014-11-2 450-680 X014-11-3 750-850 X014-11-9 950-1050 X014-11-16 1200 X014-11-17 1500...
- Page 151 EnForcer™ SCR Service Manual I.B. 1561 MODEL NUMBERS WITH THE LETTER CODES T, W, X, & Y SHALL BE REFERRED TO THE TABLES WITH THE LETTER CODE “B”. MODEL NUMBER TRANSFORMER PART NUMBER SCR MODULE PART NUMBER ES3-X (B MODELS) 24-200B X127-S24-200B R507-18-2...
- Page 152 EnForcer™ SCR Service Manual I.B. 1561 MODEL NUMBER TRANSFORMER PART NUMBER SCR MODULE PART NUMBER ES3-X (J MODELS) 12-550J X127-S12-550J R507-18-2 12-680J X127-S12-680J R507-18-2 12-750J X127-S12-680J R507-18-2 12-850J X127-S12-680J R507-18-2 12-950J X127-S12-1050J R507-18-3 12-1050J X127-S12-1050J R507-18-3 12-1200J X127-S12-1200J R507-18-3 18-550J X127-S18-550J R507-18-2 18-680J...
- Page 153 EnForcer™ SCR Service Manual I.B. 1561 REPLACEMENT AC FUSES NOTE: Special charger models might not be listed in these tables. AC input is listed on the charger’s nameplate. AC fuse values are listed on a decal inside the charger. The AC fuse part number would be: X014-99-X, where X = AC fuse value.
- Page 154 EnForcer™ SCR Service Manual I.B. 1561 REPLACEMENT AC FUSES (con’t) CHARGER ,AC FUSES; MODEL J 480 VOLTS 550 VOLTS 600 VOLTS MODEL I AC VALUE I AC VALUE I AC VALUE 6-550 X014-99-5 X014-99-5 X014-99-5 6-680 X014-99-7 X014-99-5 X014-99-5 6-750 X014-99-7 X014-99-7 X014-99-5...
- Page 155 EnForcer™ SCR Service Manual I.B. 1561 REPLACEMENT AC FUSES (con’t) CHARGER ,AC FUSES; MODEL D 220 VOLTS 380 VOLTS 440 VOLTS MODEL I AC VALUE I AC VALUE I AC VALUE 6-550 X014-99-10 X014-99-7 X014-99-5 6-680 X014-99-12 X014-99-8 X014-99-7 6-750 X014-99-12 X014-99-8 X014-99-7...
- Page 156 EnForcer™ SCR Service Manual I.B. 1561 SCHEMATIC DIAGRAM, ES3...
- Page 157 EnForcer™ SCR Service Manual I.B. 1561 ASSEMBLY DRAWING...
- Page 158 EnForcer™ SCR Service Manual I.B. 1561 Note : The illustration below identifies the location of some important components in standard chargers. The component P/N may vary from charger to charger. (For a P/N, refer to the 'Replacement Parts' tables). ITEM # DESCRIPTION Cabinet, Base Cabinet, Right side...
- Page 159 EnForcer™ SCR Service Manual I.B. 1561 INTERIOR VIEWS:...
- Page 160 EnForcer™ SCR Service Manual I.B. 1561 SINGLE EXTRUSION HEAT SINK ASSEMBLY...
- Page 161 EnForcer™ SCR Service Manual I.B. 1561 SINGLE EXTRUSION HEAT SINK ASSEMBLY (HARDWARE STACK-UP DETAILS) TO BUSS BAR TO J4 BLACK TO BATT...
- Page 162 EnForcer™ SCR Service Manual I.B. 1561 THREE EXTRUSION HEAT SINK ASSEMBLY...
- Page 163 EnForcer™ SCR Service Manual I.B. 1561 THREE EXTRUSION HEAT SINK ASSEMBLY (HARDWARE STACK-UP DETAILS) FROM BUSS BAR TO J4 BLACK TO BATT...
- Page 164 EnForcer™ SCR Service Manual I.B. 1561 SUB-ASSEMBLY PANEL ASSEMBLY...
- Page 165 EnForcer™ SCR Service Manual I.B. 1561 SUB-ASSEMBLY PANEL WIRING MODEL B LOOSE WIRE MARKER # COLOR CONNECTION GREEN G1 TO DOOR WIRE MARKER # 208 V CONNECTIONS 240 V CONNECTIONS 480 V CONNECTIONS F1 TO A1 F1 TO A1 F1 TO A1 F1 TO C5 F1 TO C6 F1 TO C6...
- Page 166 EnForcer™ SCR Service Manual I.B. 1561 SUB-ASSEMBLY PANEL WIRING (con’t) MODEL J LOOSE WIRE MARKER # COLOR CONNECTION GREEN G1 TO DOOR WIRE MARKER # 208 V CONNECTIONS 240 V CONNECTIONS 480 V CONNECTIONS F1 TO A1 F1 TO A1 F1 TO A1 F1 TO C5 F1 TO C6...
- Page 167 EnForcer™ SCR Service Manual I.B. 1561 DOOR ASSEMBLY...
- Page 168 EnForcer™ SCR Service Manual I.B. 1561 PARALLEL CABLES (OPTIONAL)
- Page 169 EnForcer™ SCR Service Manual I.B. 1561 DISCONNECT SWITCH (OPTIONAL)
- Page 170 EnForcer™ SCR Service Manual I.B. 1561 CABINET ASSEMBLY...
- Page 171 EnForcer™ SCR Service Manual I.B. 1561 CABINET ASSEMBLY, EXPLODED VIEW...
- Page 172 EnForcer™ SCR Service Manual I.B. 1561 LARGE CABINET REPLACEMENT PARTS SCHEMATIC REPLACEMENT PARTS / FUSE VALUES CAUTION: THERE ARE DANGEROUS VOLTAGES WITHIN THE BATTERY CHARGER CABINET. ONLY QUALIFIED PERSONNEL SHOULD ATTEMPT TO ADJUST OR SERVICE THIS BATTERY CHARGER. PRINTED CIRCUIT (CONTROL) BOARD Charger Model Number PCB Part Number Charger Model Number...
- Page 173 EnForcer™ SCR Service Manual I.B. 1561 Ampere Hours Value Part Number 0-680 X117-99-2 681-1200 X117-99-1 1201 & UP 300 X 2 X117-99-1 PARTS / FUSE VALUES FOR ES3-30-1700YNC Description Part Number Transformer X127-S30-1700Y AC Fuses (70A) X014-99-70 DC Fuse (400A) X014-30-7 Shunt (300A) X117-99-1...
- Page 174 EnForcer™ SCR Service Manual I.B. 1561 SCHEMATIC DIAGRAM...
- Page 175 EnForcer™ SCR Service Manual I.B. 1561 LARGE CABINET ASSEMBLY DRAWINGS...
- Page 176 EnForcer™ SCR Service Manual I.B. 1561 CHARGER INTERIOR VIEW...
- Page 177 EnForcer™ SCR Service Manual I.B. 1561 TRANSFORMER CONNECTIONS...
- Page 178 EnForcer™ SCR Service Manual I.B. 1561 HEAT SINK ASSEMBLY...
- Page 179 EnForcer™ SCR Service Manual I.B. 1561 HEAT SINK ASSEMBLY (CON’T)
- Page 180 EnForcer™ SCR Service Manual I.B. 1561 SUB-ASSEMBLY PANELS...
- Page 181 EnForcer™ SCR Service Manual I.B. 1561 CABINET ASSEMBLY...
- Page 182 EnForcer™ SCR Service Manual I.B. 1561 CABINET ASSEMBLY (CON’T)
-
Page 198: Spare Parts List
Ersatzteilliste GP 25 Spare Parts list Gültig für: / Valid for: 4699 825 013 / 4699 825 014 / 4699 825 016 4699 825 017 - 4699 825 022 4699 825 024 - 4699 825 033 4699 825 037 - 4699 825 039 4699 825 042 / 4699 825 048 / 4699 825 049 Ausgabe/Edition: 01.06.2010 Aufgrund möglicher technischer Veränderungen des hier beschriebenen Produkts behält sich ZF Gotha GmbH das Recht vor, Produktdokumentationen im Bedarfsfall zu ändern. - Page 199 GP 25 1. Inhaltsverzeichnis: 1. Contents list Contents list ........2 Inhaltsverzeichnis ......2 Preface........... 3 Vorwort .......... 3 Transmission Identification ....4 Getriebe-Identifizierung....4 Parts..........5 Ersatzteile........5 4.1. Housing parts ......... 5 4.1. Gehäuseteile ........5 4.2 Brake system parts ......7 4.2.
- Page 200 GP 25 2. Vorwort 2. Preface Die Ersatzteilliste ist nur gültig für die auf der Titelseite angegebenen This Spare Parts List is only valid for the type of transmission, as shown at the Getriebetypen. Die Typenbezeichnung Ihres Getriebes können Sie dem front page.
- Page 201 GP 25 3. Identifizierung des Antriebssystems / MDU identification Typenschild / Type plate Typenschild/ Type plate Pos. Nr. / Item no Bezeichnung Description Getriebetyp Transmission type Seriennummer Serial number Identnummer Parts list number/ Transmission Id. No Übersetzung Ratio Kundenidentnummer Customer code number (optional) (optinal) Ersatzteilliste / Spare Parts list...
- Page 202 GP 25 4. Ersatzteile / Parts 4.1. Gehäuseteile / Housing parts 101.020 101.030 101.010 101.070 101.050 101.050 101.060 101.050 101.060 101.040 101.090 Die Abbildungen können von der tatsächlichen Getriebeausführung abweichen! Illustrations may differ from actual design! Ersatzteilliste / Spare Parts list 4699.770.019 5 von / of 16 Version B / 01.06.2010...
- Page 203 GP 25 Gehäuseteile / Housing Parts Benötigte Teilestückzahl / Required Number Of Pieces Pos.Nr. Bestellnummer / Pos. / Order Bezeichnung Name Number 101.010 Gehäuse Housing 4699 301 145 4699 301 146 4699 301 168 Gehäuse- Housing 101.020 deckel cover 4699 309 083 4699 309 085 Zylinder- Cylindrical...
- Page 204 GP 25 4.2. Bremsenteile / Brake system parts 109.110 109.090 109.100 109.010 109.020 109.070 109.000 Die Abbildungen können von der tatsächlichen Getriebeausführung abweichen! Illustrations may differ from actual design! Ersatzteilliste / Spare Parts list 4699.770.019 7 von / of 16 Version B / 01.06.2010...
- Page 205 GP 25 Bremsenteile / Brake System Parts Benötigte Teilestückzahl / Required Number Of Pieces Pos.Nr. Bestellnummer / Pos. / Order Bezeichnung Name Number Brake Verschleiß- wearing parts 109.000 teile Bremse 4699 195 039 Axial Axiallager bearing Cylindrical Zylinderstift Außen- Outer lamelle clutch disc Innen-...
- Page 206 GP 25 Bremsenteile / Brake System Parts Benötigte Teilestückzahl / Required Number Of Pieces Pos.Nr. Bestellnummer / Pos. / Order Bezeichnung Name Number Axial 109.010 Axiallager bearing 4699 309 054 Cylindrical 109.020 Zylinderstift 0631 313 003 Pressure 109.070 Druckfeder spring 0632 040 021 Sealing 109.090 Dichtring...
- Page 207 GP 25 4.3. Eintriebsteile / Input parts 102.070 102.060 102.050 102.040 102.030 102.010 102.000 Die Abbildungen können von der tatsächlichen Getriebeausführung abweichen! Illustrations may differ from actual design! Ersatzteilliste / Spare Parts list 4699.770.019 10 von / of 16 Version B / 01.06.2010...
- Page 208 GP 25 Eintriebsteile / Input Parts Benötigte Teilestückzahl / Required Number Of Pieces Pos.Nr. / Bestellnummer / Pos. No. Bezeichnung Name Order Number 102.000 Stirnrad Spur gear 4699 195 036 4699 195 037 4699 195 038 4699 195 041 Stirnrad Spur gear Antriebsritzel Input pinion...
- Page 209 GP 25 4.4. Abtriebsteile / Output parts 103.200 103.190 103.090 103.130 103.180 103.500 103.110 103.600 103.080 103.010 103.100 103.120 103.150 103.160 103.070 103.020 103.140 Die Abbildungen können von der tatsächlichen Getriebeausführung abweichen! Illustrations may differ from actual design! Ersatzteilliste / Spare Parts list 4699.770.019 12 von / of 16 Version B / 01.06.2010...
- Page 210 GP 25 Abtriebsteile / Output Parts Benötigte Teilestückzahl / Required Number Of Pieces Pos.Nr. Bestellnummer / Pos. / Order Bezeichnung Name Number Ring Gear 103.500 Kit Hohlrad 4699 195 042 Internal Hohlrad gear Lock Zahnscheibe washer Ring Ring Torxschraube Torx screw 12 12 12 12 12 12 12 12 12 12 12 12 12 12 12 12 12 12 12 12 12 12 12 12 12 Kit Planeten- Planet gear...
- Page 211 GP 25 Abtriebsteile / Output Parts Benötigte Teilestückzahl / Required Number Of Pieces Pos.Nr. Bestellnummer / Pos. / Order Bezeichnung Name Number Sealing 103.100 Dichtring ring 0501 323 422 103.110 Torxschraube Torx-Screw 0501 323 470 12 12 12 12 12 12 12 12 12 12 12 12 12 12 12 12 12 12 12 12 12 12 12 12 12 103.120 Nilosring NILOS ring 0501 325 596...
- Page 212 GP 25 4.5. Anbauteile / Attaching Parts 170.020 170.010 Die Abbildungen können von der tatsächlichen Getriebeausführung abweichen! Illustrations may differ from actual design! Ersatzteilliste / Spare Parts list 4699.770.019 15 von / of 16 Version B / 01.06.2010...
- Page 213 GP 25 Anbauteile / Attaching Parts Benötigte Teilestückzahl / Required Number Of Pieces Pos.Nr. Bestellnummer / Pos. / Order Bezeichnung Name Number 170.010 Motor Motor 0501 213 927 0501 319 869 0501 007 341 0501 217 044 0501 214 992 0501 215 738 0501 215 832 0501 215 724...
- Page 214 Models 11860-Series 11870-Series SELF-PRIMING PUMPS ELECTRO-MAGNETIC CLUTCH UNIT FEATURES Body: Bronze Impeller: Nitrile Shaft: Stainless Steel Seal: Carbon-Ceramic, Face Type Ports: 11860-Series, 1" NPT Internal 11870-Series, 1-1/4" NPT Internal Bearings: Shielded Ball Bearings Weight: 11860-Series, 15 lb (6.8 kg) Approx. 11870-Series, 19-1/2 lb (8.9 kg) Approx.
-
Page 215: Service Instructions
SERVICE INSTRUCTIONS of shaft through bearing seal (and slinger on Model 11870-Series). Press on outer bearing race to assemble shaft/bearing assembly into IMPELLER REPLACEMENT: Remove end cover gasket. Pull body, bottoming bearing firmly against bearing bore shoulder.Install impeller out by grasping hub with pliers. With rotary motion in the body to bearing retaining ring in groove in body with flat side against direction the pump will be turning, push the impeller into the impeller bearing. - Page 216 EXPLODED VIEW PARTS LIST Qty. 11860-Series 11870-Series Description Req. Part No. Part No. Screw End Cover (3 Per Kit) 91003-0010 – Screw End Cover (3 Per Kit)) – 91005-0040 End Cover 11831-0000 12062-0000 Gasket 890-0000 816-0000 Impeller Nitrile, Brass** 920-0003 836-0003 Wearplate 7868-0000...
-
Page 217: Wiring Diagrams
DIMENSIONAL DRAWING TABULATION OF DIMENSIONS (Inches and Millimeters) Model D-1 D-2 11860 6-3/16 5-3/8 4-29/32 3-9/16 3-7/8 1-5/16 1-1/2 1-9/16 3-1/8 13/32 1-7/8 2-1/2 4-3/4 2-3/8 1" — — — — Series 11870 2-15/16 1-1/4" 3/16 1-1/2 8-3/16 6-1/16 7-1/16 5-1/4 5-9/16 1-7/32 2-5/16 2-1/4 4-1/2 2-3/4... - Page 218 DMC GmbH Herten Germany Board Brush www.dmcde.de Speed Snow Dump Tire Wash Related Taillight Leftside Water Title PowerOn Olympia Block Schematic Olympia Elevator HandBrake Sensor Size Document Number Panel 2 41900_150b 1.00 Reverse Light Footbrake Switch Hand Pump Switch Date:...
- Page 219 80V switched from X1-2 to Weidmuller pin16 BiCAT+ IN_23 X4-4 DMC GmbH Herten Germany IN_34 X4-5 www.dmcde.de +24V F13 X4-6 Title LED Board Brush OUT X4-7 Board Brush OUT Light Olympia Canada Out_01 100mA X4-8 Size Document Number 41900_151c 1.00 Date: Friday, September 03, 2010 Sheet...
- Page 220 Weidmuller Connector removed Backup Alarm removed to page 41800_153 Washwater Clutch Placed 60 Blue/White Hand Pump Switch MY4-24V 19-08-2009 Added Backup Alarm DMC GmbH Herten Germany 1N4007 www.dmcde.de Title Olympia Canada Size Document Number 41900_152c 1.00 Date: Friday, September 03, 2010 Sheet...
- Page 221 Removed connector 6-6-2010 Links between connector X18 and 2X3A and 2X3B only for PCB9V0. New PCB's (9V1 and up) links at the PCB DMC GmbH Herten Germany www.dmcde.de Title Olympia Canada Size Document Number 41900_153c 1.00 Date: Friday, September 03, 2010...
- Page 222 Power Gnd X16-1 69 Black 20Vdc - perm spare Option Camera 1,5A max +24V X16-2 70 Pink 24Vdc + sw spare DMC GmbH Herten Germany www.dmcde.de Title Olympia Canada Size Document Number 41900_154b 1.00 Date: Friday, September 03, 2010 Sheet...
- Page 223 80/24 X27-17 Out - X12-3 300W Out - X27-18 Out + X12-4 Out + X27-19 10-10-2010 DCDC connection updated X27-20 19-08-2009 Added backup Alarm Title 41900_156b Panel Connections Olympia Size Document Number 41900_156b 1.00 Date: Tuesday, October 19, 2010 Sheet...
- Page 224 Snow Bin Down X8-13 White Bypass Valve X8-14 Power Gnd X17-1 +24V CO X17-2 Hand Pump switch Omron MY4-24V 1N4007 DMC GmbH Herten Germany www.dmcde.de Title Olympia Canada Panel Wiring Valves Size Document Number 41900_157a 1.00 Date: Thursday, September 02, 2010 Sheet...
- Page 225 Battery connections (2/0) AWG 2/0 - 280 cm Main Fuse - 200A RED tubing RED tubing Main DC plug - female BiCAT II connector (at battery) RED tubing BLACK tubing A B C AWG#16 - black AWG#16 - red AWG 2/0 - 280 cm 15 A fuse to Accumeter (on small panel) AWG 2/0 - 200 cm...
- Page 226 E-Stop connections (2/0) in main panel AWG 2/0 - 270 cm Main Panel E-Stop use 5/16" hole lugs use 3/8" hole lug use 5/16" hole lug Main DC plug (male) AWG 2/0 - 420 cm...
- Page 227 Large connector inside seat (Connects to Main Harness)
- Page 228 0.38 (d1/4) 2 WIRES TO MAIN DC CONNECTOR 71-RD / WH ; 72-WH / RD (refer to E-Stop connections diagram) 2.20 (d1/4) 0.70 (d1/4) 1 WIRE TO BATTERY - BiCAT DATA UNIT 17-OR 0.1 (d1/4) 4 WIRES TO DMC DISPLAY 19-GN ;...
- Page 229 Conduit runs from Front bumper JB Use male pins on harness side where applicable 75cm (d9) Icemaking watertank empty 98 - RD/YL 97 - BK 8cm (d9) 96 - YL Icemaking watertank half 94 - BK 42cm (d9) 95 - GRN Icemaking watertank full 94 - BK Horn...
- Page 230 LARGE DASHBOARD BLACK (50cm) PK / BK Wrap in 1/4" tubing (50cm)
- Page 231 BROWN WHITE YELLOW M2 Motion control GREEN M0 Motion control SHIELD BROWN WHITE M2 Motor leads YELLOW 4 CONDUCTOR SHIELDED CABLE - 620 cm AWG 16 - BLACK - 620 cm GREEN M0 Motor RTD AWG 16 - RED - 620 cm Red &...
- Page 232 M1, M3 & Pump motor leads AWG 8 - RED - 195 cm Main AWG 8 - BLUE - 195 cm Pump Motor Leads AWG 8 - WHITE - 195 cm Panel AWG 16 - BLACK - 195 cm Pump Motor RTD BROWN AWG 16 - RED - 195 cm...
- Page 233 BROWN WHITE WHITE BLUE YELLOW GREEN SHIELD 2 x AWG#8 - 49cm - WH 2 x AWG#8 - 46cm - BL 2 x AWG#8 - 43cm - RD BROWN BLUE WHITE YELLOW GREEN WHITE SHIELD...
- Page 234 COMSYS (Part of Main Harness - male pins) Keyswitch Direction switch Parkbrake (Part of Main Harness - male pins) 3 WH / BK 2 RD 4 BK 6 YL 46 GN 3 WH / BK 1 RD / WH 5 WH 4 BK 47 BK 45 RD...
- Page 235 SMALL DASHBOARD 19 GN use female pins on harness side 20 BU 21 PU 22 WH 10 PK 13 RD / BU 12 YL / BK 10 PK 15 YL 10 PK DMC Display 9 GY 7 BK use female insulated spade lugs (16AWG) 14 GN 10 PK...
Need help?
Do you have a question about the Millennium-E and is the answer not in the manual?
Questions and answers