Table of Contents
Advertisement
Quick Links
EN
USB Hard Drive
HD-QLU3R5
User Manual
Layout ..............................................3
Recommended Usage .....................5
Formatting .......................................9
Maintenance ..................................10
Software .........................................37
Specifications ................................39
1
2
3
4
5
6
Advertisement
Table of Contents

Related Manuals for Buffalo HD-QLU3R5


Summary of Contents for Buffalo HD-QLU3R5
- Page 1 USB Hard Drive HD-QLU3R5 User Manual Layout ..........3 Recommended Usage .....5 Formatting ........9 Maintenance ........10 Software .........37 Specifications ........39...
-
Page 2: Table Of Contents
Table of Contents Layout............3 LEDs.and.Connections..............3 Power.On/Off..................4 Recommended.Usage........ 5 Warning.................... 5 Dismounting.the.DriveStation............7 For Windows ......................7 For Mac ........................8 Formatting..........9 CAUTION................... 9 Maintenance..........10 Backup.................... 10 Importance of Backups ..................10 Backup Storage Media .................. - Page 3 Replacing a Hard Drive..................35 Software..........37 Installing.Software.on.a.Windows.PC..........37 Optional.Software................38 TurboPC ........................38 TurboCopy ....................... 38 Backup Utility ......................38 RAMDISK Utility ...................... 38 Buffalo Tools Launcher ..................38 eco Manager ......................38 SecureLockMobile ....................38 NovaBackup ......................38 Specifications.......... 39 Specifications................. 39...
-
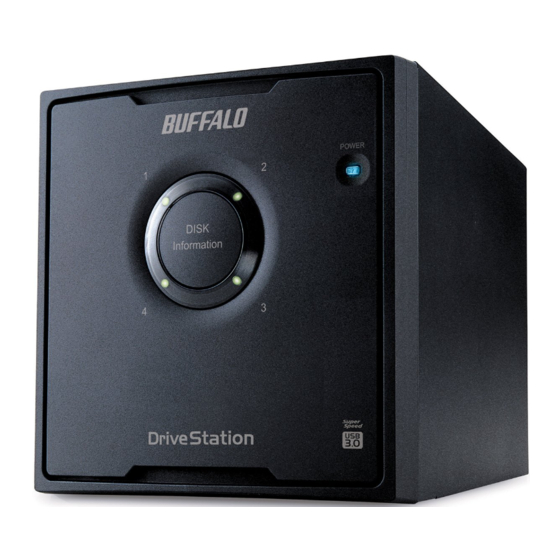
Page 4: Layout
Layout LEDs and Connections ① Power LED Front Panel Power On: blue RAID Maintenance: purple ② Access LEDs ① These indicate the status for each internal hard drive of the DriveStation. The number ② next to the LED corresponds to the hard drive number. -
Page 5: Power.on/Off
Power On/Off Auto power mode will turn the DriveStation on and off automatically with your computer, or you may turn the DriveStation off manually. Power Mode This switches the power on and o . Auto: The DriveStation turns on and o with your computer. O : This turns o the DriveStation’s power. -
Page 6: Recommended.usage
Recommended Usage Warning To avoid damage to your data, follow these precautions: Never configure this unit as a destination for virtual memory. Never perform any of the following operations while the access LED is flashing: • Unplug the cables • Turn off your computer •... - Page 7 • If your anti-virus or other security software includes a software firewall, register the RAID Utility (C:\Program Files\BUFFALO\HD-xLU3\RaidUtility.exe) as an exception for the firewall. This is not necessary with the software firewall built-in to Windows. For more information on how to add an exception to your software firewall, contact the manufacturer of your security software.
-
Page 8: Dismounting.the.drivestation
• When the RAID Utility is running, an error may be displayed, and it may not be possible to dismount the DriveStation. In this case, exit the RAID Utility before performing the above procedure. To exit the RAID Utility from the Start menu, select [All Programs]- [BUFFALO]-[HD-xLU3]-[RAID Utility[EXIT]]. HD-QLU3 User Manual... -
Page 9: For Mac
For Mac Drag the DriveStation’s icon to the trash to dismount the drive. Note:. If you’ve created multiple partitions on the DriveStation, dismount each partition separately before unplugging the drive. It’s now safe to unplug the DriveStation from your Mac. HD-QLU3 User Manual... -
Page 10: Formatting
Formatting CAUTION NTFS is suitable for use with modern Windows computers. To divide the DriveStation into multiple partitions, consult the “Format/Maintenance Guide” on your Navigator CD. A Linux-compatible format will be required if the DriveStation will be connected to a TeraStation. Consult the TeraStation's user manual for more information. -
Page 11: Maintenance
Maintenance Backup Importance of Backups The process of copying data to external storage media for protecting important data stored in a hard drive is called a “backup”. Large-capacity hard drives store a large volume of data everyday. The loss of data due to an accident, human error, or unexpected event can result in significant losses for business operations. -
Page 12: Error.check.(Scandisk)
Error Check (ScanDisk) Windows includes a tool for finding and fixing hard drive errors. To ensure reliable operation, regular drive checks are recommended. Notes: • For more information on ScanDisk, see Windows Help. • Mac OS doesn’t include a hard drive error checking utility. To perform a drive check from a Mac, use a third-party utility. -
Page 13: Building.raid.arrays
Building RAID Arrays The four internal hard drives of the DriveStation can be configured into a RAID array for use as a single hard drive. The RAID array can also be reset and rebuilt using the procedures below. Notes on Building a RAID Array •... -
Page 14: Data Protection
■ RAID 10 Mode (Enables high-speed access and secure storage of data) Four hard drives are combined into a large virtual drive. Usable space is the total of two hard drives' capacity. Because reads are distributed over two drives, access speeds are slightly faster than an individual drive's. - Page 15 ■ RAID 1 Mode (Enables secure storage of data) Drives are combined into mirrored pairs. Total usable space is the capacity of two individual drives. All data is written to two drives simultaneously. If either drive in a pair fails, all data can be recovered by replacing the drive.
-
Page 16: Hard Drive
■ RAID 0 Mode (Enables use as a high-speed, large-capacity hard drive) This mode uses the four hard drives as a single large-capacity hard drive. Data is distributed and written to the four hard drives simultaneously for faster access. The OS recognizes this as a large single drive with a capacity equal to the sum of the four hard drives. RAID 0 does not provide a mechanism for protecting data. - Page 17 ■ Spanning Mode (Enables use as a large-capacity hard drive) In this mode, all four hard drives are combined into a large single drive with capacity equal to the sum of the four individual drives. Because data is saved without distributing to the drives, the data access speed is the same as that of an individual drive.
- Page 18 ■ Normal Mode (Enables use as four hard drives) In this mode, the hard drives are used without building a RAID array. The DriveStation is recognized as four hard drives, and different data can be saved to each one. • Example of Hard Drive Configuration Configuration using HD-QL4TU3R5: Recognized as four 1 TB hard drives Data Data...
-
Page 19: Installing The Raid Utility
Installing the RAID Utility The Utility is used to build a RAID array. If the RAID Utility is not installed, install it by following the procedure below. Note: The procedure below is not necessary if the RAID Utility is already installed. ■... -
Page 20: Building A Raid Array
The screen below is displayed when there is a preset password. Enter the password, then click [OK]. Caution If you have forgotten the password, the RAID array cannot be built. Please contact the Buffalo Support Center. ① Enter the password (20 alphanumeric characters or less). ② Click [OK]. - Page 21 Select the RAID array to be built, then click [Next]. ① Select the RAID array to be built. ② Click [Next]. Select the format system (Windows 7/Vista/XP only). ① Select the format system. ② Click [Next]. Notes: ・ If using Windows Server 2003 or Macintosh, the screen above is not displayed. Skip to the next step.
- Page 22 When "Check again that there is no important data on the target drive. Are you sure you want to proceed?" is displayed, click [Yes]. Building of the RAID array is started. When the message "RAID Management drive is registered. Please connect HD-xLU3 again."...
-
Page 23: Rebuilding Or Resetting A Raid Array
Rebuilding or Resetting a RAID Array To rebuild a RAID array or change your RAID mode, use the procedure described in "Building a RAID Array". Setting a RAID Building Password You may protect the RAID array with a password. If a password is configured, it will be required to change the RAID array. - Page 24 Click [Config], and then click [Set Password]. Click [Config], then select [Set Password]. If a RAID Password is Configured If a RAID password is already set, enter it and click [OK]. Note: If you have forgotten the RAID password, then the RAID array cannot be changed. ①...
-
Page 25: E-Mail.notification.(Windows.only)
E-mail Notification (Windows Only) The RAID Utility can notify you by email when certain events occur. To configure this, follow the steps below. Note: The example below shows Windows 7. Your screens may look slightly different. Right-click the icon on the taskbar, then select [Option]. Click the [Monitoring config] tab. - Page 26 An e-mail is sent to the specified address(es) if any of the following events occur. ・ Hard drive error ・ Fan malfunction ・ Overheating of hard drive ・ Hard drive replacement count was increased ・ Error during RAID maintenance Email notification is now configured. Note: In Advanced mode, you may select which events will cause an email notification to be sent.
-
Page 27: Message.display.(Windows.only)
Message Display (Windows Only) The RAID Utility can display messages as shown below. The message display function is set as shown below. Note: The screens may vary depending on the OS you are using. Right-click the icon in the taskbar, and select [Option]. Click the [Monitoring config] tab. -
Page 28: Log.recording.(Windows.only)
Log Recording (Windows Only) The "RaidUtility.(*1).(*2).log" file is automatically created in the folder where the RAID Utility was installed (default installation directory is C:\Program Files\BUFFALO\HD-xLU3). *1: A number for the date is inserted. *2: The numbers 0 to 9 are inserted. -
Page 29: Raid.maintenance.(Windows.only)
RAID Maintenance (Windows Only) In the RAID Utility, the RAID Maintenance function can be set for periodically checking for errors due to bad sectors and automatically rebuilding when an error is found. The RAID Maintenance function is set as shown below. Note: The screens may vary depending on the OS you are using. - Page 30 Notes: RAID Maintenance will not run under the following conditions. ・ If a previous error occurred during RAID Maintenance ・ During rebuilding ・ If RAID Maintenance is already running RAID maintenance execution schedule The available settings for the execution schedule of the RAID Maintenance are shown below. ・...
-
Page 31: Raid.mode.button
RAID Mode Button The RAID mode can be changed by the RAID mode button located on the back of the DriveStation. RAID mode button Rear View Changing the RAID Mode Caution When the RAID mode is changed, all data stored in the DriveStation is erased. If you have important data saved, be sure to back up the data to a computer or other device before performing the procedure below. - Page 32 Hold down the RAID mode button for five seconds. The DriveStation will beep once, the access LED turns off, and the power LED will blink purple as the DriveStation changes its RAID mode. Caution While the power LED is blinking purple, do not turn off the power or unplug your DriveStation.
-
Page 33: Troubleshooting
DriveStation and check if dust has accumulated on the ー Repeated beeps fan. If removing dust does not solve the problem, the fan may be broken. Contact the Buffalo Technology Support Center. A hard drive has overheated. Check if the fan on the back side is running. - Page 34 A rebuild is in progress. Normally this happens after a hard drive is replaced in a RAID 5, RAID 10, or RAID 1 array. Do not turn off the power until rebuilding is complete. When rebuilding is complete, the unit will beep three times and the access LED will glow a steady green (not blinking).
-
Page 35: Replacing.hard.drives
Replacing Hard Drives If a hard drive fails, the corresponding disk access LED on the front of the DriveStation will glow red. Obtain another hard drive with the same capacity to replace the failed hard drive. ■ Using in RAID 5, RAID 10, or RAID 1 Mode The access LED for the failed hard drive glows red. -
Page 36: Replacing A Hard Drive
Replacing a Hard Drive The procedure for replacing a hard drive is shown below. After replacing the hard drive, reassemble by performing the removal procedure in reverse. The access LED for the failed hard drive number appears solid red. Make a note of the access LED number. - Page 37 Perform the removal procedure in reverse to install a new OP-HD series hard drive with cartridge (sold separately). Reconnect the cables to their original locations, then turn on the DriveStation. Connect the DriveStation to the computer. If RAID 5, RAID 10, or RAID 1 was configured, the access LED will blink red as the array rebuilds. Hard drive replacement is now complete.
-
Page 38: Software
Software Installing Software on a Windows PC Insert the DriveNavigator CD into your computer. The DriveNavigator will launch automatically. If Windows displays the message “Do you want to allow the following program to make changes to this computer?”, click [Continue] or [Yes]. Click [Begin Installation]. -
Page 39: Optional.software
This software uses some of the memory in your computer as a virtual hard drive. Buffalo Tools Launcher Buffalo Tools Launcher lets you easily launch software from the Buffalo utility suite. Just click an icon to launch the desired Buffalo tool or utility. -
Page 40: Specifications
Specifications Specifications ※ For the most up-to-date information and latest products, go to www.buffalotech.com. Interface Transfer speed Max 5 Gbps (USB 3.0) * Max 480 Mbps (USB 2.0) Max 12 Mbps (USB 1.1) Factory defaults NTFS (1 partition), RAID 5 External dimensions 149 (W) x 154 (D) x 233 (H) mm (excluding protruding parts)
Need help?
Do you have a question about the HD-QLU3R5 and is the answer not in the manual?
Questions and answers