Table of Contents
Advertisement
Quick Links
Advertisement
Table of Contents

Related Manuals for TrekStor W1

Summary of Contents for TrekStor W1
- Page 1 MiniPC W1 OPERATING INSTRUCTIONS...
-
Page 2: Table Of Contents
Content 1) About the MiniPC ……………………………………………………… 4 2) Safety information ……………………………………………………… 5 Operational safety ………………………………………………………… 5 Repair …………………………………………………………………… 6 Intended operating conditions …………………………………………… 7 Power supply ……………………………………………………………… 7 Care and maintenance …………………………………………………… 7 Information on the memory capacities indicated ………………………… 7 3) Technical specifications …………………………………………………... - Page 3 13) Automatic Windows Update function ………………………………… 21 14) Performing a system backup …………………………………………… 22 15) Reset and recovery ……………………………………………………… 23 Performing a reset ………………………………………………………… 23 Recovery ………………………………………………………………… 23 16) Switching off the MiniPC ……………………………………………… 23 17) Notes on copyright and trademarks …………………………………… 24 18) Notes on disposal ………………………………………………………...
-
Page 4: About The Minipc
We hope you enjoy your TrekStor MiniPC W1. Please read the following sections carefully to familiarise yourself with the functions of this product and how to operate it. IMPORTANT! Follow the safety information in Section 2. IMPORTANT! Please keep these instructions in a safe place for future reference. Should the device change hands, please pass these instructions on to the new owner. -
Page 5: Safety Information
2) Safety information These instructions use the following warning symbols and key words: DANGER Indicates possible danger to life and/or danger of severe, irreversible injuries. CAUTION Follow instructions to avoid injuries and material damage. WARNING Follow instructions to avoid material damage. NOTE Further information about the use of the device. -
Page 6: Repair
DANGER Do not cover the device or power adapter during operation. This may cause the device/power adapter to overheat and potentially catch fire! CAUTION This device can generate high sound volumes. Never listen at high volumes for long periods. Doing so can result in immediate or gradual hearing damage. -
Page 7: Intended Operating Conditions
Intended operating conditions Protect the device from extremely high or low temperatures and fluctuations in temperature. Use it at an ambient temperature between 10º C and 40º C. Do not place the device near a heat source and protect it from direct sunlight. Never expose the device to humidity, condensation or moisture. -
Page 8: Technical Specifications
97.5 x 22.5 mm x 97.5 mm Weight: 215 g Housing material: Plastic Operating system: Windows® 8.1 Update 4) Package contents • MiniPC W1 • Power adapter (100 V – 240 V) • Quick guide • Product safety and legal information... - Page 9 MiniPC W1 Input: 5V 3000mA Designed in Germany | Made in China TrekStor GmbH, Kastanienallee 8-10 64653 Lorsch, Germany...
-
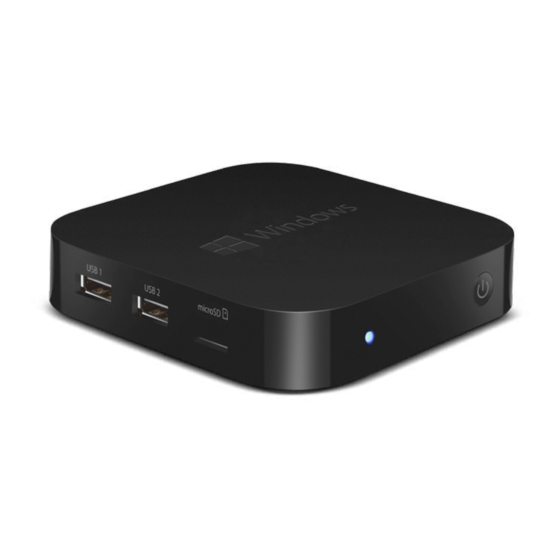
Page 10: Controls And Ports
5) Controls and ports A) DC IN B) Micro-USB socket C) HDMI socket D) RJ45 socket E) Audio out socket F) USB-A socket G) USB-A socket H) Memory card slot Status LED On/off switch K) Ventilation slots... -
Page 11: Starting Up The Minipc For The First Time
6) Starting up the MiniPC for the first time Connecting the MiniPC HDMI Connect the MiniPC to a HDMI-compatible output device (for example, television, projector, PC monitor, and so on) using a HDMI cable, and on the output device, select the correct HDMI input as the source (the HDMI input to which the cable is connected). -
Page 12: Switching On The Minipc
Switching on the MiniPC DC IN 2 sec. Connect the MiniPC to a plug socket using the power adapter provided. b) Press the on/off switch for approximately two seconds. The MiniPC starts up and the status LED lights up blue. WARNING Only operate the MiniPC on hard surfaces in order to ensure sufficient ventilation of the device. -
Page 13: Unlocking The Screen
Unlocking the screen As soon as the device has been set up (and every time it is switched on and booted up), the lock screen appears. Hold down the left mouse button and "drag" the screen up to unlock it. If your MiniPC is password-protected, you must then enter the password. -
Page 14: Charm Bar
7) Charm Bar The Charm Bar is a bar with quick links to some of the important functions of the MiniPC. You can call it up from the start screen or the desktop view. To access it, move the mouse (without clicking) to the right top corner of the screen and wait a moment. -
Page 15: Start Screen
Start screen Desktop view... -
Page 16: Accessing The Applications Menu
9) Accessing the Applications menu The Applications menu is located "beneath" the start screen. To access it, click the arrow symbol on the circle at the bottom left of the start screen. 10) Connect the MiniPC with a network/the Internet Connecting to the Internet via WiFi Open the Charm Bar (see Section 7) b) Click "s... - Page 17 Enter the network key in the input field and click "n " to confirm. The network key can generally be found on the back of your router. If a WPS authentication method (for example, a PIN) was set up for your router, the MiniPC shows a different input field.
-
Page 18: Connecting To A Network/The Internet Via A Cable (Lan)
WARNING You will be asked whether the MiniPC should search for additional devices in the selected network and whether it should automatically connect to these devices (for example, printers or television sets). This is recommended in private home networks that you can trust. If you connect to a public wireless network, we recommend that you decline this option by clicking "n ". -
Page 19: Transferring Files Between The Minipc And Other Devices
If you do not yet have a Microsoft account or are not signed in with it, you must perform these steps. Open the Windows Store and select the desired app. Click the app and then "i ". An assistant now appears to nstall guide you through the process of setting up a Microsoft account. -
Page 20: Transferring Files Between The Minipc And Another Pc
n) Click the desired device and confirm with "n ". The MiniPC now sends the selected file to the desired device. o) You may also have to confirm receipt of the file on the destination device. After a successful file transfer, deactivate the Bluetooth function on the MiniPC (and your destination device) to save energy. -
Page 21: Transferring Files Between The Minipc And A Tablet Or Mobile Phone
In addition to this method, you can connect the MiniPC to a local network (cf. "C (lan)") and use network sharing to OnneCting tO a netwOrk nternet via Cable transfer files between the MiniPC and other devices in the network or to play back files from the MiniPC. -
Page 22: Performing A System Backup
14) Performing a system backup To enable a system recovery (including all data) in the event of failure, the MiniPC allows you to make a "system image backup". We recommend performing the backup using an external hard drive. To do so, proceed as follows: Connect an external hard drive to the USB 2.0 port on the MiniPC using a USB cable. -
Page 23: Reset And Recovery
15) Reset and recovery Performing a reset If the MiniPC "freezes" and no longer responds, you can restart it. Press and hold down the on/off switch until the device switches off. Wait for about 20 seconds and then turn the device on normally. Recovery If you would like to re-set up your MiniPC, proceed as follows: Open the Charm Bar. -
Page 24: Notes On Copyright And Trademarks
The Bluetooth word mark and logos are registered trademarks owned by Bluetooth SIG, Inc. and any use of such marks by TrekStor GmbH is under license. Other trademarks and trade names are those of their respective owners. -
Page 25: Notes On Liability And Warranty
19) Notes on liability and warranty The manufacturer shall reserve the right to constantly further develop the product. These changes may be made without any direct reference to them in the operating instructions. As a result, the information contained in the operating instructions does not need to reflect the current technical design. - Page 26 Product: MiniPC W1 (MPCW1-432-1) I I I I I I I I I I I I I I I I I I I I I I I I I I I I I I I I I I I I I I I I I I I I I I I I I I I I I I I I I I I I I I I I I I I I I I I I I I I I I I I I I I I I I I I I I I I I I I I I I I I I I I I I I I I I I I I I I I I I I I I I I I I I I I I I I I I I I I I I I I I I I I I I I I I I I I I I I I I I I I I I I I I I I I I I I I I I I I I I...
- Page 27 Supportinformationen Sollten Sie Fragen zu Ihrem TrekStor Produkt haben, gehen Sie bitte wie folgt vor: • Überprüfen Sie anhand der Produkteigenschaften und der Funktionen Ihres Gerätes (auf der Verpackung ersichtlich), ob Sie die richtigen Einstellungen vorgenommen haben. • Lesen Sie aufmerksam die gesamte Bedienungsanleitung.
Need help?
Do you have a question about the W1 and is the answer not in the manual?
Questions and answers