Table of Contents
Advertisement
Quick Links
Advertisement
Table of Contents

Related Manuals for Asus Xonar DG SI


Summary of Contents for Asus Xonar DG SI
- Page 1 Xonar DG SI PCI 7.1 & Headphone Amp Audio Card User manual...
- Page 2 Product warranty or service will not be extended if: (1) the product is repaired, modified or altered, unless such repair, modification of alteration is authorized in writing by ASUS; or (2) the serial number of the product is defaced or missing.
-
Page 3: Table Of Contents
Introduction ..................1 Package contents .............. 1 System requirements ............1 Specifications summary ............. 1 Xonar DG SI card layout ..............3 Installing the hardware ..............5 Installing the audio card ............. 5 Connecting to a TV tuner card ........... 6 Driver Installation ................ -
Page 4: Notices
You are also entitled to have the goods repaired or replaced if the goods fail to be of acceptable quality and the failure does not amount to a major failure. If you require assistance please call ASUS Customer Service 1300 2787 88 or visit us at http://support.asus.com... -
Page 5: Safety Information
Trademarks Xonar and ASUS logo are trademarks of ASUSTek Computer Inc. “Dolby” and “Dolby Digital Live”, “Dolby Pro Logic IIx”, “Dolby Virtual Speaker”, “Dolby Headphone” are trademarks of Dolby Laboratories. EAX and A3D are trademarks of Creative Technology Ltd. -
Page 7: Introduction
Introduction Package contents • ASUS Xonar DG SI PCI audio card System requirements • One PCI 2.2 (or higher) compatible slot for the audio card • Microsoft Windows 10 / 8.1 / 8 / 7 / XP(32/64bit) / MCE2005 ®... - Page 8 ® sounds processing capability Windows ® XP: DirectSound3D ® GX 2.5, EAX ® 2.0&1.0, DirectSound ® DirectSound SW, A3D 1.0, OpenAL generic modes, 128 3D ® sounds processing capability *Specifications are subject to change without notice. ASUS Xonar DG SI...
-
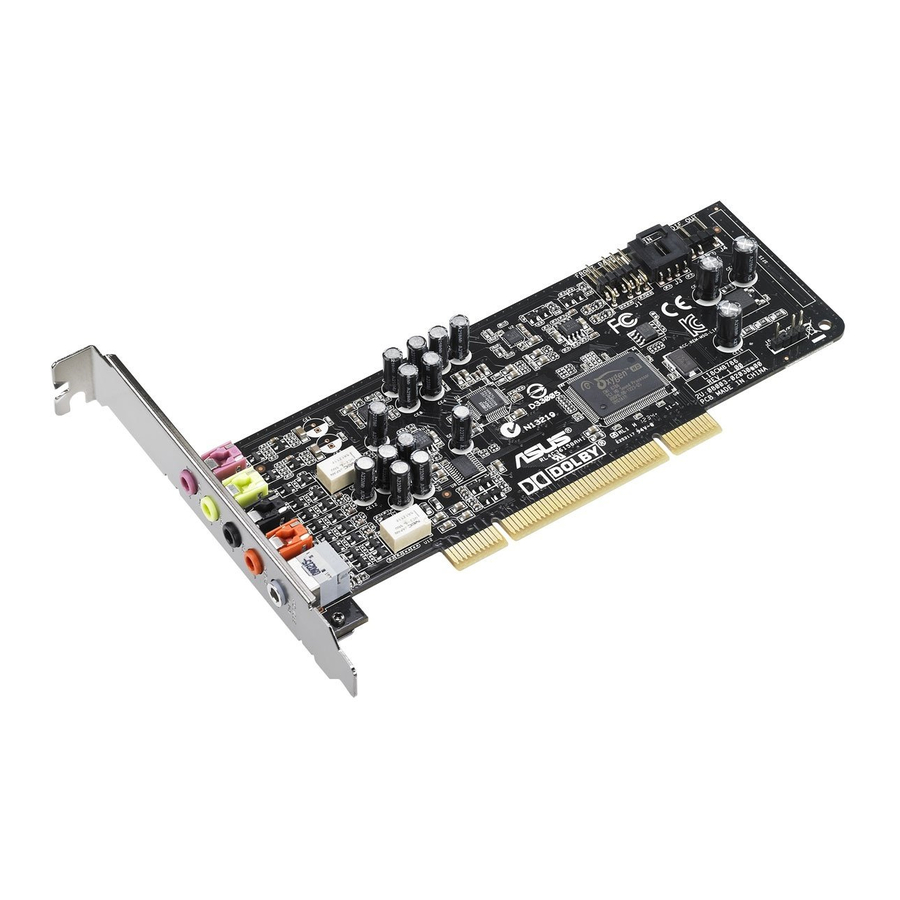
Page 9: Xonar Dg Si Card Layout
Xonar DG SI card layout Audio ports For details on using these audio ports, refer to the section Connecting speakers and peripherals. ASUS Xonar DG SI... - Page 10 (To monitor your TV tuner card’s audio from this Aux-In, you Aux Input Header must enable the “monitor” function for Aux-In in the Xonar Audio Center’s recording mixer.) Connects to the graphics card with HDMI support. S/PDIF Out header ASUS Xonar DG SI...
-
Page 11: Installing The Hardware
Touch the metal back or side panel of your computer to avoid static electricity. Remove the chassis cover. Remove the metal bracket from an available PCI slot for the Xonar DG SI audio card. Carefully insert the audio card into the PCI slot. Ensure the audio card sits properly in place. -
Page 12: Connecting To A Tv Tuner Card
Connecting to a TV tuner card If you have a traditional PCI TV tuner card on your PC, you may need to connect it to the Xonar DG SI card to send the tuner card’s sound to your PC speakers. -
Page 13: Driver Installation
Ensure that you have installed the audio card driver before installing the Xonar DG SI driver. Otherwise, driver installation error may occur. After you have installed the Xonar DG SI card, turn on your computer. Windows automatically detects the audio card and searches for device ®... - Page 14 ASUS Xonar DG SI...
-
Page 15: Connecting Speakers And Peripherals
Connecting speakers and peripherals Connecting digital speaker systems (Home Theater) The Xonar DG SI makes playback through your home theater system possible, creating an immersive and impressive cinema surround sound experience. A single digital cable connection can carry high-quality digital audio from any of your PC audio sources to any digital speakers or AV Receivers. -
Page 16: Connecting Stereo Headphones
Connecting stereo headphones 5.2.1 Connecting Stereo Headphones Item Description The Front Out jack has a built-in high-quality amplifier to Front Out/Headphone Jack drive headphones. Connect your stereo headphones directly to this jack. ASUS Xonar DG SI... - Page 17 Connect the front-channel 3.5mm plug of your 5.1 headphone into this jack. Connect the surround-channel 3.5mm plug of your 5.1 Side Surround Out headphone into this jack. Center/Subwoofer Out Connect the Center/Bass-channel 3.5mm plug of your 5.1 headphone into this jack. ASUS Xonar DG SI...
-
Page 18: Connecting Analog Speaker Systems
Connects to the “left surround” and “right surround” input ports of the analog amplifier with the mini-jack to RCA cable. Center/Subwoofer Connects to the “Center” and “subwoofer” input ports of the analog amplifier with the mini-jack to RCA cable. ASUS Xonar DG SI... - Page 19 5.3.2 Connecting 2/2.1 channel speakers 2 Speakers 2.1 Speakers Item Description Connect the 2/2.1 speaker set’s 3.5mm plug into this Front Front Out/Headphone Jack Out jack. ASUS Xonar DG SI...
- Page 20 4.1 Speakers Item Description Front Out Connects to the Front input port of the 4/4.1 speakers with the mini-jack cable. Side Surround Out Connects to the Surround input port of the 4/4.1 speakers with the mini-jack cable. ASUS Xonar DG SI...
- Page 21 Connects to the Surround input port of the 5.1 speakers with the mini-jack cable. Center/Subwoofer Connects to the Center/Subwoofer input port of the 5.1 speakers with the mini-jack cable. 5.3.5 Connecting 6.1/7.1 Channel Speakers 6.1 Speakers ASUS Xonar DG SI...
- Page 22 Center/Subwoofer Connects to the Center/Subwoofer input port of the 6.1/7.1 speakers with the mini-jack cable. Back Surround Out Connects to the Back Surround input port of the 6.1/7.1 speakers with the mini-jack cable. ASUS Xonar DG SI...
-
Page 23: Connecting Microphone
Connect the microphone’s 3.5mm plug into this Mic-In jack Jack for voice communication, recording, or karaoke. The Front Out jack has a built-in high-quality amplifier to Headphone Jack drive headphones. Connect your stereo headphones directly to this jack. ASUS Xonar DG SI... -
Page 24: Connecting Line-In Audio Sources
Item Description Line Input Jack Connect the 3.5mm plug of the CD/MP3 Player or any other Line level analog audio sources into this Line-In jack for sound recording (See the “Mixer” section of the driver guide). ASUS Xonar DG SI... -
Page 25: Xonar Audio Center
Xonar Audio Center utility. If the icon could not be found in the system tray, click Start > All Programs > ASUS Xonar DG SI Audio > Xonar DG SI Audio Center to launch the Xonar Audio Center from the Windows desktop. - Page 26 (GX2.5) and effect-free (Hi-Fi) modes. Setting Menu Panel This panel gives access to setting tabs, including Main Settings, Mixer/volume, Effects, Karaoke, FlexBass, and VocalFX. Information icon Click this icon to view the driver’s information. ASUS Xonar DG SI...
-
Page 27: Main Setting
The Sample rate determines the number of audio samples per second that the Digital-to-Analog Converters (DAC) and S/PDIF digital interface will output. The Xonar DG SI audio card can support sample rates up to 192KHz (44.1K, 48K, 96K, 192KHz). Usually audio CDG and MP3 files are 44.1KHz; DVD-Video uses 48KHz;... - Page 28 2 speakers (or 2.1), 4 speakers (or 4.1), 5.1 speakers, 7.1 speakers, Front Panel Headphone and Front Panel 2 speakers (or 2.1). Xonar DG SI will play the channels and do the proper 3D surround sound processing accordingly.
- Page 29 2 speakers (or 2.1), 4 speakers (or 4.1), 5.1 speakers, 7.1 speakers, Front Panel Headphone and Front Panel 2 speakers (or 2.1). Xonar DG SI will play the channels and do the proper 3D surround sound processing accordingly.
- Page 30 2 speakers (or 2.1), 4 speakers (or 4.1), 5.1 speakers, 7.1 speakers, Front Panel Headphone and Front Panel 2 speakers (or 2.1). Xonar DG SI will play the channels and do the proper 3D surround sound processing accordingly.
- Page 31 It enables a single digital connection to carry high quality audio from your PC to digital speakers and AV Receivers. Item Description S/PDIF Out enable/ Tick this checkbox to enable S/PDIF output. disable S/PDIF Output PCM (Pulse Code Modulation, which is a typical raw audio Formats/Functions data format.) ASUS Xonar DG SI...
- Page 32 Make all speakers (except Subwoofer) rotate clockwise Manual Rotation Manually drag and rotate all speakers (except Subwoofer) This is the default mode that allows you to manually drag Manual Drag Mode each speaker or the listener with your mouse. ASUS Xonar DG SI...
- Page 33 They differ in the sense of the “spatial dimension” they impart. DH1—Reference Room: Small, acoustically damped room. DH2—Livelier Room: More acoustically live than DH1 DH3—Larger Room: Larger room than DH1; more distant and diffused effect. ASUS Xonar DG SI...
-
Page 34: Mixer/Volume
Mixer/Volume The mixer page is designed to control the volume for playback and recording on the Xonar DG SI. Xonar DG SI also provides a high-quality digital monitoring function for hearing the recorded audio from the speakers. 6.3.1 Playback Volume... - Page 35 Enabling “Microphone Boost” will increase a volume gain to boost microphone input signals. Enable this function for a low-cost PC microphone. You can tick “Front Mic” to enable microphone of front panel. (continued on the next page) ASUS Xonar DG SI...
- Page 36 Aux: Recording from Aux-In for typically TV-tuner card audio or other sound sources Line-In: Recording from Line-in jack for external audio devices WAVE: Recording from digital wave audio you are playing on PC Reset Click to reset all volume controls to the default settings. ASUS Xonar DG SI...
-
Page 37: Effects
Click this button to apply the environment effect that you selected from the pull-down menu on the right side. There are another 23 options in this menu. Environment size There are three size settings for each environment: Large, Medium, and Small. ASUS Xonar DG SI... - Page 38 Key in a name for your own “User Defined” equalizer setting. Add / save Click this “+” button to save the parameters into User Defined list. Delete Click this “–” button to delete the parameters from User Defined list. ASUS Xonar DG SI...
-
Page 39: Karaoke
Karaoke Xonar DG SI provides powerful features for Karaoke, including Key-Shifting, Vocal Cancellation, and Microphone Echo. Microphone Echo can generate natural echo effects on your singing voice just like a karaoke machine. Key-Shifting can change the pitch of Karaoke background music, and Vocal Cancellation can reduce the original vocal in songs and keep the music and symphony for karaoke. - Page 40 But you are able to record all audio sources from Wave, Aux, and Mic with microphone echo effect. Click OK to accept it or Cancel if you want to enable it later. Tick Don’t remind me again and this message will not show up again. ASUS Xonar DG SI...
-
Page 41: Flexbass
Select the speaker type that you connected. If your speaker option type cannot perform low-frequency signals (bass), select “Small” speaker type and Xonar DG SI will filter out the bass signals and send them to the subwoofer channel. If those speakers are full-range, you can select the “Large” speaker type. -
Page 42: Smart Volume Normalization
2, it will become louder when you turn on SVN, and for higher volume music 1, it will become quieter. 0dB (Full-scale) Music 1 -10 dB Music 2 SVN On SVN Off - ∞ ASUS Xonar DG SI... - Page 43 SVN blue light When SVN is enabled, the master volume knob will be illuminated by a blue light. It will be lit red if the volume is muted. ASUS Xonar DG SI...
-
Page 44: Ds3D Gx And Dsp Modes
Every time you turn on Hi- Fi mode, Xonar DG SI will clear all sound effects. Use Hi-Fi mode for audio quality tests (using RMAA software or another machine-based measurement). Use the DSP mode button as the quick setup if you do not wish to know the details of the effect setup. - Page 45 DirectSound3D games on Windows 7 / XP. This mode is set for Hi-Fidelity playback, where all effects will Hi-Fi Mode be cleared to keep the original digital data and analog output quality as high as possible. ASUS Xonar DG SI...
-
Page 46: Vocalfx
You can add VOIP application into VOIP application List. ChatEX It emulates different background environment effects when you chat online. Magic Voice Changes your voice pitch to different types for disguising your real voice or just for fun in online chatting. ASUS Xonar DG SI... - Page 47 For VOIP Click App List. If you do not see your VOIP application in the list, click Add. Ensure that you are using the latest Skype and MSN Messenger version. Find the application and launch it. ASUS Xonar DG SI...
- Page 48 Tick Don’t remind me again if you do not want to see this message pop up again. Microphone input source must be selected from advanced setting under MIC volume control slider in Mixer page. ASUS Xonar DG SI...
-
Page 49: Troubleshooting And Faqs
Go to the sound and audio device of Windows Control Panel to check if the playback default device is set to Xonar DG SI Audio Device, instead of other onboard AC97 or HDA codec device. If it is not, please set it to Xonar DG SI Audio Device and relaunch your applications. - Page 50 ® Dolby is the ONLY brand and technology recognized by the CE industry and available on a wide range of audio equipment. Xonar DG SI includes the feature to make your PC a powerful media and entertainment center. Why do I need Dolby Headpone for PC games? Dolby Headphone is the best 3D sound positioning, spatial modeling and 5.1-...
- Page 51 Live, Cakewalk, CoolEdit, Soundforge, etc.) to convert the sounds into 48KHz files. Please note that the frequency meter on Xonar DG SI Audio Center panel will not take effect either when the playback source is 96KHz sample rate to prevent any processing distortion.
- Page 52 ASUS Xonar DG SI...
Need help?
Do you have a question about the Xonar DG SI and is the answer not in the manual?
Questions and answers