
Related Manuals for Swann SW231PC4


Summary of Contents for Swann SW231PC4
- Page 1 Advanced security made easy PC-DVR4-Net Operating Instructions Software Version 6.3.0.7 SW241-PC4™ Operating Instructions SW241-UD4™ SW231PC4 & SW231-UD4 www.swannsecurity.com xxxxx-xxxxx-xxxxx-xxxxxxxx...
-
Page 2: Before You Begin
Before you Begin FCC Verification: NOTE: This equipment has been tested and found to comply with the limits for Class B digital device, pursuant to part 15 of the FCC Rules. These limits are designed to provide reasonable protection against harmful interference in a residential installation. This equipment generates, uses and can radiate radio frequency energy and, if not installed and used in accordance with the instructions, may cause harmful interference to radio or television reception, which can be determined by turning the equipment off and on, the user is encouraged to try to correct the interference by one or more of the... -
Page 3: Table Of Contents
Table of Contents Before you Begin Table of Contents Overview Layout PCI Version USB Version Installation Hardware Software Main Interface Basic Configuration Recording Video ProcAmp Motion Detection Schedule Alarm / Sensor Configuration Auto-Mail P.T.Z. (Pan, Tilt, Zoom) Configuration P.T.Z. (Pan, Tilt, Zoom) Control User Configuration Playback Capture and Backup... -
Page 4: Overview
Overview Congratulations on your purchase of this Swann four channel PC-based surveillance system. You’ve chosen an extremely cost effective and adaptable security solution to integrate with your existing computer system. The PC-DVR and included software will allow you to turn your computer into a fully featured digital video recorder with advanced networking and remote access features. -
Page 5: Layout Pci Version
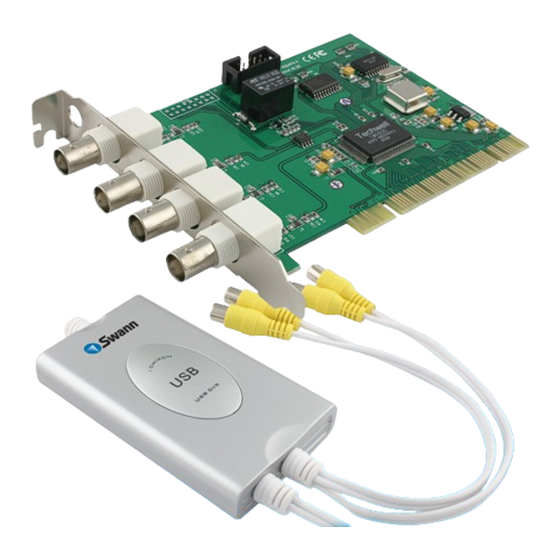
Layout: PCI Card Version Alarm Port Data Connectors (PCI) BNC Plugs for Cameras Alarm Port BNC Plugs for Cameras Rear of Card Camera Connections Data Connectors (PCI) Layout: USB Version USB Plug for connection to PC Video RCA Plugs (for Audio RCA Plugs (for Camera) Microphone or other... -
Page 6: Installation Hardware
Installation: Hardware Installing the PC-DVR: PCI Card Version IMPORTANT Remove screws Read before you attempt installation: holding your computer’s • aware that void cover in place. manufacturer’s warranty opening your computer case. If in doubt, contact your retailer for more information before proceeding. -
Page 7: Software
Installation: Software 1. Insert the included CD-ROM into your computer’s optical drive. 2. If the software does not run automatically, open your optical drive, locate and run the file named “setup.exe”. 3. Wait a moment whilst the software is loaded from the CD-ROM.You will see the following window appear: Simply choose “Next”. -
Page 8: Main Interface
Main Interface Live Viewing Display • • 1/CAM1 2/CAM2 Time & Date Lock / Unlock EMAP Event Search • • 3/CAM3 4/CAM4 Configuration Panel PTZ Controls Exit Button Channel Status Auto- Single Quad Capture Urgent Cycle Remaining Record View View Viewing Hard Drive Mode... -
Page 9: Basic Configuration
Basic Configuration Auto-Cycle Auto-Reboot & Auto-Login Config Tab Config Storage Location Network Configuration Basic Configuration Schedule Configuration Video Configuration Motion Detection Config Alarm Configuration P.T.Z. Configuration User Configuration Record Setup Return to Live Viewing Mode Access the Basic Configuration screen by clicking on the Configuration Panel icon (the one that looks like a spanner). Here, you can configure and control various aspects of the PC-DVR’s functionality. -
Page 10: Recording
Recording The PC-DVR has four recording modes: Tips and Tricks: Multiple Recording Modes • Manual Recording • Scheduled Recording You can assign one recording mode to a channel • Motion Detection based Recording easily enough - but there’s no reason to stop •... -
Page 11: Video Procamp
Video ProcAmp Video Preview Channel Select Menu Video Adjustments The Video ProcAmp (an acronym for “Processing Amplifier”) page will allow you to customize the look of each channel. The adjustable settings here will not change the recording quality or frame rate of the video files. -
Page 12: Motion Detection
Motion Detection Motion Area Display For most uses of the PC-DVR, correctly Channel Selection Menu Sensitivity Settings configured Motion Detection based recording is the most efficient, convenient and viable recording option on a long term basis. For motion detection to function properly, there are a few key settings which we have to ensure are set correctly - in order to access these settings, use the Motion Detection... -
Page 13: Schedule
Schedule To program the PC-DVR to be an autonomous monitoring system, use the Schedule Configuration screen. Here, you can easily program the behavior you want into the PC-DVR. Schedule Recording Table Motion Detection Recording Table Alarm Output Table Alarm Output Table Buttons Recording Tables: Each recording mode the PC-DVR options to define times and days for the schedule to be... -
Page 14: Alarm / Sensor Configuration
Alarm / Sensor Configuration Events monitored by the PC-DVR (such as detecting motion or losing a video signal) can trigger an alarm. The alarm is typically sound based, and generated by the PC that the card is installed in (and thus produced by the same speaker system attached to the computer). -
Page 15: Auto-Mail
E_Mail From: This is where you enter your outgoing mail the email. address. Typically, this is YourUsername@YourServer (eg. swann@swannsecurity.com). Time: Choose whether the time and date of the alarm event is contained in the attachment to the Auto-mail. Username & Password: The username and password for your outgoing mail server. -
Page 16: P .T.z. (Pan, Tilt, Zoom) Configuration
P .T.Z. (Pan, Tilt, Zoom) Configuration If you are using a PTZ capable camera/dome system, you can use the PC-DVR to control the PTZ capabilities of your camera via one of your computer’s COM ports. Configuring a PTZ system can be a bit tricky, so make sure you have the documentation for your PTZ system handy when setting up the PC-DVR - there’ll be some settings you’ll... -
Page 17: P .T.z. (Pan, Tilt, Zoom) Control
P .T.Z. (Pan, Tilt, Zoom) Control This is the control panel displayed for controlling PTZ capable Focus: Moves the area of the image which is in focus (also camera systems via the PC-DVR. called “Depth of Field”). Use this control to find focus on objects or scenes which appear to be blurry. -
Page 18: Playback
Playback To review footage or search for a specific event, use the Playback window. Here, you can search through footage recorded from all channels, and playback one or more at a time. Back CAM1 CAM2 Image Controls Search Box CAM3 CAM4 Playback Window... -
Page 19: Capture And Backup
Capture and Backup Snap Button Image Folder Capturing a Embedded Text Frame Count Snapshot When capturing a snapshot (or sequence thereof) you will be taken to the Snapshot dialog window. Frame Count: You can capture a single image at a time, or multiple images together. Select how many you want to capture from this drop down menu. -
Page 20: Networking The Pc-Dvr
Networking the PC-DVR If you are interested in configuring the PC-DVR for remote operation, for viewing live images or recorded footage via a local area network (LAN) or the Internet, we will first need to setup the PC-DVR for network access. We can set all the required options in the Basic Configuration window, as shown on page 9. -
Page 21: Remote Access
Remote Access If you have already configured your network as detailed opposite, then the PC-DVR should be accessible via the local network and the Internet. The procedure for remote access can be summarized as: Connecting to the PC-DVR remotely: this involves using an Internet browser to act as a communication interface. You may need to alter the security settings (ActiveX controls) in Internet Explorer - see below. -
Page 22: The Remote Viewing Interface
The Remote Viewing Interface CAM1 CAM2 Active Cameras CAM3 CAM4 Live Image Display Main Menu Controls Split Screen Video Selection Controls The Remote Viewing Interface is the main interface for Video Controls: A standard series of video processing remote access. From this screen, you are able to navigate to amplifier (ProcAmp) controls are available here. -
Page 23: The Remote Playback Interface
The Remote Playback Interface Date/Time Selection Record Mode Selection Playback Window Return to Live View Playback Controls Timeline Playback Window: Where the footage being played back is displayed, arranged according to the viewing mode currently File search. Rather than using the timeline to manually selected (see View Controls). -
Page 24: Remote Configuration
Remote Configuration The configuration screens available remotely offer the same Record: Gives you the option of configuring the recording options as the PC-DVR software itself. The format and layout quality of any given channel or mode. These settings can be of these screens is slightly different to those found in the configured in any way you want - for example, each recording DVR - and we’ll briefly cover some of the key differences... -
Page 25: Connecting Via Iphone
Connecting via iPhone You can connect to, view live images from and control some settings on the PC-DVR using an iPhone. Unfortunately, you will not have the level of access and control that logging on via a computer running the proper software. Only recent releases of the PC-DVR support this function, as the iPhone is still quite new technology. -
Page 26: Troubleshooting Guide
Troubleshooting Guide Problem: The PC-DVR software will not install correctly. Problem: The PC-DVR software displays an error message Solution: Be sure that you’re not running “setup.exe” from saying “Cannot open Audio”. Solution: The PC-DVR attempts to route the microphone a zipped folder – if so, extract all files before proceeding. Ensure that you are logged into your computer using an input on your sound card to the recording stream within the administrator account, otherwise you will not have the... -
Page 27: Technical Specifications
Technical Specifications PC-DVR4 Video Video Format: PAL or NTSC Video Inputs (USB Version): 4 x Composite RCA Inputs Video Inputs (PCI Version): 4 x Composite BNC Inputs Display Resolution: NTSC: 640 x 480 PAL: 704 x 576 Display Frame Rate (Global): NTSC: 30FPS, PAL 25FPS Audio Audio Inputs (USB):... - Page 28 Swann. The end user is responsible for all freight charges incurred to send the product to Swann’s repair centres. The end user is responsible for all shipping costs incurred when shipping from and to any country other than the country of origin.
Need help?
Do you have a question about the SW231PC4 and is the answer not in the manual?
Questions and answers