Table of Contents
Advertisement
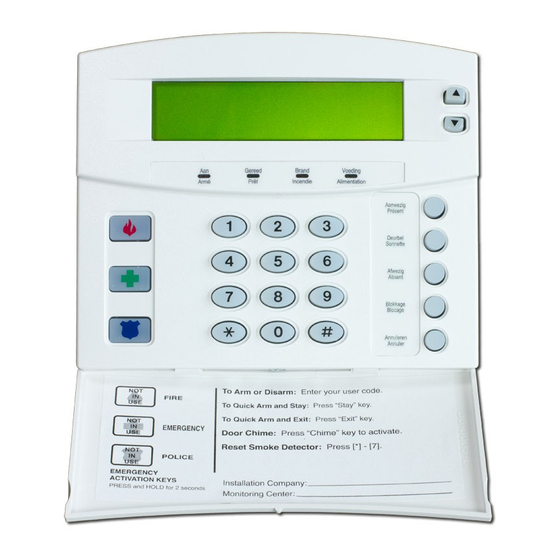
NX-148 LCD KEYPAD
INSTALLATION MANUAL
Entering the Program Mode . . . . . . . . . . . . . . . . . . . . . . . . . . . . . . . 2
Selecting the Module to Program . . . . . . . . . . . . . . . . . . . . . . . . . . . 2
Programming a Location . . . . . . . . . . . . . . . . . . . . . . . . . . . . . . . . . . 2
NX-148 Library . . . . . . . . . . . . . . . . . . . . . . . . . . . . . . . . . . . . . . . . . 3
Loading Factory Defaults . . . . . . . . . . . . . . . . . . . . . . . . . . . . . . . . . 3
Enrolling Modules and Keypads . . . . . . . . . . . . . . . . . . . . . . . . . . . . 3
Programming the NX-148 Keypad . . . . . . . . . . . . . . . . . . . . . . . 3 - 5
Adjusting the View . . . . . . . . . . . . . . . . . . . . . . . . . . . . . . . . . . . . . . . . . . 3
Programming Custom Messages . . . . . . . . . . . . . . . . . . . . . . . . . . . . . . 4
Set Keypad Options . . . . . . . . . . . . . . . . . . . . . . . . . . . . . . . . . . . . . . . . 4
Set Keypad Number & Partition . . . . . . . . . . . . . . . . . . . . . . . . . . . . . . . 5
Keypad Functions . . . . . . . . . . . . . . . . . . . . . . . . . . . . . . . . . . . . 5 - 7
Reading the Event Log . . . . . . . . . . . . . . . . . . . . . . . . . . . . . . . . . . . . . . 5
Set Elapsed Increments . . . . . . . . . . . . . . . . . . . . . . . . . . . . . . . . . . . . . 5
Set System Time & Date . . . . . . . . . . . . . . . . . . . . . . . . . . . . . . . . . . . . . 5
Adjust Keypad Tone . . . . . . . . . . . . . . . . . . . . . . . . . . . . . . . . . . . . . . . . 6
View Zone Status . . . . . . . . . . . . . . . . . . . . . . . . . . . . . . . . . . . . . . . . . . 6
View Alarm Memory . . . . . . . . . . . . . . . . . . . . . . . . . . . . . . . . . . . . . . . . 6
Change User Codes . . . . . . . . . . . . . . . . . . . . . . . . . . . . . . . . . . . . . . . . 6
Assigning Authority Level . . . . . . . . . . . . . . . . . . . . . . . . . . . . . . . . . . . . 6
Partitioned System Operation . . . . . . . . . . . . . . . . . . . . . . . . . . . 7 - 9
Service Display . . . . . . . . . . . . . . . . . . . . . . . . . . . . . . . . . . . . . 9 - 10
Maximum Wire Run . . . . . . . . . . . . . . . . . . . . . . . . . . . . . . . . . . . . 11
Specifications & Warranty . . . . . . . . . . . . . . . . . . . . . . . . . . . . . . Back
Table of Contents
Advertisement
Table of Contents

Related Manuals for CADDX NX-148


Summary of Contents for CADDX NX-148
-
Page 1: Table Of Contents
NX-148 Library ........ -
Page 2: Entering The Program Mode
ENTERING THE PROGRAM MODE To enter the Program Mode, press [U]-[8]. At this time, the LCD screen will prompt you for the programming code. Next, enter the "Go To Program Code" (FACTORY DEFAULT IS [9]-[7]-[1]-[3]). If the "Go To Program Code" is valid, the LCD screen will prompt you for the device address you wish to program. -
Page 3: Nx-148 Library
12 seconds, during which time the "Service Screen" will be displayed. Once a module is enrolled, if it is not detected by the control, the "Service Screen” will be displayed. PROGRAMMING THE NX-148 LCD KEYPADS This section describes how to program the address and partition of each keypad, as well as the options that are available. -
Page 4: Programming Custom Messages
[U]-[9]-[2] PROGRAMMING CUSTOM MESSAGES IN THE KEYPAD NOTES: The messages (custom, zone, and shutdown) are transferred to other LCD keypads after this mode is exited. All keypads must be addressed and enrolled for this to happen . Set the keypad numbers with [U]-[9]-[4] prior to programming custom messages. -
Page 5: Set Keypad Number & Partition
[U]-[9]-[4] SET KEYPAD NUMBER AND PARTITION The LCD screen will prompt for a code. 1) Enter [U]-[9]-[4] The LCD will now prompt you for the keypad number followed by 2) Enter [program code] [U]. The current keypad number will be displayed in the lower right hand corner. -
Page 6: Adjust Keypad Tone
[U]-[0] ADJUST KEYPAD TONE The LCD screen will prompt you to use the scroll keys located on 1) Press [U]-[0] the right of the display to raise or lower the tone. 2) Use the up scroll key to raise the tone. The keypad will emit a continuous tone to allow you to hear the Use the down scroll key to lower the tone. -
Page 7: Partitioned System Operation
Otherwise, the “Walk-Test Mode” will automatically exit after 15 minutes. PARTITIONED SYSTEMS OPERATION The NX-148 can be programmed to operate all the system partitions simultaneously. To set the multi-partition mode, use the [U]-[9]-[3] function, and answer "YES" to the question "Master keypad?". - Page 8 DISPLAYS IN THE PARTITIONING MASTER MODE Armed and Ready Status The LCD screen will display the Armed and Ready status of ALL eight (8) partitions if any or all of the areas is armed or not ready. This display is reflecting all 8 areas are Ready, and Area 5 is disarmed. Ready 12345678 NOTE: If a number is flashing on the armed line, that area is armed Instant .
-
Page 9: Service Display
Area 5 is selected and Area 5 is ready to arm. To exit the individual partition Area 5 Ready mode, enter [#]-[#]. Type code to arm Silencing Alarms in the Multi-Partition Mode If the keypad is sounding an alarm or the siren is running, it can be silenced by entering a code with the authority for the area(s) that are in alarm. - Page 10 Expansion The main power to an expansion power supply is not on. Power Trouble Expansion An expansion power supply has a low battery. Low Battery Expander A box containing an expansion device has been opened. Box Tamper Expansion A short circuit of an expansion device’s power supply has occurred. Over-current Expansion An expansion device or keypad is not reporting to the control panel.
-
Page 11: Maximum Wire Run
NX-124 MAXIMUM WIRE RUN (Note: These numbers are for one keypad at the end of the wire. When connecting more than one keypad to the end of the wire, a heavier gauge wire will be required.) WHEN CONNECTED TO NX-8 WHEN CONNECTED TO NX-320 Length in feet Wire Gauge... - Page 12 CADDX CONTROLS, INC. GUARANTEES THIS PRODUCT AGAINST DEFECTIVE PARTS AND WORKMANSHIP FOR TWENTY-FOUR (24) MONTHS FROM DATE OF MANUFACTURING. IF ANY DEFECT APPEARS DURING THE WARRANTY PERIOD, RETURN IT TO CADDX POSTAGE PREPAID. THE UNIT WILL BE REPAIRED AND RETURNED AT NO CHARGE. FOR THE REMAINING 36 MONTHS OF WARRANTY, THE CHARGE TO REPAIR OR REPLACE THIS UNIT WILL NOT EXCEED $10.00 PLUS...
Need help?
Do you have a question about the NX-148 and is the answer not in the manual?
Questions and answers