
Related Manuals for Solidtronic RT-RoIP2-Azetti


Summary of Contents for Solidtronic RT-RoIP2-Azetti
- Page 1 RT-RoIP2-Azetti User’s Guide Radio Over IP Network Gateway RT-RoIP2-Azetti User’s Guide Copyright © 1999-2015, Innotek Company Limited. All Right Reserved.
-
Page 2: Important Notice
Thank you for purchasing RT-RoIP2 Radio-Over-IP Network Gateway. Please read this User’s Guide carefully before putting RT-RoIP2 into operation. Support for the RT-RoIP2 is available by email. Please direct all questions via email to support@solidtronic.com. Your question(s) will be answered promptly. Electrical shock hazard Never attempt to connect the unit to any power network other than one for which it was intended. -
Page 3: Key Features
Gateway. It is a cost effective and excellent performance equipment for using to connect mobile phone and 2-way radio users, or bridge 2-ways radio systems across sites. The RT-RoIP2-Azetti is equipped with the 2 generation Intelligent Digital Audio Tracking System(iDats), the Android 4.0.3 OS with 3... -
Page 4: Product Descriptions
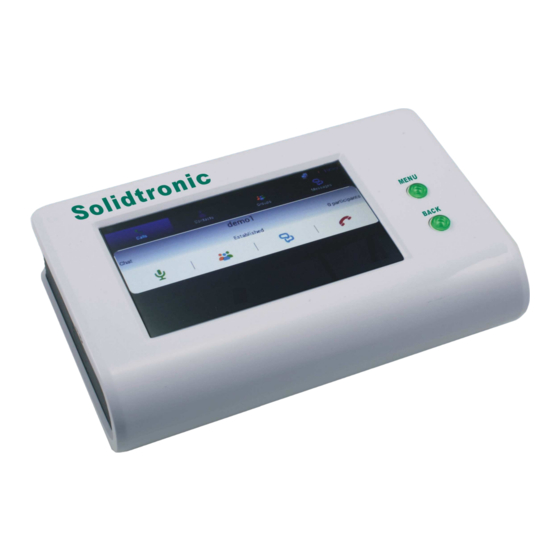
RT-RoIP2-Azetti User’s Guide Product Descriptions Packing List RT-RoIP2-Azetti Radio Over IP Network Gateway x 1 Ethernet Connection Cable x 1 Radio Unit Connection Cable x 1 This User's Guide x 1 Major Operating Controls, Terminals and Their Functions 1. LCD This is a 4.3 inch touch screen LCD for displaying and on screen controlling the system. - Page 5 RT-RoIP2-Azetti User’s Guide 4. Radio Unit Terminal This terminal is used to connect to a radio unit. 5. Mode Selection Switch : Radio Unit PTT Control Mode Selection. OFF for PTT Mode 1. ON for PTT Mode 2. DIP SW1 DIP SW2 : Carrier Handover Time Selection.
-
Page 6: Installation
RT-RoIP2-Azetti User’s Guide Installation Simple System Connection Diagrams Note: The connected Radio Unit MUST be connected with external antennas to reduce the TX RF signal affect to the system equipment. Copyright © 1999-2015, Innotek Company Limited. All Right Reserved. -
Page 7: Operation
RT-RoIP2-Azetti User’s Guide System Setup Connect the Radio Unit to an external antenna. Connect the RT-RoIP2 to a Radio Unit by using the bundled connection cable. Connect the RT-RoIP2 to an IP network by using the Ethernet cable. Turn on the Radio Unit and adjust its volume to approximate 1/3 position of maximum level. -
Page 8: Specifications
RT-RoIP2-Azetti User’s Guide Specifications Power Supply : DC 5V Power Consumption : 600mA (Typical) Ethernet : 10/100 Base-T : ARM Display : 4.3 inch Touch Screen LCD Control Buttons : MENU and BACK Pre-installed Communication App : Azetti PTT/PoC Carrier Detect Activation Time : <1/2 Seconds...
Need help?
Do you have a question about the RT-RoIP2-Azetti and is the answer not in the manual?
Questions and answers