Table of Contents
Advertisement
Quick Links
HF TRANSCEIVER
Operating Manual
VERTEX STANDARD CO., LTD.
4-8-8 Nakameguro, Meguro-Ku, Tokyo 153-8644, Japan
VERTEX STANDARD
US Headquarters
17210 Edwards Rd., Cerritos, CA 90703, U.S.A.
International Division
8350 N.W. 52nd Terrace, Suite 201, Miami, FL 33166, U.S.A.
YAESU EUROPE B.V.
P.O. Box 75525, 1118 ZN Schiphol, The Netherlands
YAESU UK LTD.
Unit 12, Sun Valley Business Park, Winnall Close
Winchester, Hampshire, SO23 0LB, U.K.
VERTEX STANDARD HK LTD.
Unit 5, 20/F., Seaview Centre, 139-141 Hoi Bun Road,
Kwun Tong, Kowloon, Hong Kong
Advertisement
Table of Contents

Related Manuals for Yaesu MARK-V FT-100MP


Summary of Contents for Yaesu MARK-V FT-100MP
- Page 1 17210 Edwards Rd., Cerritos, CA 90703, U.S.A. International Division 8350 N.W. 52nd Terrace, Suite 201, Miami, FL 33166, U.S.A. YAESU EUROPE B.V. P.O. Box 75525, 1118 ZN Schiphol, The Netherlands YAESU UK LTD. Unit 12, Sun Valley Business Park, Winnall Close Winchester, Hampshire, SO23 0LB, U.K.
-
Page 2: Table Of Contents
Tabel of Contents General Description .............. 1 Using SUB VFO B ............. 60 Specifications ............... 3 Dual Reception .............. 60 Plug/Connector Pinout Diagrams ......... 4 Split Frequency Operation ..........62 Accessories & Options ............5 Sideband Diversity Reception ......... 63 Supplied Accessories ............ - Page 3 Whether this is your first rig, or if superb receiver performance is a result of direct lin- Yaesu equipment is already the backbone of your sta- eage from the legendary FT-1000D and FT-1000MP. tion, rest assured that your transceiver will provide many New technology Direct Digital Synthesizers (two 10-bit hours of operating pleasure for years to come.
-
Page 4: General Description
CW and Data modes, help sible via the Menu programming system. dig out weak signals from the noise. Combined with The Yaesu CAT system provides a direct link to the EDSP Auto-Notch and Noise Reduction circuits, the transceiver CPU for computer control and... -
Page 5: Specifications
PECIFICATIONS General Rx Frequency Range: 100 kHz - 30 MHz Tx Frequency Ranges: 160 - 10m (Amateur bands only) Frequency Stability: ±0.5 ppm (after 1 min. @ 25 °C) ±0.25 ppm (after 1 min. @ 25 °C, w/TCXO-6) Operating Temperature Range: –10 °C ~ +50 °C Emission Modes: LSB, USB, CW, FSK, AFSK, AM, FM... -
Page 6: Plug/Connector Pinout Diagrams
ONNECTOR INOUT IAGRAMS DC IN +13.8 V DOWN FAST +13.8 V MIC GND (as viewed from front panel) (as viewed from rear panel) BAND DATA DVS-2 +13V VOICE IN TX GND VOICE OUT BAND DATA A BAND DATA B CNTL 1 BAND DATA C CNTL 2 BAND DATA D... -
Page 7: Accessories & Options
Designed especially to match the electrical and cos- 29 AC Power Supply and FRB-5 Relay Unit, available metic features of the MARK-V FT-1000MP Field, the from your Yaesu dealer. MD-200 includes a new-technology “Variable Side The FRB-5 Relay Unit allows interconnection and Pressure Control”... - Page 8 FT-1000MP Field. The FH-1 permits several remote requirements, others may be unavailable in some re- control features, which may be selected via Menu pro- gions. Check with your Yaesu dealer for additions to gramming. More information is on page 76. the above list.
-
Page 9: Safety Precautions
AFETY RECAUTIONS Before initiating the installation of your MARK-V FT- Typically, the ground connection consists of one or 1000MP Field transceiver, please take the time to re- more copper-clad steel rods, driven into the ground. If view the following safety guidelines. multiple ground rods are used, they should be posi- tioned in a “V”... -
Page 10: Electrical Shock Prevention
AFETY RECAUTIONS RF F & LECTRICAL HOCK REVENTION IELD XPOSURE DVISORY Be certain that all station wiring is properly insu- LECTROMAGNETIC OMPATIBILITY lated so as to prevent short-circuits which could dam- This transceiver is capable of power output in ex- age this transceiver and/or accessories connected to cess of 50 Watts, so customers in the United States it. -
Page 11: General Setup
ENERAL ETUP RELIMINARY NSPECTION RANSCEIVER OCATION Inspect the transceiver upon opening the packing To assure long life of the components, a primary carton. Check that all controls and switches work freely, consideration in setting up the MARK-V FT-1000MP Field is providing for adequate ventilation around the and inspect the cabinet for any damage. -
Page 12: Antenna Considerations
ENERAL ETUP NTENNA ONSIDERATIONS The MARK-V FT-1000MP Field is designed for use Loss in dB per 30m (100 feet) with any antenna system providing a 50 W resistive for Selected 50 Coaxial Cables ( Assumes 50 Input/Output Terminations ) impedance at the desired operating frequency. While minor excursions from the 50 W specification are of no Loss: Loss:... -
Page 13: Linear Amplifier Interfacing
QSK A PERATION WITH MPLIFIERS the optional Yaesu FL-7000 or VL-1000 Linear Ampli- Connect the RF output from the transceiver ANT fier, providing automatic band switching via digital band jack (A or B) to the RF input jack of the linear. Connect... -
Page 14: Accessory Installation
CCESSORY NSTALLATION INEAR MPLIFIER NTERFACING -QSK A If using an FL-7000, connect optional cable E-767 PERATION WITH NON MPLIFIERS (P/N D4000019) from the transceiver BAND DATA jack (FL-2100 SERIES OR OTHERS to the amplifier ACC-2 jack. This provides automatic The TX GND jack on the transceiver rear panel is band selection for the linear, as well as QSK Tx/Rx connected to an internal relay, for non-QSK T/R switch- switching control. - Page 15 CCESSORY NSTALLATION INEAR MPLIFIER NTERFACING BOUT Caution - Please Read!! The MARK-V FT-1000MP Field provides an exter- The MARK-V FT-1000MP Field is designed for use nal ALC jack on the rear panel (RCA-type jack) for with the FL-7000/VL-1000 when QSK operation input of Automatic Level Control voltage from a linear with a linear amplifier is desired.
-
Page 16: Transverter Operation
The MARK-V FT-1000MP Field can be used with A typical FTV-1000 setup is shown below. Installa- the optional Yaesu FTV-1000 50 MHz Transverter, pro- tion information for the FRB-5 is provided in the FRB- viding excellent receiver performance and up to 200 5 Installation Manual, while connection and operation Watts of power output. -
Page 17: Digital Modem (Tnc, Weatherfax, Etc.) Interfacing
CCESSORY NSTALLATION ( TNC, W . ) I IGITAL ODEM EATHER NTERFACING The MARK-V FT-1000MP Field offers special fea- IGITAL ODES WITH A tures for digital modes, such as a built-in digitally-syn- ( PSK-31 ) OMPUTER OUND thesized AFSK generator for RTTY and AMTOR ter- The explosion of new digital modes of amateur com- minal units, IF bandwidth optimization and automatic munication means that you will want to make connec-... - Page 18 CCESSORY NSTALLATION ( TNC, W . ) I IGITAL ODEM EATHER NTERFACING Construct a patch cable or cables to make the nec- For FSK operation using the RTTY jack, the fol- essary connections between your TNC and the appro- lowing are the pin connections required: priate rear panel jack(s) (RTTY for FSK, PACKET for Pin 1 ( SHIFT ) - Connect this pin to your TNC or AFSK).
- Page 19 CCESSORY NSTALLATION ( TNC, W . ) I IGITAL ODEM EATHER NTERFACING CAUTION!! The MARK-V FT-1000MP Field cooling system is designed to handle continuous duty transmission at 100 watts output. However, for continuous-duty digital modes like RTTY, we recommend limiting your transmissions to 3 minutes or less, with at least 3 minutes receive in between transmissions.
- Page 20 CCESSORY NSTALLATION ( TNC, W . ) I IGITAL ODEM EATHER NTERFACING There are a few steps you can take to reduce or OMPUTER ENERATED eliminate computer-generated RFI. The first step is to When using a TNC connected to your transceiver, ensure that only shielded cables are used for TNC-to- or even having a PC located in the shack, the possibil- transceiver connections, carefully check RF ground...
-
Page 21: Other Digital/Recording Device Interfacing
CCESSORY NSTALLATION CW K THER IGITAL ECORDING EVICE ADDLE AND OMPUTER NTERFACING EYING NTERFACE UGGESTIONS AF OUT J EATURES The MARK-V FT-1000MP Field includes a host of This is a 3.5 mm miniature stereo phone jack which provides constant-level (100 mV @ 600 W) for con- features for the CW operator, the functions of which nection to a WeatherFax decoder, tape recorder, or will be detailed in the “Operation”... -
Page 22: Antenna Connections
CCESSORY NSTALLATION NTENNA ONNECTIONS The MARK-V FT-1000MP Field’s three antenna con- NOTE REGARDING nectors, plus innovative microprocessor-based LARGE RECEIVE ANTENNAS memory and switching circuits, provide excellent flex- ibility in setting up your antenna connections. Although surge suppression is provided on all an- Typical antenna configurations are shown below. -
Page 23: Personal Computer Interfacing For Contest Software, Etc
CCESSORY NSTALLATION ERSONAL OMPUTER NTERFACING FOR ONTEST OFTWARE The MARK-V FT-1000MP Field features a built-in Details regarding the programming protocols for the CAT system may be found beginning on page 86. level converter, allowing direct connection from the rear- panel CAT jack to the serial port of your computer, without the need for any external converter box. -
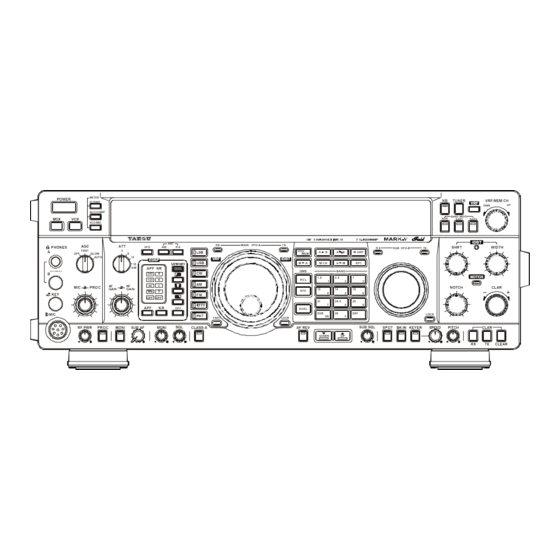
Page 24: Front Panel Controls
RONT ANEL ONTROLS This chapter describes each control and connector on the MARK-V FT-1000MP Field. You can just glance through it quickly now, but some of the descriptions will be more meaningful if you take the time to read them in detail now. - Page 25 RONT ANEL ONTROLS PROC Knob SQL Knob The inner MIC control adjusts the microphone in- This control sets the signal level threshold at which put level for (non-processed) SSB and AM transmis- main VFO-A receiver audio is muted (and the green sion.
- Page 26 RONT ANEL ONTROLS METER POWER IC/SWR ALC/COMP VCC/MIC MAIN VFO-A PHONES FAST VFO/ M GRP SLOW AUTO IDBT EDSP M CK BAND PROC GAIN GAIN 24.5 DUAL FAST LOCK RF PWR PROC MONI SUB AF MONI CLASS-A AF REV SUB S DOWN EDSP Filters OFF:...
- Page 27 RONT ANEL ONTROLS CLASS-A Button AF REV Button This button changes the final amplifier operating Pressing this reverses the main/sub receiver au- mode to Class-A. When operating the final amplifier dio adjusted using the AF GAIN knob and SUB AF in the Class-A mode, the maximum output power will knob.
- Page 28 RONT ANEL ONTROLS TUNER VRF/MEM CH BAND WIDTH NAR1 NAR2 IDBT MAIN VFO-A SHIFT WIDTH SUB VFO-B VFO/ M GRP IDBT M CK BAND NOTCH NOTCH CLAR 24.5 DUAL LOCK FAST LOCK CLASS-A AF REV SUB SQL SPOT BK-IN KEYER SPEED PITCH CLAR...
- Page 29 RONT ANEL ONTROLS [ CLAR ] Buttons SUB VFO-B Tuning Knob Pressing the [ RX ] button activates the CLAR knob, This knob adjusts the Sub VFO-B operating fre- quency. The available tuning increments are the same to allow offsetting the receiving frequency temporarily below).
- Page 30 RONT ANEL ONTROLS TUNER VRF/MEM CH BAND WIDTH NAR1 NAR2 IDBT MAIN VFO-A SHIFT WIDTH SUB VFO-B VFO/ M GRP IDBT M CK BAND NOTCH NOTCH CLAR 24.5 DUAL LOCK FAST LOCK CLASS-A AF REV SUB SQL SPOT BK-IN KEYER SPEED PITCH CLAR...
- Page 31 IF/3rd IF)” and the NAR 2 bandwidth will be set to “2.0 kHz/2.0 kHz (2nd IF/3rd IF)” automatically. Note 2 - The 2nd IF (8.2 MHz) 2.0-kHz BW filter (Yaesu P/N YF-114SN) and 250 Hz BW filter (Yaesu P/N YF- 114CN) and 3rd IF (455 kHz) 2.0-kHz BW filter (Yaesu P/N YF-110SN), 500 Hz BW filter (Yaesu P/N YF-...
-
Page 32: Lcd Bargraph Meter Indications
LCD B ARGRAPH ETER NDICATIONS +60dB TUNER WAIT HI SWR TRANSMIT PRGM CLAR MAIN DUAL COMP BUSY SPLIT BUSY FAST LOCK OFFSET MEM F TUNING M TUNE S/PO Scale LOCK Thirty-one bargraph segments indicate relative re- Front panel tuning knob and/or buttons are locked. ceived signal strength (one S-unit = 6 dB) from S-0 to S9 +60 dB. - Page 33 LCD B ARGRAPH ETER NDICATIONS +60dB TUNER WAIT HI SWR CLAR GROUP CLEAR OFFSET MEM F M CK LOCK TRACK M TUNE RTTY TUNER MEM F This indicator comes on when the automatic an- Appears when the memory channel frequency ap- tenna tuner (ATU) is activated and in-line.
-
Page 34: Top Panel Access & Controls
& C ANEL CCESS ONTROLS J6801 (RED) J6809 J6808 (BLU) J6807 (YEL) J6805 J6806 (PUL) (BLU) (BLK) RTTY A-VOX DLAY FM MIC C6807 HPB-M HPB-S HPA-M HPA-S J6804 J6802 (BRN) J6803 (BLK) (BLK) C6803 ALC - UNIT A-VOX ( ANTI-VOX TRIP ) The following controls are accessible beneath the removable panel on the top half of the transceiver case. - Page 35 VR6812 This control adjusts the tuning meter segment in- dications. Do not adjust this control, by mistake, as this control will adversely affect meter tuning indica- tion, and requires factory re-alignment!. HPB-M This control sets the audio level available from the main receiver to headphone jack B (¼-inch plug).
-
Page 36: Rear Panel Controls & Connectors
& C ANEL ONTROLS ONNECTORS DC IN ~ AC IN INPUT DC 13.8V INPUT FUSE 20 A AC 100-120V ~ 50-60Hz 6A BAND DATA +13.8V RX ANT TRV TX GND O F F OUTPUT DC 13.8V 200 mA REMOTE BACKUP DVS-2 PACKET RTTY... - Page 37 & C ANEL ONTROLS ONNECTORS EXT ALC Phono Jack RX ANT Phono Jacks (In/Out) This input jack accepts negative-going external ALC These antenna jacks are provided for connection (Automatic Level Control) voltage from a linear ampli- for a separate receive-only antenna, activated when fier, to prevent over-excitation by the transceiver.
-
Page 38: Operation
PERATION EFORE TARTING ECEIVING Before plugging in the transceiver, check your in- Note: the following procedure assumes the transceiver stallation to make sure your AC voltage is correct, and has not been used before, and not already set for Dual that your ground and antenna are connected as de- reception. -
Page 39: Mode Selection
PERATION ECEIVING MODE S ELECTION Special Note for CW Mode Press the [ MODE ] button (to the left of (Reverse CW sideband) the main tuning knob) corresponding to the When you switch modes between CW and USB, mode you wish to operate - for now, we sug- you may notice that the frequency of received sig- gest an SSB mode: USB if you have selected nal stays the same (even though the panel fre-... -
Page 40: Tuning The Mark-V Ft-1000Mp Field
PERATION ECEIVING MARK-V FT-1000MP F Shuttle Jog IELD UNING THE The Shuttle Jog ring is more efficient for large fre- Tuning is accomplished in several ways, with each quency excursions, or whenever QSY requires spin- method having its own advantages; they are: ning the VFO knob a lot, while still providing positive ¦... - Page 41 PERATION ECEIVING Panel Up/Down Buttons Display Settings Press the large UP ( p ) and DOWN ( q ) buttons below the key- Display Mode - By default, switching to and from CW, PKT or RTTY modes causes the display to pad to step around the band in change by the amount of offset selected by the CW 100-kHz steps, and then tune around the band a bit...
-
Page 42: Alternate Vfo Operation ("Front & Rear" Vfo)
PERATION ECEIVING VFO O VFO S & R LTERNATE PERATION ELECTION ECEIVER UTING ( “F ” VFO ) & R Above the Main and Sub VFO knobs are a pair of RONT If you press the keypad band key for the same band button/LEDs labeled RX and TX. -
Page 43: Signal Tuning Meter Indications
PERATION ECEIVING For RTTY and Packet, dual segments appear (rep- IGNAL UNING ETER NDICATIONS resenting the mark and space tones), and in this case The MARK-V FT-1000MP Field incorporates sev- optimum tuning is achieved when even balance and eral display indications that make tuning stations a maximum separation between the dual segments oc- simple and accurate task: cur. -
Page 44: Expanded Tuning Scale
PERATION ECEIVING AM S XPANDED UNING CALE YNCHRONOUS UNING The bargraph segment meter above the MAIN VFO- Audio distortion of AM stations due to carrier fading A frequency display serves as a triple mode enhanced is common. Synchronous tuning reduces this phenom- tuning scale. -
Page 45: General Coverage Reception
PERATION ECEIVING ENERAL OVERAGE ECEPTION Note Regarding You may have already noticed that if you tune out- AM Broadcast Reception side one of the amateur bands (actually, outside of the 500-kHz segment that includes each band), “GEN” In many countries, broadcast stations in the Stan- appears in a box at the left side of the display. -
Page 46: Dealing With Interference
PERATION EALING WITH NTERFERENCE The MARK-V FT-1000MP Field includes a wide RONT ELECTIONS range of special features to suppress the many types , IPO & ATT ELECTION of interference that may be encountered on the HF The best receiver front-end selection will depend bands. -
Page 47: Agc (Automatic Gain Control) Selection
PERATION EALING WITH NTERFERENCE AGC ( A band (for example, tuning from 1.999.99 MHz to UTOMATIC ONTROL ELECTION 2.000.00 MHz), the higher gain of the “Flat” preamp When tuning around the band look- will cause the background noise to increase sud- ing for signals, the AGC selector is usu- denly (and decrease again if you tune back inside ally best kept in the “AUTO”... -
Page 48: Noise Blanker
Other filters can be ordered to an acceptable level. Although their use requires little from your Yaesu dealer. Installation instructions are cov- more than rotating a control, it is good to have knowl- ered on page 113 and filter menu selections (5-0 through edge on how each function works and the effect on the 5-7) on pages 101 and 102. -
Page 49: Width Control
PERATION EALING WITH NTERFERENCE WIDTH C wise rotation moves the upper skirt of the IF passband ONTROL lower in frequency, and counter-clockwise rotation We just saw that specific IF filters can be selected moves the lower skirt upwards. If a QRM condition to limit the receive bandpass to a pre-set width (essen- occurs after tuning in a station, slowly rotate the con- tially the total width of the installed filter). -
Page 50: Shift Control
PERATION EALING WITH NTERFERENCE SHIFT C ONTROL OTCH ILTER The SHIFT control tunes the relative position of the After tuning in a desired signal and adjusting the IF receiver IF passband with respect to the displayed fre- bandwidth and shift, if “heterodyne” interference such quency in all modes except FM. -
Page 51: Clarifier (Rx/Tx Offset Tuning)
PERATION EALING WITH NTERFERENCE transmit frequency remains the same as the origi- LARIFIER FFSET UNING nal frequency display when the receive Clarifier is The three CLAR buttons near off. You can reset the offset to 0.00 kHz at any time the lower right corner of the front by simply pressing CLEAR. -
Page 52: Offset Display Mode
PERATION EALING WITH NTERFERENCE When you finish your QSO, remember to press the FFSET ISPLAY Clarifier RX button again to turn off the Clarifier. You The small sub-panel to the right of the MAIN VFO- might also want to clear the offset when done. A display can be configured to show one of four differ- The MARK-V FT-1000MP Field has an independent ent operating parameters. -
Page 53: Transmitting
PERATION RANSMITTING The transmitter can be activated within the 500-kHz Antenna Selection segment of any of the HF amateur bands, and from 28 to 30 MHz. When tuned to any other frequency, “GEN” is displayed at the left side of the display, and the trans- mitter is disabled. -
Page 54: Ssb Transmission
PERATION RANSMITTING SSB T If the SWR presented to the transceiver is above RANSMISSION 3:1, the tuner will generally not complete the tuning To transmit in LSB or USB mode: process (although in certain borderline cases, it may r Make sure the appropriate mode indicator is lit, and actually be able to lower the SWR below 1.5:1). -
Page 55: Microphone Tone Selection
PERATION RANSMITTING Microphone Tone Selection To enable this feature, press the orange [ CLASS-A ] switch (located below and Before setting up the speech processor, set the to the left of the Main Tun- selector switch on the rear of the MH-31 microphone ing dial) while operating ei- (supplied) for the desired tone characteristic. -
Page 56: Vox Operation
PERATION RANSMITTING VOX Operation CW T RANSMISSION (Voice-Actuated T/R Switching Operation) There are several types of CW transmission avail- able with the MARK-V FT-1000MP Field. All require VOX operation allows you to activate the transmit- ter in any voice mode merely by speaking into the mi- that you have a CW key or keyer paddles connected to crophone, without having to press the PTT switch. -
Page 57: Electronic Keyer Operation
PERATION RANSMITTING Electronic Keyer Operation ACS (Auto Character Spacing) The built-in electronic keyer offers two iambic modes This feature improves your CW sending quality by and a mechanical “bug” keyer emulation. You will need ensuring the inter-character spacing of dots and dashes to connect keyer paddles to one of the KEY jacks to remains constant. -
Page 58: Keyer Settings
PERATION RANSMITTING Keyer Settings transceiver’s SPOT tone with that of the station being worked by the DX station, so as to be “next in line” on Keyer Dot & Dash Weighting - menu selections 7- the same frequency. This SPOT signal is centered in 1 and 7-2 adjust the Dot:Space and Dash:Space weight- the receiver section’s IF passband, as well, which en- ing. -
Page 59: Am Transmission
PERATION RANSMITTING AM T RANSMISSION IGITAL PERATION Transmitter setup for the AM mode is essentially Information regarding connection of your MARK-V FT-1000MP Field to commonly-available digital-mode the same as for LSB or USB, except that you must avoid overmodulating, and limit carrier power to 25 modem devices is presented beginning on page 15. -
Page 60: Packet Operation
PERATION RANSMITTING ing the need for re-tuning or use of the SHIFT control When tuning, be aware that some common HF for re-centering. packet channels, such as “14.103” MHz, were origi- nally determined to correspond with an actual IF cen- One of four standard tone pairs can be chosen for ter frequency 1700 Hz lower (in accordance with an operation from menu selection 6-5, as desired. -
Page 61: Fm Transmission
PERATION RANSMITTING FM T FM Repeater Operation RANSMISSION Several features are available for operation on FM A separate, dedicated “29 MHz” band is provided on the MARK-V FT-1000MP Field, allowing you to op- repeaters above 29 MHz, which typically use 100-kHz splits. -
Page 62: Using Sub Vfo B
Operation SUB VFO B SING The Sub VFO works in a similar manner to the Main About the only things you cannot do with the Sub VFO, with which you should be familiar by now. The VFO (that you can with the Main VFO), are store it Sub VFO provides simple split (transmit/receive) fre- directly into a memory, and set the Clarifier. -
Page 63: Using Headphones For Dual Receive
Operation SUB VFO B SING Balance - The AF GAIN knob adjusts the volume Note that both the Main and Sub VFOs must be activated (to put the MARK-V FT-1000MP Field into for both the Main and Sub VFOs simultaneously. The small SUB AF now functions as a “balance”... -
Page 64: Split Frequency Operation
Operation SUB VFO B SING Split Operation Mode PLIT REQUENCY PERATION The MARK-V FT-1000MP Field offers three modes Typical split operation involves receiving on the Main of Split operation (chosen by menu selection 8-2): VFO-A or a memory channel, and transmitting on the Sub VFO-B. -
Page 65: Sideband Diversity Reception
Operation SUB VFO B SING IDEBAND IVERSITY ECEPTION ANDWIDTH IVERSITY ECEPTION Here you receive a single AM signal through the This mode involves receiving the same signal two receivers, each receiving the opposite sideband. through two different bandpass filters. The frequency Skywave-propagated signals often show phase distor- and mode of each VFO are the same. -
Page 66: Memory Features
Memory Features EMORY TRUCTURE The MARK-V FT-1000MP Field contains ninety-nine The [ VFO/MEM ] , [ A M ] , [ M A ] and [ M CK ] but- regular memories, labeled 1-1 through 1-99, nine spe- tons and VRF/MEM CH knob are used to control vari- cial programmed limit memories, labeled P1 through ous memory operations, as follows: P9, and five QMB (Quick Memory Bank) memories,... -
Page 67: Memory Programming
Memory Features EMORY ROGRAMMING Memory programming allows storing your favorite Auto Channel-Up or often-used frequencies into memory channels for long-term storage and quick recall. The MARK-V FT- Normally, you must manually increment the chan- 1000MP Field memories are retained after power-off nel number when programming consecutive by a long-life lithium backup battery that should not memories. -
Page 68: Recalling & Operating On Memory Channels
Memory Features & O ECALLING PERATING ON EMORY HANNELS To recall a memory stored per the previous sec- Important Note: Computer software programs uti- lizing the CAT system interface port may presume tion, you first must switch to the “Memory” mode. To do this, while operating on the Main VFO, press [ VFO/ that the transceiver is operating in the VFO mode for MEM ] . -
Page 69: Copying A Selected Memory To Vfo-A
Memory Features & O ECALLING PERATING ON EMORY HANNELS VFO-A OPYING A ELECTED EMORY TO ROUPING EMORIES If desired, you can store the frequency and all op- The 99 regular memories and PMS memories erational settings for the selected memory channel into P1~P9 can be grouped among up to five memory the Main VFO. -
Page 70: Qmb (Quick Memory Bank) Operation
Memory Features & O ECALLING PERATING ON EMORY HANNELS QMB ( Q Additional settings will be entered directly into C-1, UICK EMORY PERATION with previously-stored entries then being shifted to the The Quick Memory Bank is comprised of five next available Quick Memory. This “stacking” system memories (labeled C1 ~ C5) independent from the keeps the most recent entry in the first memory, and regular and PMS memories. -
Page 71: Scanning Features
Scanning Features VFO S CANNING EMORY CANNING The 99 memories in the MARK-V FT-1000MP Field You can start scanning on the Main VFO by holding the microphone UP or DWN button for ½ second (the offer some choices regarding how they are scanned, receiver squelch does not have to be closed in this and, after the following brief description, you can de- case). -
Page 72: Memory "Masking
Scanning Features EMORY CANNING “M ” EMORY ASKING ISABLE You may want to hide some memories from opera- After programming many memories, you may have tion, to simplify selection of others. To mask a displayed tagged specific ones to be skipped during scanning. memory, while “MEM”... -
Page 73: Programmed Memory Scanning (Pms Memories P1 ~ P9)
Scanning Features PMS M P1 ~ P9 ROGRAMMED EMORY CANNING EMORIES r Press [ VFO/MEM ] to select the VFO, and now tune To limit scanning (or tuning) to within a particular frequency range, you can use Programmed Memory to the high edge of the 17-m band (18.168 MHz). Scanning (PMS) provided with nine special-purpose Be sure that the operating mode has not changed. -
Page 74: Advanced Features
Advanced Features EDSP Enhanced Digital Signal Processing uses A/D (Ana- Information is extracted from digital data, and the log to Digital) and D/A (Digital to Analog) conversion EDSP chip performs complex mathematical calcula- techniques under microprocessor control to achieve tions according to pre-programmed routines known as significant enhancement of signals at the audio and algorithms. -
Page 75: Edsp Functions
Advanced Features EDSP EDSP F EDSP RX A UNCTIONS UDIO NHANCEMENT The EDSP circuitry in the MARK-V FT-1000MP Field EDSP Contours allows digital enhancement of both transmitted and re- QRM reduction is accomplished by uti- ceived audio. A basic primer on DSP was given to in- lization of the various DSP filter networks. -
Page 76: Edsp Noise Reducer
Advanced Features EDSP EDSP N EDSP A OISE EDUCER ULTIPLE OTCH ILTER Noise reduction is accomplished On page 48, we previously discussed basic IF notch by utilization of one of the four set- filter operation and how it is used to attenuate hetero- tings selected by the front panel [ NR ] dynes. - Page 77 Advanced Features EDSP The two Notch circuits may be enabled and/or dis- Important Note About EDSP abled using menu selection 2-9. It is important to take An advantage of EDSP is the flexibility for the user note of the selection options available: to customize or “tailor”...
-
Page 78: Remote Control Operation
FH-1 Remote Control Keypad memory keyer which includes a number of automated (available from your Yaesu dealer) connected to the features which reduce operator fatigue during long REMOTE jack on the rear panel of the transceiver. - Page 79 Advanced Features EMOTE ONTROL PERATION 1. Contest Number Memory To select between three-digit contest numbers (e.g. “599001”) and four digit contest numbers (e.g. The [ # ] key allows storage of a message of up to “5991234”), select menu selection 7-6, then rotate the 20 characters in length.
- Page 80 Advanced Features EMOTE ONTROL PERATION back in this mode; the contest number only increments just your callsign, then use message memories 1 ~ 4 (keys [ CH 1 ] ~ [ CH 4 ] ) for your “CQ Contest” mes- if the message is sent over the air.
-
Page 81: Vfo/Memory Control
Advanced Features EMOTE ONTROL PERATION II. VFO/M EMORY ONTROL Menu selection 7-9 also allows utilization of the Re- mote Control Keypad for VFO and Memory control. The front panel [ VFO/MEM ] , [ A B ] , [ A B ] , [ M A ] , [ M CK ] , [ A... -
Page 82: User-Customized Operating Mode
Advanced Features USTOMIZED PERATING Mode - Select from LSB, USB, CW (upper or lower), VERVIEW RTTY (upper or lower), or Packet (AFSK, LSB default). This mode recalls a pre-configured operating “en- vironment” (mode, filter selections, offsets, etc.) by Display Offset - Choose a custom offset ±5.000 pressing and holding in the [ PKT ] key on the front panel. -
Page 83: Optional Dvs-2 Digital Voice Recorder
SSB, AM, and FM operation with newer These LEDs light or flash to indicate the status of model Yaesu transceivers having a special jack for the DVS-2. The “PLAY” LED glows green when play- connection of the DVS-2 on the rear panel. It offers ing back stored data, the “REC”... -
Page 84: Message Recording (From Main Or Sub Receiver Audio)
Advanced Features DVS-2 D PTIONAL IGITAL OICE ECORDER ESSAGE ECORDING LAYBACK MAIN SUB R FROM ECEIVER UDIO ON THE IR OF ECORDED ECEIVER UDIO When used in this mode, the DVS-2 maintains a Once you have recorded an incoming transmission continuous recording of the last (approximately) 16 from another station, you can play it back to them by pressing the [ PLAY ] button on the DVS-2, followed im-... -
Page 85: Message Monitor (Playback Without Transmitting)
Advanced Features DVS-2 D PTIONAL IGITAL OICE ECORDER r Get your microphone ready, and then press the ESSAGE RANSMISSION [ MEMO ] button (the yellow “REC” LED will blink). ( “O ” P LAYBACK r Now press the numbered key for the segment (or After recording a memory segment, you can play it segment pair) to record (only [ 1 ] or [ 2 ] for the 8- back over the air by pressing the appropriate numbered... -
Page 86: Phone Patch Operation
Advanced Features HONE ATCH PERATION Regardless of which patch control method is used, VERVIEW you may need to instruct the person on the telephone Phone patch operation allows linking your MARK- to speak slowly at a clear normal voice, and to say V FT-1000MP Field to the public telephone line to pro- “over”... -
Page 87: Tuning Meter Re-Calibration
Advanced Features UNING ETER ALIBRATION The multi-function meter offers either flashing single ACKET UNING or dual segments to indicate properly tuned CW or FSK The dual packet tuning segments are calibrated (RTTY/PKT) stations. An explanation of tuning indica- (centered) to the default 200-Hz shift tones used for tions is on page 42. -
Page 88: Cat System Computer Control
CAT System Computer Control CAT D VERVIEW ROTOCOL The CAT (Computer Aided Transceiver) System Serial data is passed via the CAT jack on the rear in the MARK-V FT-1000MP Field provides control of panel of the transceiver at 4800 bits/sec. All commands frequency, VFO, memory, and other settings such as sent from the computer to the transceiver consist of dual-channel memories and diversity reception using... -
Page 89: Constructing And Sending Cat Commands
CAT System Computer Control CAT C ONSTRUCTING AND ENDING OMMANDS Example #1: Set Main VFO-A to 14.25000 MHz; Example #2: Activate a RX Clarifier Offset of +3.5 kHz. r First determine the opcode for the desired instruc- r Clarifier settings are controlled from opcode 09H. tion by referring to the CAT Commands Table. -
Page 90: Downloading Mark-V Ft-1000Mp Field Data
CAT System Computer Control OWNLOADING TATUS PDATE RGANIZATION MARK-V FT-1000MP F IELD An overview of the Status Update Data that can be returned to the PC in response to one of the Status On command, the MARK-V FT-1000MP Field will Update requests (opcodes 10H, FAH, F7H, or 0EH) is download some or all (1,863 bytes) of its operational shown next page. - Page 91 CAT System Computer Control TATUS PDATE RGANIZATION 1863-Byte Status Updata Data (sent L-to-R) Status Memory Operating VFO-A VFO-B Memory Flags Channel No. Data Data Data Data 6 byte 1 byte 16 byte 16 byte 16 byte 16 bytes (x 113 memories = 1808 bytes total) ( A ) ( B ) ( C )
-
Page 92: Selecting Updata To Download
CAT System Computer Control ELECTING PDATE ATA TO EMORY HANNEL UMBER OWNLOAD TRUCTURE As mentioned before, there are four opcodes that This identifies the current or last-selected memory cause the MARK-V FT-1000MP Field to report (update) channel 1 ~ 99, P1 ~ P5 or QMB 1 ~ 5 for operation. its operating status by downloading all or a portion of The table below translates hexadecimal codes into its 1,863 data bytes. -
Page 93: 16-Byte Data Record Structure
16-B ECORD TRUCTURE The following tables outline the 16-byte data record The Band Selection data byte is divided into two 4- structure common to the Operating Data, VFO-A, VFO- bit fields, representing the first and second value of B and Memory Data records. The table below shows the band number hex code. - Page 94 CAT System Computer Control 16-B ECORD TRUCTURE A value of 1011 1110 0110 1111 (the 2-s comple- IF Filter Selection - The first data bit (Bit 0) con- ment of the previous example) produces a minus off- tains a flag indicating normal or alternate reception set of -9989.375 Hz.
-
Page 95: Coding Examples
CAT System Computer Control ODING XAMPLES Although Vertex Standard does not provide CAT ample. However, in an actual program, it may be pref- control software (owing to the large variety of comput- erable to convert the decimal frequency variable in the ers and operating systems used by our customers), program to an ASCII string, and then to convert the the following are a few examples of critical CAT I/O... - Page 96 CAT System Computer Control Opcode Command Chart (1) Parameter Bytes Opcode Command Parameter Description or Key Split Tx/Rx operation ON ( T = 01H ) or OFF ( T = 00H ) SPLIT – – – Recall Recalls memory number X: 01H ~ 71H, corresponding to –...
- Page 97 CAT System Computer Control Opcode Command Chart (2) Parameter Bytes Opcode Command Parameter Description or Key Activates remote control and contest keyer functions. K1 = 00H ( fixed value ) K2 = keyer function: 00H = Message 0 01H = Message 1 02H = Message 2 Electronic 03H = Message 3...
- Page 98 CAT System Computer Control Opcode Command Chart (3) Parameter Bytes Opcode Command Parameter Description or Key Switch Antenna Tuner ON ( T = 01H ) or OFF ( T = 00H ) TUNER – – – Tuner Start – – –...
- Page 99 CAT System Computer Control Opcode Command Chart (4) Parameter Bytes Opcode Command Parameter Description or Key Instructs radio to return either five or six status flag bytes. 5-Byte Format ( F = 00H ) 6-Byte Format ( F = 01H ) Status Flag Byte #1 Status Flag Byte #1 Status Flag Byte #2...
-
Page 100: Menu Selection And Setting
Menu Selection and Settings 0-1 GrP1-cH NTRODUCTION In earlier chapters, basic and advanced operation Selects the number of default memory channels were covered to explain the various transceiver fea- (from 1-99) available within Memory Group 1. If all 99 tures. This chapter covers all of the menu selections memory channels are enabled, Memory Group 2 is not entries and their settings used by the transceiver. - Page 101 Menu Selection and Settings Auto-uP 1-7 AutoFASt Auto Channel Up - When programming memo- Automatic Selecting of AGC recovery time - ries from the VFO, this feature automatically increments When the front panel AGC selector is set to the “AUTO” selection to the next higher memory channel.
- Page 102 Menu Selection and Settings 2-5 Auto-in 3-1 diSP-rES Auto Memory Write - When enabled, active chan- Display Resolution - Selects 10 Hz, 100 Hz, or 1 nels found during scanning are automatically written kHz display frequency resolution for the Main- and Sub- into ascending memory channels of the desired VFO displays.
- Page 103 Menu Selection and Settings 3-8 SP-HoLd 4-5 (not Used) Sub Meter Peak Hold - Enables/disables the peak- 4-6 dvS-rEc hold feature for the Sub-VFO meter, and selects the DVS Record VFO - Selects the Main receiver or display bar/segment persistence (delay time) from 10 the Sub receiver as the receive audio source to record ~ 2000 msec.
- Page 104 5-1 8.2-2.0 5-6 455-500 2nd IF 2.0 kHz Filter - Enables/disables the op- 3rd IF 500 Hz Filter - Enables/disables the optional tional 2.0 kHz IF filter (Yaesu P/N YF-114SN). 500 Hz IF filter (Collins YF-115C). 5-2 CW nor 5-7 455-250...
- Page 105 Menu Selection and Settings 6-5 PAc-tonE 7-3 cntSt-no Packet Tones - Selects one of four available packet Contest Keyer ID - Enters the initial 4-digit num- tone pairs (1070/1270Hz, 1600/1800Hz, 2025/2125Hz ber that will increment/decrement after sending during or 2110/2130Hz). The frequency displayed is actually contest QSOs.
- Page 106 Menu Selection and Settings 7-9 rc-Func 8-2 SPLt-SEt Remote Control Function - Selects the active fea- Split Mode Operation - Select one of three split ture for remote control operation. operating modes: Normal - In this mode, pressing SUB VFO-B ( TX ) Note - Remote control operation requires a FH-1 Remote Control Keypad for operation;...
- Page 107 Menu Selection and Settings 8-6 uSEr-SEt 8-7 Sub-AGc User Setting - This configures an operating “envi- SUB VFO Receiver AGC - Selects automatic, slow, ronment” selected by pressing and holding in the front- or fast AGC recovery time for the Sub receiver. panel [ PKT ] button.
- Page 108 Menu Selection and Settings Custom Frequency & Display Offset Information (1) 1st Fc = F + 70.455 BFO ( kHz ) MODE –1500 Hz –1500 Hz 465.5 kHz 465.5 kHz +1500 Hz +1500 Hz 453.5 kHz 453.5 kHz 400 Hz 454.6 kHz 455.0 kHz 500 Hz...
- Page 109 Menu Selection and Settings Custom Frequency & Display Offset Information (2) SELECTED FILTER OFFSETS ACCORDING TO MODE SELECTED FILTER BANDWIDTH MODE 6 kHz 2.8 kHz 2.4 kHz 2.0 kHz 500 Hz 250 Hz – 50 Hz – 150 Hz – 500 Hz –...
- Page 110 Menu Selection and Settings Menu Selection Setting Table Func No. Function Setting Range Default Memory Group 1 Channels 1 ~ 99 01 ~ 99 Memory Group 2 Channels 0 ~ 99 Memory Group 3 Channels 0 ~ 99 Memory Group 4 Channels 0 ~ 99 Memory Group 5 Channels 0 ~ 99...
- Page 111 Menu Selection and Settings Menu Selection Setting Table (Cont.) Func No. Function Setting Range Default Key & Panel Beep Pitch 220Hz ~ 7040 Hz or BEEP TUN ON/OFF 880 Hz Tuning Drive (Auto Power-Down) Lo-1(10 W) / Lo-2 (25W) / Hi (100 W) Lo-2 (25W) TX Audio EDSP OFF/1/2/3/4...
- Page 112 Menu Selection and Settings Menu Selection Setting Table (Cont.) Func No. Function Setting Range Default [ FAST ] key Operation CONTINUOUS/TOGGLE TOGGLE LOCK Selection DIAL/PANEL/PRIMARY DIAL Split Operation NORM/AUTO/A=B NORM Power Amplifier ON/OFF Always “ON” Frontend RF AMP Selection TUNED/FLAT FLAT [ ANT ] Key Function AUTO/ON/OFF...
- Page 113 Menu Selection and Settings Easy Set Mode Settings Easy Set Mode Display Offset RX PLL RX Carrier TX PLL TX Carrier SStv-L PKT-L 0.000 kHz –1.750 kHz 456.750 kHz –1.750 kHz 456.750 kHz SStv-U PKT-L 0.000 kHz 1.750 kHz 453.250 kHz 1.750 kHz 453.250 kHz FAcS-L...
-
Page 114: Installing Internal Accessories
Field. A complete list of options and their correspond- is the heart of the master reference oscillator used ing Yaesu P/N is provided on pages 5 and 6 of this throughout the transceiver. An optional TCXO unit is manual. Please check with your dealer for pricing and available for installation into the MARK-V FT-1000MP availability. -
Page 115: Main Receiver 2Nd And 3Rd If Filters
8.2 MHz 2nd IF 455 kHz 3rd IF r Connect the speaker cable to the speaker on the Yaesu P/N Yaesu P/N top cover, then replace the all covers and screws YF-114SN 2.0 kHz... -
Page 116: Miscellaneous
Miscellaneous EMORY WITCH ITHIUM ATTERY EPLACEMENT The rear panel memory BACKUP switch is normally A 3-V Type CR2032 Lithium Battery (BT5001) is kept in the “ON” position to ensure your memorized located on the CNTL UNIT board (underside) of the data is maintained (by a small amount of power from transceiver. -
Page 117: Power-On Setting
Miscellaneous OWER ICROPROCESSOR ESET ROCEDURES Some or all transceiver settings can be reset to their factory-default states using one of the following power-on routines: r [ 29 ( 0 )] + POWER on: Resets all menu setting to factory-default. r [ SUB ( CE )] + [ ENT ] + POWER on: Resets all memories (except menu setting) to factory-default. r [ SUB ( CE )] + [ 29 ( 0 )] + [ ENT ] + POWER on: CPU master reset for all memories and menu setting. -
Page 118: Changing The Ac Input Voltage Selector Switch
Miscellaneous ( U.S.A. U AC I HANGING THE NPUT OLTAGE ELECTOR WITCH SER ONLY r Make certain that all cables are disconnected from r Locate the Voltage Selector Switch on the Power the transceiver. Supply Unit in the transceiver’s chassis. Move the r Wait 10 minutes to allow the power supply’s elec- Voltage Selector Switch to appropriate mains volt- trolytic capacitors to discharge (electrical shock... - Page 120 Copyright 2002 VERTEX STANDARD CO., LTD. All rights reserved. No portion of this manual may be reproduced without the permission of VERTEX STANDARD CO., LTD. 0202Y-0K...
Need help?
Do you have a question about the MARK-V FT-100MP and is the answer not in the manual?
Questions and answers