
Related Manuals for Necvox FD5869

Summary of Contents for Necvox FD5869
-
Page 1: Operating Instructions
Operating Instructions 7 inch Wide Screen Color Monitor 5.8 inch Wide Screen Color Monitor 5 inch Wide Screen Color Monitor OT01003216-20020218... -
Page 2: Important Notice
Important Notice It is unlawful in most jurisdictions for a person to drive a motor vehicle which is equipped with a television viewer or screen that is located in the motor vehicle at any point forward of the back of the driver's seat, or that is visible directly or indirectly, to the driver while op- erating the vehicle. -
Page 3: Installation Guide
Installation Guide 1. Slide monitor onto dash mount S2 and then tighten using fastener.(Optional) 2. Firmly attach dash mount on a flat surface and adjust viewing angle of monitor by tightening the fastener at the side. - Page 4 Installation Guide (Only for 5",5.8") 1 To install the monitor into the seat head cushion you must ensure that the monitor connecting cable assembly has already pull through via the supporting pipe. 2 Before connecting the monitor, pull the connecting cable assembly through the headrest shroud as shown in diagram 2.
-
Page 5: Electrical Connections (General)
Electrical Connections (General) Video source 2 Video source 1 (Input) (Input) Video Out Interconnection Box AD-6865 Wiring System : Yellow Wire : Battery (+) Interconnect Cable Red Wire : ACC Assembly , Monitor Black Wire : Ground Blue Wire : 12 Vdc (1A) Output... - Page 6 Electrical Connections (System Upgrade) Antenna , AM/FM TV Antenna Diversity FM Modulator 88.7 MHZ 89.1 MHZ TV Tuner (Stereo) In - Car Audio Equipment Wiring System : Yellow wire : Battery (+) Red wire : ACC Black wire : Ground Brown wire : Safety connection (Hand - break switch)
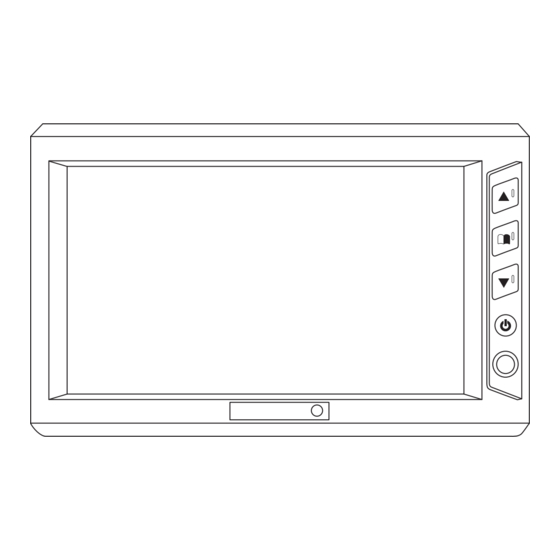
- Page 7 Basic Operation (Monitor) Positive and Negative Adjustment MENU Activation of Menu Indicator DOWN Positive and Negative Adjustment MODE ON / OFF and Mode Selection Infra-Red Remote Controller Receiver On Screen Display (OSD) Indicator Color Adjustment COLOR MODE MENU BRIGHT TINT Brightness Adjustment DIMMER FORMAT...
-
Page 8: Power On/Off
User Guide - Remote Controller: POWER ON / OFF Down Adjustment Up Adjustment CH/DISC/SET Mode Selection POWER MODE MENU Menu (Activation of OSD and Function Selection) MEMORY Using Menu Function Key : Press Menu Key COLOR MODE CH/DISC/SET BRIGHT MENU TINT MODE POWER... -
Page 9: Mode Key
Press to the desire setting MODE MENU CH/DISC/SET MODE POWER MENU COLOR MEMORY Press to the desire setting MODE MENU CH/DISC/SET POWER MODE COLOR MENU MEMORY Press Mode key to select the MODE Key desired video source input (input 1 or input 2) AV1 : PAL AV1 : NTSC MODE... -
Page 10: Display Mode
Display Mode : 1. Press MENU to indicate OSD 2. Select FORMAT 3. PRESS to switch the screen size ZOOM FULL OSD will appear on screen NORMAL FULL: 16:9 picture is fully displayed on screen. ZOOM: Picture stretched vertically and horizontally. NORMAL: When 4:3 picture is played on a wide screen, black bands appear on both side of the picture. -
Page 11: Maintenance
Remote Controller : Replacement of battery 1. Use a small coin to ply open battery holder from compartment. remote controller 2. Remove old battery and put in a new one with positive sign " + " facing upward. battery 3. Push compartment into position. Precaution : battery holder 1. -
Page 12: Accessories Supplied
Precautions : 1. This unit should be install by qualified technicians or service personnel. 2. This product is designed to operate with a 12 volt, negative ground battery system. 3. Disconnect the ground wire from the battery terminal before connecting the electrical system.
Need help?
Do you have a question about the FD5869 and is the answer not in the manual?
Questions and answers
What does the video put go to?
The video output type for the Necvox FD5869 is composite.
This answer is automatically generated