Table of Contents
Advertisement
Advertisement
Chapters
Table of Contents

Related Manuals for TruTech PVS2119


Summary of Contents for TruTech PVS2119
- Page 1 08-09-1341 2-IN-1 19" LCD TV + DVD...
-
Page 2: Safety Precautions
SAFETY PRECAUTIONS SAFETY PRECAUTIONS SAFETY PRECAUTIONS SAFETY PRECAUTIONS SAFETY PRECAUTIONS The lightning flash with an CAUTION arrowhead within a triangle alerts you to uninsulated RISK OF ELECTRIC SHOCK dangerous voltage within the DO NOT OPEN product's enclosure that could cause an RISQUE DE CHOC ÉLECTRIQUE NE AVIS electric shock. - Page 3 SAFETY PRECAUTIONS SAFETY PRECAUTIONS SAFETY PRECAUTIONS SAFETY PRECAUTIONS SAFETY PRECAUTIONS NOTES ON COPYRIGHT NOTES ON COPYRIGHT NOTES ON COPYRIGHT NOTES ON COPYRIGHT NOTES ON COPYRIGHT It is forbidden by law to copy, broadcast, show, broadcast on cable, play in public, or rent copyrighted material without permission.
-
Page 4: Import T T T T Ant Safety Instructions Impor Impor Ant Safety Instructions
IMPORTANT SAFETY INSTRUCTIONS 1. Read these instructions. 12.Use only with the cart, stand, tripod, 2. Keep these Instructions. bracket, or table 3. Heed all warnings. specified by the 4. Follow all Instructions. manufacturer, or sold with 5. Do not use this apparatus theapparatus. -
Page 5: Table Of Contents
T T T T T ABLE OF CONTENTS ABLE OF CONTENTS ABLE OF CONTENTS ABLE OF CONTENTS ABLE OF CONTENTS SAFETY PRECAUTIONS .... 2 – 3 SAFETY PRECAUTIONS .... 2 – 3 SAFETY PRECAUTIONS .... 2 – 3 SAFETY PRECAUTIONS .... 2 – 3 SAFETY PRECAUTIONS .... -
Page 6: Disc Forma Disc Formats
DISC FORMA DISC FORMA DISC FORMA TS DISC FORMA DISC FORMA This unit can playback: JPG-CD [8CM/12CM DISC] picture viewer CD-R/CD-RW AUDIO CD Compatible [8CM/12CM DISC] REGION MANAGEMENT INFORMA REGION MANAGEMENT INFORMA REGION MANAGEMENT INFORMATION REGION MANAGEMENT INFORMA REGION MANAGEMENT INFORMA TION TION TION... -
Page 7: Remote Control
REMOTE CONTROL REMOTE CONTROL REMOTE CONTROL REMOTE CONTROL REMOTE CONTROL USING THE REMOTE CONTROL USING THE REMOTE CONTROL USING THE REMOTE CONTROL USING THE REMOTE CONTROL USING THE REMOTE CONTROL • Point the remote control at the REMOTE SENSOR located on the unit. •... -
Page 8: Remote Control Reference Guide
REMOTE CONTROL REFERENCE GUIDE REMOTE CONTROL REFERENCE GUIDE REMOTE CONTROL REFERENCE GUIDE REMOTE CONTROL REFERENCE GUIDE REMOTE CONTROL REFERENCE GUIDE 6) 6) 6) 6) MTS button MTS button MTS button MTS button MTS button Press to select MONO sound, STEREO sound and Secondary Audio Program (SAP). -
Page 9: Remote Control Reference Guide Remote Control Reference Guide Remote Control Reference Guide Remote Control Reference Guide Remote Control Reference Guide
REMOTE CONTROL REFERENCE GUIDE REMOTE CONTROL REFERENCE GUIDE REMOTE CONTROL REFERENCE GUIDE REMOTE CONTROL REFERENCE GUIDE REMOTE CONTROL REFERENCE GUIDE 24) AV IN button 24) AV IN button 24) AV IN button 24) AV IN button 24) AV IN button Select source connected to AV1/ AV2. -
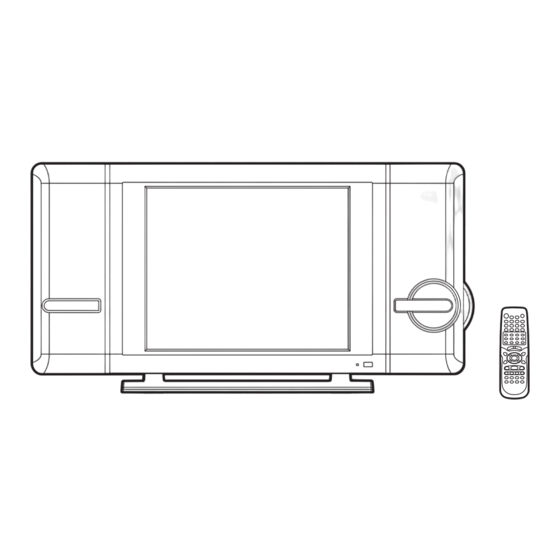
Page 10: Unit Reference Guide
UNIT REFERENCE GUIDE UNIT REFERENCE GUIDE UNIT REFERENCE GUIDE UNIT REFERENCE GUIDE UNIT REFERENCE GUIDE TOP, FRONT & SIDE VIEW , FRONT & SIDE VIEW , FRONT & SIDE VIEW , FRONT & SIDE VIEW , FRONT & SIDE VIEW STANDBY/ON button STANDBY/ON button STANDBY/ON button... - Page 11 UNIT REFERENCE GUIDE UNIT REFERENCE GUIDE UNIT REFERENCE GUIDE UNIT REFERENCE GUIDE UNIT REFERENCE GUIDE BACK & BOTTOM VIEW BACK & BOTTOM VIEW BACK & BOTTOM VIEW BACK & BOTTOM VIEW BACK & BOTTOM VIEW 25 26 27 17) TV Antenna Cable terminal - TV Antenna Cable terminal - TV Antenna Cable terminal - TV Antenna Cable terminal -...
-
Page 12: Connections
CONNECTIONS CONNECTIONS CONNECTIONS CONNECTIONS CONNECTIONS CONNECTING A TV ANTENNA/CABLE/SA CONNECTING A TV ANTENNA/CABLE/SA CONNECTING A TV ANTENNA/CABLE/SATELLITE TELLITE TELLITE TELLITE CONNECTING A TV ANTENNA/CABLE/SA CONNECTING A TV ANTENNA/CABLE/SA TELLITE To view television channels correctly, a signal must be received from one of the following sources: - An indoor or outdoor aerial antenna - A cable system... -
Page 13: Connecting To A/V Devices (Vcr, Camcorder, Game System, Etc.)
CONNECTIONS CONNECTIONS CONNECTIONS CONNECTIONS CONNECTIONS CONNECTING TO A/V DEVICES CONNECTING TO A/V DEVICES CONNECTING TO A/V DEVICES CONNECTING TO A/V DEVICES CONNECTING TO A/V DEVICES (VCR, Camcor (VCR, Camcor (VCR, Camcor (VCR, Camcor (VCR, Camcorder der, Game System, etc.) , Game System, etc.) , Game System, etc.) , Game System, etc.) , Game System, etc.) - Page 14 CONNECTIONS CONNECTIONS CONNECTIONS CONNECTIONS CONNECTIONS Connecting to Devices with a Composite (yellow RCA-type) Video Output To connect to A/V devices such as a VCR or camcorder: - Connect to a VCR - Connect to a VCR - Connect to a VCR - Connect to a VCR - Connect to a VCR Connect the right (red) and left (white)
-
Page 15: Connecting To Sources With Component
CONNECTIONS CONNECTIONS CONNECTIONS CONNECTIONS CONNECTIONS CONNECTING TO CONNECTING TO CONNECTING TO SOURCES WITH COMPONENT VIDEO OUTPUT SOURCES WITH COMPONENT VIDEO OUTPUT SOURCES WITH COMPONENT VIDEO OUTPUT SOURCES WITH COMPONENT VIDEO OUTPUT CONNECTING TO CONNECTING TO SOURCES WITH COMPONENT VIDEO OUTPUT (DVD - only 480i, 480p, 720p &... -
Page 16: Connecting A Pc
CONNECTIONS CONNECTIONS CONNECTIONS CONNECTIONS CONNECTIONS CONNECTING A PC CONNECTING A PC CONNECTING A PC CONNECTING A PC CONNECTING A PC Connect the 15-pin D-SUB PC/VGA connector from your computer to the 15-pin D-SUB PC/VGA input on this unit using a monitor cable (not included). -
Page 17: Allation
INST INST ALLA ALLA TION TION INST ALLA ALLA TION TION INST INST ALLA TION REMOVING THE BASE ST REMOVING THE BASE ST REMOVING THE BASE STAND REMOVING THE BASE ST REMOVING THE BASE ST WARNING: The LCD Display is very fragile, and must be protected at all times when removing the base stand. -
Page 18: Using Headphones
USING HEADPHONES USING HEADPHONES USING HEADPHONES USING HEADPHONES USING HEADPHONES • Turn down the volume before connecting headphones to the unit, then adjust the volume to your desired level. • When headphones are connected, no sound will come from the front speakers. -
Page 19: Cd/Dvd Opera Cd/Dvd Operation
CD/DVD OPERA CD/DVD OPERA CD/DVD OPERA TION TION TION TION CD/DVD OPERA CD/DVD OPERA TION This owner’s manual explains the basic instructions of this unit. Some DVDs are This owner’s manual explains the basic instructions of this unit. Some DVDs are This owner’s manual explains the basic instructions of this unit. -
Page 20: Skip (Forward/Reverse)
CD/DVD OPERA CD/DVD OPERA TION TION CD/DVD OPERA CD/DVD OPERA CD/DVD OPERA TION TION TION SKIP (FORWARD / REVERSE) SKIP (FORWARD / REVERSE) SKIP (FORWARD / REVERSE) SKIP (FORWARD / REVERSE) SKIP (FORWARD / REVERSE) While you are playing a disc, press the NEXT NEXT NEXT button to move to the beginning... -
Page 21: Special Functions
SPECIAL FUNCTIONS SPECIAL FUNCTIONS SPECIAL FUNCTIONS SPECIAL FUNCTIONS SPECIAL FUNCTIONS DISPLA DISPLA Y FUNCTION (DVD) Y FUNCTION (DVD) DISPLA DISPLA DISPLAY FUNCTION (DVD) Y FUNCTION (DVD) Y FUNCTION (DVD) Using DISPLAY, you can check the current settings of the following items: ANGLE, AUDIO and SUBTITLE. -
Page 22: Cd/Dvd Programmable Memory
CD/DVD PROGRAMMABLE MEMORY CD/DVD PROGRAMMABLE MEMORY CD/DVD PROGRAMMABLE MEMORY CD/DVD PROGRAMMABLE MEMORY CD/DVD PROGRAMMABLE MEMORY PROGRAMMABLE MEMORY PROGRAMMABLE MEMORY PROGRAMMABLE MEMORY PROGRAMMABLE MEMORY PROGRAMMABLE MEMORY The two types of programmed playback provided by this Unit are title/chapter programmed playback and track programmed playback. TITLE/CHAPTER PROGRAMMED PLA TITLE/CHAPTER PROGRAMMED PLA YBACK (DVD) -
Page 23: Playing A Picture File Disc
PLA YING A PICTURE FILE DISC YING A PICTURE FILE DISC YING A PICTURE FILE DISC YING A PICTURE FILE DISC YING A PICTURE FILE DISC This unit can play a Picture files recorded on CD-R and CD-RW discs. YING A PICTURE FILE DISC YING A PICTURE FILE DISC PLAYING A PICTURE FILE DISC YING A PICTURE FILE DISC... -
Page 24: Settings
CUSTOMIZING THE FUNCTION SETTINGS CUSTOMIZING THE FUNCTION SETTINGS CUSTOMIZING THE FUNCTION SETTINGS CUSTOMIZING THE FUNCTION SETTINGS CUSTOMIZING THE FUNCTION SETTINGS LANGUAGE SETUP LANGUAGE SETUP LANGUAGE SETUP LANGUAGE SETUP LANGUAGE SETUP 1. Press the SETUP SETUP SETUP SETUP button in stop mode. SETUP 2. -
Page 25: Password
CUSTOMIZING THE FUNCTION SETTINGS CUSTOMIZING THE FUNCTION SETTINGS CUSTOMIZING THE FUNCTION SETTINGS CUSTOMIZING THE FUNCTION SETTINGS CUSTOMIZING THE FUNCTION SETTINGS PASSWORD PASSWORD PASSWORD PASSWORD PASSWORD button to shift and select Password, enter your 4-digit security code and then press the ENTER button. If you forget the password, you can erase your current password by pressing If you forget the password, you can erase your current password by pressing If you forget the password, you can erase your current password by pressing... -
Page 26: Tv Setup
TV SETUP MAIN MENU MAIN MENU MAIN MENU MAIN MENU MAIN MENU 1. 1. 1. 1. 1. Press the MENU MENU MENU MENU button. MENU 2. 2. 2. 2. 2. Use button to select the options (Picture / Sound / Setup / TV Setting / Restore Setting). -
Page 27: Sound Menu
TV SETUP SOUND MENU SOUND MENU SOUND MENU SOUND MENU SOUND MENU 1. 1. 1. 1. Press the MENU MENU MENU MENU button. MENU 2. 2. 2. 2. 2. Use button to select the Sound menu Sound menu Sound menu Sound menu, then press and use the Sound menu... -
Page 28: Parental Setting
TV SETUP PARENT PARENT AL SETTING AL SETTING PARENT PARENT PARENTAL SETTING AL SETTING AL SETTING LOCK CODE LOCK CODE LOCK CODE LOCK CODE LOCK CODE 1. Press the MENU button. 2. Use button to select the Setup menu, then press button to confirm the setting. -
Page 29: 2. 2. 2. 2. 2. Use
TV SETUP PARENT PARENT AL SETTING AL SETTING PARENT PARENT PARENTAL SETTING AL SETTING AL SETTING CHILD LOCK CHILD LOCK CHILD LOCK CHILD LOCK CHILD LOCK 1. 1. 1. 1. 1. Press the MENU MENU MENU MENU MENU button. 2. 2. 2. 2. 2. Use button to select the Setup menu Setup menu Setup menu... -
Page 30: Timers Setting
TV SETUP TIMERS SETTING TIMERS SETTING TIMERS SETTING TIMERS SETTING TIMERS SETTING 1. 1. 1. 1. Press the MENU MENU MENU MENU button. MENU 2. 2. 2. 2. 2. Use Setup menu Setup menu button to select the Setup menu Setup menu Setup menu, then press button. -
Page 31: Mts Setting
TV SETUP MTS ( MTS ( Multi-channel T Multi-channel T elevision Sound) elevision Sound) SETTING SETTING MTS ( MTS ( MTS (Multi-channel T Multi-channel T Multi-channel Television Sound) elevision Sound) elevision Sound) SETTING SETTING SETTING This feature allows reception of sound other than the main audio for the program. 1. -
Page 32: Language Code List
LANGUAGE CODE LIST... -
Page 33: Maintenance
MAINTENANCE CLEANING DISC CLEANING DISC CLEANING DISC CLEANING DISC CLEANING DISC A defective or soiled disc inserted into the unit can cause sound to drop out during playback. Handle the disc by holding its inner and outer edges. • Do NOT touch the surface of the unlabeled side of the disc. •... -
Page 34: Troubleshooting Guide
TROUBLE SHOOTING GUIDE SYMPTOM CAUSE (AND REMEDY) • Check that the AC power cord is connected. No power. • Turn on the unit. • Remove any obstacles between the remote and the The remote does not unit. function. • Use the remote near the unit. •... - Page 35 TROUBLE SHOOTING GUIDE SYMPTOM CAUSE (AND REMEDY) Bad Picture (snow, • Check the location of the antenna and adjust it if multiple images, neccessary. distortion, blurry) • Make sure the antenna cable is connected firmly. • Make sure all input cables are firmly. No sound.
- Page 36 Printed in China 811-211991-012...
Need help?
Do you have a question about the PVS2119 and is the answer not in the manual?
Questions and answers