Advertisement
Quick Links
27930
I
NTRODUCTION
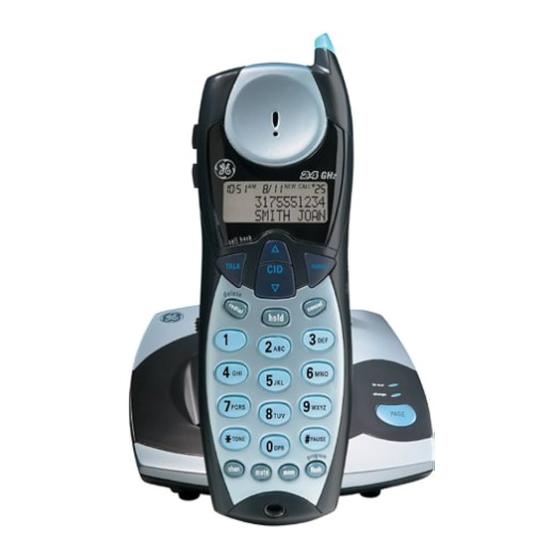
40-Channel 2.4 GHz Caller ID with
Your Caller ID phone stores and displays specific
Call Waiting Cordless Telephone
information, provided by your local telephone company, to
User's Guide
subscribers of Caller ID or similar caller identification
services. You must subscribe to one of these services in
order to use this unit.
Your Caller ID phone enables you to:
• Identify callers before you answer the phone.
• View the time and date of each incoming call.
• Record up to 40 Caller ID messages sequentially.
• Know who called while you were away.
To get the most from your new phone, we suggest that you
take a few minutes right now to read through this user's
guide.
IMPORTANT: In order to use this unit, you must
subscribe to either the standard Name/Number Caller
ID Service or Caller ID with Call Waiting Service. To
know who is calling while you are on the phone, you
must subscribe to Caller ID with Call Waiting Service.
IMPORTANT: Because cordless phones operate on
electricity, you should have at least one phone in your
home that isn't cordless, in case the power in your
home goes out.
CAUTION: When using telephone equipment,
there are basic safety instructions that should
always be followed. Refer to the IMPORTANT
SAFETY INSTRUCTIONS provided with this
product and save them for future reference.
WARNING: TO PREVENT FIRE OR
ELECTRICAL SHOCK HAZARD, DO
NOT EXPOSE THIS PRODUCT TO
RAIN OR MOISTURE.
B
Y
EFORE
OU
We bring good things to life.
P
C
ARTS
HECKLIST
FCC R
I
EGISTRATION
NFORMATION
Make sure your package includes the items shown here.
Your telephone equipment is registered with the Federal
Communications Commission and is in compliance with parts 15 and
68, FCC Rules and Regulations.
1 Notification to the Local Telephone Company
TALK
On the bottom of this equipment is a label indicating, among other
in use/VMWI
information, the FCC Registration number and Ringer Equivalence
1
charge
GHI
4
PAGE
Number (REN) for the equipment. You must, upon request, provide
7
PQRS
TONE
*
this information to your telephone company.
O
mute
The REN is useful in determining the number of devices you may
connect to your telephone line and still have all of these devices
Base
Handset
ring when your telephone number is called. In most (but not all)
areas, the sum of the RENs of all devices connected to one line
should not exceed 5. To be certain of the number of devices you may
connect to your line as determined by the REN, you should contact
your local telephone company.
Notes
Handset battery
• This equipment may not be used on coin service provided by the
telephone company.
M
J
ODULAR
ACK
• Party lines are subject to state tariffs, and therefore, you may not
be able to use your own telephone equipment if you are on a
You need an RJ11 type modular phone jack, which
party line. Check with your local telephone company.
• Notice must be given to the telephone company upon
is the most common type of phone jack and might
permanent disconnection of your telephone from your line.
look like the one pictured here. If you don't have a
2 Rights of the Telephone Company
modular jack, call your local phone company to
Should your equipment cause trouble on your line which may harm
find out how to get one installed.
the telephone network, the telephone company shall, where
practicable, notify you that temporary discontinuance of service may
be required. Where prior notice is not practicable and the
circumstances warrant such action, the telephone company may
INSTALLATION NOTE: Some cordless telephones
temporarily discontinue service immediately. In case of such
operate at frequencies that may cause interference to
temporary discontinuance, the telephone company must: (1) promptly
nearby TVs microwave ovens, and VCRs. To minimize
notify you of such temporary discontinuance; (2) afford you the
opportunity to correct the situation; and (3) inform you of your right to
or prevent such interference, the base of the cordless
bring a complaint to the Commission pursuant to procedures set forth
telephone should not be placed near or on top of a
in Subpart E of Part 68, FCC Rules and Regulations.
TV, microwave ovens, or VCR. If such interference
The telephone company may make changes in its communications
facilities, equipment, operations or procedures where such action
continues, move the cordless telephone farther away
is required in the operation of its business and not inconsistent
from these appliances. Certain other communications
with FCC Rules and Regulations. If these changes are expected to
devices may also use the 2.4 GHz frequency for
affect the use or performance of your telephone equipment, the
communication, and, if properly set, these devices may
telephone company must give you adequate notice, in writing, to
allow you to maintain uninterrupted service.
interfere with each other and/or your new telephone.
If you are concerned with interference, please refer to
H
A
C
EARING
ID
OMPATIBILITY
the owner's manual for these devices on how to
This telephone system meets FCC standards for Hearing Aid
properly set channels to avoid interference. Typical
Compatibility.
devices that may use the 2.4 GHz frequency for
communication include wireless audio/video senders,
FCC NUMBER IS LOCATED ON THE CABINET BOTTOM
REN NUMBER IS LOCATED ON THE CABINET BOTTOM
wireless computer networks, multi-handset cordless
telephone systems, and some long-range cordless
ATLINKS USA, Inc.
telephone systems.
10330 North Meridian Street
Model 27930M/P
Indianapolis, IN 46290
15727290 (Rev. 3 DOM E)
© 2001 ATLINKS USA, Inc.
01-51
Trademark(s) ® Registered
Printed in China
Marca(s) ® Registrada(s)
D
S
S
IGITAL
ECURITY
YSTEM
Your cordless phone uses a digital security system to
provide protection against false ringing, unauthorized
access, and charges to your phone line.
When you place the handset in the base, the unit verifies
its security code. After a power outage or battery
replacement, you should place the handset in the base for
about 20 seconds to reset the code.
I
NSTALLATION
D
I
ESKTOP
NSTALLATION
NOTE : For desktop charging only, the handset is able
to charge facing up or down.
3
2
4
1. Remove the battery compartment door on the handset,
insert the battery pack, plug the cord into the jack (inside
the compartment), and replace the compartment door.
2. Set the RINGER switch (on the handset) to ON and place
CAUTION:
RISK OF ELECTRIC SHOCK
the handset in the cradle on the base.
DO NOT OPEN
THE LIGHTNING FLASH
CAUTION: TO REDUCE THE RISK OF
THE EXCLAMATION
AND ARROW HEAD
ELECTRIC SHOCK, DO NOT REMOVE
POINT WITHIN THE
WITHIN THE TRIANGLE
COVER (OR BACK). NO USER
TRIANGLE IS A
3. Plug the telephone line cord into the TEL LINE jack on
WARNING SIGN
IS A WARNING SIGN
SERVICEABLE PARTS INSIDE. REFER
ALERTING YOU OF
SERVICING TO QUALIFIED SERVICE
ALERTING YOU OF
"DANGEROUS
PERSONNEL.
IMPORTANT
the back of the base and into a modular jack.
VOLTAGE" INSIDE THE
INSTRUCTIONS
PRODUCT.
ACCOMPANYING THE
PRODUCT.
4. Plug the power supply into the power jack on the back
SEE MARKING ON BOTTOM / BACK OF PRODUCT
of the base and the other end into an electrical outlet.
The "charge" indicator comes on, verifying the battery
B
EGIN
is charging.
Allow the phone to charge for 12 hours prior to first use.
If you don't properly charge the phone, battery
performance will be compromised.
CAUTION: Use only the ATLINKS USA, Inc.
5-2530 power supply that came with this unit.
Using other power supplies may damage the unit.
CID
FORMAT
Belt clip
hold
NOTE : The phone is shipped in Tone Dialing Mode
3
DEF
ABC
2
5
6
MNO
from the manufacturer.
JKL
Mounting bracket
9
TUV
8
WXYZ
PAUSE
#
OPER
W
M
I
ALL
OUNT
NSTALLATION
Telephone
AC power
line cord
supply
R
EQUIREMENTS
4
TALK
FORMAT
CID
1
hold
1
2
DEF
3
ABC
4
6
5
GHI
5
JKL
MNO
7
9
PQRS
TUV
8
WXYZ
*
TONE
#
PAUSE
O
OPER
2
mute
Because it is necessary to charge the handset for 12 hours
prior to connecting the phone for use the first time, it is
better to leave the unit on a flat surface during initial
charge before attempting to hang it on the wall.
1. Remove the battery compartment door on the handset,
insert the battery pack, plug the cord into the jack (inside
the compartment), and replace the compartment door.
2. Set the RINGER switch (on the handset) to ON and place
the handset in the cradle on the base.
3. Plug the power supply into the power jack on the back
of the base and the other end into an electrical outlet.
The "charge" indicator comes on, verifying the battery
is charging.
Allow the phone to charge for 12 hours prior to first use.
2. Use the CID Review (up or down arrow) button or the
If you don't properly charge the phone, battery
handset number pad to scroll to 1YES or 2NO .
performance will be compromised.
3. Press flash/program to store selection. You will hear a
4. Remove the handset from the cradle and set aside. Turn the
confirmation tone.
base over and align the four slots on the bottom of the
C
base with the four hook-tabs on the mounting bracket.
ORDLESS
5. Insert the hook-tabs into the slots and push upwards
until the mounting bracket snaps securely into place.
6. Plug the telephone line cord into the TEL LINE jack on the
back of the base and the other end into a modular jack.
7. Slip the mounting holes on the bracket over the wall
plate posts and firmly slide the unit down into place
(wall plate not included).
redial/
delete
8. Place the handset in the cradle.
button
NOTE: If desired, gather the extra line cord together,
fasten with a wire tie, and store inside the wall
RINGER
mounting bracket.
switch
NOTE : The phone is shipped in Tone Dialing Mode
TONE
from the manufacturer.
button
1
CAUTION: Use only the ATLINKS USA, Inc.
5-2530 power supply that came with this unit.
Using other power supplies may damage the unit.
S
U
ET
P
There are five programmable menus available: Language,
R
ECEIVING A
Area Code, Ringer Tone, Set Tone/Pulse, and Default Setting.
1. Check the display to see who is calling.
L
S
S
ANGUAGE
ETTING
ELECTION
2. Press the TALK button.
1. Make sure the phone is OFF (not in TALK mode).
M
AKING A
2. Press the flash/program button until " 1ENGLISH 2FRA
3ESP " shows in the display. " 1ENGLISH " is the
To make a call, press the TALK button before you dial and
default setting.
press it again to hang up.
3. Use the CID review (up or down arrow) button or the
R
EDIAL
handset number pad to enter your selection.
While the phone is on, press the redial/delete button to
4. Press flash/program to store selection. You will hear a
confirmation tone.
redial the last number you dialed (up to 32 digits). If you
get a busy signal, and want to keep dialing the number,
just press redial/delete again (you don't have to turn the
A
C
S
REA
ODE
ELECTION
phone off and back on).
1. Make sure the phone is OFF (not in TALK mode).
P
REDIAL
2. Press the flash/program button until "SET AREA CODE - - -
" shows in the display. " - - -" is the default setting.
1. Make sure the handset is OFF (not in TALK mode).
3. Use the handset number pad to enter your three digit
2. Enter the telephone number you want to predial (up to
area code.
32 digits). The telephone number shows in the display.
4. Press flash/program to store selection. You will hear a
3. Press the TALK/callback button and the telephone
confirmation tone.
number is automatically dialed. TALK and the selected
number shows in the display.
R
T
S
INGER
ONE
ELECTION
F
LASH
1. Make sure the phone is OFF (not in TALK mode).
2. Press the flash/program button until " SET RINGER
Use the flash/program button to activate custom calling
TONE123 " shows in the display. "1" is the default setting.
services such as call waiting or call transfer, which
are available through your local phone company.
3. Use the CID review (up or down arrow) button or the
handset number pad to scroll to 1, 2, or 3.
TIP: Don't use the TALK button to activate custom
3
calling services such as call waiting, or you'll hang up
4. Press flash/program to store selection. You will hear a
the phone.
confirmation tone.
6
T
/P
D
S
7
ONE
ULSE
IALING
ELECTION
I
U
N
1. Make sure the phone is OFF (not in TALK mode).
The phone is ON when the indicator on the handset
2. Press the flash/program button until " SET TONE/
antenna is lit and the in use/VMWI indicator on the base is
PULSE" shows in the display. "1TONE" is the default
lit. The antenna indicator and the in use indicator on the
setting.
base flashes when you receive a call.
3. Use the CID review (up or down arrow) button or the
C
handset number pad to scroll to 1TONE or 2PULSE .
HANNEL
4. Press flash/program to store selection. You will hear a
While talking, you might need to manually change the
confirmation tone.
channel in order to get rid of static. Press and release the
chan button to advance to the next clear channel.
D
S
S
EFAULT
ETTING
ELECTION
T
EMPORARY
1. Press the flash/program button until DEFAULT
SETTING? 1YES 2NO shows in the display. "2NO" is
This feature enables pulse (rotary) service phone users to
the default setting.
access touch-tone services offered by banks, credit card
companies, etc., by pressing the TONE button to temporarily
make the phone touch-tone compatible. To get information
about your bank account, for example, you would:
1. Call the bank's information line.
2. Press the TONE button (*) after your call is answered.
3. Follow the voice instructions to complete your transaction.
4. Hang up when finished. The phone returns to Pulse
P
B
HONE
ASICS
(rotary) service.
VOLUME buttons
H
OLD
CID
review
Press the hold button to put a call on hold. HOLD shows in
TALK/
button
the display, and the handset antenna indicator flashes. To
callback
release a line on hold, press the hold button again or pick
button
FORMAT
up an extension phone.
button
C
ANCEL
cancel
TALK
FORMAT
CID
Press the cancel button to cancel any command you
button
initiated. Press cancel to hang up after finishing a call.
hold
hold
1
3
DEF
2
ABC
button
F
H
INDING THE
ANDSET
4
6
GHI
MNO
5
JKL
This feature helps to locate a misplaced handset.
7
PQRS
9
WXYZ
PAUSE
8
TUV
button
*
#
TONE
PAUSE
Press the PAGE button on the base. The handset beeps
O
OPER
continuously for about 2 minutes or until you press the
mute
flash/
TALK button on the handset..
program
NOTE: The ringer does not have to be on for this
chan
button
feature to work.
button
mute
mem
button
button
R
S
INGER
WITCH
C
ALL
The RINGER switch must be ON for the handset to ring
during incoming calls.
V
OLUME
C
ALL
The VOLUME button controls the volume of the handset's
earpiece. There are four volume levels. VOL 1 is the lowest
level and VOL 4 is the loudest.
V
M
OICE
ESSAGING
Provided your phone company offers
voice messaging service and you
subscribe to it, the in use/vmwi
indicator on the base flashes when the
phone is not in use to indicate there is
a message waiting. It stops flashing
after the message has been reviewed.
C
ID F
ALLER
EATURES
Time
Date
Caller ID phone number
This unit receives and displays information transmitted by
your local phone company. This information can include
the phone number, date, and time; or the name, phone
number, date, and time. The unit can store up to 40 calls
I
SE
NDICATOR
for later review.
C
ID
C
ALLER
WITH
Provided you subscribe to Caller ID with Call Waiting
service from your phone company, you are able to see who
is calling when you hear the call waiting beep. The caller
B
UTTON
identification information appears in the display after you
hear the tone.
• Press the flash button to put the current person on hold
so that you can answer the incoming call.
IMPORTANT: In order to use the Caller ID functions
T
ONE
with this unit, you must subscribe to either the
standard Name/Number Caller ID Service or Caller
ID with Call Waiting Service. To know who is calling
while you are on the phone, you must subscribe to
Caller ID with Call Waiting Service.
R
S
C
ECEIVING AND
TORING
ALLS
When you receive a call, the information is transmitted by
the phone company to your Caller ID telephone between
the first and second ring.
When the memory is full, a new call automatically replaces
the oldest call in memory. NEW appears in the display for
calls received that have not been reviewed. REPT indicates
that a new call from the same number was received more
than once.
NOTE: Check with your local phone company
regarding name service availability.
R
R
EVIEWING
ECORDS
As calls are received and stored, the display is updated to
let you know how many calls have been received.
• Press the CID review down button to scroll through the
call records from the most recent to the oldest.
• Press the CID review up button to scroll through the call
records from the oldest to the newest.
T
CID R
RANSFERRING
ECORDS TO
M
EMORY
You may transfer a Caller ID record to your phone's memory.
NOTE: It is important that you format CID records
correctly before storing in memory. It is not possible to
re-format CID records stored in memory.
1. Use the CID review (up or down arrow) button to scroll
to the desired record.
2. Press the mem button.
3. Press the desired memory location. Example, press the
number 1 key to store the record in memory location 1.
To replace a CID record stored in a memory location
in use/vmwi
indicator
with a new CID record:
1. Repeat steps 1 through 3.
2. Press the mem button and REPLACE MEMO? shows in
in use/VMWI
charge/page
the display.
charge
indicator
PAGE
3. Press mem again and the new CID record replaces the
PAGE
old CID record in that memory location. The unit beeps
button
twice to confirm.
D
R
ELETING
ECORDS
Use the redial/delete button to erase the record currently
Number of calls
shown in the display or all records.
D
C
R
ELETING THE
URRENT
ECORD
1. Make sure the phone is OFF (not in TALK mode).
2. Use the CID review (up or down arrow) buttons to
display the desired Caller ID record.
3. Press redial/delete. The display shows DELETE?
4. Press redial/delete again to erase the record. The unit
Caller ID name
beeps twice to confirm and the next Caller ID record
shows in the display.
D
A
R
ELETING
LL
ECORDS
1. Make sure the phone is OFF (not in TALK mode).
2. Use the CID review (up or down arrow) buttons to
display any Caller ID record.
W
ALL
AITING
3. Press and hold redial/delete button until the unit beeps
and DELETE ALL? shows in the display.
4. Press redial/delete again to erase all records. The display
shows NO CALLS .
D
C
ID N
IALING A
ALLER
UMBER
1. Make sure the phone is OFF (not in TALK mode).
2. Use the CID review (up or down arrow) buttons to
display the desired Caller ID record.
3. Press TALK/callback. The number dials automatically.
Advertisement

Related Manuals for GE 27930GE3


Summary of Contents for GE 27930GE3
- Page 1 27930 Allow the phone to charge for 12 hours prior to first use. 2. Use the CID Review (up or down arrow) button or the 1. Call the bank’s information line. IGITAL ECURITY YSTEM NTRODUCTION If you don't properly charge the phone, battery handset number pad to scroll to 1YES or 2NO .
- Page 2 CID N HANGING THE UMBER ORMAT IALING A TORED UMBER ROUBLESHOOTING EADSET AND AUSES OF ECEPTION NTERFERENCE NFORMATION CCESSORY RDER The FORMAT button lets you change the format of the 1. Make sure the phone is ON by pressing the TALK/ ALLER This device complies with Part 15 of the FCC Rules.
Need help?
Do you have a question about the 27930GE3 and is the answer not in the manual?
Questions and answers