Advertisement
Quick Links
PLEASE READ AND UNDERSTAND THIS ENTIRE MANUAL BEFORE ALLOWING CHILD TO USE THIS PRODUCT.
Owner's Manual
Quick-Clamp system for
fast, easy, no-tool assembly
and handlebar/seat
height adjustment.
Custom STRIDER™ Ultralight
wheels with our no-flat EVA
polymer tires that never need air.
Extremely Durable.
Lightweight.
Always ready to ride.
Integrated Launch Pad™
footrest for advanced
riding skills!
Advertisement

Subscribe to Our Youtube Channel
Related Manuals for Strider ST4


Summary of Contents for Strider ST4
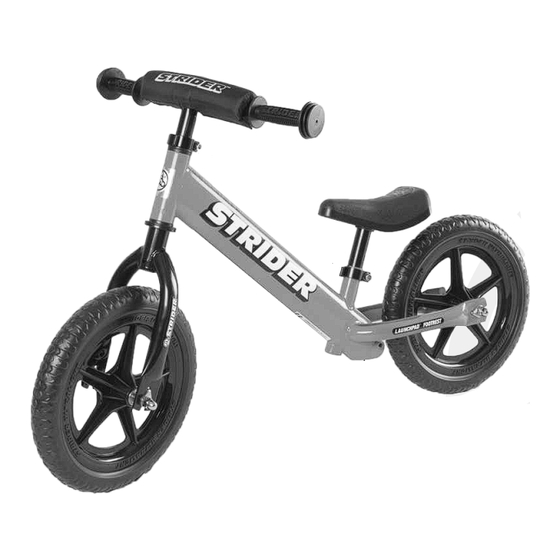
- Page 1 Owner’s Manual Quick-Clamp system for fast, easy, no-tool assembly and handlebar/seat height adjustment. Custom STRIDER™ Ultralight wheels with our no-flat EVA polymer tires that never need air. Extremely Durable. Lightweight. Always ready to ride. Integrated Launch Pad™ footrest for advanced riding skills! PLEASE READ AND UNDERSTAND THIS ENTIRE MANUAL BEFORE ALLOWING CHILD TO USE THIS PRODUCT.
-
Page 2: Handlebar Assembly
Fast, Easy, No-Tool HANDLEBAR ASSEMBLY Assembly QUICK CLAMP LEVERS FLAT PLASTIC WASHER TOP BUSHING (INSTALLED) BOTTOM BUSHING (INSTALLED) CUPPED PLASTIC WASHER FORK/FRONT WHEEL ASSEMBLY... - Page 3 WELCOME to the awesome experience of mobilizing toddlers like never before! The STRIDER™ Balance Bike will have your child enjoying the freedom of riding on two wheels earlier than you ever thought possible and make family outings more fun and active. We'd like to thank you for your purchase and wish you and your child the best.
- Page 4 UNPACKING YOUR STRIDER 1. Remove and discard all protective wrapping and the 3 plastic wheel nut covers used to protect the STRIDER during shipping (shown at right). These are not usable parts. Small pieces can be a choking hazard. 2. After removing all packing materials, you should have the Dispose of these pieces properly.
- Page 5 Take care not to push out the top bushing. Make sure head tube sits tightly on cupped washer (Fig 4). 4. Note the position of the STRIDER stickers on fork. They should be positioned right side up as shown (Fig 2).
-
Page 6: Install Handlebar
INSTALL HANDLEBAR FLAT SLOT PLASTIC WASHER Tip: Place front wheel between knees while kneeling on floor to steady the bike. 1. Install the flat plastic washer over fork steer tube (Fig 5). 2. Install the Quick Clamp with lever open (Fig 6). - Page 7 INSTALL SADDLE/SEATPOST SEAT POST MINIMUM INSERTION MARK MUST BE INSIDE THE SEAT TUBE ON THE BIKE FRAME FOR PROPER INSTALLATION AND USE. MINIMUM INSERTION LINE SEAT TUBE...
- Page 8 LOOSEN ADJUST SADDLE/SEATPOST CLAMP Tip: Place rear wheel between knees while kneeling on floor to steady the bike. TIGHTEN CLAMP 1. Loosen Quick Clamp, Set saddle at proper height (child should be able to sit on the bike with both feet flat on the Fig 9 TIGHTEN BOLT ground with just a slight bend in their...
-
Page 9: Maintenance
Maintenance: Lubrication: Your STRIDER will perform best when kept clean, Lubrication reduces friction and helps protect against rust. lubricated, and serviced regularly. How much of your STRIDER's service and maintenance you can Use paste lubricant (or Vaseline) on the headset do yourself depends on your level of skill and experience. - Page 10 Join our Community. See what the world has to say about Strider. www.StriderBikes.com ©2007-2013 Strider Sports Int'l, Inc. 1820 Samco Rd, Rapid City, SD 57702. COMPLIES WITH U. S. All rights reserved. www.StriderBikes.com Designed in Rapid City, SD, U.S.A. Manufactured in China.
Need help?
Do you have a question about the ST4 and is the answer not in the manual?
Questions and answers