
Related Manuals for Microtech USB CameraMate

Summary of Contents for Microtech USB CameraMate
- Page 1 USER'S USER'S MANUAL MANUAL CameraMate Click Here to Begin Digital Film Reader HELP BACK NEXT CONTENTS CONTACT Version 2.0...
- Page 2 USER'S USER'S MANUAL MANUAL USB CameraMate CONTENTS Home How to use this Online Guide Getting Started Connecting to a Macintosh Connecting to a PC Compatible Using the USB CameraMate Obtaining Technical Support Contacting Microtech HELP BACK NEXT CONTENTS CONTACT...
-
Page 3: Acrobat Reader
USER'S USER'S MANUAL MANUAL USB CameraMate HOW TO USE This Online Guide Controls in this online guide Controls within Adobe ® Acrobat ® Reader? HELP BACK NEXT CONTENTS CONTACT... - Page 4 Go to the Table of Contents. CONTENTS Go to this page ("How to Use This Online Guide"). HELP How to contact Microtech via e-mail, telephone, fax, or standard mail. CONTACT Go to next page. NEXT Go back to previous page.
- Page 5 USER'S USER'S MANUAL MANUAL USB CameraMate GETTING STARTED Introduction What's included with the USB CameraMate System Requirements Parts of the USB CameraMate Registering the USB CameraMate HELP BACK NEXT CONTENTS CONTACT...
-
Page 6: System Requirements
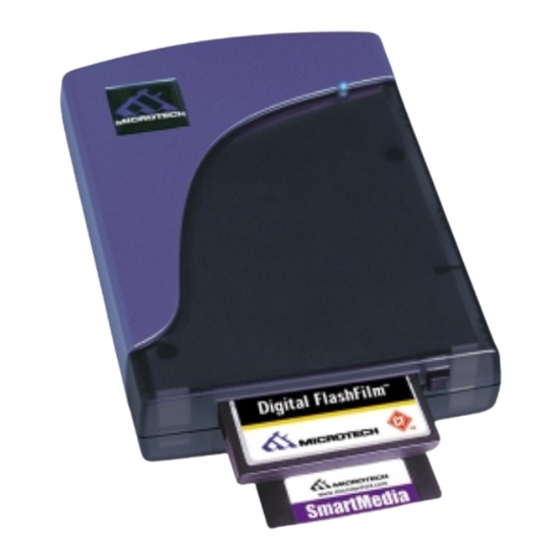
Thank you for purchasing the USB CameraMate from Microtech International, Inc. The USB CameraMate is a card reader for new Apple Macintosh (iMac, iBook, G3/G4, Cube, etc.) and PC Compatible owners who wish to use SmartMedia or CompactFlash cards. The USB CameraMate is easy to use and provides transfer rates of up to 12Mb/sec (1.5MB/sec). - Page 7 Optional Power Adapter* SmartMedia slot CompactFlash eject button DC 5V Rear View Front View *WARNING: Permanent damage will result when used with a standard power adapter. Use only with the Microtech Optional Power Adapter (if power required). HELP BACK NEXT CONTENTS CONTACT...
- Page 8 MANUAL Registering the USB CameraMate Thank you again for purchasing the Microtech USB CameraMate. In order for us to better serve you, we encourage you to register your USB CameraMate as soon as possible. There are sever- al benefits to registering the USB CameraMate: Registering your USB CameraMate entitles you to free periodic driver software updates when available.
- Page 9 USER'S USER'S MANUAL MANUAL USB CameraMate CONNECTING to a Macintosh Installing the Driver Software Connecting to the USB Port Connecting to a USB Hub HELP BACK NEXT CONTENTS CONTACT...
-
Page 10: Installation Overview
MANUAL MANUAL Installation Overview The USB CameraMate is relatively easy to install and operate. To avoid complications during the installation process, please follow the steps in order as described in this chapter. Installing the driver software Start up your Macintosh computer and close all other applications. - Page 11 CameraMate to your computer after restarting. Proceed to the next page for instructions on connecting the Microtech USB CameraMate. Installation note: If you attempt to attach the USB connector of the USB CameraMate to the computer prior to installing the drivers, you will receive the following (or a similar) message: If this occurs, click "Cancel", install the driver software, and then attach the USB connector.
-
Page 12: Connecting To The Usb Port
MANUAL Connecting to the USB port: Connect the USB connector of the USB CameraMate to the USB port located at the back of the computer. In the case of the Apple iMac or iBook, use the USB ports located on the side of the computer. Do not use the USB port on the keyboard. Refer to the illustrations below. - Page 13 NOTE: Use only with a powered USB hub or the optional Microtech Power Adapter may be required. Then connect the USB connector of the USB CameraMate to a port on the USB hub. The USB cable may be plugged into the computer or hub while the computer is running.
- Page 14 USER'S USER'S MANUAL MANUAL USB CameraMate CONNECTING to a PC Compatible Installing the Driver Software Connecting to the USB Port Connecting to a USB Hub HELP BACK NEXT CONTENTS CONTACT...
- Page 15 MANUAL MANUAL Installation Overview The USB CameraMate is relatively easy to install and operate. To avoid complications during the installation process, please follow the steps in order as described in this chapter. Installing the driver software Before connecting and using the USB CameraMate, you must first install the device drivers located on the accompanying Microtech Driver CD.
- Page 16 USER'S USER'S USB CameraMate MANUAL MANUAL Read the license agreement and click Yes as shown on left. Click Yes. Select the location on your computer where you wish to install the drivers. Click Next. Click Next. Click Next. Click Next.
- Page 17 Click Finish and restart your computer once the installation is complete. Click Finish Congratulations! Driver installation is now complete. You may now connect the USB CameraMate to your computer. Proceed to the next page for instructions on connecting the USB CameraMate. HELP BACK NEXT CONTENTS...
- Page 18 USB CameraMate MANUAL MANUAL Connecting to the USB port: Connect the USB connector of the USB CameraMate to the USB port on your computer. The USB cable may be plugged into the computer while the computer is running. Enlarged view...
- Page 19 NOTE: Use only with a powered USB hub or the optional Microtech Power Adapter may be required. Then connect the USB connector of the USB CameraMate to a port on the USB hub. Make sure the connectors are secured firmly. The USB cable may be plugged into the computer or hub while the computer is running.
-
Page 20: How To Use
Inserting a SmartMedia card Inserting a CompactFlash card Inserting a card (Macintosh) Formatting cards (Macintosh) Removing a card (Macintosh) Inserting a card (PC) Formatting cards (PC) Removing a card (PC) Using the USB CameraMate with digital cameras HELP BACK NEXT CONTENTS CONTACT... -
Page 21: Inserting A Smartmedia Card
MANUAL MANUAL This section describes the operation relating to the USB CameraMate and digital film cards. To avoid complications while attempting to use your USB CameraMate, Microtech recommends reading this entire chapter. For installation information, refer to “Chapter 2: Connecting to a Macintosh” (page 9) or “Chapter 3: Connecting to a PC Compatible”... - Page 22 USER'S USER'S USB CameraMate MANUAL MANUAL Inserting a SmartMedia card (continued) Insert the SmartMedia card as shown below. The CameraMate can accept both 3.3V and 5V Smartmedia cards. Notice the notched corner of the SmartMedia card. The location of notch will appear at different locations indicating whether the card is a 5V or 3.3V SmartMedia card - refer...
-
Page 23: Inserting A Compactflash Card
This is normal. IMPORTANT: If excessive force is required, or the card just doesn’t seem to fit, do not attempt to force the card in the reader, instead, call Microtech’s toll free tech support number for assis- tance. - Page 24 IMPORTANT: Be sure you have installed the USB CameraMate drivers prior to attempting to operate the USB CameraMate. Also be sure the Apple File Exchange control panel is set to load in your system folder - you can activate it using the Apple Extensions Manager control panel.
- Page 25 MANUAL Formatting cards (Macintosh) There may be instances where you may wish to format a card in the USB CameraMate rather than in a digital camera. There may also be times when you may be required or prompted to format your card. As such please read the information in this section for information on format- ting either CompactFlash or SmartMedia cards.
- Page 26 USER'S USER'S USB CameraMate MANUAL MANUAL Formatting cards (Macintosh - continued) Formatting SmartMedia cards: SmartMedia cards cannot be formatted on a Macintosh using the CameraMate. SmartMedia cards should be formatted on a digital camera (or a PC Compatible or handheld PC equipped with a SmartMedia slot).
- Page 27 USER'S USER'S USB CameraMate MANUAL MANUAL Removing a card (Macintosh) Make sure that the "Access/Power" indicator is not flashing. The access indicator will flash when data is being read or written on the card. Wait until the operations are com- plete and the access indicator is no longer flashing before attempting to remove the card.
- Page 28 USER'S USER'S USB CameraMate MANUAL MANUAL Removing a card (Macintosh - continued) WARNING: Do not remove a mounted card without first dragging the card icon to the trash. If removed improperly, a warning message (similar to the one shown below) will appear on the screen.
- Page 29 USER'S USER'S USB CameraMate MANUAL MANUAL Inserting a card (PC) With a PC compatible computer, running Windows (98, 98 SE, ME, or 2000), two DPCM-USB icons for each slot will appear under "My Computer" as removable drives (see the illustration below).
- Page 30 MANUAL Formatting cards (PC) There may be instances where you may wish to format a card in the USB CameraMate rather than in a digital camera. There may also be times when you may be required or prompted to format your card. As such please read the information in this section for information on format- ting either CompactFlash or SmartMedia cards.
- Page 31 USER'S USER'S USB CameraMate MANUAL MANUAL Select the format type. Depending on the type of card inserted, you will see a message similar to one of the examples shown below. CompactFlash format screen: SmartMedia format screen: The CFPrep Utility will create a single formatted...
- Page 32 USER'S USER'S USB CameraMate MANUAL MANUAL Click "Close." Formatting is now complete. Removing a card (PC) Make sure that the "Access/Power" indicator is not flashing. The access indicator will flash when data is being read or written on the card. Wait until the operations are complete and the access indicator is no longer flashing before attempting to remove the card.
- Page 33 MANUAL Using the USB CameraMate with digital cameras The USB CameraMate was designed to simplify life for the digital photographer and not to detract from the creative process. Most digital cameras include the necessary software/drivers to access images on your computer— make sure that the required software for your camera is installed.
- Page 34 USER'S USER'S USB CameraMate MANUAL MANUAL There are several magazines dedicated exclusively to digital photography which can be tremen- dously helpful. Most of the these magazines also maintain web sites with useful information. There are also a growing number of books marketed to both novice and professional digital pho- tographers.
- Page 35 USER'S USER'S MANUAL MANUAL USB CameraMate OBTAINING Technical Support Contacting Microtech Technical Support Returning Products For Service Microtech Limited Warranty HELP BACK NEXT CONTENTS CONTACT...
-
Page 36: Returning Products For Service
Any package that does not carry an RMA number will be refused by Microtech’s Receiving Department. Pack the USB CameraMate in its original box. Be certain that it fits snugly and is surrounded with the original, corrugated packing material. - Page 37 Microtech within ninety (90) days after the date of purchase. If you discover a defect, Microtech will, at its option, repair or replace this product with a new or reconditioned product at no charge to you, provided you return it during the warranty period, with transportation charges prepaid, to Microtech.
- Page 38 MANUAL USB CameraMate CONTACTING Microtech International Microtech International, Inc. is an industry leader in digital connectivity solutions and personal computer memory upgrades. Our digital connectivity solutions include an exten- sive line of PC Card and flash memory readers and media, which improve the performance, capacity, and flexibility of any digital appliance.
- Page 39 Copyright Information The contents of this manual are copyrighted by Microtech International, Inc. and may not be reproduced in whole or in part without written permission of Microtech International, Inc. The same proprietary and copyright notices must be affixed to any permitted copies as were affixed to the original.
Need help?
Do you have a question about the USB CameraMate and is the answer not in the manual?
Questions and answers