ViewSonic ViewPad 10E User Manual
Hide thumbs
Also See for ViewPad 10E:
- User manual (29 pages) ,
- Specifications (2 pages) ,
- Software manual (98 pages)

Related Manuals for ViewSonic ViewPad 10E


Summary of Contents for ViewSonic ViewPad 10E
- Page 1 ViewPad 10e User Guide Guide de l’utilisateur Guía del usuario Bedienungsanleitung Руководство пользователя 使用手冊(繁中) 使用手册(简中) Model No. VS14445...
-
Page 2: Compliance Information
Compliance Information FCC Statement The following statement applies to all products that have received FCC approval. Applicable products bear the FCC logo, and/or an FCC ID in the format FCC ID: GSS-VS14445 on the product label.This device complies with part 15 of the FCC Rules. Operation is subject to the following two conditions: (1) This device may not cause harmful interference, and (2) This device must accept any interference received, including interference that may cause undesired operation. - Page 3 CE Conformity for European Countries The device complies with the EMC Directive 2004/108/EC and Low Voltage Directive 2006/95/EC, R&TTE Directive 1999/5/EC. Following information is only for EU-member states: The mark is in compliance with the Waste Electrical and Electronic Equipment Directive 2002/96/EC (WEEE).
-
Page 4: Declaration Of Rohs Compliance
Declaration of RoHS Compliance This product has been designed and manufactured in compliance with Directive 2002/95/EC of the European Parliament and the Council on restriction of the use of certain hazardous substances in electrical and electronic equipment (RoHS Directive) and is deemed to comply with the maximum concentration values issued by the European Technical Adaptation Committee (TAC) as shown below: Proposed Maximum... -
Page 5: Important Safety Instructions
Important Safety Instructions DO NOT place objects on top of the device, as objects may scratch the screen. DO NOT expose the device to dirty or dusty environments. DO NOT place the device on an uneven or unstable surface. DO NOT insert any foreign objects into the device. DO NOT expose the device to strong magnetic or electrical field. -
Page 6: Copyright Information
® registered trademarks of DataViz, Inc. All rights reserved. Disclaimer: ViewSonic Corporation shall not be liable for technical or editorial errors or omissions contained herein; nor for incidental or consequential damages resulting from furnishing this material, or the performance or use of this product.In the interest of continuing product improvement, ViewSonic Corporation reserves the right to change product specifications without notice. -
Page 7: Product Registration
_______________________________ Product disposal at end of product life ViewSonic respects the environment and is committed to working and living green. Thank you for being part of Smarter, Greener Computing. Please visit ViewSonic website to learn more. USA & Canada: http://www.viewsonic.com/company/green/recycle-program/ Europe: http://www.viewsoniceurope.com/uk/kbase/article.php?id=639... -
Page 8: Table Of Contents
Chapter 1: Getting Started ..............1 1.1 Your Device ...................1 Chapter 2: Start Using Your Device ..........4 2.1 Home Screen ..................4 Set Screen Mode ..................4 Extended Home Screen .................4 2.2 ViewScene 3D ..................5 Using of ViewScene 3D ................5 Customizing Home Screen ..............6 3D Carousel ...................7 Apps List ....................8 Panels ....................9... -
Page 9: Chapter 1: Getting Started
Chapter 1: Getting Started 1.1 Your Device Front Rear ② ③ ① ④⑤ ⑥ ⑦ Part Name Description Touch screen Use finger to control system & application. Indicator Refer to "Indicators" on page 3 for details. Camera A built-in webcam that allows you to capture still images, record videos, and chat online. - Page 10 Side Left Right ① ⑧ ② ③ ④ ⑤ ⑥ ⑦ ⑨ Bottom Part Name Description Volume button Press to adjust the volume (+Volume up/-Volume down). Power button Press and hold the power button for 2-3 seconds to power on your device.
- Page 11 1.2 Accessories After opening the package, carefully inspect the contents. If any of the items is missing or appear damaged, contact your dealer. The shipping carton should contain the following: • ViewPad 10e • Changeable Power Plug • Power Adaptor •...
-
Page 12: Chapter 2: Start Using Your Device
• Compliance Information Chapter 2: Start Using Your Device 2.1 Home Screen From the Home screen, you can quickly access common features and view battery and connection status. Set Screen Mode Press and hold the power button for 2-3 seconds to power on your device. And then follow the on-screen instructions to complete the initial Operating system setup. -
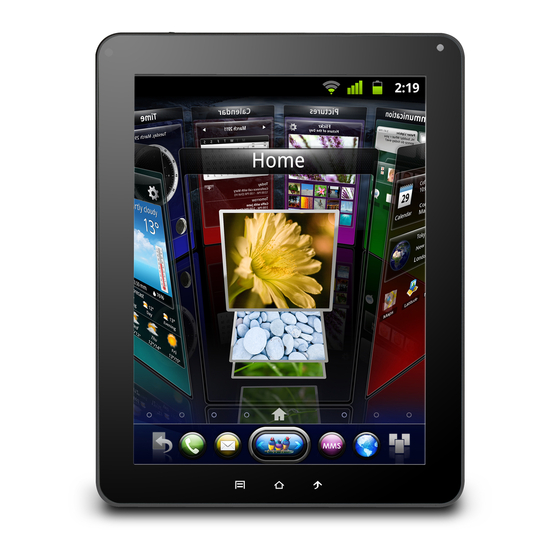
Page 13: Viewscene 3D
2.2 ViewScene 3D Using of ViewScene 3D It is ViewScene 3D as default when the main unit boot up, your device becomes a multiple personalized 3D Home screens that you can quickly apply to your device. The preset Home screens are preconfigured with a different collection of widgets that reflects a different moments in your life that is more suitable for business, travel, play, or social life. -
Page 14: Customizing Home Screen
Customizing Home Screen Home screen is an extended panel user interface that gives you up-to-date information at a glance, such as time, weather, calendar, upcoming appointments, next alarm, new messages, missed calls, new emails, and new voicemail. It also has a fully customizable layout where you can add your own favorite apps, folders, and widgets for one-tap access. -
Page 15: Carousel
3D Carousel The 3D Carousel shows Home screen panels bundled with all the features in a simple and intuitive 3D model. The carousel brings your entire device features at one glance. • The Tap the carousel button in Home screen to open 3D carousel. •... -
Page 16: Apps List
Apps List The apps list is accessible from the Home screen using the apps list button at the right corner of Home bar. Home button on top of applications icon indicates that the app is already on the Home screen. Tap this small Home icon to find the app location on the Home screen. Press MENU button to view the available options. -
Page 17: Panels
Panels ViewScene 3D comes with rich functioning panels such as Calendar, Weather, Picture of the Day (Flickr), Time, and more. Those panels have 3D Magic Animation feature that can be displayed when viewed in the 3D carousel. To view panel’s settings, tap the settings icon located at the top right corner of the panel. In Time panel settings you can change the current skin. -
Page 18: Chapter 3: Settings
Chapter 3: Settings Touch the "Settings" icon to open the settings configuration from aplications menu, you can use it to setup your Wi-Fi Connection, adjust time, display settings and so on. 3.1 Install and Remove an Applications Use the 1 Mobile market application to install popular applications to your device. Remove an applications Touch to enter applications menu >... -
Page 19: Setting Date & Time
3.2 Setting Date & Time Touch the “Settings” icon from the applications menu, select “Date & time settings" and click to change date & time setting, You can set date, time zone, time, and so on. 3.3 Set the System Language Touch applications menu icon >... -
Page 20: Configuring A Wi-Fi Network
3.4 Configuring a Wi-Fi Network From the Home screen, press , and tap Settings > Wireless & networks. • Select the Wi-Fi check box to turn Wi-Fi on and the detected available Wi-Fi network list will appear. • Tap the Wi-Fi network you want to connect to. If you selected an open network, you will be automatically connected to the network. -
Page 21: Configuring A Bluetooth Connection
3.5 Configuring a Bluetooth Connection From the applications menu press , and tap Settings > Wireless & networks. • Select the Bluetooth check box to activate the Bluetooth. • A list of Bluetooth devices will appear. To pair with a device, tap the device name in the discovered Bluetooth list. -
Page 22: Chapter 4: Using Applications
Chapter 4: Using Applications 4.1 Setting up an Internet Email Account Select the Video from the applications menu. Touch the selected video thumbnail to start playing your video content. When streaming video content trough HDMI output, touching the screen will enable the video playback options. -
Page 23: Play Music
4.2 Play Music Touch the “Music” icon from the applications menu. You can search music by Artists, Albums, Playlists, or by All songs to start playing music in your device. 4.3 Gallery Gallery application provides a viewing space for your pictures and videos. Before using Gallery application, remember to install the Micro SD Card. -
Page 24: Chapter 5: Other Information
Chapter 5: Other Information Troubleshooting 1. Unable to power on the device. Ensure the device had been charged sufficiently (red light while charging, blank when fully charged). 2. System force closes, crashes or fails to operate and is not recoverable or able to start after a full charge. -
Page 25: Customer Support
Renta y Datos, 29 SUR 721, COL. LA PAZ, 72160 PUEBLA, PUE. Tel: 01.222.891.55.77 CON 10 LINEAS Electroser, Av Reforma No. 403Gx39 y 41, 97000 Mérida, Yucatán. Tel: 01.999.925.19.16 Other places please refer to http://www.viewsonic.com/la/soporte/index.htm#Mexico Latin America (Peru) www.viewsonic.com/la/ T= 0800-54565 soporte@viewsonic.com... -
Page 26: Limited Warranty
How long the warranty is effective: ViewSonic ViewPad are warranted for at least 1 year for labor from the date of the first customer purchase. User is responsible for the back up of any data before returning the unit for service. - Page 27 Exclusion of damages: ViewSonic’s liability is limited to the cost of repair or replacement of the product. ViewSonic shall not be liable for: 1. Damage to other property caused by any defects in the product, damages based...
- Page 28 Informations de conformité AVISO FCC La siguiente declaración se aplica a todos los productos que han recibido la aprobación FCC. Los productos correspondientes llevan el logotipo FCC y/o un identificador FCC con el formato GSS-VS14445 en la etiqueta del producto.Este dispositivo cumple el Apartado 15 de las Normas FCC.
- Page 29 Conformité CE pour les pays européens L’appareil est conforme la norme EMC 2004/108/EC et à la norme sur la basse tension 2006/95/EC, la norme R&TTE 1999/5/EC. Les indications qui suivent sont destinées uniquement aux Etats membres de l’Union Européenne: La marque est conforme à la Directive sur l’élimination des déchets électriques et électroniques 2002/96/EC (Waste Electrical and Electronic Equipment = WEEE).
- Page 30 Déclaration de conformité RoHS (LSDEEE) Ce produit a été conçu et fabriqué dans le respect de la directive 2002/95/EC du Parlement Européen et du Conseil relative à la limitation de l’utilisation de certaines substances dangereuses dans les équipements électriques et électroniques (Directive RoHS - LSDEEE) et il est déclaré...
- Page 31 Importantes instructions de sécurité NE PAS placer d'objet sur le ViewPad. Les objets peuvent le rayer ou pénétrer dans l'écran. NE PAS exposer le ViewPad à la saleté ou à la poussière. NE PAS placer le ViewPad sur une surface instable ou irrégulière. NE PAS faire pénétrer un objet étranger dans le ViewPad.
- Page 32 ® marques commerciales ou des marques déposées de DataViz, Inc. Tous droits réservés. Décharge de responsabilité : La société ViewSonic Corporation ne peut être tenue pour responsable d’erreurs techniques ou d’impression ni d’omissions dans le présent manuel ; dommages directs ou indirects résultant de la livraison, des performances ou de l’utilisation de ce produit;...
- Page 33 _______________________________ Elimination du produit en fin de vie ViewSonic respecte l’environnement et fait des efforts allant dans le sens d’un environnement de travail et de vie écologiques. Merci d’oeuvrer aussi pour une informatique plus intelligente et plus écologique. Pour en savoir plus, veuillez visiter le site web de ViewSonic.
- Page 34 Chapitre 1 : Mise en route..............1.1 Votre appareil ..................Chapitre 2 : Commencer à utiliser votre appareil......2.1 Écran d'accueil ..................Définir le mode Écran ................2.2 ViewScene 3D ..................Utilisation de ViewScene 3D ..............Écran d'accueil personnalisé ..............Carrousel 3D ..................
-
Page 35: Chapitre 1 : Mise En Route
Chapitre 1 : Mise en route 1.1 Votre appareil Avant Arrière ② ③ ① ④⑤ ⑥ ⑦ Nom de la pièce Description Ecran tactile Utilisez un doigt pour contrôler le système & les applications. Voyant Référez-vous à "Voyants" en page 3 pour les détails. ... - Page 36 Côté Droite Gauche Dessus ① ⑧ ② ③ ④ ⑤ ⑥ ⑦ ⑨ Nom de la pièce Description Bouton Volume Appuyez pour régler le volume (+Volume plus/-Volume moins). Bouton d'alimentation Restez appuyé sur le bouton d'alimentation pendant 2-3 secondes pour allumer votre appareil.
- Page 37 Vérifiez toujours le contenu de la boîte lorsque vous l’ouvrez la première fois. S'il manque un élément ou si un élément est endommagé, contactez immédiatement votre revendeur. La boîte devrait contenir les éléments suivants : • ViewPad 10e • Fiche d'alimentation modifiable • Adaptateur secteur •...
-
Page 38: Chapitre 2 : Commencer À Utiliser Votre Appareil
Chapitre 2 : Commencer à utiliser votre appareil 2.1 Écran d'accueil À partir de l'écran d'accueil, vous pouvez accéder rapidement aux fonctions les plus communes, visualiser l'état de la batterie et les statuts de connexion. Définir le mode Écran Restez appuyé sur le bouton d'alimentation pendant 2-3 secondes pour allumer votre appareil. -
Page 39: Viewscene 3D
2.2 ViewScene 3D Utilisation de ViewScene 3D Il s'agit de ViewScene 3D par défaut au démarrage de l'unité principale, votre appareil se transforme en de multiples écrans d'accueil personnalisables en 3D que vous pouvez appliquer rapidement à votre appareil. Les écrans d'accueil prédéfinis sont préconfigurés avec une collection différente de widgets qui reflète des moments différents de votre vie, qui sont plus appropriés pour le travail, les voyages, les jeux ou la vie sociale. -
Page 40: Écran D'accueil Personnalisé
Écran d'accueil personnalisé L'écran d'accueil est un panneau d'interface utilisateur étendu qui vous donne des informations à jour en un coup d'œil, comme l'heure, la météo, le calendrier, les prochains rendez-vous, l'alarme suivante, les nouveaux messages, les appels manqués, les nouveaux e-mails et les messages vocaux nouveaux. Il dispose également d'une disposition entièrement personnalisable où... -
Page 41: Carrousel 3D
changer de couleur, et définir comme Accueil (panneau par défaut). Glissez-déposez pour ajouter, supprimer et réorganiser les panneaux. Pointez sur un panneau pour le renommer, le changer de couleur, ou le définir comme Accueil. Veuillez noter que les panneaux prédéfinis tels que la météo, l'heure et le calendrier ne peuvent pas être supprimés définitivement, ils vont rester en bas du panneau. -
Page 42: Liste Des Applications
Liste des applications La liste des applications est accessible depuis l' écran d'accueil en utilisant le bouton de liste des applications dans le coin droit de la barre d'accueil. Le bouton d'accueil au dessus de l'icône des applications indique que l'application est déjà... -
Page 43: Panneaux
Panneaux ViewScene 3D est livré avec des panneaux riches en fonctions tels que le calendrier, la météo, la photo du jour (Flickr), l'heure, et plus encore. Ces panneaux ont des fonctions d'animation magique 3D qui peut être affichées dans le carrousel 3D. Pour afficher les paramètres du panneau, appuyez sur l'icône des paramètres située dans le coin supérieur droit du panneau. -
Page 44: Chapitre 3 : Réglages
Chapitre 3 : Réglages Touchez l'icône "Settings (Paramètres)" pour ouvrir le menu de configuration des paramètres, vous pouvez l'utiliser pour configurer votre connexion Wi-Fi, régler l'heure, afficher les réglages et ainsi de suite. 3.1 Installer et supprimer une application Utilisez l'application du marché 1 Mobile pour installer des applications populaires pour votre appareil. -
Page 45: Réglage De La Date Et De L'heure
3.2 Réglage de la date et de l'heure Touchez l'icône “Settings (Paramètres)” dans le menu des applications, sélectionnez “Date & time settings (Réglages date et heure)" et cliquez pour modifier le réglage de la date et de l'heure, vous pouvez régler la date, le fuseau horaire, l'heure et ainsi de suite. 3.3 Régler la langue d’affichage Touchez l'icône du menu des applications >... -
Page 46: Configuration D'un Réseau Wi-Fi
3.4 Configuration d'un réseau Wi-Fi Depuis l'écran d'accueil, appuyez sur , pointez sur Settings (Paramètres) > Wireless & networks (Sans fil et réseaux). • Cochez la case Wi-Fi pour activer le Wi-Fi et la liste des réseaux Wi-Fi détectés disponibles apparaît. •... -
Page 47: Configuration D'une Connexion Bluetooth
3.5 Configuration d'une connexion Bluetooth Depuis le menu des applications, appuyez sur , pointez sur Settings (Paramètres) > Wireless & networks (Sans fil et réseaux). • Cochez la case Bluetooth pour activer le Bluetooth. • Une liste des appareils Bluetooth apparaît. Pour apparier avec un appareil, appuyez sur le nom de l'appareil dans la liste des appareils Bluetooth découverts. -
Page 48: Chapitre 4 : Utiliser Des Applications
Chapitre 4 : Utiliser des applications 4.1 Configurer un compte de messagerie Internet Sélectionnez la vidéo dans le menu des applications. Touchez la vignette vidéo sélectionnée pour commencer à jouer votre contenu vidéo. Lors du streaming de contenu vidéo via la sortie HDMI, le fait de toucher l'écran active les options de lecture vidéo. -
Page 49: Lecture De Musique
4.2 Lecture de musique Touchez l'icône “Music (Musique)” dans le menu des applications. Vous pouvez rechercher la musique par Artiste, Album, Liste de lecture, ou par Toutes les chansons pour commen- cer à jouer la musique dans votre appareil. 4.3 Galerie L'application Galerie offre un espace d'affichage pour vos photos et vidéos. -
Page 50: Chapitre 5 : Autres Informations
Chapitre 5 : Autres informations Guide de dépannage 1. Impossible d'allumer l'appareil. Assurez-vous que l'appareil avait été suffisamment chargée (lumière rouge pendant la charge, verte lorsque complètement chargé). 2. Le système force à la fermeture, se bloque ou ne fonctionne pas et n'est pas récu- pérable ni en mesure de démarrer après une charge complète. - Page 51 Site Internet Courrier électronique F= Fax France et autres pays www.viewsoniceurope. www.viewsoniceurope.com/fr/ service_fr@viewsoniceurope.com francophones en Europe com/fr/ support/call-desk/ T (Numéro vert)= 1-866-463- 4775 Canada www.viewsonic.com service.ca@viewsonic.com T= 1-424-233-2533 F= 1-909-468-3757 www.viewsoniceurope. www.viewsoniceurope.com/chfr/ Suisse service_ch@viewsoniceurope.com com/chfr/ support/call-desk/ www.viewsoniceurope. www.viewsoniceurope.com/befr/ Belgique (Français) service_be@viewsoniceurope.com...
- Page 52 ® Étendue de la garantie : ViewSonic garantit que ses produits sont exempts de vices de fabrication ou de malfaçon pendant toute la durée de la période de garantie. Si un produit présente un défaut matériel ou de malfaçon pendant cette période, ViewSonic devra, à sa discrétion, réparer le produit ou le remplacer par un produit similaire.
- Page 53 Exclusion des dommages : La responsabilité de viewsonic se limite au coût de réparation ou de remplacement du produit. La sociéte viewsonic ne pourra pas être tenue pour responsable: 1. Des dommages causés à d’autres biens en raison d’un défaut du produit, les dom- mages résultant d’une gêne, de l’impossibilité...
- Page 54 Información de conformidad AVISO FCC La siguiente declaración se aplica a todos los productos que han recibido la aprobación FCC. Los productos correspondientes llevan el logotipo FCC y/o un identificador FCC con el formato GSS-VS14445 en la etiqueta del producto.Este dispositivo cumple el Apartado 15 de las Normas FCC.
- Page 55 Certificación CE para países europeos Este dispositivo cumple con la Directiva EMC (Compatibilidad Electromagnética) 2004/108/EC y la Directiva de Baja Tensión 2006/95/EC, R&TTE Directiva 1999/5/EC. La información siguiente es sólo para los estados miembros de la UE: La marca cumple con la Directriz para el Desecho de Equipos Electrónicos y Eléctricos 2002/96/EC (WEEE).
- Page 56 Declaración de Cumplimiento de RoHS Este producto ha sido diseñado y fabricado cumpliendo la Directiva 2002/95/EC del Parlamento Europeo y el Consejo para la restricción del uso de ciertas sustancias peligrosas en equipos eléctricos y electrónicos (Directiva RoHS) y se considera que cumple con los valores de concentración máximos publicados por el European Technical Adaptation Committee (Comité...
- Page 57 Importantes Instruciones de Seguridad NO coloque ningún objeto sobre su ViewPad. Los objetos pueden arañar la pantalla o entrar en ella. NO exponga su ViewPad a entornos sucios o polvorientos. NO coloque su ViewPad en una superficie irregular o inestable. NO inserte ningún objeto extraño en su ViewPad.
- Page 58 La información contenida en este documento puede cambiar sin previo aviso.Queda prohibida la copia, reproducción o transmisión de este documento por ningún medio ni para ningún fin, sin el previo consentimiento por escrito de ViewSonic Corporation. Información de derechos de propiedad intelectual Los derechos de todas las tecnologías y productos que componen este dispositivo son...
- Page 59 ViewSonic es respetuoso con el medioambiente y está comprometido a trabajar y vivir de una manera que sea respetuosa con el medioambiente. Gracias por ser parte de una forma de Computación más Inteligente y más Verde. Visite el sitio web de ViewSonic para saber más.
- Page 60 Capítulo 1: Procedimientos iniciales ..........1.1 El dispositivo ..................Capítulo 2: Comenzar a utilizar el dispositivo ........ 2.1 Pantalla de inicio .................. Establecer el modo de pantalla .............. 2.2 ViewScene 3D ..................Utilizar ViewScene 3D ................Personalizar la pantalla de inicio ............3D Carousel ...................
-
Page 61: Capítulo 1: Procedimientos Iniciales
Capítulo 1: Procedimientos iniciales 1.1 El dispositivo Vista frontal Vista posterior ② ③ ① ④⑤ ⑥ ⑦ Nombre del Descripción componente Pantalla táctil Utilice el dedo para controlar el sistema y las aplicaciones. Indicador Consulte la sección "Indicadores" en la página 3 para obtener detalles. -
Page 62: Vista Lateral
Vista lateral Lado izquierdo Lado superior Lado derecho ① ⑧ ② ③ ④ ⑤ ⑥ ⑦ ⑨ Lado inferior Nombre del Descripción componente Botón Volumen Presione este botón para ajustar el volumen (+Subir volumen/-Bajar volumen). Botón de encendido Mantenga presionado este botón entre 2 y 3 segundos para y apagado encender el dispositivo. - Page 63 Después de abrir el paquete, inspeccione meticulosamente su contenido. Si cualquiera de los artículos falta o está dañado, póngase en contacto son su distribuidor. La caja debe contener los siguientes artículos: • ViewPad 10e • Enchufe de alimentación intercambiable • Adaptador de alimentación •...
-
Page 64: Capítulo 2: Comenzar A Utilizar El Dispositivo
Capítulo 2: Comenzar a utilizar el dispositivo 2.1 Pantalla de inicio Desde la pantalla de inicio, puede acceder rápidamente a funciones comunes y ver el estado de la batería y de la conexión. Establecer el modo de pantalla Mantenga presionado este botón entre 2 y 3 segundos para encender el dispositivo. A continuación, siga las instrucciones de la pantalla para completar la configuración del sistema operativo inicial. -
Page 65: Viewscene 3D
2.2 ViewScene 3D Utilizar ViewScene 3D ViewScene 3D se establece de forma predeterminada cuando la unidad principal arranca. El dispositivo se convierte en varias pantallas de inicio 3D personalizadas que puede aplicar rápidamente al dispositivo. Las pantallas de inicio predefinidas están preconfiguradas con una colección diferente de widgets que reflejan distintos momentos de su vida: negocios, viajes, juego o vida social. -
Page 66: Personalizar La Pantalla De Inicio
Personalizar la pantalla de inicio La pantalla de inicio es una interfaz de usuario de paneles extendida que proporciona información actualizada rápidamente, como por ejemplo el tiempo, un calendario, próximas citas, alarma siguiente, mensajes nuevos, llamadas perdidas, correos electrónicos nuevos y correo de voz nuevo. -
Page 67: Carousel
paneles) puede agregar, quitar, reordenar, cambiar nombres, cambiar colores y establecer como Inicio (panel predeterminado). Utilice la función Arrastrar y colocar para agregar, quitar y reordenar paneles. Toque un panel para cambiar su nombre, color o establecer como Inicio. Tenga en cuenta que los paneles predefinidos como el tiempo, la hora y el calendario, no se pueden quitar permanentemente, sino que permanecen en el suelo del panel. -
Page 68: Lista De Aplicaciones
Lista de aplicaciones Puede acceder a la lista de aplicaciones desde la pantalla de inicio utilizando el botón de la lista de aplicaciones situado en la esquina derecha de la barra Inicio. El botón de Inicio situado en la parte superior del icono de aplicaciones indica que la aplicación ya se encuentra en la pantalla de inicio. -
Page 69: Paneles
Paneles Entre otros, ViewScene 3D incluye versátiles paneles de funcionamiento como los siguientes: Calendar (Calendario), Weather (El Tiempo), Picture of the Day (Imagen del día) (Flickr) y Time (Hora). Dichos paneles tienen la función 3D Magic Animation (Animación mágica 3D) que se puede mostrar cuando se ve en el carrusel 3D. Para ver la configuración del panel, toque el icono de configuración situado en la esquina superior derecha de dicho panel. -
Page 70: Capítulo 3: Configuración
Capítulo 3: Configuración Toque el icono "Settings (Configuración)" para abrir la configuración de parámetros desde el menú de aplicaciones. Puede utilizarlo para configurar la conexión Wi-Fi, ajustar la hora, mostrar la configuración, etc. 3.1 Instalar y quitar aplicaciones Utilice la aplicación 1 Mobile market para instalar aplicaciones populares en el dispositivo. Quitar una aplicación Toque para entrar en el menú... -
Page 71: Establecer La Fecha Y Hora
3.2 Establecer la fecha y hora Toque el icono “Settings (Configuración)” en el menú y aplicaciones, seleccione “Date & time settings (Configuración de fecha y hora)" y haga clic para cambiar la configuración de la fecha y la hora. Puede establecer la fecha, la zona horaria, la hora, etc. 3.3 Establecer el idioma del sistema Toque el icono del menú... -
Page 72: Configurar Una Red Wi-Fi
3.4 Configurar una red Wi-Fi En la pantalla de inicio, presione y toque Settings (Configuración) > Wireless & networks (Inalámbrico y redes). • Active la casilla Wi-Fi para habilitar la funcionalidad Wi-Fi. Aparecerá la lista de redes Wi-Fi disponibles. • Toque la red Wi-Fi a la que desea conectarse. Si seleccione una red abierta, se conectará... -
Page 73: Configurar Una Conexión Bluetooth
3.5 Configurar una conexión Bluetooth En el menú de aplicaciones, presione y toque Settings (Configuración) > Wireless & networks (Inalámbrico y redes). • Active la casilla Bluetooth para habilitar la funcionalidad Bluetooth. • Aparecerá una lista de dispositivos Bluetooth. Para realizar la asociación con un dispositivo, toque el nombre del mismo en la lista de dispositivos Bluetooth detectados. -
Page 74: Capítulo 4: Utilizar Aplicaciones
Capítulo 4: Utilizar aplicaciones 4.1 Configurar una cuenta de correo electrónico de Internet Seleccione el vídeo en el menú de aplicaciones. Toque la miniatura del vídeo seleccionado para comenzar a reproducir el contenido de dicho vídeo. Cuando transmita contenido de vídeo por secuencias a través de la salida HDMI, al tocar la pantalla se habilitarán las opciones de reproducción de vídeo. -
Page 75: Reproducir Música
4.2 Reproducir música Toque el icono “Music (Música)” en el menú de aplicaciones. Puede buscar música por artistas, álbumes, listas de reproducción o por todas las canciones para comenzar a reproducir música en el dispositivo. 4.3 Galería La aplicación Gallery (Galería) proporciona un espacio de visualización para imágenes y vídeos. -
Page 76: Capítulo 5: Otra Información
Capítulo 5: Otra información Solucionar problemas 1. No se puede encender el dispositivo. Asegúrese de que el dispositivo tiene carga suficiente (luz roja durante la carga y verde cuando está completamente cargado). 2. El sistema se cierra, se bloquea o no funciona correctamente y no se puede recuperar o es incapaz de iniciarse después de una carga completa Inserte un clic en el orificio de restablecimiento y presione suavemente antes de soltarlo. - Page 77 Latinoamérica (México) www.viewsonic.com/la/ T= 001-8882328722 soporte@viewsonic.com Renta y Datos, 29 SUR 721, COL. LA PAZ, 72160 PUEBLA, PUE. Tel: 01.222.891.55.77 CON 10 LINEAS Electroser, Av Reforma No. 403Gx39 y 41, 97000 Mérida, Yucatán. Tel: 01.999.925.19.16 Other places please refer to http://www.viewsonic.com/la/soporte/index.htm#Mexico...
- Page 78 Los productos o las piezas sustituidos pueden incluir componentes o piezas reparadas o recicladas. Duración de la garantía: ViewSonic ViewPad tiene una garantía de al menos 1 año en mano de obra a partir de la fecha de compra del primer cliente. Destinatario de la garantía: Esta garantía sólo es válida para el primer comprador de este producto.
- Page 79 Exclusión de daños: La responsabilidad de viewsonic se limita al coste de la reparación o sustitución del producto. Viewsonic no se hace responsable de: 1. Daños a otras pertenencias causados por defectos del producto, inconvenientes, pérdida de uso del producto, de tiempo, de beneficios, de oportunidades comer-...
- Page 80 Übereinstimmungserklärung CE-Konformität für europäische Länder Das Gerät erfüllt die Anforderungen der EMV-Richtlinie 2004/108/EG und der Niederspannungsrichtlinie 2006/95/EG, R&TTE-Richtlinie 1999/5/EC. Die folgende Information gilt nur für Mitgliedsstaaten der EU: Das rechts gezeigte Symbol weist auf Konformität mit der Richtlinie über Elektround Elektronik-Altgeräte (WEEE) 2002/96/EG hin.Produkte, die nicht diese Kennzeichnung tragen, dürfen nicht im kommunalen Abfall entsorgt werden, sondern müssen in dem Rücknahme- und Sammlungssystem entsorgt werden, das je nach Land oder Gebiet entsprechend örtlichem Gesetz zur Verfügung...
- Page 81 RoHS-Konformitätserklärung Dieses Produkt wurde gemäß den Anforderungen der EG-Richtlinie 2002/95/EG zur Beschränkung der Verwendung bestimmter gefährlicher Stoffe in Elektro- und Elektronikgeräten (RoHS-Richtlinie) entworfen und hergestellt und hat sich als mit den maximalen Konzentrationswerten, die der europäischen Ausschuss für die technische Anpassung (Technical Adaptation Committee;...
- Page 82 Wichtige Sicherheitsanweisungen Platzieren Sie keine Gegenstände auf dem ViewPad. Gegenstände könnten die Bildschirmoberfläche zerkratzen oder in das Gerät eindringen. Setzen Sie das ViewPad keinen schmutzigen oder staubigen Umgebungen aus. Platzieren Sie das ViewPad nicht auf einer unebenen oder unstabilen Oberfläche. Stecken Sie keine Fremdkörper in das ViewPad.
- Page 83 Schäden oder Folgeschäden, die auf die Lieferung dieses Materials oder den Betrieb bzw. die Verwendung dieses Produkts zurückzuführen sind.Um stetige Produktverbesserung zu gewährleisten, behält sich ViewSonic Corporation das Recht vor, die technischen Daten des Produkts ohne vorherige Ankündigung zu ändern.
- Page 84 Kaufdatum: _______________________________ Produktentsorgung am Ende der Produktlebenszeit ViewSonic achtet die Umwelt und verpflichtet sich zu einer umweltbewussten Arbeits- und Lebensweise. Vielen Dank, dass Sie einen Beitrag zu einem intelligenteren, umweltfreundlicheren Umgang mit EDV-Produkten leisten. Weitere Einzelheiten finden Sie auf der ViewSonic-Webseite.
- Page 85 Kapitel 1: Erste Schritte ..............1 1.1 Ihr Gerät ....................1 1.2 Zubehör ....................3 Kapitel 2: Gerät in Betrieb nehmen..........4 2.1 Startbildschirm ..................4 Bildschirmmodus einstellen ..............4 2.2 ViewScene 3D ..................5 ViewScene 3D verwenden ..............5 Startbildschirm anpassen ...............6 3D-Karussel ....................7 Apps-Liste ....................8 Bildschirme .....................9 Kapitel 3: Einstellungen ..............
-
Page 86: Kapitel 1: Erste Schritte
Kapitel 1: Erste Schritte 1.1 Ihr Gerät Vorderseite Rückseite ② ③ ① ④⑤ ⑥ ⑦ Komponente Beschreibung Touchscreen System und Anwendungen steuern Sie mit Ihrem Finger. Anzeige Einzelheiten entnehmen Sie bitte dem Abschnitt „Anzeige“ auf Seite 3. Kamera Eine integrierte Webcam, die Ihnen die Aufnahme von Fotos und Videos sowie Video-Chats ermöglicht. - Page 87 Seiten Links Oberseite Rechts ① ⑧ ② ③ ④ ⑤ ⑥ ⑦ ⑨ Unterseite Komponente Beschreibung Lautstärke-Taste Zum Anpassen der Lautstärke drücken (Lautstärke erhöhen / Lautstärke verringern). Ein-/Austaste Ein-/Austaste zum Einschalten Ihres Gerätes 2 bis 3 Sekunden gedrückt halten. ...
-
Page 88: Zubehör
Bitte prüfen Sie nach dem Öffnen des Kartons sorgfältig den Lieferumfang. Falls etwas fehlen oder beschädigt sein sollte, wenden Sie sich bitte an Ihren Händler. Der Lieferkarton sollte Folgendes enthalten: • ViewPad 10e • Austauschbarer Netzstecker • Netzteil • Schnellstartanleitung •... -
Page 89: Kapitel 2: Gerät In Betrieb Nehmen
Kapitel 2: Gerät in Betrieb nehmen 2.1 Startbildschirm Über den Startbildschirm können Sie schnell auf allgemeine Funktionen zugreifen sowie Akku- und Verbindungsstatus einsehen. Bildschirmmodus einstellen Halten Sie die Ein-/Austaste zum Einschalten Ihres Gerätes 2 bis 3 Sekunden gedrückt. Befolgen Sie dann zum Abschließen der Ersteinrichtung des Betriebssystems die Anweisungen auf dem Bildschirm. -
Page 90: Viewscene 3D
2.2 ViewScene 3D ViewScene 3D verwenden Beim Einschalten des Gerätes wird standardmäßig ViewScene 3D aufgerufen; dadurch wird Ihr Gerät zu einem vielseitigen personalisierten 3D-Bildschirm, den Sie schnell an Ihrem Gerät anbringen können. Die voreingestellten Startbildschirme sind mit unterschiedlichen Sammlungen an Widgets vorkonfiguriert, die verschiedene Momente in Ihrem Leben widerspiegeln und je nach Situation (Arbeit, Reise, Spiel und soziales Leben) unterschiedlich geeignet sind. -
Page 91: Startbildschirm Anpassen
Startbildschirm anpassen Der Startbildschirm ist eine erweiterte Benutzerschnittstelle, die Ihnen aktuelle Informationen auf einen Blick bereitstellt, wie z. B. Uhrzeit, Wetter, Kalender, anstehende Termine, nächster Alarm, neueste Meldungen, verpasste Anrufe, neue eMails und neue Mailbox-Nachrichten. Zudem verfügt er über ein vollständig anpassbares Layout, dem Sie Ihre eigenen Lieblings-Apps, Ordner und Widgets zum Zugreifen mit einer Berührung hinzufügen können. -
Page 92: Karussel
• Verwalten Sie Ihre Startbildschirme, drücken Sie die Menütaste und tippen auf Manage panels (Bildschirme verwalten). Auf dem Manage panels (Bildschirme verwalten)- Bildschirm können Sie Bildschirme hinzufügen, entfernen, neu anordnen, umbenennen, Farben ändern und einen Bildschirm als Startbildschirm (Standardbildschirm) festlegen. Durch Ziehen-und-Ablegen können Sie Bildschirme hinzufügen, entfernen und anordnen. -
Page 93: Apps-Liste
Apps-Liste Die Apps-Liste ist über die Apps-Listenschaltfläche auf der rechten Seite der Startbildschirmleiste vom Startbildschirm aus aufrufbar. Die Startbildschirmschaltfläche an der Oberseite des Anwendungssymbols zeigt, dass sich die Anwendung bereits auf dem Startbildschirm befindet. Tippen Sie zur Suche nach der App-Position auf dem Startbildschirm auf das kleine Startbildschirmsymbol. -
Page 94: Bildschirme
Bildschirme ViewScene 3D wird mit funktionsgeladenen Bildschirmen, wie Calendar (Kalender), Weather (Wetter), Picture of the Day (Bild des Tages) (Flickr), Time (Uhrzeit) und mehr, geliefert. Diese Bildschirme verfügen über eine magische 3D-Animation, die bei Betrachtung des 3D-Karussels eingeblendet werden kann. Tippen Sie zur Anzeige der Bildschirmeinstellungen auf das Einstellungssymbol im oberen rechten Bereich des Bildschirms. -
Page 95: Kapitel 3: Einstellungen
Kapitel 3: Einstellungen Berühren Sie zum Öffnen der Einstellungskonfiguration aus dem Anwendungsmenü das „Settings (Einstellungen)“-Symbol; Sie können es zur Einrichtung von Wi-Fi-Verbindung, Uhrzeit, Anzeigeeinstellungen etc. nutzen. 3.1 Anwendungen installieren und entfernen Verwenden Sie zur Installation beliebter Anwendungen auf Ihrem Gerät die 1 Mobile market (1 Mobilmarkt)-Anwendung. -
Page 96: Datum & Uhrzeit Einstellen
3.2 Datum & Uhrzeit einstellen Berühren Sie im Anwendungsmenü das „Settings (Einstellungen)“-Symbol, wählen Sie „Date & time settings (Datums- & Zeiteinstellungen)“ und passen die Datums- & Zeiteinstellungen durch Antippen an; Sie können Datum, Uhrzeit, Zeitzone etc. ändern. 3.3 Systemsprache einstellen Berühren Sie das Symbol des Anwendungsmenüs >... -
Page 97: Wi-Fi-Netzwerk Konfigurieren
3.4 Wi-Fi-Netzwerk konfigurieren Tippen Sie auf dem Startbildschirm auf , tippen Sie auf Settings (Einstellungen) > Wireless & networks (Drahtlos & Netzwerke). • Wählen Sie zum Aktivieren von Wi-Fi das Wi-Fi-Kontrollkästchen; eine Liste der verfügbaren Wi-Fi-Netzwerke wird angezeigt. • Tippen Sie auf das Wi-Fi-Netzwerk, mit dem Sie eine Verbindung herstellen möchten. Wenn Sie ein offenes Netzwerk auswählen, wird die Verbindung automatisch hergestellt. -
Page 98: Eine Bluetooth-Verbindung Konfigurieren
3.5 Eine Bluetooth-Verbindung konfigurieren Tippen Sie im Anwendungsmenü auf , tippen Sie auf Settings (Einstellungen) > Wireless & networks (Drahtlos & Netzwerke). • Wählen Sie zum Aktivieren der Bluetooth-Funktion das Bluetooth-Kontrollkästchen. • Eine Liste der Bluetooth-Geräte erscheint. Tippen Sie zum Paaren mit einem Gerät auf den Gerätenamen in der Liste erkannter Bluetooth-Geräte. -
Page 99: Kapitel 4: Anwendungen Verwenden
Kapitel 4: Anwendungen verwenden 4.1 eMail-Konto einrichten Wählen Sie das Video aus dem Anwendungsmenü. Berühren Sie zum Start der Wiedergabe Ihres Videoinhaltes das gewünschte Videominiaturbild. Wenn Sie über den HDMI-Ausgang Videoinhalte übertragen, können Sie durch Berührung des Bildschirms die Videowiedergabeoptionen aktivieren. Nachstehend wird es etwa 3 bis 4 Sekunden auf dem Fernsehbildschirm angezeigt, wenn Videos via HDMI übertragen werden. -
Page 100: Musik Wiedergeben
4.2 Musik wiedergeben Berühren Sie das „Music (Musik)“-Symbol im Anwendungsmenü. Sie können die Musik nach Artists (Interpret), Album, Playlists (Wiedergabeliste) oder durch All songs (Auswahl) aller Lieder durchsuchen und die Wiedergabe an Ihrem Gerät starten. 4.3 Gallery (Galerie) Die Anwendung Gallery (Galerie) ermöglicht die Betrachtung Ihrer Bilder und Videos. Denken Sie daran, vor der Nutzung der Gallery (Galerie)-Anwendung eine microSD-Karte einzustecken. -
Page 101: Kapitel 5: Sonstige Informationen
Kapitel 5: Sonstige Informationen Problemlösung 1. Das Gerät lässt sich nicht einschalten. Stellen Sie sicher, dass das Gerät ausreichend aufgeladen ist (rote Leuchte während des Ladevorgangs, grün bei voller Akkukapazität). 2. Das System erzwingt das Schließen von Anwendungen, stürzt ab oder funktioniert nicht bzw. - Page 102 Kundendienst Für technische Unterstützung oder Kundendienst für Ihr Gerät sehen Sie bitte in der unten stehenden Tabelle nach, oder wenden Sie sich an Ihren Händler. HINWEIS: Sie benötigen die Seriennummer Ihres Geräts. Land/Region Website Telefone E-mail www.viewsoniceurope. www.viewsoniceurope.com/de/ Deutschland service_de@viewsoniceurope.com com/de/ support/call-desk/ www.viewsoniceurope.
- Page 103 Ersatzprodukte oder -teile können reparierte oder überholte Teile und Komponenten enthalten. Gültigkeitsdauer der Garantie: Das ViewPad von ViewSonic ist ab Kaufdatum des Erstkäufers durch eine mindestens einjährige Garantie auf die Verarbeitung abgedeckt. Die Garantie gilt für folgende Personen: Diese Garantie gilt nur für den Ersterwerb durch den Endverbraucher.
- Page 104 Garantie der Marktgängigkeit und der eignung für einen bestimmten Zweck, ausgeschlossen. Ausschluss von Schadensersatzansprüchen: Die Haftung von viewsonic ist auf die Kosten für die Reparatur oder den Ersatz des Produkts beschränkt. Viewsonic übernimmt keine Haftung für: 1. Sachschäden, die durch Produktfehler verursacht wurden, Schäden durch Hinder- nisse, Verlust des Produkts, Zeitverlust, entgangenen Gewinn, entgangene Geschäfte, Vertrauensschäden, Störungen von Geschäftsbeziehungen sowie andere...
- Page 105 Соответствие стандартам Соответствие СЕ для европейских стран Устройство соответствует Директиве по электромагнитной совместимости 2004/108/EC и Директиве по низкому напряжению 2006/95/EC. Данная информация имеет отношение только к странам-участникам Европейского Союза (ЕС): Символ, указанный справа, соответствует Директиве 2002/96/EC об Отходах электического и электронного оборудования (WEEE). Продукция, обозначенная...
- Page 106 Декларация про соответствие RoHS Данный продукт был разработан и произведен в соответствии с Директивой 2002/95 Европейского парламента и Совета Европы про ограничение использования некоторых вредных веществ в электрическом и электронном оборудовании (Директива RoHS), он также соответствует максимальным значениям концентрации, предложенным Техническим...
- Page 107 Важные рекомендации по технике безопасности НЕ помещайте какие-либо предметы на планшет ViewPad. Предметы могут поцарапать или разбить экран. ЗАПРЕЩАЕТСЯ использовать планшет ViewPad в условиях повышенного загрязнения и в пыльных местах. НЕ ставьте планшет ViewPad на неровную или неустойчивую поверхность. НЕ вставляйте какие-либо посторонние предметы в планшет ViewPad. НЕ...
- Page 108 Ограничение ответственности: корпорация ViewSonic не несет ответственности ни за какие технические или редакторские ошибки, равно как и за недостаточность информации в данном документе; ViewSonic также не несет ответственности за побочный или косвенный ущерб, связанный с использованием настоящего документа, а также с характеристиками и эксплуатацией изделия.
- Page 109 Дата покупки: Утилизация продукта по истечении срока эксплуатации Компания ViewSonic заботится о состоянии окружающей среды и обязуется направить все свои усилия на создание экологически чистых условий работы и жизни. Компания признательна за ваш вклад в более «умные» и экологически чистые...
- Page 110 Глава 1. Подготовка к работе ............1 1.1 Вид устройства ...................1 1.2 Принадлежности .................3 Глава 2. Использование устройства ..........4 2.1 Главный экран ..................4 Настройка экрана .................4 2.2 Режим ViewScene 3D ................5 Использование режима ViewScene 3D ..........5 Настройка Главного экрана ..............6 Карусель...
-
Page 111: Глава 1. Подготовка К Работе
Глава 1. Подготовка к работе 1.1 Вид устройства Вид спереди Вид сзади ② ③ ① ④⑤ ⑥ ⑦ Деталь Описание Сенсорный экран Сенсорный экран позволяет управлять системой и приложениями с помощью пальцев. Индикатор Подробное описание см. в разделе «Индикаторы» на стр. 3. ... - Page 112 Вид сбоку Слева Сверху Справа ① ⑧ ② ③ ④ ⑤ ⑥ ⑦ ⑨ Снизу Деталь Описание Кнопка громкости Изменение уровня громкости ("+" увеличить/"-" уменьшить). Кнопка питания Для включения устройства нажмите и удерживайте в течение 2-3 секунд кнопку питания. ...
-
Page 113: Принадлежности
Распаковав изделие, внимательно проверьте комплектность. Если какой-либо из указанных ниже аксессуаров отсутствует или поврежден, обратитесь к продавцу устройства. В упаковке изделия должны находиться перечисленные ниже предметы. • Устройство ViewPad 10e • Съемный разъем питания • Адаптер питания • Краткое руководство... -
Page 114: Глава 2. Использование Устройства
Глава 2. Использование устройства 2.1 Главный экран На главной странице можно быстро получить доступ к основным функциям и проверить состояние аккумулятора и подключения к Интернету. Настройка экрана Для включения устройства нажмите и удерживайте в течение 2-3 секунд кнопку питания. Для первоначальной настройки операционной системы следуйте экранным инструкциям. -
Page 115: Режим Viewscene 3D
2.2 Режим ViewScene 3D Использование режима ViewScene 3D При загрузке устройства по умолчанию включается режим ViewScene 3D, и устройство предлагает несколько вариантов главного экрана в режиме 3D, которые можно тут же применить в вашем устройстве. Предустановленные главные экраны используют различные наборы виджетов, которые отображают различные моменты в... -
Page 116: Настройка Главного Экрана
Настройка Главного экрана Главный экран представляет собой панель расширенного пользовательского интерфейса, на которой отображается актуальная информация, например, текущее время, погода, календарь, предстоящие встречи, предупреждения, новые сообщения, пропущенные вызовы, новые почтовые поступления, новая голосовая почта. Макет панели полностью настраивается, на нее можно добавить свои любимые приложения, папки... -
Page 117: Карусель 3D
• Для управления панелями Главного экрана нажмите кнопку MENU, а затем Manage panels (Управление панелями) на экране. В экране Manage panels (Управление панелями) вы можете добавлять, удалять, изменять порядок, переименовывать, изменять цвет и задать как Главную панель (панель по умолчанию). С помощью функции... -
Page 118: Список Приложений
Список приложений Доступ к списку приложений можно получить с главной страницы с помощью кнопки списка приложений в правом углу строки приложений главного экрана. Кнопка Home в верхней части значка приложения означает, что данное приложение уже размещено на главном экране. Для нахождения приложения на главном экране щелкните... -
Page 119: Панели
Панели Устройство ViewScene 3D оснащено такими функциями как Calendar (Календарь), Weather (Погода), Picture of the Day (Flickr) (Картинка дня (Flickr)), Time (Время) и многими другими. В этих панелях используется функция 3D Magic Animation, которая активируется при просмотре в режиме 3D-карусели. Для... -
Page 120: Глава 3. Настройки
Глава 3. Настройки В меню приложений коснитесь значка "Settings (Настройки)" для отображения настроек, после чего вы можете настроить подключение Wi-Fi, время, параметры отображения и т.п. 3.1 Установка и удаление приложений Для установки популярных приложений на свое устройство воспользуйтесь службой 1 Mobile market. Удаление... -
Page 121: Настройка Даты И Времени
3.2 Настройка даты и времени В меню приложений коснитесь значка "Settings (Настройки)", выберите функцию "Date & time settings (Настройка даты и времени)" и щелкните ее для установки даты и времени. Здесь можно установить дату, время, часовой пояс и т.п. 3.3 Выбор языка системы В... -
Page 122: Настройка Сети Wi-Fi
3.4 Настройка сети Wi-Fi На главном экране нажмите кнопку , затем Settings (Настройки) > Wireless & networks (Беспроводное подключение и сеть). • Для включения режима Wi-Fi установите флажок для параметра Wi-Fi, после чего отображается список обнаруженных доступных сетей Wi-Fi. • Для подключения щелкните нужную сеть Wi-Fi. Если вы выбрали открытую сеть, вы... -
Page 123: Настройка Подключения Bluetooth
3.5 Настройка подключения Bluetooth В меню приложений нажмите кнопку , затем Settings (Настройки) > Wireless & networks (Беспроводное подключение и сеть). • Для активации подключения Bluetooth установите флажок для параметра Bluetooth. • Отображается список устройств Bluetooth. Для сопряжения с устройство нажмите имя... -
Page 124: Глава 4. Использование Приложений
Глава 4. Использование приложений 4.1 Настройка учетной записи электронной почты в Интернете В меню приложений выберите Video (Видео). Для воспроизведения коснитесь миниатюры выбранного видео. При передаче потока видеоданных через выход HDMI прикосновение к экрану включает функции воспроизведения видео. При передаче видео через HDMI изображение отображается на экране телевизора через... -
Page 125: Воспроизведение Музыки
4.2 Воспроизведение музыки В меню приложений щелкните значок "Music (Музыка)". Вы можете искать произведения по Artists (Исполнитель), Albums (Альбом), Playlists (Список воспроизведения) или All songs (Все) и начать их воспроизведение на устройстве. 4.3 Галерея Приложение Gallery (Галерея) выделяет пространство для просмотра фото- и видеоизображений. -
Page 126: Глава 5. Другая Информация
Глава 5. Другая информация Устранение неполадок 1. Устройство не включается. Проверьте зарядку батареи устройства (красный индикатор горит при зарядке, зеленый загорается при полной зарядке). 2. Система закрывается, дает сбои и не работает, а также не восстанавливается и не запускается после полной зарядки батареи. Вставьте... - Page 127 Служба поддержки Для получения технической поддержки или технического обслуживания изделия см. информацию, приведенную в таблице ниже, или обратитесь с организацией, в которой Вы приобрели монитор. ПРИМЕЧАНИЕ: Вам будет нужен серийный номер монитора. Страна или регион Веб-сайт Tелефон Телефон www. www.viewsoniceurope. service_ru@viewsoniceurope.
- Page 128 аналогичное. Заменяемое изделие или детали могут содержать отремонтированные или восстановленные детали и компоненты. Срок действия гарантии: На планшет ViewSonic ViewPad предоставляется гарантия сроком 1 год на отсутствие производственного брака с момента его приобретения первым покупателем. Субъект гарантии: Гарантия распространяется только на первого конечного покупателя.
- Page 129 3. В случае необходимости транспортируйте данное изделие в авторизованный сервисный центр ViewSonic в оригинальной упаковке или отправьте, оплатив доставку, непосредственно в компанию ViewSonic. 4. За дополнительной информацией или адресом ближайшего сервисного центра ViewSonic обращайтесь в корпорацию ViewSonic. Ограничение подразумеваемых гарантий: Не...
- Page 130 電磁相容資訊 注意: 若更換錯誤類型的電池,會有爆炸的危險。 請用原廠建議之同款或同等級的電池來更換。請依原廠指示處理廢棄電池。 減少電磁波影響,請妥適使用。 廢電池請回收 For better environmental protection, waste batteries should be collected separately for recycling or special disposal. 經型式認證合格之低功率射頻電機,非經許可,公司,商號或使用者均不得擅自變更頻率、 加大功率或變更原設計之特性及功能。 低功率射頻電機之使用不得影響飛航安全及干擾合法通信;經發現有干擾現象時,應立即停 用,並改善至無干擾時方得繼續使用。 前項合法通信,指依電信法規定作業之無線電通信。 低功率射頻電機須忍受合法通信或工 業、科學及醫療用電波輻射性電機設備之干擾。...
- Page 131 RoHS 符合性聲明 本產品係根據歐盟議會與理事會 (European Parliament and the Council ) 之 Directive 2002/95/EC 的規定設計與製造而成,限制在電氣與電子設備上使用某些危害物質 (RoHS 危 害物質禁用指令),並通過歐盟技術協調委員會 (Technical Adaptation Committee,TAC) 對 於一些物質最大濃度的規範,如下所示: 物質 最大允許濃度 實際濃度 鉛 (Pb) 0.1% < 0.1% 汞 (Hg) 0.1% < 0.1% 鎘 (Cd) 0.01% < 0.01% 六價鉻 (Cr6+) 0.1% <...
- Page 132 重要的安全指示 請勿按壓或觸碰 LCD 螢幕;請勿將本裝置與微小物品一同存放,否則容易刮傷 LCD 螢 幕或掉入平板電腦內部。 請勿將平板電腦放置在骯髒或灰塵聚積的環境中,請保持環境乾燥清潔。 請勿將平板電腦放置在不平穩的工作表面上。 請勿於平板電腦上方放置物品,或使物品掉落在平板電腦上;請勿將異物強行推入平板 電腦內部;請勿用力闔上平板電腦的螢幕。 請勿將平板電腦放置在有強烈磁場或電場的環境中;請勿將軟碟片放在平板電腦附近或 上方,否則可能導致軟碟片內資料遺失。 請勿將平板電腦放置在陽光直射之處,尤其是車內,否則將導致 LCD 螢幕受損。 請勿將本裝置存放在溫度超過 40 ºC 或 104 ºF 的環境下。操作溫度介於 -20 ºC (-68°F) 至 60 ºC (140°F) 之間。 請勿將平板電腦放置在(或靠近)液體、雨水或潮濕的環境中。 注意:使用錯誤類型的電池可能會有爆炸的風險;請依照說明妥善棄置舊電池。 10. 請勿將平板電腦作為一般都市廢棄物處理,請先確認當地的廢電子產品處置規範;請將 電池組妥善回收處理,並可洽詢當地的相關機構或零售商,以瞭解回收的建議資訊。 11. 平板電腦及變壓器在運作或充電時,溫度可能稍微升高,請勿將平板電腦置於膝上或身 體上的任何部位,以免其高溫引起身體不適或受傷。 12. 電源額定值:請參考平板電腦的電源額定值標籤,並確認變壓器符合額定值。僅限使用 製造商指定的原廠配件。...
- Page 133 ® ® ® 的商標或註冊商標。保留所有權利。 免責聲明:ViewSonic 公司不對本文檔中的技術、編輯錯誤或遺漏負責;亦不對因提供本資 料,或因本產品之性能或使用所造成意外或衍生的損壞負責。 為了持續產品改良的利益,ViewSonic 公司保留在沒有通知的情況下變更此產品規格的權 利。本文件中資訊如有修改,恕不另行通知。 未經 ViewSonic Corporation 事先書面同意,任何人均不得為任何目的,以任何方式複製、 翻版或傳送此文件。 智慧財產權資訊 本裝置採用的各種技術和產品之權利均屬於其各擁有人的財產: 本產品是基於 Linux 架構下的 Android 作業平台,可透過各種以 JavaScript 為基礎的應用軟 體進行擴充。 Google、Google 標誌、Android、Android 標誌、Gmail 及 YouTube 均為 Google Inc.之商 標。 Bluetooth 及 Bluetooth 標誌為 Bluetooth SIG, Inc. 的商標。...
- Page 134 產品註冊 為滿足您將來之需並讓您在第一時間內收到任何額外的產品資訊,請在以下網際網路位址註 冊您的產品:www.viewsonic.com。 使用者紀錄 ViewPad 10e 產品名稱: VS14445 機型: ViewPad 10e_UG_TCH Rev. 1a 11-16-11 文件編號: _______________________________ 序號: _______________________________ 購買日期: 產品壽命結束時的棄置方式 ViewSonic 尊重環境並致力於以保護環境的態度工作與生活。感謝您購買更聰明、更環保 的電腦運算裝置。 請上 ViewSonic 網站了解更多資訊。 美國和加拿大:http://www.viewsonic.com/company/green/recycle-program/ 歐洲:http://www.viewsoniceurope.com/uk/support/recycling-information/ 台灣:http://recycle.epa.gov.tw/recycle/index2.aspx...
- Page 135 第 1 章:開始使用 ................1 1.1 裝置概觀 ....................1 1.2 配件......................3 第 2 章:啟動裝置 ................4 2.1 首頁畫面 ....................4 設定畫面模式 ..................4 2.2 ViewScene 3D ..................5 使用 ViewScene 3D ................5 自訂首頁畫面 ..................6 3D 旋轉介面 ...................7 應用程式清單 ..................8 面板 ......................9 第 3 章:設定 ..................10 3.1 安裝與移除應用程式...
-
Page 136: 第 1 章:開始使用
第 1 章:開始使用 1.1 裝置概觀 正視圖 後視圖 ③ ② ① ④⑤ ⑥ ⑦ 零件名稱 說明 觸控式螢幕 使用手指就能控制系統及應用程式。 指示燈 有關「指示燈」的詳細說明,請參考第 3 頁。 相機 透過內建的網路攝影機,讓您輕鬆捕捉靜態影像、錄影及進行線上 聊天。 功能表按鈕 按下即可使用功能表功能。 首頁按鈕 按下即可使用首頁功能。 返回按鈕 按下即可使用返回功能。 喇叭 發出多媒體內容檔案或系統通知的聲音。 若要「關閉 ViewScene 3D」,請移至管理應用程式 - ViewScene 3D - 清除預設值,然後在 按下首頁按鈕後,即可另選預設為「Launcher」... - Page 137 側視圖 左視圖 上視圖 右視圖 ① ⑧ ② ③ ④ ⑤ ⑥ ⑦ ⑨ 下視圖 零件名稱 說明 按下即可調整音量( + 增加音量/ - 降低音量)。 音量按鈕 按住電源按鈕 2-3 秒可將裝置開機。 電源按鈕 Micro-SD 卡插槽 Micro-SD 記憶卡插槽最高相容於 32GB SD 與 SDHC 。 迷你 HDMI 連接埠 使用迷你...
-
Page 138: 配件
指示燈 ① 零件名稱 說明 電池狀態指示燈 電池在充電時,此燈會持續亮紅燈。 電池已充滿電時,指示燈將會熄滅。 主機從操作模式轉為待命模式時,指示燈將會持續亮紅燈約 30 秒。 1.2 配件 打開包裝後,請仔細檢查內容物。若有任何遺漏或損壞,請聯絡您的經銷商。包裝內應含有 以下物品: • ViewPad 10e • 可轉換式電源插頭 • 電源變壓器 • 快速使用指南 • USB 線 • 電磁相容資訊... -
Page 139: 第 2 章:啟動裝置
第 2 章:啟動裝置 2.1 首頁畫面 您可從首頁畫面快速存取各種常用功能,並檢視電池及連線狀態。 設定畫面模式 按住電源按鈕 2-3 秒可將裝置開機。接著再依照畫面上的指示說明,完成作業系統初始設 定。 系統首頁畫面(桌面)顯示如下(裝置內建的 G-sensor 可感應移動,並改變其角度/方 向)。... -
Page 140: Viewscene 3D
2.2 ViewScene 3D 使用 ViewScene 3D 主機開機時,將以 ViewScene 3D 作為預設值,此時會顯示多種個人化的 3D 首頁畫面,可 快速套用到您的裝置。預設的首頁畫面已使用不同的小工具進行組合,映照出生活中不同的 時刻,更適用於您的商務、旅遊、娛樂或社交生活。... -
Page 141: 自訂首頁畫面
自訂首頁畫面 首頁畫面為延伸面板(使用者介面),可呈現最新資訊總覽,例如時間、天氣、日曆、近期 的約會、下一個鬧鐘、新訊息、未接來電、新郵件以及新語音郵件。首頁畫面也設有可完全 自訂的版面配置,可讓您新增自己最喜愛的應用程式、資料夾,以及一按即可存取的小工 具。 • 首頁鍵為啟動ViewScene 3D 的唯一方式。應用程式清單內無 ViewScene 3D 應用程式圖 示。若因任何原因須關閉 ViewScene 3D,返回預設的啟動程式,您可從設定 (Settings) > 應用程式 (Applications) > 管理應用程式 (Manage application) > ViewScene 3D >清除 預設值 (Clear Defaults),重新啟動 ViewScene 3D。 然後按下首頁鍵檢視啟動程式選擇 功能表。在啟動程式選擇功能表中,勾選「預設為供此動作使用 (Use by deafult for this action)」核取方塊,然後選擇 ViewScene 3D。 •... -
Page 142: 旋轉介面
3D 旋轉介面 3D旋轉介面會以簡易、直覺式的3D模型,顯示搭載所有功能的首頁畫面面板。3D旋轉介面 會向您呈現整個裝置的功能。 • 點選首頁畫面中的旋轉介面按鈕,開啟3D旋轉介面。 • 使用向左或向右的手勢移動面板。 • 點選面板,確認選擇。 • 若讓旋轉介面閒置數秒,將會啟動面板與小工具的Magic動畫,並播放已安裝的小工具與 應用程式概覽以探索裝置功能。 • 若您想旋轉介面或選擇面板而點選畫面後,Magic動畫將會終止並立即執行點選動作。 • 您可重新排列、新增或移除旋轉面板。點選旋轉畫面內的面板按鈕,即可開啟3D面板管 理畫面。... -
Page 143: 應用程式清單
應用程式清單 您可使用首頁列右側的應用程式清單按鈕,從首頁畫面存取應用程式清單。 應用程式圖示上方的首頁按鈕,功能在於指出已在首頁畫面上的應用程式。請您點選此首頁 小圖示,找到首頁畫面上的應用程式位置。按下功能表 (MENU) 按鈕即可檢視可用的選項。 若從功能表 (MENU) 選擇解除安裝 (Uninstall) 應用程式選項,您將會在可移除的應用程式上 方看見紅色圖示。點選此位於應用程式上的紅色圖示,即可永久解除安裝此應用程式。... - Page 144 面板 ViewScene 3D 附有如日曆、天氣、每日一圖 (Flickr)、時間等功能豐富的面板。這些面板具 有 3D Magic 動畫功能,可在3D旋轉介面中檢視時顯示。 若要檢視面板設定,請點選位於面板右上方的設定圖示。在時間面板設定中,您可變更目前 的面板。共有超過60種的時間面板可供選擇。網際網路需連線,才可檢視時間面板線上的目 錄。天氣面板最多可讓您新增10座不同城市。 您可使用任一 Flickr面板圖片作為桌布,快速改變裝置的外觀與感覺。請您點選圖片,然後 選擇「設為桌布 (Set as Wallpaper)」選項,即可將此圖片套用到首頁畫面。...
-
Page 145: 第 3 章:設定
第 3 章: 設定 輕按「設定 (Setting)」圖示,從應用程式功能表開啟設定,之後即可設定Wi-Fi連線、調整 時間、顯示設定及進行其他工作。 3.1 安裝與移除應用程式 使用 1 Mobile 市集應用程式,在裝置上安裝熱門的應用程式。 移除應用程式 輕按即可進入應用程式功能表 (Applications Menu) > 設定 (Setting) > 應用程式 (Applications) > 管理應用程式 (Manage Applications)。 您將會看見安裝於裝置內的應用程式清單。選擇 要解除安裝的應用程式,然後按一下解除安裝 (Uninstall) 按鈕。... -
Page 146: 設定日期與時間
3.2 設定日期與時間 從應用程式功能表輕按「設定 (Setting) 」圖示,並選擇「日期與時間設定 (Date & time settings) 」,即可設定日期、時區及時間等功能。 3.3 設定系統語言 輕按應用程式功能表圖示 (Applications menu icon) > 設定 (Settings) > 語言與鍵盤設定 (Language and Keyboard settings) > 從畫面上顯示的語言清單選擇語言。向上/向下捲動, 從清單選擇所需的語言。... - Page 147 3.4 設定 網路 ,然後點選設定 (Settings) > 無線與網路 (Wireless & networks)。 從首頁畫面,按下 選擇 Wi-Fi 核取方塊,開啟 Wi-Fi,之後將會出現偵測到可用的 Wi-Fi 網路清單。 • 點選您要連線的 Wi-Fi 網路。若選擇開放的網路,將自動連線至該網路。 • 若選擇使用WEP保護的網路,請輸入密碼,然後點選連線 (Connect)。 • 若裝置連線到無線網路,Wi-Fi 圖示會在狀態列中出現。 Wi-Fi 設定 連線至安全網路...
-
Page 148: 設定藍牙連線
3.5 設定藍牙連線 ,然後點選設定 (Settings) > 無線與網路 (Wireless & Networks) 從應用程式功能表,按下 。 選擇藍牙 (Bluetooth) 核取方塊啟動藍牙功能。 將會出現藍牙 (Bluetooth) 裝置清單。若要與裝置配對,請點選所偵測到的藍牙 (Bluetooth) 清單內裝置名稱。 3.6 網頁瀏覽 • 從首頁 (Home) 畫面,點選網際網路圖示。 • 在瀏覽器畫面上,點選 URL 方塊,然後使用鍵盤輸入網頁位址。 注意: 資料連線或 Wi-Fi 連線需已在使用中,才可存取網際網路。... -
Page 149: 第 4 章:使用應用程式
第 4 章: 使用應用程式 4.1 設定網際網路電子郵件帳戶 從應用程式功能表選擇影片。 輕按所選的影片縮圖,開始播放影片內容。 透過 HDMI 輸出串流影片內容時,輕按螢幕將可啟用影片播放選項。 透過 HDMI 傳送影片時,約會在電視螢幕上顯示3-4秒。 調整影片音量: 在您的畫面中向上/向下捲動,調整音量。 啟用影片內容搜尋功能: 在影片中向上/向下捲動,搜尋影片內容。 點選畫面,播放/暫停影片: 點選畫面可讓您播放/暫停影片內容。... -
Page 150: 播放音樂
4.2 播放音樂 從應用程式功能表輕按「音樂 (Music)」圖示。您可依演出者 (Artist)、專輯 (Albums)、播放 清單 (Playlist) 或所有歌曲 (All songs) 搜尋專輯,以便在裝置內開始播放音樂。 4.3 圖片庫 圖片庫應用程式提供相片及影片觀看空間。使用圖片庫應用程式之前,請記得安裝Micro SD 卡。 從應用程式功能表輕按圖片庫 (Gallery) 圖示,進入圖片庫應用程式。 在圖片庫 (Gallery) 畫 面上,預設資料夾為所有圖片及所有影片。您亦可在 micro SD 卡上建立個人資料夾,管理 檔案。... -
Page 151: 第 5 章:其他資訊
第 5 章: 其他資訊 疑難排除 1. 裝置無法開機。 請確定裝置已充滿電(充電時亮紅燈,充滿電時燈會熄滅)。 2. 系統強制關閉、當機或無法運作,且在充滿電後,仍無法復原或啟動。 請稍微施力將迴紋針插入重設孔,然後放開。 3. 裝置無法關機。 請按住電源按鈕 4-6 秒,直到系統關機為止。 4. 如何延長電池使用壽命? 將螢幕亮度調整至最低可視程度。 請在設定 (Settings) > 顯示設定 (Display Settings) 內降低螢幕逾時時間。 關閉裝置的藍牙 (Bluetooth) 功能。 在不需要時關閉裝置的無線網路功能。 5. 裝置無法找到無線網路。 若未設定網路服務提供者 (ISP) 的帳號,或與無線路由器的距離過遠,請聯繫您的網路服 務公司取得協助。 6. Wi-Fi 顯示良好的訊號強度,但卻無法連線至網路。 請檢查是否已正確輸入任一安全性密碼。... - Page 152 關於技術支援或產品服務,請參照下表或洽詢經銷商。 注意事項:您需要產品序號。 T = 電話 公司名稱 地址 網址及電子郵件 F = 傳真 T= 886 2 2246 3456 優派國際股份 www.viewsonic.com.tw/support/repair/ F= 886 2 2249 1751 新北市中和區連城路192 號9 樓 service@tw.viewsonic.com 有限公司 Toll Free= 0800 061 198 優派香港有限 香港尖沙咀東部科學館道1 號康 T= 852 3102 2900 service@hk.viewsonic.com...
- Page 153 被未經 ViewSonic 授權之任何人員修復或嘗試修復。 c. 產品外部之原因,例如電源不安定或電源故障。 d. 使用不符合 ViewSonic 規格的耗材或零件所造成的損壞。 e. 正常損耗。 與產品缺陷無關的其他原因所致。 3. 任何一款展示的產品都會出現一種情形稱之為〝圖像燒傷〞,當靜態圖像在顯示器上超 長時間顯示時,便會出現這種現象。 4. 拆卸、安裝、單程運送、保險及設定服務費用。 如何獲得服務: 1. 有關如何在保固期內獲得服務的資訊,請與 ViewSonic 客戶支援聯繫。 2. 若要獲得擔保之服務,您需要提供(a)原始銷售日期購買單據,(b)您的姓名、(c) 您的地址、(d)關於問題的故障說明、(e)此產品的序號。 3. 請將產品放入原來的包裝容器,攜帶產品或以預付運費的方式將產品運送至獲授權的 ViewSonic 服務中心或 ViewSonic 公司。 4. 如需其他資訊或是最近的 ViewSonic 服務中心名稱,請與 ViewSonic 公司聯繫。 有限隱含保固: 除了此文中說明的擔保,不提供任何其他明文規定或隱含的擔保,包括適銷性和特殊目的的 適用性隱含擔保。...
- Page 154 損失免責條款: ViewSonic 的責任僅限於承擔修復或替換產品的費用。ViewSonic 將不負責承擔: 1. 由於本產品缺陷導致的任何財產損失、由於本產品使用不便導致的損失、使用本產品導 致的損失、 時間損失、利潤損失、商業機會損失、商譽損失、業務關係損失、其他商業 損失,即便已被提醒會造成這樣的損失時 ViewSonic 也不負責。 2. 任何其他損失,不論是意外的、繼發性的或其他損失。 3. 任何他方對客戶提出的索賠。 4. 被未經 ViewSonic 授權的任何個人修復或嘗試修復過。 4.3: ViewSonic TPC Warranty TPC_LW01 Rev. 1A 06-20-08...
- Page 155 中国电子信息产品污染控制标识要求 本产品有毒有害物质或元素的名称及含量标识如下表: 中国电子信息产品污染控制标识要求 多溴联 部件名称 六价铬 多溴联苯 铅(Pb) 镉(Cd) 汞(Hg) 苯醚 (Cr6+) (PBB) (PBDE) 锂电池 ○ ○ ○ ○ ○ ○ 电源适配器 × ○ ○ ○ ○ ○ 印制电路板 × ○ ○ ○ ○ ○ 主板+电子部件(PCBA × ○ ○ ○ ○...
- Page 156 重要的安全指示及回收处理提示 请勿按压或触碰 LCD 屏幕;请勿将平板计算机与微小物品一同存放,否则容易刮伤 LCD屏幕或掉入平板计算机内部。 请勿将平板计算机放置在肮脏或灰尘聚积的环境中,请保持环境干燥清洁。 请勿将平板计算机放置在不平稳的工作表面上。 请勿于平板计算机上方放置物品,或使物品掉落在平板计算机上;请勿将异物强行推入 平板计算机内部;请勿用力阖上平板计算机的屏幕。 请勿将平板计算机放置在有强烈磁场或电场的环境中;请勿将软盘片放在平板计算机附 近或上方,否则可能导致软盘片内数据遗失。 请勿将平板计算机放置在阳光直射之处,尤其是车内,否则将导致 LCD 屏幕受损。 不要将本设备存放在超过 40 ºC 或 104 ºF 温度的环境中。本设备的操作温度是 -20 ºC (-68°F) 到 60 ºC (140°F) 。 请勿将平板计算机放置在(或靠近)液体、雨水或潮湿的环境中。 注意:使用错误类型的电池可能会有爆炸的风险;请依照说明妥善弃置旧电池。 10. 请勿将平板计算机作为一般都市废弃物处理,请先确认当地的废电子产品处置规范;请 将电池组妥善回收处理,并可洽询当地的相关机构或零售商,以了解回收的建议信息。 11. 平板计算机及变压器在运作或充电时,温度可能稍微升高,请勿将平板计算机置于膝上 或身体上的任何部位,以免其高温引起身体不适或受伤。 12. 电源额定值:请参考平板计算机的电源额定值标签,并确认变压器符合额定值。仅限使 用制造商指定的原厂配件。 13.
- Page 157 版权信息 版权所有© ViewSonic Corporation, 2012。保留所有权利。 ® Android 是 Google Inc. 的商标。经 Google 许可后使用该商标。 此产品安装在基于 Linux 的 Android™ 平台,通过多个 JME 应用程序软件可以进行扩充。 本设备中使用所有产品及本文提及的商标是其各自拥有者的商标或注册商标。 Google™、Google 标志、Android™、Android 标志和 Gmail™ 是 Google Inc. 的商标。经 Google 许可后使用该商标。 microSD™ 是 SD Card Association 的商标。 Bluetooth 和 Bluetooth 徽标是 Bluetooth SIG, Inc. 的商标。...
- Page 158 产品注册 为满足您未来的需要并使您在第一时间内收到附加产品信息,请在以下因特网地址注 册您产品: www.viewsonic.com。 请您记录 ViewPad 10e 产品名: VS14445 型号: ViewPad 10e_UG_SCH Rev. 1a 11-16-11 文档号: _______________________________ 序列号: _______________________________ 购买日期: 产品达到使用寿命后废弃产品 ViewSonic 注重环境保护,致力于绿色工作和生活。感谢您参与 Smarter, Greener Computing。如需更多信息,请访问 ViewSonic 网站。 美国和加拿大:http://www.viewsonic.com/company/green/recycle-program/ 欧洲:http://www.viewsoniceurope.com/uk/kbase/article.php?id=639 台湾:http://recycle.epa.gov.tw/recycle/index2.aspx...
- Page 176 客户支持 关于技术支持或产品服务信息,请参见下表或与经销商联系。 注意信息:您需要提供产品列号。 国家/地区 网站 电话 电子邮件 www.viewsonic.com.cn 4008 988 188 service.cn@cn.viewsonic.com 中国 www.hk.viewsonic.com 852 3102 2900 service@ hk.viewsonic.com 香港 www.hk.viewsonic.com 853 2870 0303 service@ hk.viewsonic.com 澳门 有限保修 ViewSonic ViewPad 产品有限保修政策( 仅限大陆区域,香港、澳门、台湾地区除外),请 参阅该产品的保修卡。...
Need help?
Do you have a question about the ViewPad 10E and is the answer not in the manual?
Questions and answers