Table of Contents
Advertisement
Advertisement
Table of Contents

Related Manuals for Honda Electronics HE-51C

Summary of Contents for Honda Electronics HE-51C
- Page 2 INTRODCTION We thank you very much for your purchasing our product HE-51C. ■ Please be sure to read this operation manual carefully and understand what it describes before you operate this unit in order to keep your safety. ■ After you read this manual, please keep it at the place where you will not lose or break and so as to read soon when it necessary.
-
Page 3: Table Of Contents
CONTENTS 1.Caution on safety (Please make sure to read.) ・・・・・・・・・・・・・・・・・・・・・・・・・・・・ 1-1. Handling of unit ・・・・・・・・・・・・・・・・・・・・・・・・・・・・・・・・・・・・・・・・・・・・・・・・ 1-2. Handling of cables ・・・・・・・・・・・・・・・・・・・・・・・・・・・・・・・・・・・・・・・・・・・・・・ 1-3. Handling of transducer and water temperature sensor ・・・・・・・・・・・・・・・・ 1-4. TFT LCD Panel ・・・・・・・・・・・・・・・・・・・・・・・・・・・・・・・・・・・・・・・・・・・・・・・・ 1-5. Caution on operation ・・・・・・・・・・・・・・・・・・・・・・・・・・・・・・・・・・・・・・・・・・・・ 2. General information of fish finder ・・・・・・・・・・・・・・・・・・・・・・・・・・・・・・・・・・・・・... - Page 4 Pixel ・・・・・・・・・・・・・・・・・・・・・・・・・・・・・・・・・・・・・・・・・・・・・・・・ Size Auto Gain ・・・・・・・・・・・・・・・・・・・・・・・・・・・・・・・・・・・・・・・・・・・・・・・ Auto Range ・・・・・・・・・・・・・・・・・・・・・・・・・・・・・・・・・・・・・・・・・・・・・・ Fish Alarm ・・・・・・・・・・・・・・・・・・・・・・・・・・・・・・・・・・・・・・・・・・・・・・ Fish Mark ・・・・・・・・・・・・・・・・・・・・・・・・・・・・・・・・・・・・・・・・・・・・・・・ A-Mode ・・・・・・・・・・・・・・・・・・・・・・・・・・・・・・・・・・・・・・・・・・・・・・・・・ Color Configuration ・・・・・・・・・・・・・・・・・・・・・・・・・・・・・・・・・・・・・・ Background Color ・・・・・・・・・・・・・・・・・・・・・・・・・・・・・・・・・・・・・・・・ Clutter ・・・・・・・・・・・・・・・・・・・・・・・・・・・・・・・・・・・・・・・・・・・・・・・・・・ Depth Digit Readout ・・・・・・・・・・・・・・・・・・・・・・・・・・・・・・・・・・・・ Bottom Nature Distinction ・・・・・・・・・・・・・・・・・・・・・・・・・・・・・・・・・ 7-2-3.MENU 2 ・・・・・・・・・・・・・・・・・・・・・・・・・・・・・・・・・・・・・・・・・・・・・・・・ Expansion Rate ・・・・・・・・・・・・・・・・・・・・・・・・・・・・・・・・・・・・・・・・・・ Scale Line ・・・・・・・・・・・・・・・・・・・・・・・・・・・・・・・・・・・・・・・・・・・・・・・...
-
Page 5: Caution On Safety (Please Make Sure To Read.)
1. Caution on safety (Please make sure to read.) This section explains the important caution in order to prevent the person who will use our product or other persons from human damage or damage to their property. 1-1. Handling of unit Do not take off the cover. -
Page 6: Handling Of Cables
Do not install where it becomes high temperature. It causes to ● igniting, injuring or electric shock due to inside heating. 1-2. Handling of cables Please use specified power supply cable, batteries or fuse. ● It causes to heating or firing. Do not leave the power plug as it is while it is pulled out of the unit. -
Page 7: Tft Lcd Panel
Installation inside the hull with adhesive should be done while you ● ventilate well inside the boat. Volatile gas from solvent or etc. causes to toxic symptoms. When you work using electric tools, please keep your hands dry. ● It causes to electric shock. When you pull out or insert the plug of transducer, please be sure to ●... -
Page 8: General Information Of Fish Finder
Careful carrying and handling Do not apply the strong shock on LCD panel or unit. Do not put the object on LCD panel. LCD unit inside the main unit is made by glass. When some shock is applied on LCD panel or unit, it may be broken. Avoid high temp. -
Page 9: Features Of Unit
width of fish school becomes on the screen. The important thing to distinguish the fish volume is to judge it according to size of fish school and the strength of reflected echo (color) while you keep “the deeper fish school stays the bigger picture is displayed” in your mind. -
Page 10: Installation
4. Installation 4-1. Installation of unit ● Do not install simply. It causes to accident like injuring. ※ Be sure to install correctly according to below procedure. Install the display unit with front protect cover referring to below figure. Main unit Clamping Knob Rubber Ring Mushroom... -
Page 11: Installation Of Transducer
4-2. Installation of transducer Work on the board is unstable and risky ● Installation and maintenance of transducer or water temperature sensor should be done after you land and fix the boat. Installation inside the hull with adhesive should be done while you ●... -
Page 12: Method To Install The Transducer
4-2-2. Method to install the transducer Below method are recommended. Please refer to each section for details. 4-2-3. Inside hull installation 4-2-4. Installation in the fish reserve 4-2-5. Installation on the transom 4-2-6. Installation on transducer (Thru-Hull) Avoid the place which has a jut such as a drain or scupper Transducer in front of transducer... -
Page 13: Installation In The Fish Reserve
(In this case, set auto function to “Manual” , set sensitivity to nearly center of bar with Gain key and the depth to 20m with Range key. It is good when the bottom is indicated in the strongest color (red). (2)... -
Page 14: Installation On The Transom
4-2-5. Installation on the transom Transom Dead rise angle not Parallel installation to the slope exceed 10° Transom Dead rise angle Stripe exceed 10° Install on the stripe Installation kit Transom Transom Transducer Hull Bottom ※Fill with any gap with Down tilt of trailing When you install the transducer above the edge 2-5°... -
Page 15: Installation Of Water Temp. Sensor (Option)
4-3. Installation of water temp. sensor (option) ●Work on the board is too unstable and risky. Installation or maintenance of water temp. sensor should be done after you land and fix the boat. ●When you work using electric tools, please keep your hands dry. It causes to electric shock. -
Page 16: Putting The Batteries
5. Putting the batteries 1) Open the battery cover on the rear side of unit and put the batteries. Release two locks pushing them. Raise the battery cover. Pull the battery cover toward you and remove it. Put 8 pcs. size AA batteries with correct polarity. -
Page 17: Operation Keys And How To See The Display
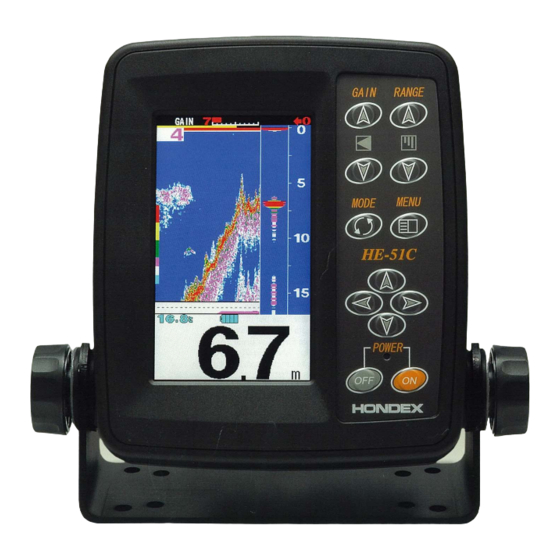
6. Operation keys and how to see the display Auto Gain Bottom Level Fish Mark (Page 19) (Page 22) (Page 20) Gain Bar Gain Level Sweep Speed (Page 15) (Page 15) Gain key (Page 18) Color Bar (Page 15) (Page 21) Range key (Page 14)... -
Page 18: Operation Of Unit
7. Operation of unit 7-1. Basic Operation 7-1-1. Power ON/OFF If you press key for a long time, sound like pipo pipo “ pi” comes out and power is turned on. If you press key for a long time, power is turned off. )... -
Page 19: To Adjust The Sensitivity
7-1-3. To adjust the sensitivity ●Y ou can adjust the sensitivity manually. It adjusts sensitivity when you want. Each time when you press key, sensitivity increases and gain bar becomes long. Each time when you press key, sensitivity decreases and gain bar becomes short. Gain Level Gain Bar Gain key... -
Page 20: To Use As Lantern (Lantern Mode)
[Bottom Lock Exp.] [Auto Exp., Manual Exp.] Exp. Range Marker Indicates distance from bottom. Normal Image Exp. Image Exp. Image Bottom Normal Image ※ You can select 2 times, 4 times or 8 times expansion rate. (→page 22) 7-1-5. To use as lantern (Lantern mode) You can use display (back light) as lighting. -
Page 21: To Set Functions On Menu
7-2. To set functions on menu 7-2-1. To use menu You can change setting of menu item with key and key. Menu key Menu 1 is shown pressing key. Cross key Menu is finished pressing key while Menu 1 is pressed. While Menu 1 is shown, menu 2 is shown pressing key for more than 2 seconds. -
Page 22: Menu 1
7-2-2. MENU 1 Brightness It adjusts brightness of screen. LIGHT : D,・,・,・,B Press key. [MENU 1] is shown. Select “LIGHT” with key. Select brightness of screen with key. Note 1) When you use the unit at Maximum brightness using internal batteries, operating time will be decreased about 10-20 percent even if new batteries are used. -
Page 23: Pixel Size
Pixel Size It changes size of one pixel (dot) which is shown. PIXEL SIZE : S, L Press key. [MENU 1] is shown. Select “PIXEL SIZE” with of cross key. Select size of pixel with key. S : Fine image is shown. L : Image is shown with emphasis. -
Page 24: Fish Alarm
FISH ALARM It catches the response from fish school (fish) and comes out alarm. FISH ALARM:OFF Press key. “MENU 1” is shown. Select “FISH ALARM” with of cross key. Select with key. OFF: It cancels FISH ALARM. ON : It sets FISH ALARM. Note) It may catch the response from other objects than fish, for example, floating matter, stain, plankton or etc. -
Page 25: Background Color
As image of fish finder is displayed in color with this “Color Configuration”, you can know the strength of response with displayed color. As display of response varies by changing color configuration, it enables to display defined color specially. COLOR : 1, 2, 3, 4 Color Bar Press key. -
Page 26: Bottom Nature Distinction
Bottom Nature Distinction Besides strength of second reflection is indicated in digits 0 – 20, it’s graph is shown on the lower of fish finder image. Bigger it’s value the stronger strength of second reflection. It is considered as Hard Bottom. You can also recognize the variation of bottom status roughly by graph indication. This function activates if second reflection is not shown on the image. -
Page 27: Scale Line
Scale Line Horizontal lines are shown at the position of depth scale on the screen. SCALE LINE : OFF ON Press key. “MENU 1” is shown. Press key for more than 2 seconds. Scale Line “MENU 2” is shown. Select “SCALE LINE” with of cross key. -
Page 28: Water Temp. Alarm
Water Temp. Alarm Alarm goes off within or out of two set values (TEMP SET 1, TEMP SET 2). ALARM SET : OFF , IN RANGE, OUT RANGE TEMP SET1 : 0~40°C TEMP SET 2 : 0~40°C Press key. “MENU 1” is shown. Press key for more than 2 seconds. -
Page 29: Battery Alarm
Battery Alarm Alarm goes off when voltage becomes less than 10V and voltage indication flashes. BATT ALARM : OFF ON Press key. “MENU 1” is shown. Press key for more than 2 seconds. “MENU 2” is shown. Select “BATT ALARM” with of cross key. -
Page 30: Water Temp. Correction
Water Temp, Correction You can correct water temperature at 0.1 ℃ step from range of –5.0 ℃ ∼ +5.0 ℃ connecting optional water temp. sensor. Please set corrected value so that water temperature digit shown on bottom of screen is equal to real temperature. -
Page 31: Clean Echo
Other Setting: Clean Echo Non-synchronized noise like interference with other boat’s fish finder, air bubbles, electric noise, mechanical noise, etc. is eliminated and clear display less noise is shown. CLEAN ECHO:OFF, L, H Press key. “MENU 1” is shown. Press key for more than 2 seconds. -
Page 32: Keel Offset
[Long pulse length] For example, this case Closed objects look like one object. [Short pulse length] Closed objects can be distinguished. Special Setting:Keel Offset It enables to set with the draft value of boat when you want to indicate the depth from sea surface. -
Page 33: System Reset
System Reset When you want to return to factory setting, please execute “system reset”. Press key. “MENU 1” is shown. Press key for more than 2 seconds. “MENU 2” is shown. Select “SYSTEM RESET” with cross key. Press key. If it is OK to execute “system reset”, press key. -
Page 34: Options
Power Supple Cable (DC04) Sun Shielded Cable Cover Instruction Manual Pan –head tapping screw 9. Options Transducer (TD26) Water Temp. Sensor TC01C(10m) TC01G(5m) 4X20 Screw x 2 50/200kHz (3P 8m) Front Cover Water Temp. sensor Strap with hooks TC02ES(15m)+TCT01 Installation Clamping Knob(short) Strap with hooks 4x20 Screw x 4... -
Page 35: Specifications
10. Specifications Display 4 inch TFT Color LCD Numbers of pixel 272 x 480 Numbers of color indicated Max. 10 colors Power Supply Size AA battery 8 pcs. or 11-14VDC Power Consumption Approx. 3W Dimension (Display unit) 173 (H) x 173 (W) x 78 (D) mm Weight (Display unit) Approx. -
Page 36: Trouble Shooting
11. Trouble Shooting • When the condition of this unit is bad, please check the following points before asking to repair. Symptoms Causes Remedy Power can Dry cells are not put correctly. Put correctly. not be turned Dry cells are run down. Replace with new ones. - Page 37 Bottom or fish school Too low sensitivity Increase the sensitivity. Or set to is not displayed well. Auto Gain (automatic sensitivity). <Installation of transducer is bad> Re-install transducer ・Transducer glued inside the boat’s adequate position. bottom almost come loose. ・Transducer installed on boat does not face just under the boat.
-
Page 38: Dimension Drawing
12. Dimension Drawing <Drawing of holes for installing bracket>... - Page 39 20 Oyamazuka, Oiwa-cho, Toyohashi, Aichi Japan, PC441-3193 Tel: 81-532-41-2512, Fax: 81-532-41-4441...
Need help?
Do you have a question about the HE-51C and is the answer not in the manual?
Questions and answers