
Related Manuals for Lassco Spinnit EBM-2.1

Summary of Contents for Lassco Spinnit EBM-2.1
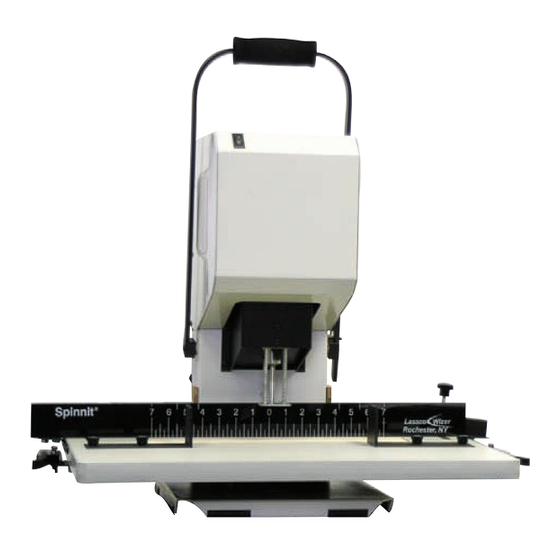
- Page 1 Lassco Spinnit EBM-2.1 Paper Drill User's Manual Provided By http://www.MyBinding.com http://www.MyBindingBlog.com...
- Page 2 Serial Number: Date of Purchase: Dealer: Address: Before operating this equipment, please read these instructions completely and keep these operating Telephone Number: instructions for future reference. 485 Hague Street, Rochester, NY 14606 U.S.A. Tel: 585-436-1934 Fax: 585-464-8665 www.lasscowizer.com info@lasscowizer.com...
-
Page 3: Table Of Contents
Table Of Contents Introduction Introduction............... Page 02 Shipping Damage Inspection..........Page 02 Safety Information Safety Instructions............. Page 03 Warning Labels..............Page 03 Setting Up Your Machine Loose Materials Inventory..........Page 04 Table Assembly..............Page 05 Backgauge Assembly............Page 06 Paper Side Stops.............. Page 06 Chip Bag................ -
Page 4: Introduction
Introduction Introduction Thank you for your purchase of the Spinnit EBM-2.1 Paper Drill. Lassco-Wizer has been designing and manufacturing proven performance equipment for the graphic arts, office, screen printing, sign, awards and engraving industries for over 60 years. We ask that you take a moment to fill in the serial number and other information on the front cover of this manual. -
Page 5: Safety Information
Safety Information Safety Instructions All operators must read and understand the Users Manual and all other safety instruc- tions before using this equipment. If after reading the manual you are still uncertain about use, please contact a Service Technician for assistance. If you need contact information for a Service Technician nearest you please call 585-436-1934. -
Page 6: Setting Up Your Machine
Setting Up Your Machine Loose Materials Inventory Remove and inspect the following items: EZ-114A: Table Assembly (1) EBM2-1034: Drill Strip (1) (This item comes installed on the table as shown) EZ-115A: Backgauge (1) EZ-1016 Pattern Bars (set of 5) 2-3/4 3-1/2 50-35: 5/16”-18 EBM-76:... -
Page 7: Table Assembly
Setting Up Your Machine Table Assembly Installation Grasping the Table and depressing the Release Step #1 Handles to unlock the Table Pin, slide the V-Bars located on the underside of the Table into the V-Rollers on the Base of the machine as shown. Please note that one of the Table Stops (EZ-1014) comes Note: installed. -
Page 8: Backgauge Assembly
Setting Up Your Machine Backgauge Assembly Assemble the Backgauge by placing the Black Fiber Washer (EBM-76) over the Threaded Step #3 Stud. Place the Clamp Bracket (EZ-1028) on the Threaded Stud with the knob end toward the center of the assembly. Tighten the Elastic Stop Nut on the Threaded Stud with a wrench until it is snug, allowing the Clamp Bracket to move with slight resistance. -
Page 9: Chip Bag
Setting Up Your Machine Chip Bag Attach the chip bag as shown by stretching the Step #6 open end over the top hook of the chip chute. Continue fitting it around the entire edge of the chip chute making sure it is snug. Be sure to empty the chip bag regularly as needed. -
Page 10: Operating Instructions
Operating Instructions Drill bit Removal and Installation Remove the hole guard which is attached to the chuck. This Step #1 is done by grasping the bent end and sliding the guard off. Using the Chuck Release Key (EBM-32), insert the tapered Step #2 end facing down into the chuck hole. -
Page 11: Leveling The Drill Bits
Operating Instructions Leveling The Drill Bits To level the drill bits to the Table, first loosen the Step #6: Leveling Knob on the right hand side of the machine as shown. Pull down on the Handle to raise the Table until the hollow drill bit is just touching the Drill Strip (EBM2-1034). -
Page 12: Clearing The Chips
Tips On Drilling Use a sharp bit at all times...Using a drill bit sharpener (Lassco-WIzer MS-1 recom- mended), sharpen your drill bits regularly. Apply light pressure when sharpening. Too much pressure may cause flaring of the tip. (Once a drill bit has a flared tip, it becomes defective.) -
Page 13: Maintenance
Maintenance Every 6 Months Remove back panel and lubricate the lift pin with a good grade of light machine oil. Lubricate Note: Refer to your Trouble Shooting Guide for problem solving CAUTION: KEEP FINGERS FROM BETWEEN LIFT COMPONENTS. OBSERVE ALL SAFETY PRECAUTIONS DURING THE PREVENTATIVE MAINTENANCE OF THIS MACHINE. -
Page 14: Trouble Shooting Guide
Trouble Shooting Guide Problem Cause Correction Drill bit not concentric. Foreign material in chuck or in Inspect and clean. drill plug. Drill bit is bent. Replace drill bit. Drill bit not seated in chuck Reinsert drill bit correctly. properly. Chuck is not tight to spindle. Tighten set screw. -
Page 15: Parts Diagrams
Parts Diagrams Front, Back, and Side View See Parts List on Page 15 Page 13... -
Page 16: Interior Front And Back
Parts Diagrams Interior Front and Back See Parts List on Page 15 Page 14... -
Page 17: Parts List
Parts Diagrams Parts List EZ-108A: Handle Assembly FM5-5006: Rocker Switch (On/Off) EZ-117A: Shroud Assembly FM5-5003: Chuck FM5-5011: Chuck Release Guard Hollow Drill Bit EBM2-0111A: Pressure Foot Assembly 3S-14: Table Scale EZ-1010L: Table Release Handle (Left) EZ-1010R: Table Release Handle (Right) EBM-44A: Channel Guard FM4-4007: Paper Side Stop Knob (Table Height Adjustment Knob) EZ-1034: Table Guide...
Need help?
Do you have a question about the Spinnit EBM-2.1 and is the answer not in the manual?
Questions and answers